Page 5 - Important safety instructions
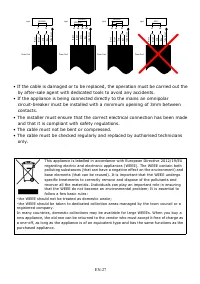
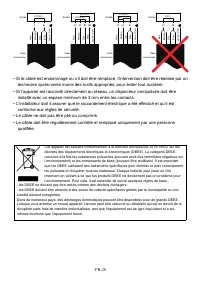
EN-4 Important safety instructions • Never leave the appliance unattended when in use. Boilover causes smoking and greasy spillovers that may ignite. • Never use your appliance as a work or storage surface. • Never leave any objects or utensils on the appliance. • Do not place or leave any magnetisa...
Page 8 - Congratulations
EN-7 CAUTION: The cooking process has to be supervised. A short term cooking process has to be supervised continuously. WARNING: In order to prevent tipping of the appliance, this stabilizing means must be installed. Refer to the instructions for installation. WARNING: Use only hob guards designed b...
Page 9 - Product Overview; Top View
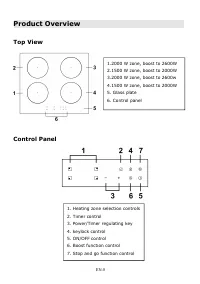
EN-8 Product Overview Top View Control Panel 1.2000 W zone, boost to 2600W2.1500 W zone, boost to 2000W3.2000 W zone, boost to 2600w4.1500 W zone, boost to 2000W5. Glass plate6. Control panel 1. Heating zone selection controls2. Timer control3. Power/Timer regulating key4. keylock control5. ON/OFF c...
Page 10 - A Word on Induction Cooking; Before using your New Induction Hob
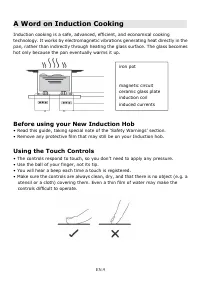
EN-9 A Word on Induction Cooking Induction cooking is a safe, advanced, efficient, and economical cookingtechnology. It works by electromagnetic vibrations generating heat directly in thepan, rather than indirectly through heating the glass surface. The glass becomeshot only because the pan eventual...
Page 11 - Choosing the right Cookware; Pan dimensions
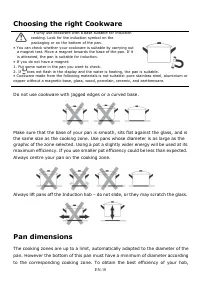
EN-10 Choosing the right Cookware • Only use cookware with a base suitable for induction cooking. Look for the induction symbol on the packaging or on the bottom of the pan. • You can check whether your cookware is suitable by carrying out a magnet test. Move a magnet towards the base of the pan. If...
Page 12 - Using your Induction Hob; To start cooking
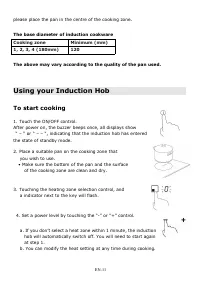
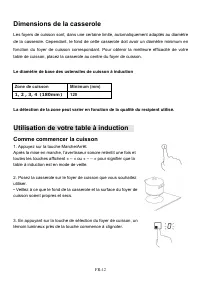
EN-11 please place the pan in the centre of the cooking zone. The base diameter of induction cookware Cooking zone Minimum (mm) 1, 2, 3, 4 (180mm) 120 The above may vary according to the quality of the pan used. Using your Induction Hob To start cooking 1. Touch the ON/OFF control.After power on, th...
Page 13 - When you have finished cooking; and then
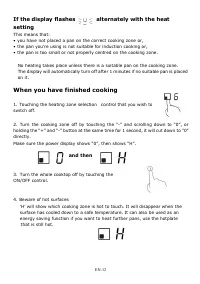
EN-12 If the display flashes alternately with the heat setting This means that:• you have not placed a pan on the correct cooking zone or,• the pan you’re using is not suitable for induction cooking or,• the pan is too small or not properly centred on the cooking zone. No heating takes place unless ...
Page 14 - Using the Power Management; Setting the total power level to fit your requirement; Power management Rules
EN-13 Using the Power Management Using power management you can set the total power to 2.5kW/ 3.0kW/ 4.5kW/6.5kW and 7.4kW. The default total power setting is the maximum power level. Setting the total power level to fit your requirement 1. Make sure the cooktop is turned off.Note: you can only set ...
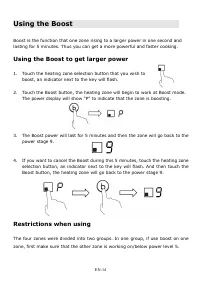
Page 15 - Using the Boost; Using the Boost to get larger power; Restrictions when using
EN-14 Using the Boost Boost is the function that one zone rising to a larger power in one second andlasting for 5 minutes. Thus you can get a more powerful and faster cooking. Using the Boost to get larger power 1. Touch the heating zone selection button that you wish to boost, an indicator next to ...
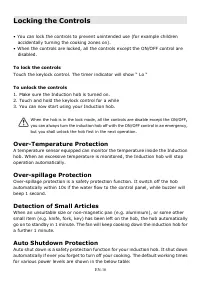
Page 17 - Locking the Controls; Over-Temperature Protection
EN-16 Locking the Controls • You can lock the controls to prevent unintended use (for example children accidentally turning the cooking zones on). • When the controls are locked, all the controls except the ON/OFF control are disabled. To lock the controls Touch the keylock control. The timer indica...
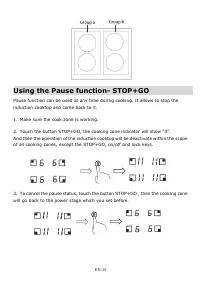
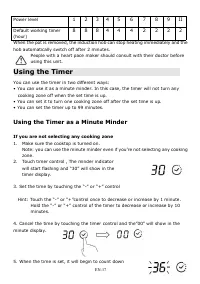
Page 18 - Using the Timer; Using the Timer as a Minute Minder
EN-17 Power level 1 2 3 4 5 6 7 8 9 II Default working timer(hour) 8 8 8 4 4 4 2 2 2 2 When the pot is removed, the induction hob can stop heating immediately and thehob automatically switch off after 2 minutes. People with a heart pace maker should consult with their doctor beforeusing this unit. U...
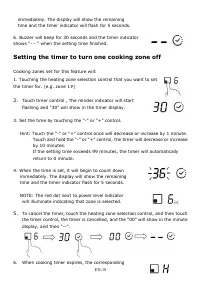
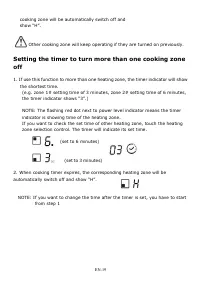
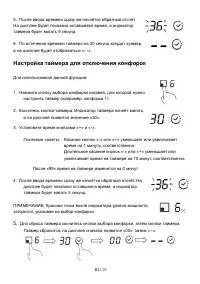
Page 19 - Setting the timer to turn one cooking zone off
EN-18 immediately. The display will show the remainingtime and the timer indicator will flash for 5 seconds. 6. Buzzer will beep for 30 seconds and the timer indicatorshows “- - “ when the setting time finished. Setting the timer to turn one cooking zone off Cooking zones set for this feature will:1...
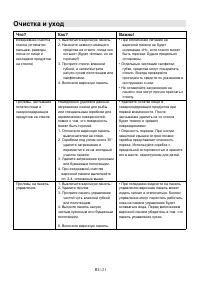
Page 21 - Care and Cleaning
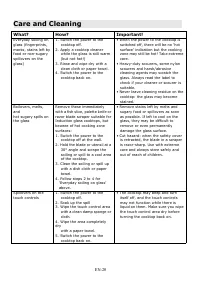
EN-20 Care and Cleaning What? How? Important! Everyday soiling on glass (fingerprints, marks, stains left byfood or non-sugary spillovers on the glass) 1. Switch the power to the cooktop off. 2. Apply a cooktop cleaner while the glass is still warm (but not hot!) 3. Rinse and wipe dry with a clean c...
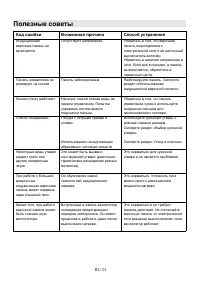
Page 22 - Hints and Tips
EN-21 Hints and Tips Problem Possible causes What to do The induction hobcannot be turned on. No power. Make sure the induction hob isconnected to the power supply and that it is switched on. Check whether there is a poweroutage in your home or area. If you’ve checked everything and the problem pers...
Page 23 - Failure Display and Inspection
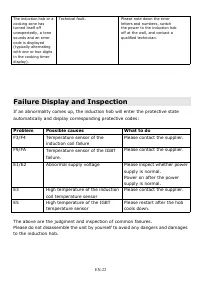
EN-22 The induction hob or a cooking zone hasturned itself off unexpectedly, a tone sounds and an errorcode is displayed (typically alternating with one or two digitsin the cooking timer display). Technical fault. Please note down the error letters and numbers, switchthe power to the induction hob o...
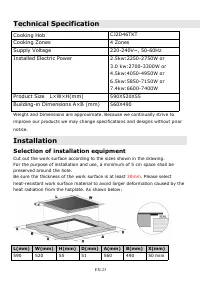
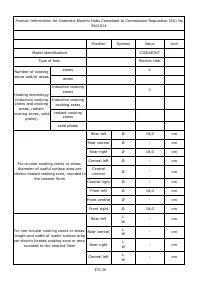
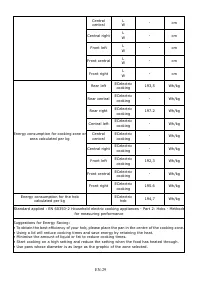
Page 24 - Technical Specification; Cooking Hob; Supply Voltage; Installation; Selection of installation equipment
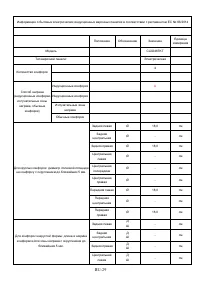
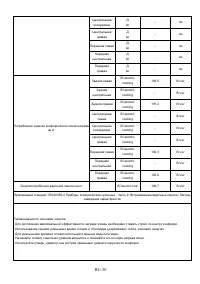
EN-23 Technical Specification Cooking Hob CJ2D46TKT Cooking Zones 4 Zones Supply Voltage 220-240V~, 50-60Hz Installed Electric Power 2.5kw:2250-2750W or3.0 kw:2700-3300W or4.5kw:4050-4950W or6.5kw:5850-7150W or7.4kw:6600-7400W Product Size L×W×H(mm) 590X520X55 Building-in Dimensions A×B (mm) 560X490...
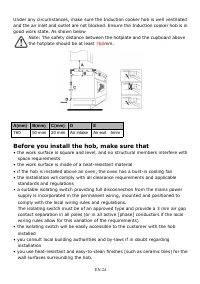
Page 25 - Before you install the hob, make sure that
EN-24 Under any circumstances, make sure the Induction cooker hob is well ventilatedand the air inlet and outlet are not blocked. Ensure the Induction cooker hob is ingood work state. As shown below Note: The safety distance between the hotplate and the cupboard abovethe hotplate should be at least ...
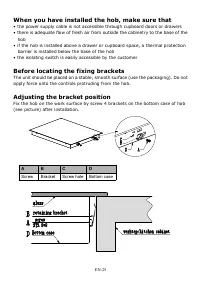
Page 26 - When you have installed the hob, make sure that; Before locating the fixing brackets
EN-25 When you have installed the hob, make sure that • the power supply cable is not accessible through cupboard doors or drawers• there is adequate flow of fresh air from outside the cabinetry to the base of the hob • if the hob is installed above a drawer or cupboard space, a thermal protection b...
Page 27 - Cautions; Connecting the hob to the mains power supply
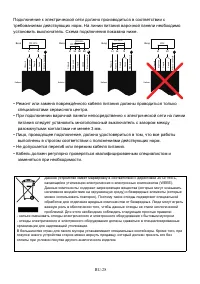
EN-26 Cautions 1. The induction hotplate must be installed by qualified personnel or technicians. We have professionals at your service. Please never conduct the operation byyourself. 2. The hob will not be installed directly above a dishwasher, fridge, freezer, washing machine or clothes dryer, as ...
Page 33 - Risque de surface chaude
FR-3 électromagnétique. • Toutefois, les personnes porteuses de pacemakers ou d’autres implants électriques (tels que des pompes à insuline) doivent consulter leur médecin ou le fabricant de l’implant avant d’utiliser cet appareil afin de s’assurer que leurs implants ne seront pas affectés par le ch...
Page 38 - Nous vous félicitons
FR-8 Cet appareil inclut un raccordement à la terre pour des finalités fonctionnelles uniquement. Nous vous félicitons de votre choix de la table de cuisson à induction. Nous vous recommandons de prendre le temps de lire ce manuel d’instruction / d’installationafin de bien comprendre comment l’insta...
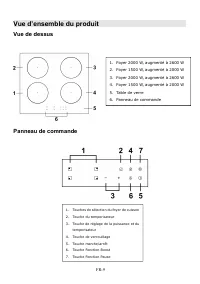
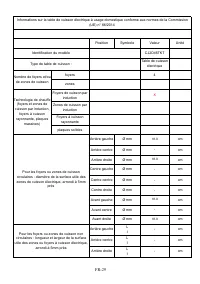
Page 39 - Vue d’ensemble du produit; Vue de dessus
FR-9 Vue d’ensemble du produit Vue de dessus Panneau de commande 1. Foyer 2000 W, augmenté à 2600 W2. Foyer 1500 W, augmenté à 2000 W3. Foyer 2000 W, augmenté à 2600 W4. Foyer 1500 W, augmenté à 2000 W5. Table de verre6. Panneau de commande 1. Touches de sélection du foyer de cuisson2. Touche du tem...
Page 40 - Un mot sur la cuisson à induction; Avant d’utiliser votre nouvelle table de cuisson à induction
FR-10 Un mot sur la cuisson à induction La cuisson à induction est une technologie sûre, innovante, efficace et économique. Ellefonctionne au moyen de vibrations électromagnétiques qui génèrent de la chaleurdirectement dans la casserole plutôt qu’indirectement en chauffant la surface vitrée. La vitr...
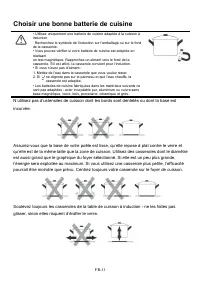
Page 41 - Choisir une bonne batterie de cuisine
FR-11 Choisir une bonne batterie de cuisine • Utilisez uniquement une batterie de cuisine adaptée à la cuisson à induction. Recherchez le symbole de l’induction sur l’emballage ou sur le fond de la casserole. • Vous pouvez vérifier si votre batterie de cuisine est adaptée en réalisant un test magnét...
Page 42 - Dimensions de la casserole; Utilisation de votre table à induction; Comme commencer la cuisson
FR-12 Dimensions de la casserole Les foyers de cuisson sont, dans une certaine limite, automatiquement adaptés au diamètrede la casserole. Cependant, le fond de cette casserole doit avoir un diamètre minimum enfonction du foyer de cuisson correspondant. Pour obtenir la meilleure efficacité de votret...
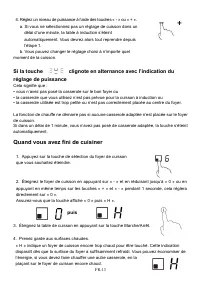
Page 43 - Si la touche; Quand vous avez fini de cuisiner; puis
FR-13 4. Réglez un niveau de puissance à l’aide des touches « - » ou « + ». a. Si vous ne sélectionnez pas un réglage de cuisson dans un délai d’une minute, la table à induction s’éteintautomatiquement. Vous devrez alors tout reprendre depuisl’étape 1. b. Vous pouvez changer le réglage choisi à n’im...
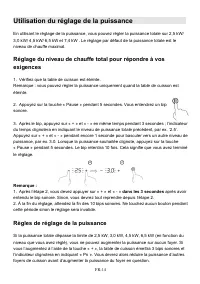
Page 44 - Utilisation du réglage de la puissance; Réglage du niveau de chauffe total pour répondre à vos; Règles de réglage de la puissance
FR-14 Utilisation du réglage de la puissance En utilisant le réglage de la puissance, vous pouvez régler la puissance totale sur 2,5 kW/3,0 kW/ 4,5 kW/ 6,5 kW et 7,4 kW . Le réglage par défaut de la puissance totale est leniveau de chauffe maximal. Réglage du niveau de chauffe total pour répondre à ...
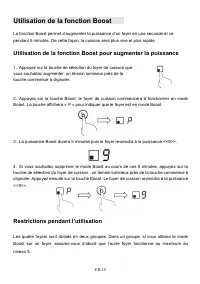
Page 45 - Utilisation de la fonction Boost; Utilisation de la fonction Boost pour augmenter la puissance
FR-15 Utilisation de la fonction Boost La fonction Boost permet d’augmenter la puissance d’un foyer en une seconde et cependant 5 minutes. De cette façon, la cuisson sera plus vive et plus rapide. Utilisation de la fonction Boost pour augmenter la puissance 1. Appuyez sur la touche de sélection du f...
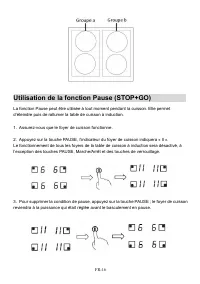
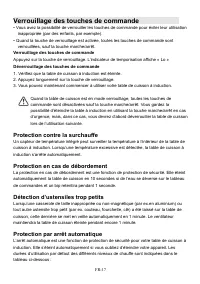
Page 47 - Protection contre la surchauffe
FR-17 Verrouillage des touches de commande • Vous avez la possibilité de verrouiller les touches de commande pour éviter leur utilisation inappropriée (par des enfants, par exemple). • Quand la touche de verrouillage est activée, toutes les touches de commande sont verrouillées, sauf la touche march...
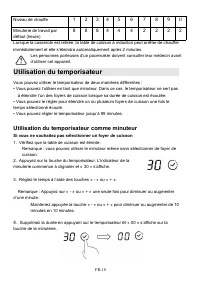
Page 48 - Utilisation du temporisateur; Utilisation du temporisateur comme minuteur
FR-18 Niveau de chauffe 1 2 3 4 5 6 7 8 9 II Minuterie de travail pardéfaut (heure) 8 8 8 4 4 4 2 2 2 2 Lorsque la casserole est retirée, la table de cuisson à induction peut arrêter de chaufferimmédiatement et elle s’éteindra automatiquement après 2 minutes. Les personnes porteuses d’un pacemaker d...
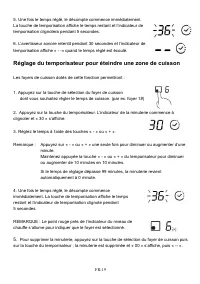
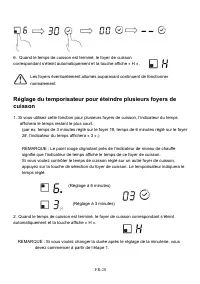
Page 49 - Réglage du temporisateur pour éteindre une zone de cuisson
FR-19 5. Une fois le temps réglé, le décompte commence immédiatement.La touche de temporisation affiche le temps restant et l’indicateur detemporisation clignotera pendant 5 secondes. 6. L’avertisseur sonore retentit pendant 30 secondes et l’indicateur detemporisation affiche « - -» quand le temps r...
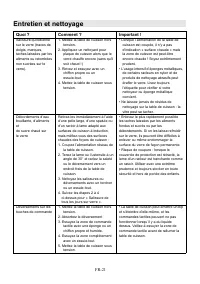
Page 51 - Entretien et nettoyage
FR-21 Entretien et nettoyage Quoi ? Comment ? Important ! Salissure quotidienne sur le verre (traces de doigts, marques, taches laissées par les aliments ou retombées non sucrées sur le verre). 1. Mettez la table de cuisson hors tension. 2. Appliquez un nettoyant pour plaque de cuisson alors que le ...
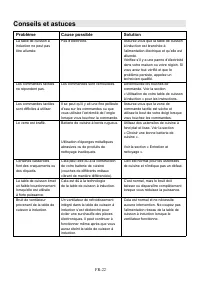
Page 52 - Conseils et astuces
FR-22 Conseils et astuces Problème Cause possible Solution La table de cuisson à induction ne peut pas être allumée. Pas d’électricité. Assurez-vous que la table de cuisson à induction est branchée à l’alimentation électrique et qu’elle est allumée. Vérifiez s’il y a une panne d’électricité dans vot...
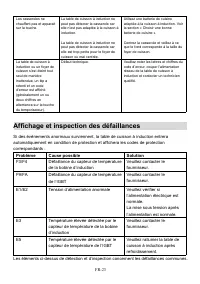
Page 53 - Affichage et inspection des défaillances
FR-23 Les casseroles ne chauffent pas et apparait sur la touche. La table de cuisson à induction ne peut pas détecter la casserole car elle n’est pas adaptée à la cuisson à induction. La table de cuisson à induction ne peut pas détecter la casserole car elle est trop petite pour le foyer de cuisson ...
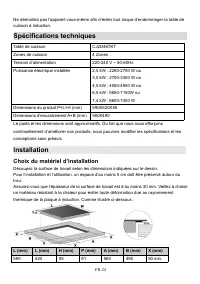
Page 54 - Spécifications techniques; Choix du matériel d’installation
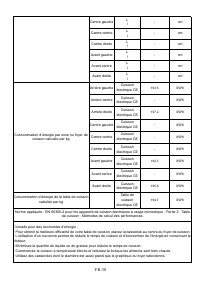
FR-24 Ne démontez pas l’appareil vous-même afin d’éviter tout risque d’endommager la table decuisson à induction. Spécifications techniques Table de cuisson CJ2D46TKT Zones de cuisson 4 Zones Tension d’alimentation 220-240 V ~ 50-60Hz Puissance électrique installée 2,5 kW : 2250-2750 W ou3,0 kW : 27...
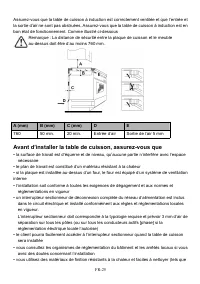
Page 55 - Avant d’installer la table de cuisson, assurez-vous que
FR-25 Assurez-vous que la table de cuisson à induction est correctement ventilée et que l’entrée etla sortie d’air ne sont pas obstruées. Assurez-vous que la table de cuisson à induction est enbon état de fonctionnement. Comme illustré ci-dessous Remarque : La distance de sécurité entre la plaque de...
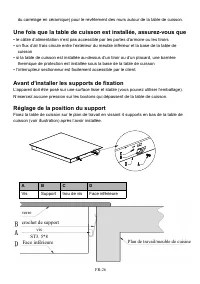
Page 56 - Une fois que la table de cuisson est installée, assurez-vous que; Avant d’installer les supports de fixation; crochet de support; vis; Face inférieure; Plan de travail/meuble de cuisine
FR-26 du carrelage en céramique) pour le revêtement des murs autour de la table de cuisson. Une fois que la table de cuisson est installée, assurez-vous que • le câble d’alimentation n’est pas accessible par les portes d’armoire ou les tiroirs• un flux d’air frais circule entre l’extérieur du meuble...
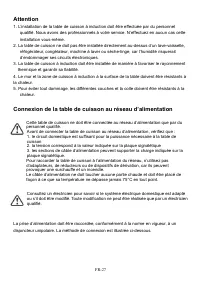
Page 57 - Attention; Connexion de la table de cuisson au réseau d’alimentation
FR-27 Attention 1. L’installation de la table de cuisson à induction doit être effectuée par du personnel qualifié. Nous avons des professionnels à votre service. N’effectuez en aucun cas cetteinstallation vous-même. 2. La table de cuisson ne doit pas être installée directement au-dessus d’un lave-v...
Page 68 - Поздравляем вас
RU-8 ВНИМАНИЕ: Не оставляйте без присмотра готовящиеся блюда. Процесс приготовления пищи должен находиться под постоянным контролем. ВНИМАНИЕ: Для предотвращения падения панель необходимо надёжно закрепить. Смотрите указания по установке. ВНИМАНИЕ: Используйте только крепления, поставленные изготови...
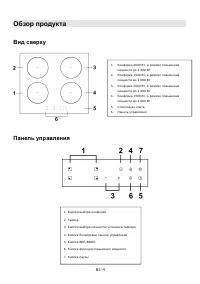
Page 69 - Обзор продукта; Вид сверху
RU-9 Обзор продукта Вид сверху Панель управления 1. Конфорка 2000 Вт, в режиме повышениямощности до 2 600 Вт 2. Конфорка 1500 Вт, в режиме повышениямощности до 2 000 Вт 3. Конфорка 2000 Вт, в режиме повышениямощности до 2 600 Вт 4. Конфорка 1500 Вт, в режиме повышениямощности до 2 000 Вт 5. Стеклянн...
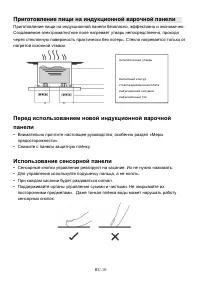
Page 70 - Приготовление пищи на индукционной варочной панели; Использование сенсорной панели
RU-10 Приготовление пищи на индукционной варочной панели Приготовление пищи на индукционной панели безопасно, эффективно и экономично.Создаваемое электромагнитное поле нагревает утварь непосредственно, проходячерез стеклянную поверхность практически без потерь. Стекло нагревается только отнагретой к...
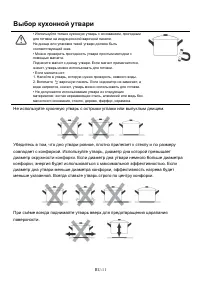
Page 71 - Выбор кухонной утвари
RU-11 Выбор кухонной утвари • Используйте только кухонную утварь с основанием, пригодным для готовки на индукционной варочной панели. На днище или упаковке такой утвари должен быть соответствующий знак. • Можно проверить пригодность утвари простым методом с помощью магнита. Поднесите магнит к днищу ...
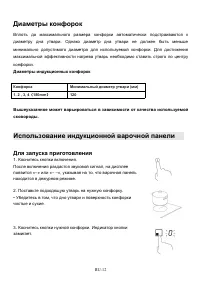
Page 72 - Диаметры конфорок; Использование индукционной варочной панели; Для запуска приготовления
RU-12 Диаметры конфорок Вплоть до максимального размера конфорки автоматически подстраиваются кдиаметру дна утвари. Однако диаметр дна утвари не должен быть меньшеминимально допустимого диаметра для используемой конфорки. Для достижениямаксимальной эффективности нагрева утварь необходимо ставить стр...
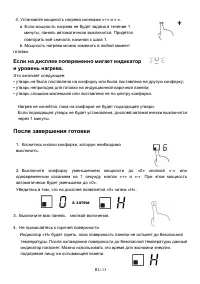
Page 73 - Если на дисплее попеременно мигает индикатор; После завершения готовки; а затем
RU-13 4. Установите мощность нагрева кнопками «+» и «-». a. Если мощность нагрева не будет задана в течение 1 минуты, панель автоматически выключится. Придётсяповторить всё сначала, начиная с шага 1. b. Мощность нагрева можно изменить в любой момент готовки. Если на дисплее попеременно мигает индика...
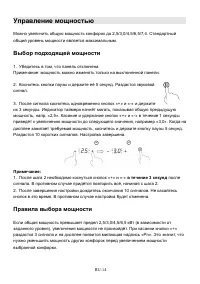
Page 74 - Управление мощностью; Выбор подходящей мощности; Правила выбора мощности
RU-14 Управление мощностью Можно увеличить общую мощность конфорок до 2,5/3,0/4,5/6,5/7,4. Стандартныйобщий уровень мощности является максимальным. Выбор подходящей мощности 1. Убедитесь в том, что панель отключенаПримечание: мощность можно изменять только на выключенной панели. 2. Коснитесь кнопки ...
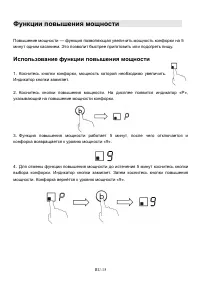
Page 75 - Функции повышения мощности; Использование функции повышения мощности
RU-15 Функции повышения мощности Повышение мощности — функция позволяющая увеличить мощность конфорки на 5минут одним касанием. Это позволит быстрее приготовить или подогреть пищу. Использование функции повышения мощности 1. Коснитесь кнопки конфорки, мощность которой необходимо увеличить.Индикатор ...
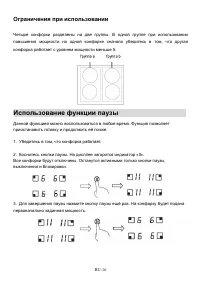
Page 76 - Ограничения при использовании; Использование функции паузы
RU-16 Ограничения при использовании Четыре конфорки разделены на две группы. В одной группе при использованииповышения мощности на одной конфорке сначала убедитесь в том, что другаяконфорка работает с уровнем мощности меньше 5. Использование функции паузы Данной функцией можно воспользоваться в любо...
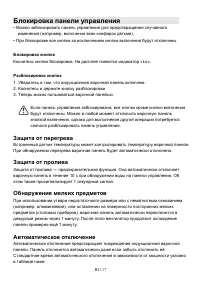
Page 77 - Блокировка панели управления; Защита от перегрева
RU-17 Блокировка панели управления • Можно заблокировать панель управления для предотвращения случайного изменения (например, включения всех конфорок детьми). • При блокировке все кнопки за исключением кнопки включения будут отключены. Блокировка кнопок Коснитесь кнопки блокировки. На дисплее появит...
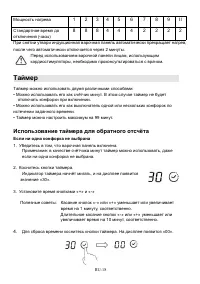
Page 78 - Таймер; Использование таймера для обратного отсчёта
RU-18 Мощность нагрева 1 2 3 4 5 6 7 8 9 II Стандартное время доотключения (часы) 8 8 8 4 4 4 2 2 2 2 При снятии утвари индукционная варочная панель автоматически прекращает нагрев,после чего автоматически отключается через 2 минуты. Перед использованием варочной панели лицам, использующимкардиостим...
Page 79 - Настройка таймера для отключения конфорок
RU-19 5. После ввода времени сразу же начнётся обратный отсчёт.На дисплее будет показано оставшееся время, а индикатортаймера будет мигать 5 секунд. 6. По истечении времени таймера на 30 секунд загудит зуммер,а на дисплее будет отображаться «- -». Настройка таймера для отключения конфорок Для исполь...
Page 80 - Настройка таймера для отключения нескольких конфорок
RU-20 6. По истечении времени готовки соответствующая конфорка отключитсяавтоматически и на дисплее появится «H». Другие работающие конфорки продолжат работу. Настройка таймера для отключения нескольких конфорок 1. При использовании таймера для отключения нескольких конфорок на дисплее будет отображ...
Page 81 - Очистка и уход
RU-21 Очистка и уход Что? Как? Важно! Ежедневная очистка стекла (отпечатки пальцев, разводы, пятна от пищи и несладких продуктов на стекле) 1. Выключите варочную панель. 2. Нанесите немного моющего средства на стекло, когда оно остынет (будет тёплым, но не горячим!) 3. Протрите стекло влажной губкой...
Page 82 - Полезные советы
RU-22 Полезные советы Код ошибки Возможная причина Способ устранения Индукционная варочная панель не включается Отсутствует напряжение. Убедитесь в том, что варочная панель подсоединена к электрической сети и её настенный выключатель включён. Убедитесь в наличии напряжения в сети. Если всё в порядке...
Page 83 - Определение причин неполадок в работе по кодам ошибок.
RU-23 Пища не нагревается, индикации на дисплее нет. Варочная панель не обнаруживает утварь из-за её непригодности для индукционной готовки. Варочная панель не обнаруживает утварь из-за её малого размера или неверной установки на конфорку. Используйте утварь, предназначенную для индукционных варочны...
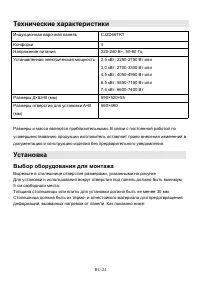
Page 84 - Технические характеристики; Установка; Выбор оборудования для монтажа
RU-24 Технические характеристики Индукционная варочная панель CJ2D46TKT Конфорки 4 Напряжение питания 220-240 В~, 50-60 Гц Установленная электрическая мощность 2,5 кВт: 2250-2750 Вт или 3,0 кВт: 2700-3300 Вт или4,5 кВт: 4050-4950 Вт или6,5 кВт: 5850-7150 Вт или7,4 кВт: 6600-7400 Вт Размеры Д×Ш×В (мм...
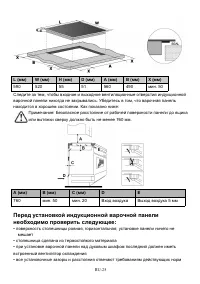
Page 85 - Перед установкой индукционной варочной панели
RU-25 L (мм) W (мм) H (мм) D (мм) A (мм) B (мм) X (мм) 590 520 55 51 560 490 мин. 50 Следите за тем, чтобы входное и выходное вентиляционные отверстия индукционнойварочной панели никогда не закрывались. Убедитесь в том, что варочная панельнаходится в хорошем состоянии. Как показано ниже: Примечание:...
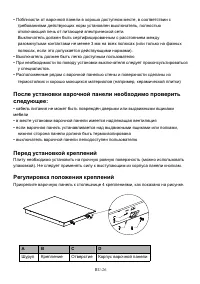
Page 86 - После установки варочной панели необходимо проверить; Перед установкой креплений
RU-26 • Поблизости от варочной панели в хорошо доступном месте, в соответствии с требованиями действующих норм установлен выключатель, полностьюотключающий печь от питающей электрической сети.Выключатель должен быть сертифицированным с расстоянием междуразомкнутыми контактами не менее 3 мм на всех п...
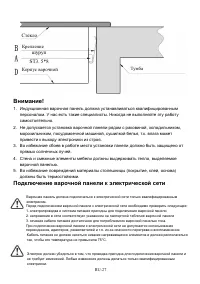
Page 87 - Подключение варочной панели к электрической сети; Стекло; шуруп
RU-27 Внимание! 1. Индукционная варочная панель должна устанавливаться квалифицированным персоналом. У нас есть такие специалисты. Никогда не выполняйте эту работусамостоятельно. 2. Не допускается установка варочной панели рядом с раковиной, холодильником, морозильником, посудомоечной машиной, сушил...