Page 6 - ENGLISH
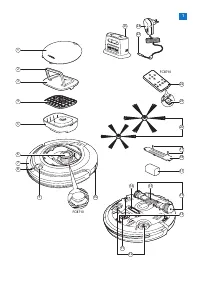
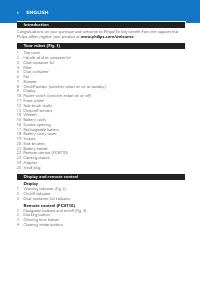
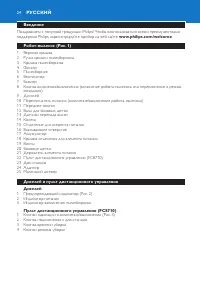
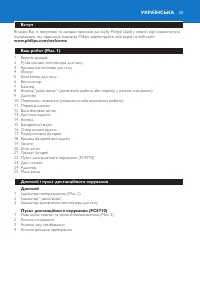
6 Introduction Congratulations on your purchase and welcome to Philips! To fully benefit from the suppor t that Philips offers, register your product at www.philips.com/welcome . Your robot (Fig. 1) 1 Top cover 2 Handle of dust container lid 3 Dust container lid 4 Filter 5 Dust container 6 Fan 7 Bum...
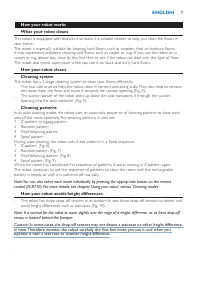
Page 7 - lock into position with a click.; Removing the protection tag from the remote control; Now the remote control is ready for use.
How your robot cleansCleaning system The robot has a 2-stage cleaning system to clean your floors efficiently. - The two side brushes help the robot clean in corners and along walls. They also help to remove dir t loose from the floor and move it towards the suction opening (Fig. 4). - The suction p...
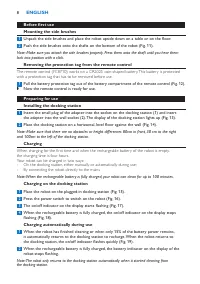
Page 8 - 00 cm to the left of the docking station.; Charging; the charging time is four hours.; Charging on the docking station; robot stops flashing.; Charging directly from the mains; Press the power switch to switch on the robot.
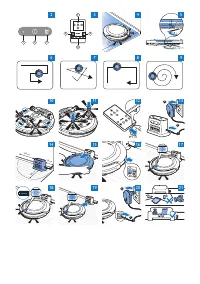
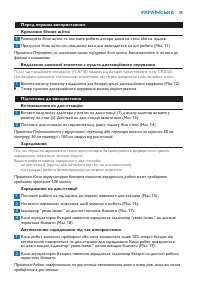
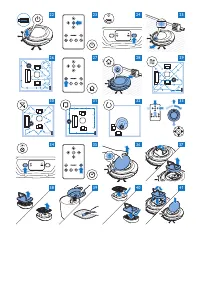
Preparing for use Installing the docking station 1 Insert the small plug of the adapter into the socket on the docking station (1) and insert the adapter into the wall socket (2). The display of the docking station lights up (Fig. 13). 2 Place the docking station on a horizontal, level floor against...
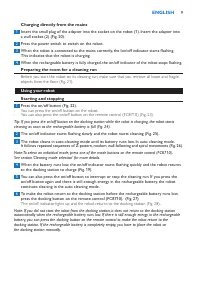
Page 9 - See section ‘Cleaning mode selection’ for more details.; Random mode
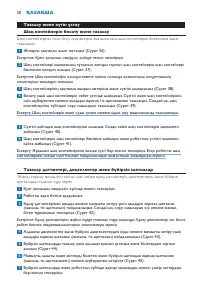
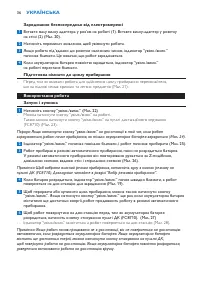
Using your robot Starting and stopping 1 Press the on/off button (Fig. 22). - You can press the on/off button on the robot. - You can also press the on/off button on the remote control (FC8710) (Fig. 23). Tip: If you press the on/off button on the docking station while the robot is charging, the rob...
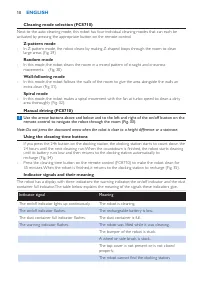
Page 10 - Indicator signal; Cleaning and maintenance; Note: Make sure the power switch is in ‘off ’ position.
Note: Do not press the downward arrow when the robot is close to a height difference or a staircase. Using the cleaning time buttons - If you press the 24h button on the docking station, the docking station star ts to count down the 24 hours until the next cleaning run. When the countdown is finishe...
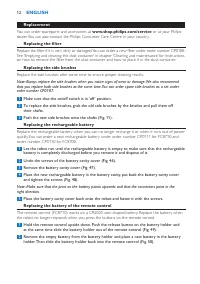
Page 11 - Cleaning sensors, wheels and side brushes; side brushes from time to time.; Replacement; You can order sparepar ts and accessories at; Replacing the filter; Make sure that the on/off switch is in ‘off ’ position.
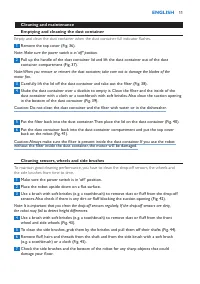
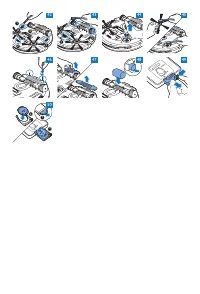
Caution: Always make sure the filter is present inside the dust container. If you use the robot without the filter inside the dust container, the motor will be damaged. Cleaning sensors, wheels and side brushes To maintain good cleaning performance, you have to clean the drop-off sensors, the wheels...
Page 13 - Troubleshooting; Problem
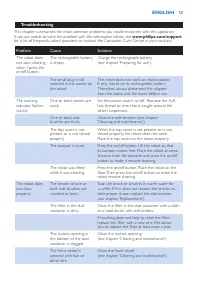
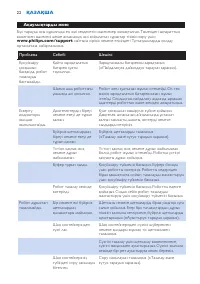
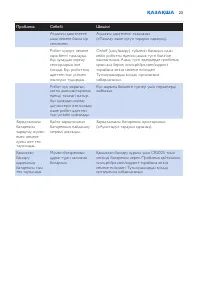
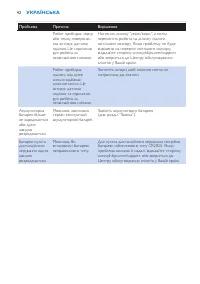
Troubleshooting This chapter summarises the most common problems you could encounter with this appliance. If you are unable to solve the problem with the information below, visit www.philips.com/support for a list of frequently asked questions or contact the Consumer Care Centre in your countr y. Pr...
Page 15 - DEUTSCH
15 Einführung Herzlichen Glückwunsch zu Ihrem Kauf und willkommen bei Philips! Um die Unterstützung von Philips optimal nutzen zu können, registrieren Sie Ihr Produkt bitte unter www.philips.com/welcome . Ihr Roboter (Abb. 1) 1 Obere Abdeckung 2 Griff des Staubbehälterdeckels 3 Staubbehälterdeckel 4...
Page 17 - Schutzlasche von der Fernbedienung abnehmen; Jetzt ist die Fernbedienung einsatzbereit.; Für den Gebrauch vorbereiten; Ladevorgang vier Stunden.; An der Dockingstation aufladen; Roboters auf zu blinken.; Direkt über das Stromnetz aufladen; Drücken Sie den Netzschalter, um den Roboter einzuschalten.
Schutzlasche von der Fernbedienung abnehmen Die Fernbedienung (FC8710) wird mit einer CR2025 Knopfbatterie betrieben. Diese Batterie ist mit einer Schutzlasche versehen, die vor dem Gebrauch entfernt werden muss. 1 Ziehen Sie die Batterieschutzlasche aus dem Batteriefach der Fernbedienung (Abb. 12)....
Page 18 - aktivier t werden können.; Zufallsmodus
4 Wenn der Akku vollständig aufgeladen ist, hört die Betriebsanzeige des Roboters auf zu blinken.Den Raum für die Reinigung vorbereiten - Bevor Sie mit dem Roboter die Reinigung star ten, sollten Sie sich vergewissern, dass sich keine losen und zerbrechlichen Gegenstände auf dem Boden befinden (Abb....
Page 19 - Höhenunterschieds bzw. einer Treppe befindet.; Die Tasten zur Reinigungszeit verwenden; Anzeigesignal; Reinigung und Wartung
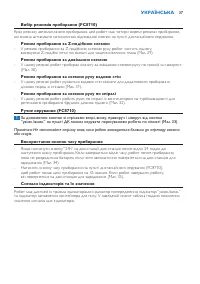
Den Wänden entlang - In diesem Modus folgt der Roboter dem Verlauf der Wände, um den Bereich an den Wänden zusätzlich zu reinigen (Abb. 31). Spiralmodus - In diesem Modus führ t der Roboter spiralförmige Bewegungen aus, und der Ventilator läuft mit Turbo-Geschwindigkeit, um einen schmutzigen Bereich...
Page 20 - der Motorbelüftung zu beschädigen.; Sensoren, Räder und Seitenbürsten reinigen; die Räder und die Seitenbürsten von Zeit zu Zeit reinigen.
2 Ziehen Sie den Griff am Staubbehälterdeckel nach oben, und heben Sie den Staubbehälter aus der Staubbehälterkammer (Abb. 37). Hinweis: Achten Sie beim Entnehmen oder Wiedereinsetzen des Staubbehälters darauf, nicht die Flügel der Motorbelüftung zu beschädigen. 3 Nehmen Sie den Deckel vorsichtig vo...
Page 21 - Ersatz; Ersatzteile und Zubehör erhalten Sie unter; Den Filter auswechseln; und ziehen Sie sie vom Schaft.; Den Akku ersetzen; richtige Richtung weisen.
Ersatz Ersatzteile und Zubehör erhalten Sie unter www.shop.philips.com/service oder bei Ihrem Philips Händler. Sie können auch ein Philips Ser vice-Center in Ihrem Land kontaktieren. Den Filter auswechseln Wechseln Sie den Filter aus, wenn er stark verschmutzt oder beschädigt ist. Sie können einen n...
Page 22 - Fehlerbehebung
Fehlerbehebung In diesem Abschnitt sind die häufigsten Probleme zusammengestellt, die mit Ihrem Gerät auftreten können. Sollten Sie ein Problem mithilfe der nachstehenden Informationen nicht beheben können, besuchen Sie unsere Website unter : www.philips.com/support für eine Liste mit häufig gestell...
Page 24 - ESPAÑOL
24 Introducción Enhorabuena por la compra de este producto y bienvenido a Philips. Para sacar el mayor par tido de la asistencia que Philips le ofrece, registre su producto en www.philips.com/welcome . El robot (fig. 1) 1 Cubier ta superior 2 Asa de la tapa del depósito del polvo 3 Tapa del depósito...
Page 25 - Patrones de limpieza; limpieza” del capítulo “Uso del robot”.; Cómo evita el robot las diferencias de altura; que encajan en su posición con un clic.; Extracción de la pestaña protectora del mando a distancia
Cómo limpia el robotSistema de limpieza El robot cuenta con un sistema de limpieza de 2 etapas para limpiar el suelo de forma eficiente. - Los dos cepillos laterales ayudan a que el robot limpie los rincones y a lo largo de las paredes. También ayudan a acabar con la suciedad suelta del suelo y move...
Page 26 - El mando a distancia está listo para usar.; Preparación para su uso; derecha y 100 cm a la izquierda de la estación base.; Carga; el tiempo de carga es de cuatro horas.; Carga de la estación base; del robot deja de parpadear.; Carga directa desde la red eléctrica; Pulse el interruptor de encendido para encender el robot.
1 Tire de la pestaña protectora de la pila para extraerla del compartimento de la pila del mando a distancia (fig. 12). , El mando a distancia está listo para usar. Preparación para su uso Instalación de la estación base 1 Inserte la clavija pequeña del adaptador en la toma de la estación base (1) y...
Page 28 - significado de las señales que proporcionan estos indicadores.; Limpieza y mantenimiento
Modo de seguimiento de la pared - En este modo, el robot sigue las paredes de la habitación para limpiar mejor la zona que hay a lo largo de las paredes (fig. 31). Modo en espiral - En este modo, el robot realiza un movimiento en espiral con el ventilador a velocidad turbo para limpiar una zona suci...
Page 29 - del ventilador del motor.; Limpieza de los sensores, las ruedas y los cepillos laterales; las ruedas y los cepillos laterales de vez en cuando.; Sustitución; Puede solicitar piezas de repuesto y accesorios en
2 Tire hacia arriba del asa de la tapa del depósito del polvo y levante el depósito del polvo hasta extraerlo de su compartimento (fig. 37). Nota: Cuando quite o vuelva a introducir el depósito del polvo, tenga cuidado de no dañar las cuchillas del ventilador del motor. 3 Levante con cuidado la tapa...
Page 30 - Sustitución del filtro; colocarlo en el mismo.; Sustitución de los cepillos laterales; repuesto con el número de pedido CP0107.; Sustitución de la batería recargable; la dirección adecuada.
Sustitución del filtro Sustituya el filtro si está muy sucio o dañado. Puede solicitar un nuevo filtro con el número de pedido CP0108. Consulte “Vaciado y limpieza del depósito del polvo” en el capítulo “Limpieza y mantenimiento” para obtener instrucciones sobre cómo retirar el filtro del depósito d...
Page 31 - Guía de resolución de problemas; Problema
Guía de resolución de problemas En este capítulo se resumen los problemas más frecuentes que pueden surgir con este aparato. Si no puede resolver el problema con la siguiente información, visite www.philips.com/support para consultar una lista de preguntas más frecuentes o póngase en contacto con el...
Page 33 - FRANÇAIS
33 Introduction Félicitations pour votre achat et bienvenue dans l’univers Philips ! Pour profiter pleinement de l’assistance Philips, enregistrez votre produit sur le site à l’adresse suivante : www.philips.com/ welcome . Votre robot (fig. 1) 1 Couvercle supérieur 2 Poignée du couvercle du compar t...
Page 34 - Mouvements d’aspiration; d’aspiration qu’il utilise sont les suivantes :; Comment votre robot peut-il éviter les différences de hauteur ?; escalier ou d’une autre différence de hauteur.; Avant la première utilisation; que vous entendiez un clic. Elles sont alors verrouillées.
proximité la première fois pour voir si le robot s’adapte à ce type de sol. Le robot nécessite également une sur veillance lorsque vous l’utilisez sur des sols durs noirs et brillants. Comment fonctionne votre robotSystème de nettoyage Le robot présente un système de nettoyage en 2 étapes pour netto...
Page 35 - Retrait de la languette de protection de la télécommande; La télécommande est désormais prête à l’emploi.; Avant utilisation; 0 cm à droite et 100 cm à gauche de la station d’accueil.; Charge; est de quatre heures.; Charge sur la station d’accueil; du robot cesse de clignoter.; Charge directement sur le secteur; Allumez le robot à l’aide de l’interrupteur d’alimentation.
Retrait de la languette de protection de la télécommande La télécommande (FC8710) fonctionne avec une pile bouton CR2025. Cette pile est protégée par une languette de protection qui doit être retirée avant utilisation. 1 Retirez la languette de protection du compartiment à pile de la télécommande (f...
Page 36 - mode d’aspiration automatique.; Mode de mouvements en Z
4 Lorsque la batterie rechargeable est entièrement chargée, le voyant marche/arrêt du robot cesse de clignoter.Préparation de la pièce pour une séance de nettoyage - Avant de démarrer la séance de nettoyage du robot, veillez à retirer tous les objets meubles et fragiles du sol (fig. 21). Utilisation...
Page 37 - Nettoyage et entretien
Mode aléatoire - Dans ce mode, le robot nettoie la pièce en décrivant des mouvements rectilignes et croisés. (fig. 30) Mode de déplacement le long des murs - Dans ce mode, le robot suit les murs de la pièce pour rendre la zone située le long des murs encore plus propre (fig. 31). Mode en spirale - D...
Page 38 - les lames du ventilateur du moteur.; Nettoyage des détecteurs, des roues et des brossettes latérales; les roues et les brossettes latérales de temps en temps.
1 Ôtez le couvercle supérieur (fig. 36). Remarque : Vérifiez si l’interrupteur d’alimentation est en position d’arrêt. 2 Tirez la poignée vers le haut du couvercle du compartiment à poussière et sortez le compartiment à poussière de son logement (fig. 37). Remarque : Lorsque vous retirez ou réinsére...
Page 39 - Remplacement; ou auprès de votre revendeur Philips.; Remplacement du filtre; Vérifiez si le bouton marche/arrêt est en position d’arrêt.; Remplacement de la batterie rechargeable; sont orientés dans la bonne direction.; Remplacement de la pile de la télécommande
Remplacement Vous pouvez commander des pièces détachées et des accessoires sur le site Web www.shop.philips.com/service ou auprès de votre revendeur Philips. Vous pouvez également contacter le Ser vice Consommateurs Philips de votre pays. Remplacement du filtre Remplacez le filtre s’il est très sale...
Page 40 - Dépannage; Problème
Dépannage Cette rubrique présente les problèmes les plus courants que vous pouvez rencontrer avec cet appareil. Si vous ne par venez pas à résoudre le problème à l’aide des informations ci-dessous, rendez-vous sur www.philips.com/support pour consulter les questions fréquemment posées ou contactez l...
Page 42 - ITALIANO
42 Introduzione Congratulazioni per l’acquisto e benvenuti in Philips! Per trarre il massimo vantaggio dall’assistenza Philips, registrate il vostro prodotto su www.philips.com/welcome Il vostro robot (fig. 1) 1 Coperchio superiore 2 Impugnatura del coperchio del contenitore della polvere 3 Coperchi...
Page 43 - Modalità di pulizia; Movimenti a “Z” o a zig-zag; Come il robot evita le differenze di altezza; differenze di altezza.; Primo utilizzo; finché non li sentite scattare in posizione.; Rimozione della linguetta di protezione dal telecomando; da un’apposita linguetta che deve essere rimossa prima dell’uso.
Sistema di pulizia del robotSistema di pulizia Il robot dispone di un sistema di pulizia a 2 stadi per pulire i pavimenti in modo efficace. - Le due spazzole laterali aiutano il robot a pulire negli angoli e lungo i muri e ad aspor tare dal pavimento lo sporco facendolo confluire verso l’aper tura d...
Page 44 - Adesso il telecomando è pronto per l’uso.; Predisposizione dell’apparecchio; e 80 cm davanti alla docking station.; Come ricaricare l’apparecchio; il tempo di ricarica è di quattro ore.; Ricarica sulla docking station; robot smette di lampeggiare.; Carica diretta tramite presa di corrente; Premete l’interruttore di alimentazione per accendere il robot.
1 Estraete la linguetta di protezione della batteria dal vano batterie del telecomando (fig. 12). , Adesso il telecomando è pronto per l’uso. Predisposizione dell’apparecchio Installazione della docking station 1 Inserite lo spinotto dell’adattatore nella presa sulla docking station (1) e inserite l...
Page 45 - Utilizzo del robot; il robot continua in modalità di pulizia automatica.
Preparazione della stanza per una sessione di pulizia - Prima di iniziare una sessione di pulizia con il robot, accer tatevi di rimuovere tutti gli oggetti fragili e sparsi sul pavimento (fig. 21). Utilizzo del robot Avvio e arresto 1 Premete il pulsante on/off (fig. 22). - Potete premere il pulsant...
Page 46 - Comportamento della spia; Pulizia e manutenzione; pale della ventola del motore.
Spostamento manuale (FC8710) 1 Utilizzate i pulsanti freccia situati attorno al pulsante on/off sul telecomando per spostare il robot all’interno della stanza (fig. 33). Nota: non premete il pulsante freccia verso il basso quando il robot è vicino a un dislivello o una scala. Uso dei pulsanti per l’...
Page 47 - Pulizia di sensori, rotelle e spazzole laterali; vuoto, le rotelle e le spazzole laterali.; Sostituzione; Potete ordinare par ti di ricambio e accessori sul sito; Sostituzione del filtro; “Pulizia e manutenzione”.
4 Scuotete il contenitore della polvere sopra una pattumiera per svuotarlo. Pulite il filtro e l’interno del contenitore della polvere con un panno o uno spazzolino a setole morbide. Pulite anche l’apertura di aspirazione nella parte inferiore del contenitore della polvere (fig. 39). Attenzione: Non...
Page 48 - Sostituzione delle spazzole laterali; di ricambio con il numero d’ordine CP0107.; Sostituzione della batteria ricaricabile; di rimuoverla e smaltirla.; Sostituzione della batteria del telecomando
Sostituzione delle spazzole laterali Per assicurare risultati di pulizia ottimali, dopo un cer to periodo di utilizzo, sostituite le spazzole laterali. Nota: sostituite sempre le spazzole laterali quando notate segni di usura o danni. Consigliamo inoltre di sostituire entrambe le spazzole laterali c...
Page 49 - Risoluzione dei problemi
Risoluzione dei problemi Questo capitolo riassume i problemi più comuni che potreste riscontrare con l’apparecchio. Se non riuscite a risolvere il problema con le informazioni ripor tate sotto, visitate il sito www.philips.com/support per un elenco di domande frequenti o contattate il centro assiste...
Page 51 - NEDERLANDS
51 Introductie Gefeliciteerd met uw aankoop en welkom bij Philips! Als u volledig wilt profiteren van de ondersteuning die Philips biedt, registreer uw product dan op www.philips.com/welcome . Uw robot (fig. 1) 1 Bovenklep 2 Handgreep van het deksel van de stofbak 3 Deksel van stofbak 4 Filter 5 Sto...
Page 52 - Schoonmaakpatronen; van het hoofdstuk ‘Uw robot gebruiken’.; Hoe uw robot hoogteverschillen vermijdt
Hoe uw robot schoonmaaktReinigingssysteem De robot heeft een 2-fasenreinigingssysteem om uw vloeren efficiënt te stofzuigen. - Dankzij de twee zijborstels kan de robot in hoeken en langs muren schoonmaken. Ze helpen ook om stof van de vloer los te maken en dit richting de zuigopening te verplaatsen ...
Page 53 - De afstandsbediening is nu klaar voor gebruik.; Klaarmaken voor gebruik; duur t het opladen vier uur.; Opladen op het docking station; vanaf het docking station is gestart.; Rechtstreeks opladen met netvoeding; Druk op de aan/uitknop om de robot in te schakelen.; De kamer klaarmaken voor een schoonmaakbeurt
1 Trek het beschermstrookje uit het batterijvak van de afstandsbediening (fig. 12). , De afstandsbediening is nu klaar voor gebruik. Klaarmaken voor gebruik Het docking station plaatsen 1 Steek de kleine stekker van de adapter in de aansluiting op het docking station (1) in en steek de adapter in he...
Page 54 - in de accu, dan blijft de robot stofzuigen in de automatische modus.; Willekeurig patroon
Uw robot gebruiken Starten en stoppen 1 Druk op de aan/uitknop (fig. 22). - U kunt op de aan/uitknop op het apparaat drukken. - U kunt ook op de aan/uitknop op de afstandsbediening (FC8710) drukken (fig. 23). Tip: Als u op de aan/uitknop op het docking station drukt terwijl de robot wordt opgeladen,...
Page 55 - Indicatorsignaal; Reiniging en onderhoud; motorventilator niet beschadigt.
De knoppen voor de reinigingstijd gebruiken - Als u op de 24-uursknop op het docking station drukt, begint het docking station 24 uur tot de volgende schoonmaakbeur t af te tellen. Wanneer het aftellen is voltooid, begint de robot met schoonmaken totdat de accu bijna leeg, waarna de robot automatisc...
Page 56 - het filter in de stofbak, raakt de motor beschadigd.; Sensoren, wielen en zijborstels schoonmaken; Plaats de robot ondersteboven op een vlakke ondergrond.; Vervanging; Ga naar; Het filter vervangen; plaatsen van een nieuw filter in de stofbak.; De zijborstels vervangen; bestellen onder bestelnummer CP0107.; De accu vervangen
Let op: Zorg er altijd voor dat het filter in de stofbak is geplaatst. Als u de robot gebruikt zonder het filter in de stofbak, raakt de motor beschadigd. Sensoren, wielen en zijborstels schoonmaken Voor een goede werking moeten de valsensoren, de wielen en de zijborstels van tijd tot tijd worden ge...
Page 57 - voordat u deze verwijdert en inlevert.; De batterij van de afstandsbediening vervangen
1 Laat de robot werken tot de accu leeg is om ervoor te zorgen dat de accu volledig leeg is voordat u deze verwijdert en inlevert. 2 Verwijder de schroeven van de deksel van de accuholte (fig. 46). 3 Verwijder de deksel van de accuholte (fig. 47). 4 Plaats de nieuwe accu in de accuholte. Plaats de d...
Page 58 - Problemen oplossen; Probleem
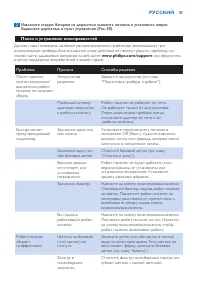
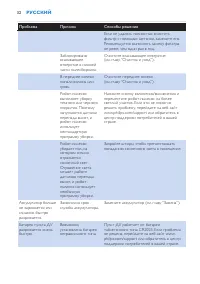
Problemen oplossen Dit hoofdstuk behandelt in het kor t de problemen die u kunt tegenkomen tijdens het gebruik van dit apparaat. Als u het probleem niet kunt oplossen met de informatie hieronder, ga dan naar www.philips.com/support voor een lijst met veelgestelde vragen of neem contact op met het Co...
Page 60 - PORTUGUÊS
60 Introdução Parabéns pela sua compra e bem-vindo à Philips! Para tirar todo o par tido da assistência fornecida pela Philips, registe o seu produto em www.philips.com/welcome . O seu robot (fig. 1) 1 Tampa superior 2 Pega da tampa do compar timento para o pó 3 Tampa do compar timento para o pó 4 F...
Page 61 - Padrões de limpeza; Padrão em Z ou em ziguezague; Como o seu robot evita diferenças de altura; ouvir encaixar na posição correcta com um estalido.
utilização para verificar se o robot consegue limpar este tipo de superfície. O robot também tem de ser super visionado quando utilizado em pavimentos pretos e brilhantes. Como o seu robot limpaSistema de limpeza O seu robot tem um sistema de limpeza de 2 níveis para limpar o chão eficazmente. - As ...
Page 62 - Retirar a patilha de protecção do telecomando; Agora, o telecomando está pronto a utilizar.; Preparar para a utilização; 0 cm para a direita e 100 cm para a esquerda da estação de base.; Carregamento; de carregamento é de quatro horas.; Carregamento na estação de base; indicador de bateria no visor do robot.; Carregar directamente na corrente eléctrica; Prima o botão de alimentação para ligar o robot.
Retirar a patilha de protecção do telecomando O telecomando (apenas FC8710) funciona com uma pilha CR2025 tipo botão. Esta pilha é protegida com uma patilha de protecção que tem de ser retirada antes da utilização. 1 Puxe a patilha de protecção da pilha para fora do compartimento da pilha no telecom...
Page 63 - intermitente. Isto indica que o robot está a carregar.; Utilizar o robot; o robot continua a limpar no modo de limpeza automático.; Modo de padrão em Z
3 Quando o robot é ligado à alimentação correctamente, o indicador ligado/desligado fica intermitente. Isto indica que o robot está a carregar. 4 Quando a bateria recarregável está completamente carregada, pára a intermitência do indicador ligado/desligado do robot.Preparar a divisão para uma limpez...
Page 64 - Sinal do indicador; Limpeza e manutenção
Modo de seguimento de paredes - Neste modo, o robot segue as paredes da divisão para assegurar uma limpeza extra das áreas junto às paredes (fig. 31). Modo em espiral - Neste modo, o robot descreve um movimento em espiral com a ventoinha à velocidade turbo para limpar cuidadosamente uma área suja (f...
Page 65 - do ventilador do motor.; Limpar sensores, rodas e escovas laterais; escovas laterais ocasionalmente.
1 Retire a tampa superior (fig. 36). Nota: Certifique-se de que o botão de alimentação está na posição desligada. 2 Puxe para cima a pega da tampa do compartimento para o pó e retire o compartimento para pó da respectiva divisão (fig. 37). Nota: Ao retirar ou reintroduzir o compartimento para pó, te...
Page 66 - Substituição; Pode encomendar peças sobressalentes e acessórios em; Substituir o filtro; pó e como colocá-lo no compar timento para pó.; Substituir as escovas laterais; de substituição como um conjunto com o número de encomenda CP0107.; Substituir a bateria recarregável; voltados na direcção certa.; Substituir a pilha do telecomando
Substituição Pode encomendar peças sobressalentes e acessórios em www.shop.philips.com/service ou no seu revendedor Philips. Também pode contactar o Centro de Apoio ao Cliente da Philips no seu país. Substituir o filtro Substitua o filtro se estiver muito sujo ou danificado. Pode encomendar um filtr...
Page 67 - support
support para consultar uma lista de perguntas frequentes ou contacte o Centro de Assistência ao Cliente no seu país. Problema Causa Solução O robot não começa a limpar quando primo o botão ligar/ desligar. A bateria recarregável está vazia. Carregue a bateria recarregável (consulte o capítulo “Prepa...


 Philips FC6048_01
User Manual
Philips FC6048_01
User Manual
 Philips FC6050_03
User Manual
Philips FC6050_03
User Manual
 Philips FC6051
User Manual
Philips FC6051
User Manual
 Philips FC6053
User Manual
Philips FC6053
User Manual
 Philips FC6055_01
User Manual
Philips FC6055_01
User Manual
 Philips FC6064
User Manual
Philips FC6064
User Manual
 Philips FC6065
User Manual
Philips FC6065
User Manual
 Philips FC6067_01
User Manual
Philips FC6067_01
User Manual
 Philips FC6082
User Manual
Philips FC6082
User Manual
 Philips FC6091
User Manual
Philips FC6091
User Manual
 Philips FC6092
User Manual
Philips FC6092
User Manual
 Philips FC6093
User Manual
Philips FC6093
User Manual
 Philips FC6094
User Manual
Philips FC6094
User Manual
 Philips FC6095
User Manual
Philips FC6095
User Manual