Page 6 - Important; The charger plug feels warm. This is normal.; Preparing the appliance for use; E N G L I S H
Important ◗ Read these instructions for use carefully andlook at the illustrations before you start usingthe appliance. ◗ Always switch the vacuum cleaner off afteruse. ◗ Never suck up water (or any other liquid).Never suck up ashes until they are cold. ◗ Do not let water enter the vacuum cleaner or...
Page 7 - Charging the appliance; Put the vacuum cleaner on the holder.
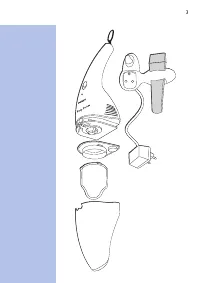
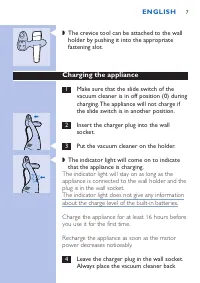
C ◗ The crevice tool can be attached to the wallholder by pushing it into the appropriatefastening slot. Charging the appliance 1 Make sure that the slide switch of thevacuum cleaner is in off position (0) duringcharging. The appliance will not charge ifthe slide switch is in another position. 2 Ins...
Page 9 - Replacing the filter; Push the tip of the filter inwards.; Cleaning the appliance
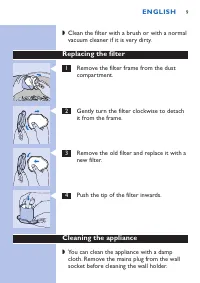
◗ Clean the filter with a brush or with a normalvacuum cleaner if it is very dirty. Replacing the filter C 1 Remove the filter frame from the dustcompartment. C 2 Gently turn the filter clockwise to detachit from the frame. C 3 Remove the old filter and replace it with anew filter. C 4 Push the tip ...
Page 11 - Information & service
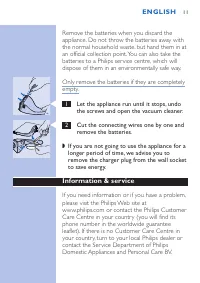
Remove the batteries when you discard theappliance. Do not throw the batteries away withthe normal household waste, but hand them in atan official collection point. You can also take thebatteries to a Philips ser vice centre, which willdispose of them in an environmentally safe way. Only remove the ...
Page 12 - P O L S K I
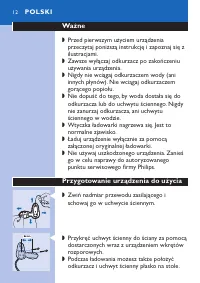
Ważne ◗ Przed pierwszym użyciem urządzeniaprzeczytaj poniższą instrukcję i zapoznaj się zilustracjami. ◗ Zawsze wyłączaj odkurzacz po zakończeniuużywania urządzenia. ◗ Nigdy nie wciągaj odkurzaczem wody (aniinnych płynów). Nie wciągaj odkurzaczemgorącego popiołu. ◗ Nie dopuść do tego, by woda dostał...
Page 13 - Ładowanie urządzenia; Umieść odkurzacz w uchwycie
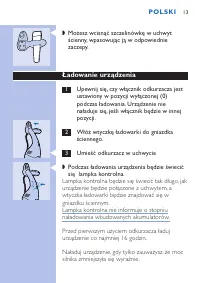
C ◗ Możesz wcisnąć szczelinówkę w uchwytścienny, wpasowując ją w odpowiedniezaczepy. Ładowanie urządzenia 1 Upewnij się, czy włącznik odkurzacza jestustawiony w pozycji wyłączonej (0)podczas ładowania. Urządzenie nienaładuje się, jeśli włącznik będzie w innejpozycji. 2 Włóż wtyczkę ładowarki do gnia...
Page 15 - Wymiana filtra; Wyjmij ramę filtra z komory na kurz.
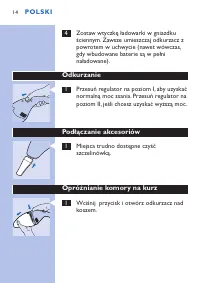
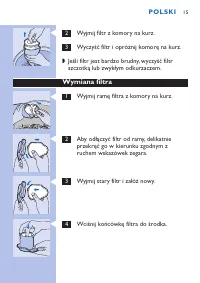
C 2 Wyjmij filtr z komory na kurz. 3 Wyczyść filtr i opróżnij komorę na kurz. ◗ Jeśli filtr jest bardzo brudny, wyczyść filtrszczotką lub zwykłym odkurzaczem. Wymiana filtra C 1 Wyjmij ramę filtra z komory na kurz. C 2 Aby odłączyć filtr od ramy, delikatnieprzekręć go w kierunku zgodnym zruchem wska...
Page 16 - Czyszczenie urządzenia; Nie należy myć komor y na kurz w zmywarce.; Zamawianie filtrów
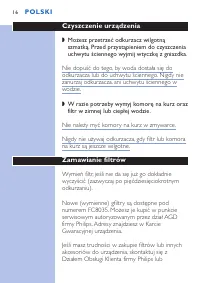
Czyszczenie urządzenia ◗ Możesz przetrzeć odkurzacz wilgotnąszmatką. Przed przystąpieniem do czyszczeniauchwytu ściennego wyjmij wtyczkę z gniazdka. Nie dopuść do tego, by woda dostała się doodkurzacza lub do uchwytu ściennego. Nigdy niezanurzaj odkurzacza, ani uchwytu ściennego wwodzie. ◗ W razie p...
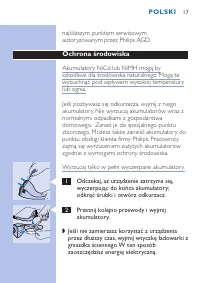
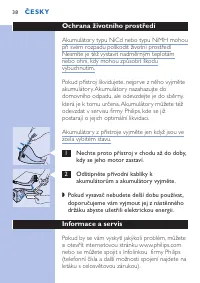
Page 17 - Ochrona środowiska; Wyrzucaj tylko w pełni wyczerpane akumulator y.
najbliższym punktem serwisowymautor yzowanym przez Philips AGD. Ochrona środowiska Akumulator y NiCd lub NiMH mogą byszkodliwe dla środowiska naturalnego. Mogą tewybuchnąć pod wpływem wysokiej temperatur ylub ognia. Jeśli pozbywasz się odkurzacza, wyjmij z niegoakumulator y. Nie wyrzucaj akumulatoró...
Page 18 - Informacja i serwis
Informacja i serwis Jeśli chcesz skorzystać z serwisu lub potrzebujeszinformacji bądź jeśli masz jakiś problem skontaktujsię z Działem Obsługi Klienta (numer telefonuznajdziesz w karcie gwarancyjnej) lub zwróć siędo najbliższego punktu serwisowego działu AGDfirmy Philips. P O L S K I 1 8
Page 19 - Opriţi întotdeauna aparatul după utilizare.; Pregătirea aparatului pentru utilizare; RO M Â N Ă
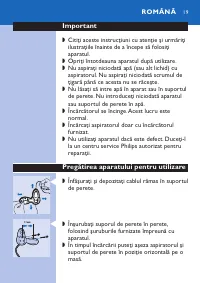
Important ◗ Citiţi aceste instrucţiuni cu atenţie şi urmăriţiilustraţiile înainte de a începe să folosiţiaparatul. ◗ Opriţi întotdeauna aparatul după utilizare. ◗ Nu aspiraţi niciodată apă (sau alt lichid) cuaspiratorul. Nu aspiraţi niciodată scrumul deţigară până ce acesta nu se răceşte. ◗ Nu lăsaţ...
Page 20 - Încărcarea aparatului; Introduceţi încărcătorul în priză.
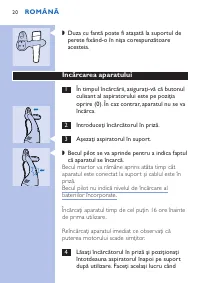
C ◗ Duza cu fantă poate fi ataşată la suportul deperete fixând-o în nişa corespunzătoareacesteia. Încărcarea aparatului 1 În timpul încărcării, asiguraţi-vă că butonulculisant al aspiratorului este pe poziţiaoprire (0). În caz contrar, aparatul nu se vaîncărca. 2 Introduceţi încărcătorul în priză. C...
Page 21 - Scoateţi filtrul din compartimentul de praf.
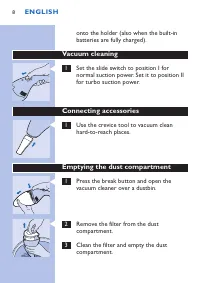
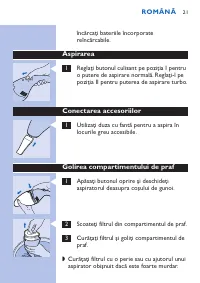
încărcaţi bateriile încorporatereîncărcabile. Aspirarea C 1 Reglaţi butonul culisant pe poziţia I pentruo putere de aspirare normală. Reglaţi-l pepoziţia II pentru puterea de aspirare turbo. Conectarea accesoriilor C 1 Utilizaţi duza cu fantă pentru a aspira înlocurile greu accesibile. Golirea compa...
Page 22 - Înlocuirea filtrului; Pliaţi capătul filtrului în interior.; Curăţarea aparatului
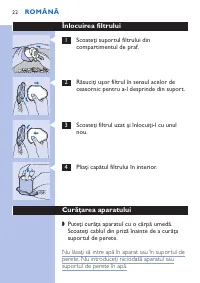
Înlocuirea filtrului C 1 Scoateţi suportul filtrului dincompartimentul de praf. C 2 Răsuciţi uşor filtrul în sensul acelor deceasornic pentru a-l desprinde din suport. C 3 Scoateţi filtrul uzat şi înlocuiţi-l cu unulnou. C 4 Pliaţi capătul filtrului în interior. Curăţarea aparatului ◗ Puteţi curăţa ...
Page 24 - Informaţii şi service
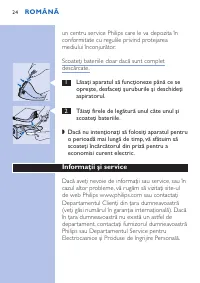
un centru ser vice Philips care le va depozita înconformitate cu regulile privind protejareamediului înconjurător. Scoateţi bateriile doar dacă sunt completdescărcate. C 1 Lăsaţi aparatul să funcţioneze până ce seopreşte, desfaceţi şuruburile şi deschideţiaspiratorul. C 2 Tăiaţi firele de legătură u...
Page 25 - Р У С С К И Й
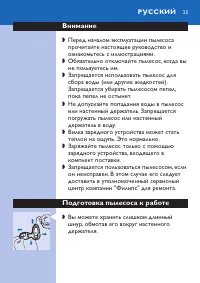
Внимание ◗ Перед началом эксплуатации пылесосапрочитайте настоящее руководство иознакомьтесь с иллюстрациями. ◗ Обязательно отключайте пылесос, когда выне пользуетесь им. ◗ Запрещается использовать пылесос длясбора воды (или других жидкостей).Запрещается убирать пылесосом пепел,пока пепел не остынет...
Page 27 - Порядок работы
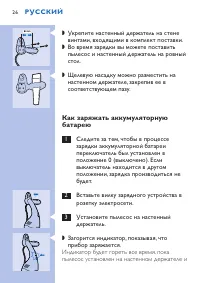
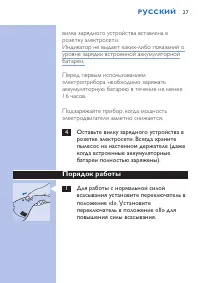
вилка зарядного устройства вставлена врозетку электросети.Индикатор не выдает каких-либо показаний оуровне зарядки встроенной аккумуляторнойбатареи. Перед первым использованиемэлектроприбора необходимо заряжатьаккумуляторную батарею в течение не менее16 часов. Подзаряжайте прибор, когда мощностьэлек...
Page 28 - Выньте из отсека пылесборника фильтр.; Замена фильтра
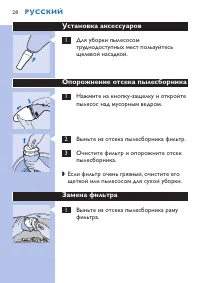
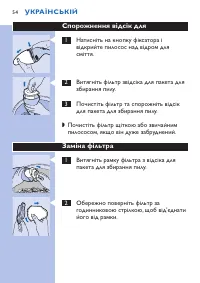
Установка аксессуаров C 1 Для уборки пылесосомтруднодоступных мест пользуйтесьщелевой насадкой. Опорожнение отсека пылесборника C 1 Нажмите на кнопку-защелку и откройтепылесос над мусорным ведром. C 2 Выньте из отсека пылесборника фильтр. 3 Очистите фильтр и опорожните отсекпылесборника. ◗ Если филь...
Page 29 - Вставьте край фильтра внутрь.; Очистка пылесоса
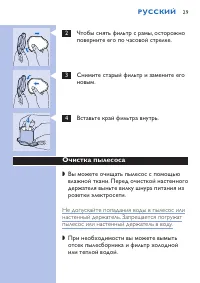
C 2 Чтобы снять фильтр с рамы, осторожноповерните его по часовой стрелке. C 3 Снимите старый фильтр и замените егоновым. C 4 Вставьте край фильтра внутрь. Очистка пылесоса ◗ Вы можете очищать пылесос с помощьювлажной ткани. Перед очисткой настенногодержателя выньте вилку шнура питания изрозетки элек...
Page 31 - Информация и обслуживание
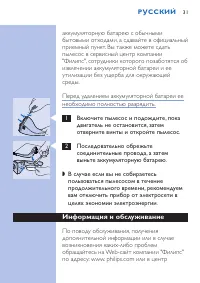
аккумуляторную батарею с обычнымибытовыми отходами, а сдавайте в официальныйприемный пункт. Вы также можете сдатьпылесос в сервисный центр компании"Филипс", сотрудники которого позаботятся обизвлечении аккумуляторной батареи и ееутилизации без ущерба для окружающейсреды. Перед удалением акку...
Page 33 - Důležité; Po použití vždy přístroj vypněte.; Příprava vysavače k použití; Č E S K Y
Důležité ◗ Než přístroj poprvé použijete, pročtětepečlivě celý návod a sledujte přitom příslušnávyobrazení. ◗ Po použití vždy přístroj vypněte. ◗ Nikdy nevysávejte vodu (nebo jiné tekutiny).Nikdy též nevysávejte popel pokud není zcelachladný. ◗ Dbejte na to, aby se do přístroje nebo do jehonástěnnéh...
Page 34 - Nabíjení akumulátorů přístroje; Zasuňte zástrčku do síťové zásuvky.
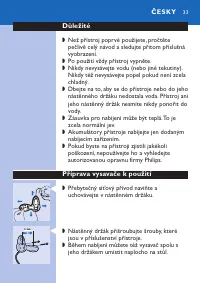
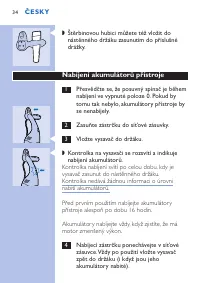
C ◗ Štěrbinovou hubici můžete též vložit donástěnného držáku zasunutím do příslušnédrážky. Nabíjení akumulátorů přístroje 1 Přesvědčte se, že posuvný spínač je běhemnabíjení ve vypnuté poloze 0. Pokud bytomu tak nebylo, akumulátory přístroje byse nenabíjely. 2 Zasuňte zástrčku do síťové zásuvky. C 3...
Page 35 - Vyjměte filtr z prachového prostoru.
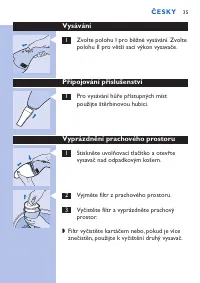
Vysávání C 1 Zvolte polohu I pro běžné vysávání. Zvoltepolohu II pro větší sací výkon vysavače. Připojování příslušenství C 1 Pro vysávání hůře přístupných místpoužijte štěrbinovou hubici. Vyprázdnění prachového prostoru C 1 Stiskněte uvolňovací tlačítko a otevřtevysavač nad odpadkovým košem. C 2 Vy...
Page 36 - Výměna filtru; Špičku filtru zasuňte směrem dovnitř.; Čištění přístroje
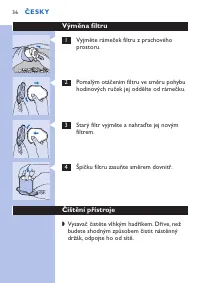
Výměna filtru C 1 Vyjměte rámeček filtru z prachovéhoprostoru. C 2 Pomalým otáčením filtru ve směru pohybuhodinových ruček jej oddělte od rámečku. C 3 Starý filtr vyjměte a nahraďte jej novýmfiltrem. C 4 Špičku filtru zasuňte směrem dovnitř. Čištění přístroje ◗ Vysavač čistěte vlhkým hadříkem. Dříve...
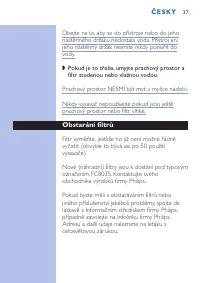
Page 37 - Prachový prostor NESMÍ být myt v myčce nádobí.; Obstarání filtrů
Dbejte na to, aby se do přístroje nebo do jehonástěnného držáku nedostala voda. Přístroj anijeho nástěnný držák nesmíte nikdy ponořit dovody. ◗ Pokud je to třeba, umyjte prachový prostor afiltr studenou nebo vlažnou vodou. Prachový prostor NESMÍ být myt v myčce nádobí. Nikdy vysavač nepoužívejte pok...
Page 39 - Fontos; Használat után mindig kapcsolja ki a porszívót.; A készülék használata előtt; M AG YA R
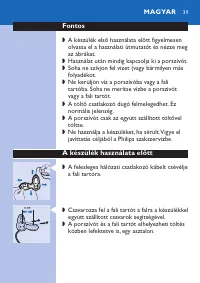
Fontos ◗ A készülék első használata előtt figyelmesenolvassa el a használati útmutatót és nézze megaz ábrákat. ◗ Használat után mindig kapcsolja ki a porszívót. ◗ Soha ne szívjon fel vizet (vagy bármilyen másfolyadékot. ◗ Ne kerüljön víz a porszívóba vagy a falitartóba. Soha ne merítse vízbe a porsz...
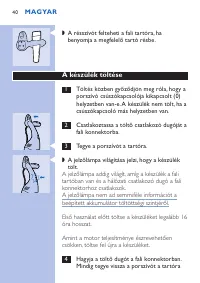
Page 40 - A készülék töltése; Tegye a porszívót a tartóra.
C ◗ A résszívót felteheti a fali tartóra, habenyomja a megfelelő tartó résbe. A készülék töltése 1 Töltés közben győződjön meg róla, hogy aporszívó csúszókapcsolója kikapcsolt (0)helyzetben van-e. A készülék nem tölt, ha acsúszókapcsoló más helyzetben van. 2 Csatlakoztassa a töltő csatlakozó dugóját...
Page 41 - Vegye ki a szűrőt a porkamrából.
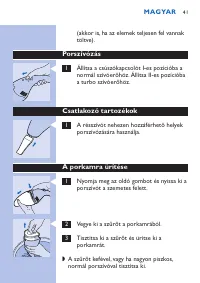
(akkor is, ha az elemek teljesen fel vannaktöltve). Porszívózás C 1 Állítsa a csúszókapcsolót I-es pozícióba anormál szívóerőhöz. Állítsa II-es pozícióbaa turbo szívóerőhöz. Csatlakozó tartozékok C 1 A résszívót nehezen hozzáférhető helyekporszívózására használja. A porkamra ürítése C 1 Nyomja meg a...
Page 42 - A szűrő cseréje; Vegye ki a szűrő keretet a porkamrából.; A készülék tisztítása
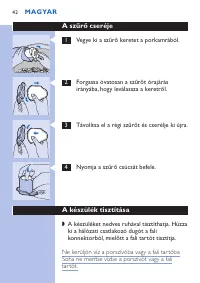
A szűrő cseréje C 1 Vegye ki a szűrő keretet a porkamrából. C 2 Forgassa óvatosan a szűrőt órajárásirányába, hogy leválassza a keretről. C 3 Távolítsa el a régi szűrőt és cserélje ki újra. C 4 Nyomja a szűrő csúcsát befele. A készülék tisztítása ◗ A készüléket nedves ruhával tisztíthatja. Húzzaki a ...
Page 43 - A porkamrát TILOS mosogatógépben tisztítani.; Szűrő rendelése
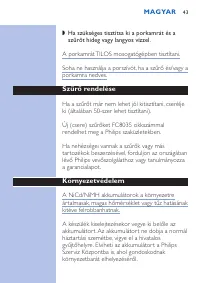
◗ Ha szükséges tisztítsa ki a porkamrát és aszűrőt hideg vagy langyos vízzel. A porkamrát TILOS mosogatógépben tisztítani. Soha ne használja a porszívót, ha a szűrő és/vagy aporkamra nedves. Szűrő rendelése Ha a szűrőt már nem lehet jól kitisztítani, cseréljeki (általában 50-szer lehet tisztítani). ...
Page 44 - Információ és szerviz
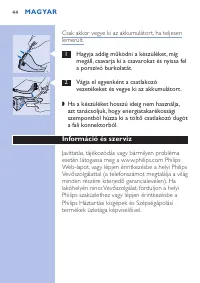
Csak akkor vegye ki az akkumulátor t, ha teljesen lemerült. C 1 Hagyja addig működni a készüléket, mígmegáll, csavarja ki a csavarokat és nyissa fela porszívó burkolatát. C 2 Vágja el egyenként a csatlakozóvezetékeket és vegye ki az akkumulátort. ◗ Ha a készüléket hosszú ideig nem használja,azt taná...
Page 45 - Dôležité upozornenie; Prístroj vždy po použití vypnite.; Príprava prístroja na použitie; S L OV E N S K Y
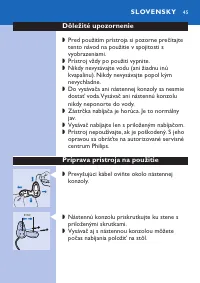
Dôležité upozornenie ◗ Pred použitím prístroja si pozorne prečítajtetento návod na použitie v spojitosti svyobrazeniami. ◗ Prístroj vždy po použití vypnite. ◗ Nikdy nevysávajte vodu (ani žiadnu inúkvapalinu). Nikdy nevysávajte popol kýmnevychladne. ◗ Do vysávača ani nástennej konzoly sa nesmiedostať...
Page 46 - Nabíjanie prístroja; Postavte vysávač na konzolu.
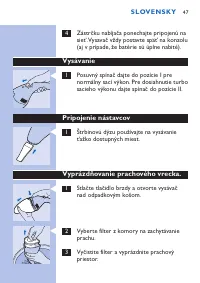
C ◗ Nástavec na vysávane štrbín môžete upevniťku konzole tak, že ich zatlačíte dozodpovedajúcich drážiek na uchytenie. Nabíjanie prístroja 1 Dbajte, aby posuvný vypínač vysávača bolpočas nabíjania v pozícií vypnutý (0).Prístroj sa nebude nabíjať, ak je posuvnývypínač v inej pozícii. 2 Zástrčku nabíj...
Page 48 - Výmena filtra; Okraj filtra zatlačte smerom dnu.; Čistenie prístroja
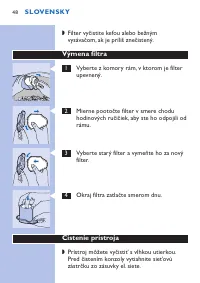
◗ Filter vyčistite kefou alebo bežnýmvysávačom, ak je príliš znečistený. Výmena filtra C 1 Vyberte z komory rám, v ktorom je filterupevnený. C 2 Mierne pootočte filter v smere choduhodinových ručičiek, aby ste ho odpojili odrámu. C 3 Vyberte starý filter a vymeňte ho za novýfilter. C 4 Okraj filtra ...
Page 50 - Baterky vytiahnite len ak sú úplne prázdne.; Informácie a servis
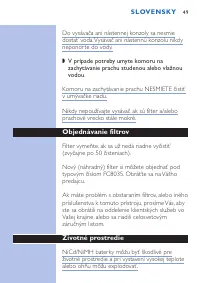
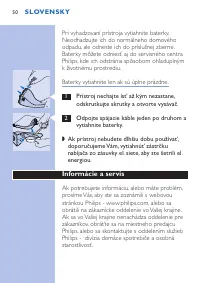
Pri vyhadzovaní prístroja vytiahnite baterky.Neodhadzujte ich do normálneho domovéhoodpadu, ale odneste ich do príslušnej zberne.Baterky môžete odniesť aj do ser visného centraPhilips, kde ich odstránia spôsobom ohľaduplnýmk životnému prostrediu. Baterky vytiahnite len ak sú úplne prázdne. C 1 Príst...
Page 51 - Увага; У К РА Ї Н С Ь К І Й
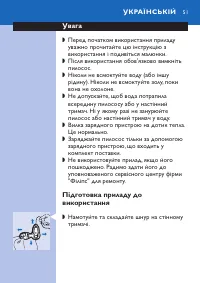
Увага ◗ Перед початком використання приладууважно прочитайте цю інструкцію звикористання і подивіться малюнки. ◗ Після використання обов'язково вимкнітьпилосос. ◗ Ніколи не всмоктуйте воду (або іншурідину). Ніколи не всмоктуйте золу, покивона не охолоне. ◗ Не допускайте, щоб вода потрапилавсередину ...
Page 52 - Заряджання приладу; Встановіть пилосос у тримач.
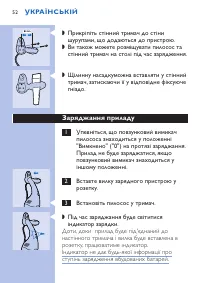
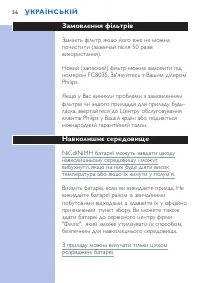
C ◗ Прикріпіть стінний тримач до стінишурупами, що додаються до пристрою. ◗ Ви також можете розміщувати пилосос тастінний тримач на столі під час зарядження. C ◗ Щілинну насадкуможна вставляти у стіннийтримач, затискаючи її у відповідне фіксуючегніздо. Заряджання приладу 1 Упевніться, що повзунковий...
Page 53 - Використання пилососу
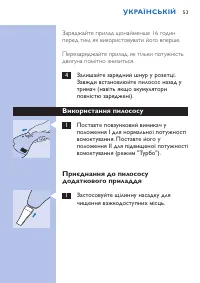
Заряджайте прилад щонайменше 16 годинперед тим, як використовувати його вперше. Перезаряджайте прилад, як тільки потужністьдвигуна помітно знизиться. 4 Залишайте зарядний шнур у розетці.Завжди встановлюйте пилосос назад утримач (навіть якщо акумуляториповністю заряджені). Використання пилососу C 1 П...
Page 55 - Натисніть верхівку фільтру усередину.; Чистка пилососу
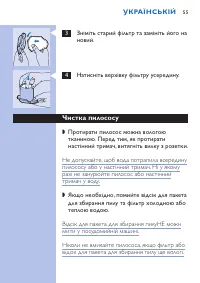
C 3 Зніміть старий фільтр та замініть його нановий. C 4 Натисніть верхівку фільтру усередину. Чистка пилососу ◗ Протирати пилосос можна вологоютканиною. Перед тим, як протиратинастінний тримач, витягніть вилку з розетки. Не допускайте, щоб вода потрапила всерединупилососу або у настінний тримач. Ні ...
Page 57 - Інформація та сервіс
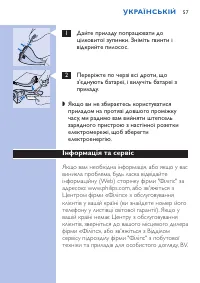
C 1 Дайте приладу попрацювати доцілковитої зупинки. Зніміть гвинти івідкрийте пилосос. C 2 Переріжте по черзі всі дроти, щоз'єднують батареї, і вилучіть батареї зприладу. ◗ Якщо ви не збираєтесь користуватисяприладом на протязі довшого проміжкучасу, ми радимо вам вийняти штепсельзарядного пристрою з...
Page 58 - Važno; Uvijek isključite usisivač nakon uporabe.; Priprema usisivača za uporabu; H RVAT S K I
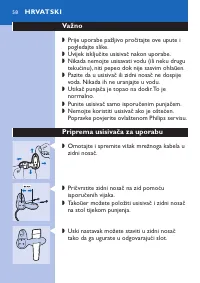
Važno ◗ Prije uporabe pažljivo pročitajte ove upute ipogledajte slike. ◗ Uvijek isključite usisivač nakon uporabe. ◗ Nikada nemojte usisavati vodu (ili neku drugutekućinu), niti pepeo dok nije sasvim ohlaūen. ◗ Pazite da u usisivač ili zidni nosač ne dospijevoda. Nikada ih ne uranjajte u vodu. ◗ Uti...
Page 59 - Punjenje; Utaknite utikač punjača u zidnu utičnicu.; Usisavanje
Punjenje 1 Tijekom punjenja preklopka za uključenjemora biti u položaju "isključeno" (0).Usisivač se neće puniti ako je preklopka udrugom položaju. 2 Utaknite utikač punjača u zidnu utičnicu. C 3 Stavite usisivač na držač. C ◗ Pali se indikator u znak da je punjenje u tijeku. Indikator ostaj...
Page 60 - Izvadite filter iz spremnika za prašinu.; Zamjena filtera
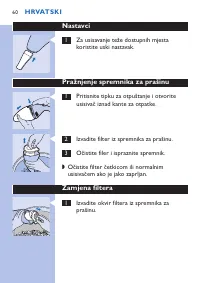
Nastavci C 1 Za usisavanje teže dostupnih mjestakoristite uski nastavak. Pražnjenje spremnika za prašinu C 1 Pritisnite tipku za otpuštanje i otvoriteusisivač iznad kante za otpatke. C 2 Izvadite filter iz spremnika za prašinu. 3 Očistite filer i ispraznite spremnik. ◗ Očistite filter četkicom ili n...
Page 61 - Čišćenje
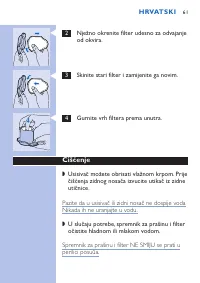
C 2 Nježno okrenite filter udesno za odvajanjeod okvira. C 3 Skinite stari filter i zamijenite ga novim. C 4 Gurnite vrh filtera prema unutra. Čišćenje ◗ Usisivač možete obrisati vlažnom krpom. Priječišćenja zidnog nosača izvucite utikač iz zidneutičnice. Pazite da u usisivač ili zidni nosač ne dosp...
Page 62 - Izvadite baterije samo ako su potpuno prazne.
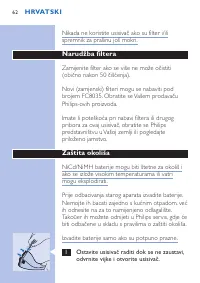
Nikada ne koristite usisivač ako su filter i/ilispremnik za prašinu još mokri. Narudžba filtera Zamijenite filter ako se više ne može očistiti(obično nakon 50 čišćenja). Novi (zamjenski) filteri mogu se nabaviti podbrojem FC8035. Obratite se Vašem prodavačuPhilips-ovih proizvoda. Imate li poteškoća ...
Page 63 - Informacije i servis
C 2 Prerežite žice za spajanje jednu po jednu iizvadite baterije. ◗ Ako usisivač nećete koristiti dulje vrijeme,savjetujemo odspajanje punjača iz utičnicezbog štednje energije. Informacije i servis Ako Vam je potrebna informacija ili imateproblem, posjetite Philips-ovu web stranicuwww.philips.com il...
Page 64 - E E S T I
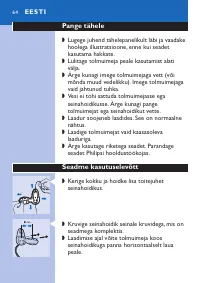
Pange tähele ◗ Lugege juhend tähelepanelikult läbi ja vaadakehoolega illustratsioone, enne kui seadetkasutama hakkate. ◗ Lülitage tolmuimeja peale kasutamist alativälja. ◗ Ärge kunagi imege tolmuimejaga vett (võimõnda muud vedelikku). Imege tolmuimejagavaid jahtunud tuhka. ◗ Vesi ei tohi sattuda tol...
Page 65 - Seadme töökorda seadmine; Pange laadimispistik pistikupessa.
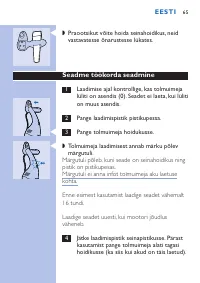
C ◗ Praootsikut võite hoida seinahoidikus, neidvastavatesse õnarustesse lükates. Seadme töökorda seadmine 1 Laadimise ajal kontrollige, kas tolmuimejalüliti on asendis (0). Seadet ei laeta, kui lülition muus asendis. 2 Pange laadimispistik pistikupessa. C 3 Pange tolmuimeja hoidukusse. C ◗ Tolmuimej...
Page 66 - Eemaldage filter tolmukambrist.
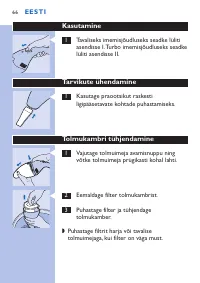
Kasutamine C 1 Tavaliseks imemisjõudluseks seadke lülitiasendisse I. Turbo imemisjõudluseks seadkelüliti asendisse II. Tarvikute ühendamine C 1 Kasutage praootsikut raskestiligipääsetavate kohtade puhastamiseks. Tolmukambri tühjendamine C 1 Vajutage tolmuimeja avamisnuppu ningvõtke tolmuimeja prügik...
Page 67 - Filtri vahetus; Eemaldage filtri raam tolmukambrist.; Tolmuimeja puhastamine
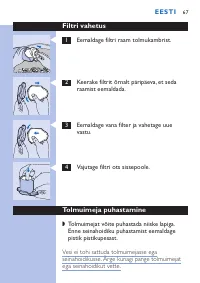
Filtri vahetus C 1 Eemaldage filtri raam tolmukambrist. C 2 Keerake filtrit õrnalt päripäeva, et sedaraamist eemaldada. C 3 Eemaldage vana filter ja vahetage uuevastu. C 4 Vajutage filtri ots sissepoole. Tolmuimeja puhastamine ◗ Tolmuimejat võite puhastada niiske lapiga.Enne seinahoidiku puhastamist...
Page 70 - Svarīgi; Uzlādētāja kontaktdakša sasilst. Tas ir normāli.; Putekļusūcēja sagatavošana lietošanai; L AT V I S K I
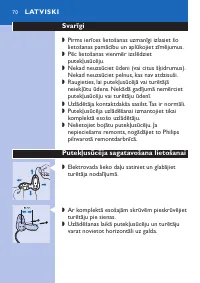
Svarīgi ◗ Pirms ierīces lietošanas uzmanīgi izlasiet šolietošanas pamācību un aplūkojiet zīmējumus. ◗ Pēc lietošanas vienmēr izslēdzietputekļusūcēju. ◗ Nekad neuzsūciet ūdeni (vai citus šķidrumus).Nekad neuzsūciet pelnus, kas nav atdzisuši. ◗ Raugieties, lai putekļusūcējā vai turētājāneiekļūtu ūdens...
Page 71 - Putekļusūcēja uzlādēšana; Novietojiet putekļusūcēju turētājā.
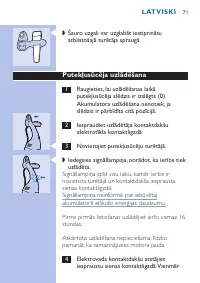
C ◗ Šauro uzgali var uzglabāt iestiprinātuatbilstošajā turētāja spraugā. Putekļusūcēja uzlādēšana 1 Raugieties, lai uzlādēšanas laikāputekļusūcēja slēdzis ir izslēgts (0).Akumulatora uzlādēšana nenotiek, jaslēdzis ir pārbīdīts citā pozīcijā. 2 Iespraudiet uzlādētāja kontaktdakšuelektrotīkla kontaktl...
Page 72 - No putekļu nodalījuma izņemiet filtru.
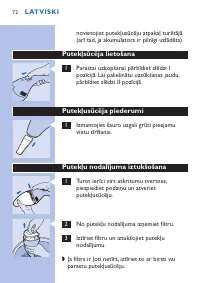
novietojiet putekļusūcēju atpakaļ turētājā(arī tad, ja akumulators ir pilnīgi uzlādēts). Putekļsūcēja lietošana C 1 Parastai uzkopšanai pārbīdiet slēdzi Ipozīcijā. Lai palielinātu uzsūkšanas jaudu,pārbīdiet slēdzi II pozīcijā. Putekļusūcēja piederumi C 1 Izmantojiet šauro uzgali grūti pieejamuvietu ...
Page 73 - Filtra maiņa; Iebīdiet filtra galu uz iekšu.; Ierīces tīrīšana
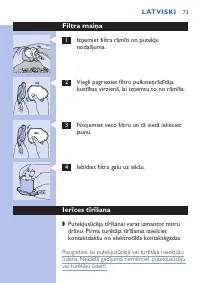
Filtra maiņa C 1 Izņemiet filtra rāmīti no putekļunodalījuma. C 2 Viegli pagrieziet filtru pulksteņrādītājakustības virzienā, lai izņemtu to no rāmīša. C 3 Noņemiet veco filtru un tā vietā ieliecietjaunu. C 4 Iebīdiet filtra galu uz iekšu. Ierīces tīrīšana ◗ Putekļusūcēja tīrīšanai varat izmantot mi...
Page 75 - Informācija un apkalpošana
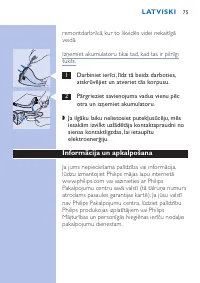
remontdarbnīcā, kur to likvidēs videi nekaitīgāveidā. Izņemiet akumulatoru tikai tad, kad tas ir pilnīgitukšs. C 1 Darbiniet ierīci, līdz tā beidz darboties,atskrūvējiet un atveriet tās korpusu. C 2 Pārgrieziet savienojuma vadus vienu pēcotra un izņemiet akumulatoru. ◗ Ja ilgāku laiku nelietosiet pu...
Page 76 - Svarbu žinoti; Po naudojimo siurblį visada išjunkite.; Aparato paruošimas naudojimui; L I E T U V I Š K A I
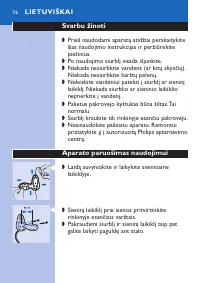
Svarbu žinoti ◗ Prieš naudodami aparatą atidžiai perskaitykitešias naudojimo instrukcijas ir peržiūrėkitepiešinius. ◗ Po naudojimo siurblį visada išjunkite. ◗ Niekada nesiurbkite vandens (ar kitų skysčių).Niekada nesiurbkite karštų pelenų. ◗ Neleiskite vandeniui patekti į siurblį ar sieninįlaikiklį....
Page 77 - Aparato pakrovimas; Įjunkite pakrovėjo kyštuką į elektros lizdą.
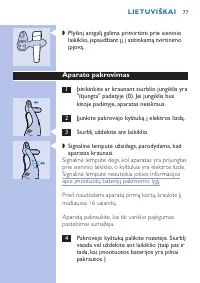
C ◗ Plyšinį antgalį galima pritvirtinti prie sieniniolaikiklio, įspaudžiant jį į atitinkamą tvirtinimoįpjovą. Aparato pakrovimas 1 Įsitikinkite ar kraunant siurblio jungiklis yra"išjungta" padėtyje (0). Jei jungiklis buskitoje padėtyje, aparatas nesikraus. 2 Įjunkite pakrovėjo kyštuką į elek...
Page 78 - Iš dulių kameros išimkite filtrą.
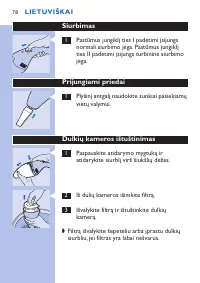
Siurbimas C 1 Pastūmus jungiklį ties I padėtimi įsijungsnormali siurbimo jėga. Pastūmus jungiklįties II padėtimi įsijungs turbininė siurbimojėga. Prijungiami priedai C 1 Plyšinį antgalį naudokite sunkiai pasiekiamųvietų valymui. Dulkių kameros ištuštinimas C 1 Paspauskite atidarymo mygtuką iratidary...
Page 79 - Filtro pakeitimas; Nuo dulkių kameros nuimkite filtro rėmą.; Aparato valymas
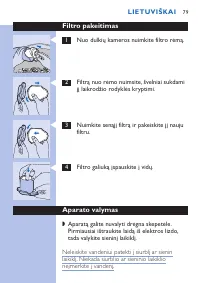
Filtro pakeitimas C 1 Nuo dulkių kameros nuimkite filtro rėmą. C 2 Filtrą nuo rėmo nuimsite, švelniai sukdamijį laikrodžio rodyklės kryptimi. C 3 Nuimkite senąjį filtrą ir pakeiskite jį naujufiltru. C 4 Filtro galiuką įspauskite į vidų. Aparato valymas ◗ Aparatą galite nuvalyti drėgna skepetėle.Pirm...
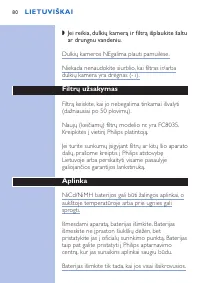
Page 80 - Dulkių kameros NEgalima plauti pamuilėse.; Filtrų užsakymas; Baterijas išimkite tik tada, kai jos visai išsikrovusios.
◗ Jei reikia, dulkių kamerą ir filtrą išplaukite šaltuar drungnu vandeniu. Dulkių kameros NEgalima plauti pamuilėse. Niekada nenaudokite siurblio, kai filtras ir/arbadulkių kamera yra drėgnas (- i). Filtrų užsakymas Filtrą keiskite, kai jo nebegalima tinkamai išvalyti(dažniausiai po 50 plovimų). Nau...
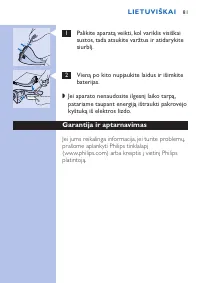
Page 81 - Garantija ir aptarnavimas
C 1 Palikite aparatą veikti, kol variklis visiškaisustos, tada atsukite varžtus ir atidarykitesiurblį. C 2 Vieną po kito nupjaukite laidus ir išimkitebaterijas. ◗ Jei aparato nenaudosite ilgesnį laiko tarpą,patariame taupant energiją ištraukti pakrovėjokyštuką iš elektros lizdo. Garantija ir aptarna...
Page 82 - Pomembno; Po uporabi aparat vedno izklopite.; Priprava aparata za uporabo; S L OV E N Š Č I N A
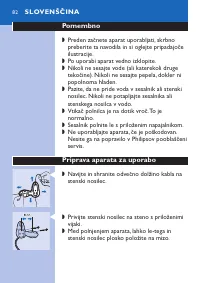
Pomembno ◗ Preden začnete aparat uporabljati, skrbnopreberite ta navodila in si oglejte pripadajočeilustracije. ◗ Po uporabi aparat vedno izklopite. ◗ Nikoli ne sesajte vode (ali katerekoli drugetekočine). Nikoli ne sesajte pepela, dokler nipopolnoma hladen. ◗ Pazite, da ne pride voda v sesalnik ali...
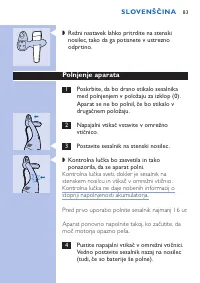
Page 83 - Polnjenje aparata; Postavite sesalnik na stenski nosilec.
C ◗ Režni nastavek lahko pritrdite na stenskinosilec, tako da ga potisnete v ustreznoodprtino. Polnjenje aparata 1 Poskrbite, da bo drsno stikalo sesalnikamed polnjenjem v položaju za izklop (0).Aparat se ne bo polnil, če bo stikalo vdrugačnem položaju. 2 Napajalni vtikač vstavite v omrežnovtičnico....
Page 84 - Odstranite filter iz prostora za prah.
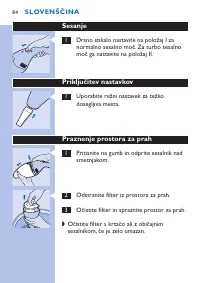
Sesanje C 1 Drsno stikalo nastavite na položaj I zanormalno sesalno moč. Za turbo sesalnomoč ga nastavite na položaj II. Priključitev nastavkov C 1 Uporabite režni nastavek za težkodosegljiva mesta. Praznenje prostora za prah C 1 Pritisnite na gumb in odprite sesalnik nadsmetnjakom. C 2 Odstranite f...
Page 85 - Zamenjava filtra; Odstranite okvir filtra iz prostora za prah.; Čiščenje aparata
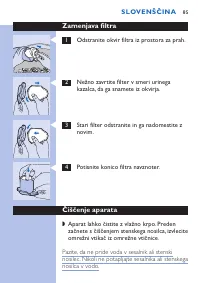
Zamenjava filtra C 1 Odstranite okvir filtra iz prostora za prah. C 2 Nežno zavrtite filter v smeri urinegakazalca, da ga snamete iz okvirja. C 3 Stari filter odstranite in ga nadomestite znovim. C 4 Potisnite konico filtra navznoter. Čiščenje aparata ◗ Aparat lahko čistite z vlažno krpo. Predenzačn...
Page 87 - Baterije odstranite le, ko so popolnoma prazne.; Informacije in servis
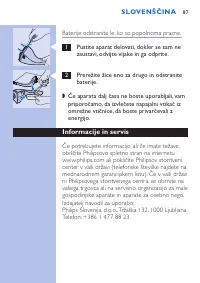
Baterije odstranite le, ko so popolnoma prazne. C 1 Pustite aparat delovati, dokler se sam nezaustavi, odvijte vijake in ga odprite. C 2 Prerežite žice eno za drugo in odstranitebaterije. ◗ Če aparata dalj časa ne boste uporabljali, vampriporočamo, da izvlečete napajalni vtikač izomrežne vtičnice, d...