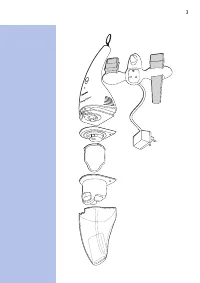
Page 6 - Important; Never suck up ashes until they are cold.; Preparing the appliance for use; Screw the wall holder to the wall.; E N G L I S H
Important ◗ Read these instructions for use carefully andlook at the illustrations before you start usingthe appliance. ◗ Always switch the vacuum cleaner off afteruse. ◗ Never suck up ashes until they are cold. ◗ Do not suck up flammable or corrosiveliquids. ◗ Do not let water enter the vacuum clea...
Page 7 - Charging the appliance
C ◗ The crevice tool and the squeegee can beattached to the wall holder by pushing theminto the appropriate fastening slots. Charging the appliance 1 Make sure that the slide switch of thevacuum cleaner is in off position (0) duringcharging. The appliance will not charge ifthe slide switch is in ano...
Page 8 - Close the vacuum cleaner again.
onto the holder (also when the built-inbatteries are fully charged). Vacuum cleaning 1 Make sure the deflector and the filter havebeen inserted into the dust compartmentbefore you start using the appliance. Deflector and filter C 1 Press the break button and open thevacuum cleaner. C 2 Insert the de...
Page 9 - Sucking up liquids
Sucking up liquids C 1 Connect the squeegee to the dustcompartment. C 2 Stop sucking up liquids when the liquidlevel inside the dust compartment hasreached the maximum indication line. C 3 When sucking up liquids, hold theappliance with the dust compartmentpointing downwards at an angle. Make sureth...
Page 10 - Connecting accessories; Do not use the crevice tool to suck up liquids.; Emptying the dust compartment
Connecting accessories C 1 Use the crevice tool to vacuum cleanhard-to-reach places. Do not use the crevice tool to suck up liquids. Emptying the dust compartment C 1 Press the break button and open thevacuum cleaner over a dustbin. C 2 Remove the filter and the deflector fromthe dust compartment. 3...
Page 15 - D E U T S C H
Wichtig ◗ Lesen Sie diese Gebrauchsanweisungsorgfältig durch, und sehen Sie sich dabei dieAbbildungen an, bevor Sie das Gerät zumersten Mal verwenden. ◗ Schalten Sie das Gerät nach jedem Gebrauchwieder aus. ◗ Saugen Sie niemals Asche auf, bevor sie völligausgekühlt ist. ◗ Saugen Sie keine brennbaren...
Page 16 - Die Akkus aufladen
C ◗ Schrauben Sie die Wandhalterung an dieWand. ◗ Sie können den Staubsauger zum Aufladen mitder Wandhalterung auch flach auf den Tischlegen. C ◗ Sie können die Fugendüse und denGummischrubber in der Wandhalterunganbringen, indem Sie diese Teile in die dafürvorgesehenen Aussparungen drücken. Die Akk...
Page 18 - Schließen Sie den Staubsauger wieder.; Flüssigkeiten aufsaugen
C 3 Drücken Sie den Staubbeutel fest in dieStaubkammer. 4 Schließen Sie den Staubsauger wieder. C 2 Stellen Sie den Ein-/Ausschalter fürnormale Saugleistung auf Position I und fürTurbo-Saugleistung auf Position II . Flüssigkeiten aufsaugen C 1 Bringen Sie den Schieber an derStaubkammer an. C 2 Unter...
Page 20 - Wechsel des Staubbeutels; Nehmen Sie den Filter vom Deflektor.
Wechsel des Staubbeutels C 1 Nehmen Sie den Deflektor und denFilterhalter aus der Staubkammer. C 2 Nehmen Sie den Filter vom Deflektor. C 3 Nehmen Sie den Filter mit einer leichtenDrehung im Uhrzeigersinn vomFilterhalter. C 4 Nehmen Sie den alten Filter heraus, undersetzen Sie ihn durch einen neuen....
Page 22 - Umweltschutz
Ersatzfilter sind unter der Type FC8036 bei IhremPhilips Händler erhältlich. Sollten passende Staubbeutel oder andereZusatzteile beim ör tlichen Handel nicht verfügbarsein, so wenden Sie sich bitte an das PhilipsSer vice Center in Ihrem Lande. Beachten Siehierzu bitte die beiliegende Garantieschrift...
Page 23 - Information und Service
◗ Wenn Sie beabsichtigen, das Gerät für einelängere Zeit nicht zu benutzen, so empfiehltes sich, das Steckernetzgerät aus derSteckdose zu ziehen. Sie sparen damit Stromund schonen die Umwelt. Information und Service Wenden Sie sich mit Ihren Fragen, Wünschen undProblemen bitte an das Philips Ser vic...
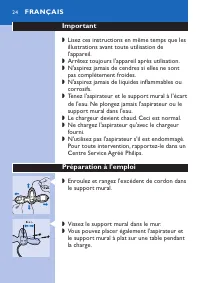
Page 24 - Arrêtez toujours l'appareil après utilisation.; Préparation à l'emploi; Vissez le support mural dans le mur.; F R A N Ç A I S
Important ◗ Lisez ces instructions en même temps que lesillustrations avant toute utilisation del'appareil. ◗ Arrêtez toujours l'appareil après utilisation. ◗ N'aspirez jamais de cendres si elles ne sontpas complètement froides. ◗ N'aspirez jamais de liquides inflammables oucorrosifs. ◗ Tenez l'aspi...
Page 25 - Branchez le chargeur dans la prise murale.
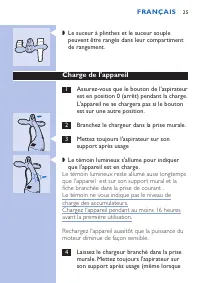
C ◗ Le suceur à plinthes et le suceur souplepeuvent être rangés dans leur compartimentde rangement. Charge de l'appareil 1 Assurez-vous que le bouton de l'aspirateurest en position 0 (arrêt) pendant la charge.L'appareil ne se chargera pas si le boutonest sur une autre position. 2 Branchez le chargeu...
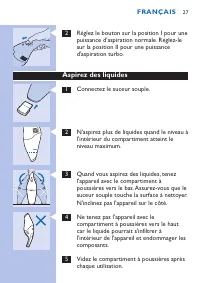
Page 27 - Aspirez des liquides; Connectez le suceur souple.
C 2 Réglez le bouton sur la position I pour unepuissance d'aspiration normale. Réglez-lesur la position II pour une puissanced'aspiration turbo. Aspirez des liquides C 1 Connectez le suceur souple. C 2 N'aspirez plus de liquides quand le niveau àl'intérieur du compartiment atteint leniveau maximum. ...
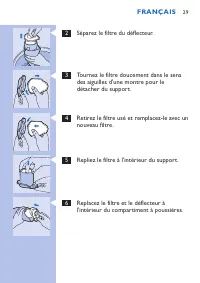
Page 28 - Accessoires; Pour vider le compartiment à poussières; Changement du filtre
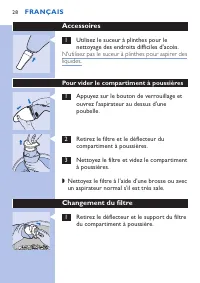
Accessoires C 1 Utilisez le suceur à plinthes pour lenettoyage des endroits difficiles d'accès. N'utilisez pas le suceur à plinthes pour aspirer desliquides. Pour vider le compartiment à poussières C 1 Appuyez sur le bouton de verrouillage etouvrez l'aspirateur au dessus d'unepoubelle. C 2 Retirez l...
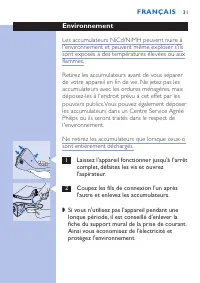
Page 31 - Environnement
Environnement Les accumulateurs NiCd/NiMH peuvent nuire àl'environnement et peuvent même exploser s'ilssont exposés à des températures élevées ou auxflammes. Retirez les accumulateurs avant de vous séparerde votre appareil en fin de vie. Ne jetez pas lesaccumulateurs avec les ordures ménagères, mais...
Page 32 - Information et service
Information et service Pour plus d'informations, visitez notre Philips Website : www.philips.com ou veuillez contacter leSer vice Consommateurs Philips de votre pays(vous trouverez le numéro de téléphone dans ledépliant sur la garantie internationale). S'il n'y aaucun Ser vice Consommateurs Philips ...
Page 33 - Belangrijk; Schakel de stofzuiger altijd na gebruik uit.; Klaarmaken voor gebruik; N E D E R L A N D S
Belangrijk ◗ Lees deze gebruiksaanwijzing aandachtig dooren bekijk de illustraties goed voordat u hetapparaat voor de eerste keer gebruikt. ◗ Schakel de stofzuiger altijd na gebruik uit. ◗ Zuig nooit as op voordat deze volledig isafgekoeld. ◗ Zuig geen brandbare of bijtende vloeistoffenop. ◗ Zorg er...
Page 34 - Schroef de wandhouder aan de wand vast.; Opladen van het apparaat; Steek de oplaadstekker in het stopcontact.
C ◗ Schroef de wandhouder aan de wand vast. ◗ U kunt de stofzuiger en de wandhouder ookplat op een tafel neerleggen tijdens hetopladen. C ◗ De spleetzuigmond en de wisser kunnen aande wandhouder worden bevestigd door ze inde daarvoor bestemde bevestigingssleuven teduwen. Opladen van het apparaat 1 Z...
Page 36 - Opzuigen van vloeistoffen
C 3 Druk het filter stevig in het stofvak. 4 Sluit de stofzuigerbehuizing weer. C 2 Zet de schuifschakelaar in stand I voornormale zuigkracht. Zet deschuifschakelaar in stand II voor turbo-zuigkracht. Opzuigen van vloeistoffen C 1 Bevestig de wisser aan de zuigmond vanhet apparaat. C 2 Stop met het ...
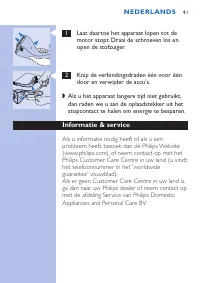
Page 38 - Filter vervangen; Scheid filter en deflector van elkaar.
◗ Als het filter erg vies is, kan het met eenborstel of een gewone stofzuiger wordenschoongemaakt. Filter vervangen C 1 Verwijder de deflector en de filterhouderuit het stofvak. C 2 Scheid filter en deflector van elkaar. C 3 Draai het filter rechtsom om het los temaken van de houder. C 4 Verwijder h...
Page 39 - Druk de punt van het filter naar binnen.; Schoonmaken van het apparaat
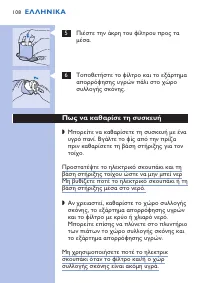
C 5 Druk de punt van het filter naar binnen. C 6 Plaats het filter en de deflector terug inhet stofvak. Schoonmaken van het apparaat ◗ U kan het apparaat met een vochtige doekschoonmaken. Neem de stekker uit hetstopcontact voordat u de wandhouderschoonmaakt. Zorg er voor dat er geen water de stofzui...
Page 42 - Importante; No aspiren líquidos inflamables o corrosivos.; Cómo preparar el aparato para el uso; Atornillen el soporte mural a la pared.; E S PA Ñ O L
Importante ◗ Antes de empezar a usar el aparato, leancuidadosamente este modo de empleo ymiren las ilustraciones. ◗ Apaguen siempre el Aspirador después deluso. ◗ No aspiren nunca cenizas hasta que esténfrías. ◗ No aspiren líquidos inflamables o corrosivos. ◗ No permitan que entre agua ni en elAspir...
Page 43 - Cómo cargar el aparato; Enchufen la clavija cargadora a la red.
C ◗ La herramienta para rendijas y la escobilla degoma pueden fijarse al soporte muralpresionándolas en las adecuadas ranuras defijación. Cómo cargar el aparato 1 Asegúrense de que el interruptordeslizante del Aspirador esté en posiciónPARO (O) durante la carga. El aparato nose cargará si el interru...
Page 44 - Vuelvan a cerrar el Aspirador.
4 Dejen la clavija del cargador en el enchufe.Vuelvan a colocar siempre el Aspirador enel soporte (Incluso cuando las bateríasincorporadas estén completamentecargadas). Cómo limpiar aspirando 1 Antes de empezar a usar el aparato,asegúrense de que el deflector y el filtrohayan sido insertados en elco...
Page 45 - Cómo aspirar líquidos
C 2 Lleven el interruptor deslizante a laposición I para una normal potencia desucción. LLeven el interruptor a la posiciónII para obtener una potencia de succión"Turbo". Cómo aspirar líquidos C 1 Conecten la escobilla de goma alcompartimento del polvo. C 2 Paren de aspirar líquidos cuando e...
Page 46 - Cómo conectar los accesorios; Cómo vaciar el compartimento del polvo
5 Vacíen el compartimento del polvo cadavez que hayan usado el aparato paraaspirar un líquido. Cómo conectar los accesorios C 1 Usen la herramienta para rendijas paraaspirar en lugares de difícil acceso. No usen la herramienta para rendijas para aspirarlíquidos. Cómo vaciar el compartimento del polv...
Page 47 - Cómo sustituir el filtro; Separen el filtro del deflector.
Cómo sustituir el filtro C 1 Quiten el deflector y el marco del filtrodel compartimento del polvo. C 2 Separen el filtro del deflector. C 3 Para sacarlo del marco, giren suavementeel filtro en sentido horario C 4 Quiten el filtro viejo y sustitúyanlo poruno nuevo. C 5 Presionen el extremo del filtro...
Page 49 - Medio Ambiente
Filtros nuevos (Para sustitución) están disponiblesbajo el número de tipo FC8036. Contacten consu distribuidor Philips. Si tienen alguna dificultad en la obtención defiltros o de cualquier otro accesorio para esteaparato, contacten con el Ser vicio Philips deAtención al Cliente de su país o consulte...
Page 50 - Información y Servicio
C 2 Corten (uno detrás de otro) los hilosconectores y quiten las baterías. ◗ Si no van a usar el aparato durante un largoperíodo de tiempo, les aconsejamosdesenchufar el soporte mural de la red. Conello se ahorra electricidad y beneficia elMedio Ambiente. Información y Servicio Si necesitan informac...
Page 51 - I TA L I A N O
Importante ◗ Prima di usare l'apparecchio, leggeteattentamente le istruzioni e osservate leillustrazioni. ◗ Spegnete sempre l'apparecchio dopo l'uso. ◗ Non aspirate la cenere se non completamentefredda. ◗ Non aspirate mai liquidi corrosivi o sostanzeinfiammabili. ◗ Fate in modo che l'acqua non entri...
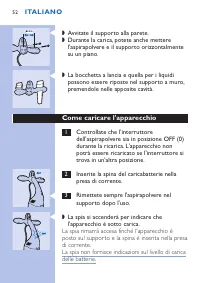
Page 52 - Avvitate il supporto alla parete.; Come caricare l'apparecchio
C ◗ Avvitate il supporto alla parete. ◗ Durante la carica, potete anche metterel'aspirapolvere e il supporto orizzontalmentesu un piano. C ◗ La bocchetta a lancia e quella per i liquidipossono essere riposte nel supporto a muro,premendole nelle apposite cavità. Come caricare l'apparecchio 1 Controll...
Page 53 - Premete il pulsante e aprite l'aspirapolvere.
Prima di usare l'aspirapolvere per la prima voltacaricatelo per almeno 16 ore. Ricaricate l'apparecchio non appena la potenzadel motore risulta ridotta. 4 Lasciate la spina del caricabatterie inseritanella presa. Rimettete semprel'aspirapolvere nel supporto (anche se lebatterie incorporate sono comp...
Page 54 - Come aspirare i liquidi
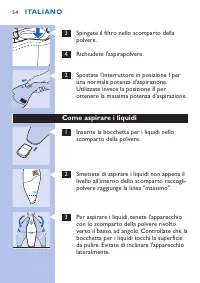
C 3 Spingete il filtro nello scomparto dellapolvere. 4 Richiudete l'aspirapolvere. C 2 Spostate l'interruttore in posizione I peruna normale potenza d'aspirazione.Utilizzate invece la posizione II perottenere la massima potenza d'aspirazione. Come aspirare i liquidi C 1 Inserite la bocchetta per i l...
Page 55 - Come inserire gli accessori; Come svuotare lo scomparto della polvere
C 4 Non tenete l'apparecchio con loscomparto della polvere rivolto versol'alto: così facendo, il liquido aspiratopotrebbe entrare nell'apparecchio,danneggiandolo. 5 Svuotate lo scomparto della polvere ognivolta che usate l'apparecchio per aspiraredei liquidi. Come inserire gli accessori C 1 Usate la...
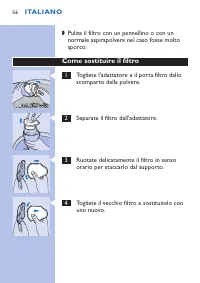
Page 56 - Come sostituire il filtro
◗ Pulite il filtro con un pennellino o con unnormale aspirapolvere nel caso fosse moltosporco. Come sostituire il filtro C 1 Togliete l'adattatore e il porta filtro dalloscomparto della polvere. C 2 Separate il filtro dall'adattatore. C 3 Ruotate delicatamente il filtro in sensoorario per staccarlo ...
Page 57 - Come pulire l'apparecchio
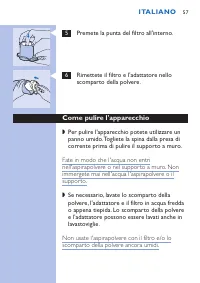
C 5 Premete la punta del filtro all'interno. C 6 Rimettete il filtro e l'adattatore nelloscomparto della polvere. Come pulire l'apparecchio ◗ Per pulire l'apparecchio potete utilizzare unpanno umido. Togliete la spina dalla presa dicorrente prima di pulire il supporto a muro. Fate in modo che l'acqu...
Page 59 - Garanzia & Assistenza
C 1 Lasciate in funzione l'apparecchio fino aquando si ferma, svitate le viti e apritel'aspirapolvere. C 2 Tagliate i fili di collegamento uno alla voltae togliete le batterie. ◗ Se prevedete di non usare l'apparecchio perun lungo periodo di tempo, vi consigliamo ditogliere la spina dal supporto a m...
Page 60 - Não aspire líquidos inflamáveis ou corrosivos.; Preparação para utilização; Aparafuse o suporte à parede.; P O RT U G U Ê S
Importante ◗ Antes de usar o aparelho, leia este modo deemprego e consulte as respectivas ilustrações. ◗ Desligue o aspirador sempre que terminar otrabalho. ◗ Nunca aspire cinzas que ainda estejamquentes. ◗ Não aspire líquidos inflamáveis ou corrosivos. ◗ Não deixe entrar água para dentro doaspirado...
Page 61 - Carga
C ◗ O bocal estreito e o rodo podem seracoplados ao suporte de parede empurrando-os para os encaixes respectivos. Carga 1 Certifique-se que o comutador doaspirador está na posição 'off' (0)(desligado) durante a carga. O aparelhonão entra em carga se o comutadorestiver na posição de ligado. 2 Introdu...
Page 62 - Prima o botão e abra o aspirador.
4 Deixe a ficha do carregador ligada àtomada. Reponha sempre o aspirador nosuporte (mesmo se as bateriasincorporadas estiverem com carga total). Aspirar 1 Antes de começar a usar o aspirador,verifique se o deflector e o filtro estãointroduzidos no compartimento para o pó. Deflector e filtro C 1 Prim...
Page 63 - Aspirar líquidos; Ligue o rodo ao compartimento para o pó.
C 2 Coloque o comutador na posição I parauma potência de aspiração normal. Parauma potência de aspiração turbo,posicione em II. Aspirar líquidos C 1 Ligue o rodo ao compartimento para o pó. C 2 Páre de aspirar líquidos quando o nível delíquido no interior do compartimento parao pó tiver atingido a i...
Page 64 - Ligação dos acessórios; Não use o bocal estreito para aspirar líquidos.; Esvaziar o compartimento para o pó
5 Esvazie o compartimento para o pósempre que tiver utilizado o aspiradorpara líquidos. Ligação dos acessórios C 1 Utilize o bocal estreito para aspirar locaisde acesso difícil. Não use o bocal estreito para aspirar líquidos. Esvaziar o compartimento para o pó C 1 Prima o botão e abra o aspirador so...
Page 65 - Substituição do filtro; Separe o filtro do deflector.
Substituição do filtro C 1 Retire o deflector e a armação do filtropara fora do compartimento do pó. C 2 Separe o filtro do deflector. C 3 Rode suavemente o filtro para a direitapara o separar da armação. C 4 Retire o filtro velho e substitua-o por umnovo. C 5 Empurre a ponta do filtro para dentro. ...
Page 67 - Meio ambiente
Os filtros novos (de substituição) encontram-se àvenda sob a ref. FC8036. Favor contactar o seuagente Philips. Se tiver dificuldades na obtenção dos filtros ou deoutros acessórios para este aspirador, por favorcontacte o Centro de Informação ao ConsumidorPhilips do seu País ou consulte o folheto dag...
Page 68 - Informações e assistência
◗ Se não se servir do aspirador durante muitotempo, deverá desligar a ficha do carregadorda tomada eléctrica para poupar energia. Informações e assistência Se necessitar de assistência ou de informações ouse tiver qualquer problema, por favor visite oendereço da Philips em www.philips.com oucontacte...
Page 69 - Viktig; Slå alltid av støvsugeren etter bruk.; Klargjøring før bruk; Skru veggholderen opp på veggen.; N O R S K
Viktig ◗ Les denne bruksanvisningen nøye og se påillustrasjonene før du begynner å brukestøvsugeren. ◗ Slå alltid av støvsugeren etter bruk. ◗ Sug aldri opp aske før den er helt avkjølt. ◗ Ikke sug opp brennbare eller etsende væsker. ◗ Ikke la det komme vann inn i støvsugereneller veggholderen. Hold...
Page 70 - Lading av støvsugeren; Sett laderstøpselet i veggkontakten.
C ◗ Radiatormunnstykket og vinduspussernalenkan kobles til veggholderen ved å trykke deminn på de tilpassede sporene. Lading av støvsugeren 1 Kontroller at støvsugerens skyvebryter erstilt på av (0) under lading. Støvsugerenlades ikke hvis skyvebryteren står på etannet nivå. 2 Sett laderstøpselet i ...
Page 71 - Trykk filteret godt inn i støvbeholderen.
(også når de innebygde, oppladbarebatteriene er fulladet). Støvsuging 1 Sørge for at væskeavlederen og filteret erblitt satt inn i støvkammeret før Debegynner å bruke apparatet. Væskeavleder og filter C 1 Trykk inn bremseknappen og åpnestøvsugeren. C 2 Sett væskeavlederen og filteret inn istøvbehold...
Page 73 - Tømming av støvkammeret; Rengjør filteret og tøm støvkammeret.; Bytting av filter; Skill filteret fra væskeavlederen.
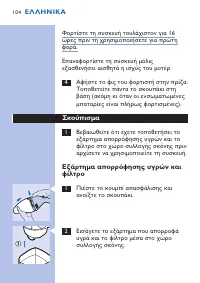
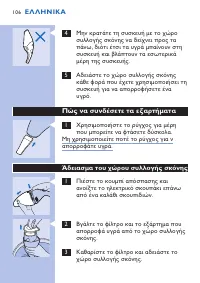
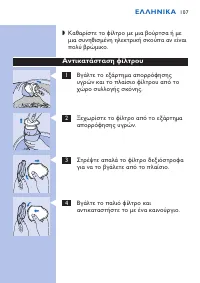
Tømming av støvkammeret C 1 Trykk på utløserknappen og åpnestøvsugeren over en søppelbøtte. C 2 Fjern filteret og væskeavlederen frastøvkammeret. 3 Rengjør filteret og tøm støvkammeret. ◗ Rengjør filteret med en børste eller eventuelten vanlig støvsuger dersom det er sværtskittent. Bytting av filter...
Page 74 - Trykk tuppen på filteret innover.; Regjøring av støvsugeren
C 3 Vri filteret forsiktig med klokken for åkoble det fra rammen. C 4 Fjerne det gamle filteret og skifte det utmed et nytt filter. C 5 Trykk tuppen på filteret innover. C 6 Sett filteret og væskeavlederen tilbake istøvkammeret. Regjøring av støvsugeren ◗ Du kan rengjøre støvsugeren ved hjelp av enf...
Page 76 - Fjern bare batteriene hvis de er helt tomme.; Informasjon & service
kundesentre, som vil kvitte seg med dem på enmiljøvennlig måte. Fjern bare batteriene hvis de er helt tomme. C 1 La støvsugeren gå til den stopper, skru løsskruene og åpne støvsugeren. C 2 Kutt de forbindende ledningstrådene énetter én og fjern batteriene. ◗ Hvis De ikke skal bruke støvsugeren på la...
Page 77 - Viktigt; Stäng alltid av dammsugaren efter användning.; Förberedelser före användning; Linda upp överflödig sladd i vägghållaren.; S V E N S K A
Viktigt ◗ Läs anvisningarna noga och titta pållustrationerna innan du använderdammsugaren. ◗ Stäng alltid av dammsugaren efter användning. ◗ Sug aldrig upp aska innan den svalnat. ◗ Sug inte upp lättantändliga eller frätandevätskor. ◗ Se till att det inte kommer in vatten idammsugaren eller vägghåll...
Page 78 - Ladda dammsugaren; Sätt in laddarens kontakt i vägguttaget.
C ◗ Fogmunstycket och gummirakan fästs påvägghållaren genom att tryckas fast i sinafästskåror. Ladda dammsugaren 1 Se till att skjutomkopplaren pådammsugaren står i läge av (0) underladdningen. Dammsugaren laddas inte omskjutomkopplaren står i något annat läge. 2 Sätt in laddarens kontakt i väggutta...
Page 79 - Skjut in filtret i dammfacket ordentligt.
dammsugaren i sin hållare (även ombatterierna är fulladdade). Dammsuga 1 Kontrollera att vattenavvisaren och filtretsitter ordentligt på plats i dammfacketinnan du använder dammsugaren. Vattenavvisare och filter C 1 Tryck på öppningsknappen och öppnadammsugaren. C 2 Sätt in vattenavvisaren och filtr...
Page 80 - Suga upp vätska; Anslut gummiskrapan till dammfacket.; Ansluta tillbehör
Suga upp vätska C 1 Anslut gummiskrapan till dammfacket. C 2 Avbryt uppsugning av vätskor närvätskenivån i dammfacket har nåttindikeringsmärket för maximum. C 3 När du suger upp vätskor ska du hålladammsugaren så att dammfacket är riktatnedåt i vinkel. Gummiskrapan ska ligga anmot den yta som rengör...
Page 81 - Tömma dammfacket; Gör ren filtret och töm dammfacket.; Byta filter; Ta loss filtret från vattenavvisaren.
Tömma dammfacket C 1 Tryck på knappen och öppnadammsugaren över en soppåse. C 2 Ta ut filtret och vattenavvisaren urdammfacket. 3 Gör ren filtret och töm dammfacket. ◗ Gör ren filtret med en borste eller en vanligdammsugare om det är mycket smutsigt. Byta filter C 1 Ta ut vattenavvisaren och filtret...
Page 82 - Göra ren dammsugaren
C 4 Byt ut det gamla filtret mot ett nytt. C 5 Tryck filtrets spets inåt. C 6 Sätt tillbaka filtret och vattenavvisaren idammfacket. Göra ren dammsugaren ◗ Gör ren dammsugaren med en fuktad trasa. Taut kontakten ur vägguttaget innan du gör renvägghållaren. Se till att det inte kommer in vatten idamm...
Page 83 - Ta bara ut batterierna när de är helt urladdade.
Använd aldrig dammsugaren när filtret och/ellervattenavvisaren inte är torr t/torra. Beställa filter Byt filter när det inte längre går att göra ren detordentligt (vanligtvis efter ca 50 rengöringar). Nya filter finns att beställa under ar tikelnummerFC8036. Kontakta din Philipsåterförsäljare. Om du...
Page 84 - Information och service
C 2 Klipp av anslutningskablarna en och en ochta sedan ut batterierna. ◗ Om du inte ska använda dammsugaren underen längre period rekommenderar vi att du tarut kontakten ur vägguttaget. Det sparar strömoch är bra för miljön. Information och service Om du behöver ser vice eller information ellerom du...
Page 85 - Tärkeää; Älä imuroi palavia tai syövyttäviä nesteitä.; Käyttöönotto; Kiinnitä seinäteline seinään.; S U O M I
Tärkeää ◗ Lue tämä käyttöohje huolellisesti ja katselekuvat, ennen kuin alat käyttää laitetta. ◗ Katkaise rikkaimurista virta aina käytönjälkeen. ◗ Imuroi tuhkat vasta kun ne ovat täysinjäähtyneet. ◗ Älä imuroi palavia tai syövyttäviä nesteitä. ◗ Rikkaimuriin tai seinätelineeseen ei saapäästää vettä...
Page 86 - Lataus
C ◗ Rakosuutin ja lasta voidaan säilyttääseinätelineessä painettuna omiin koloihinsa. Lataus 1 Varmista että rikkaimurin käynnistyskytkinon ladattaessa asennossa 0 (katkaistu).Laite ei lataudu, jos käynnistyskytkin onjossain muussa asennossa. 2 Työnnä latauslaitteen pistotulppapistorasiaan. C 3 Lait...
Page 87 - Paina irrotuspainiketta ja avaa rikkaimuri.
(myös silloin kun sisäänrakennetut akut onladattu täyteen). Imurointi 1 Varmista, että deflektori ja suodatin ovatpaikallaan pölysäiliössä, ennen kuin alatkäyttää laitetta. Deflektori ja suodatin C 1 Paina irrotuspainiketta ja avaa rikkaimuri. C 2 Aseta deflektori ja suodatin pölysäiliöön. C 3 Paina...
Page 88 - Nesteiden imurointi; Kiinnitä lasta pölysäiliöön.; Tarvikkeiden kiinnitys; Älä käytä rakosuutinta nesteiden imurointiin.
Nesteiden imurointi C 1 Kiinnitä lasta pölysäiliöön. C 2 Lopeta imurointi, kun pölysäiliössä olevannesteen pinta on noussutenimmäismerkkiviivan tasolle. C 3 Kun imuroit nestettä, pidä laitetta vinossaasennossa pölysäiliö alaspäin. Lastan tuleekoskettaa puhdistettavaa pintaa. Älä kallistalaitetta siv...
Page 89 - Pölysäiliön tyhjennys; Poista suodatin ja deflektori pölysäiliöstä.; Suodattimen vaihto; Irrota suodatin deflektorista.
Pölysäiliön tyhjennys C 1 Paina irrotuspainiketta ja avaa rikkaimurijäteastian päällä. C 2 Poista suodatin ja deflektori pölysäiliöstä. 3 Puhdista suodatin ja tyhjennä pölysäiliö. ◗ Puhdista suodatin harjalla tai tavallisellaimurilla, jos se on kovin likainen. Suodattimen vaihto C 1 Poista deflektor...
Page 90 - Paina suodattimen kärki sisään.; Laitteen puhdistus
C 4 Poista vanha suodatin ja vaihda tilalle uusisuodatin. C 5 Paina suodattimen kärki sisään. C 6 Aseta suodatin ja deflektori takaisinpölysäiliöön. Laitteen puhdistus ◗ Laite voidaan pyyhkiä puhtaaksi kosteallaliinalla. Irrota pistotulppa pistorasiasta ennenseinätelineen pyyhkimistä. Rikkaimuriin t...
Page 91 - Poista akut vasta kun ne ovat täysin tyhjät.
Älä käytä rikkaimuria, ennen kuin suodatin japölysäiliö ovat täysin kuivat. Suodattimien hankinta Vaihda suodatin, kun sitä ei enää voi puhdistaakunnolla (tavallisesti noin 50 puhdistuksenjälkeen). Uusia suodattimia (varaosa) on saatavissatuotenumerolla FC8036. Kysy Philips-myyjältä. Jos suodattimie...
Page 93 - Vigtigt; Sluk altid for støvsugeren efter brug.; Sådan gøres støvsugeren klar til brug; Skru vægholderen fast på væggen.; DA N S K
Vigtigt ◗ Læs brugsvejledningen grundigt igennem og sepå illustrationerne før apparatet tages i brugførste gang. ◗ Sluk altid for støvsugeren efter brug. ◗ Støvsug aldrig aske op før den er helt kold. ◗ Opsug ikke antændelige eller ætsende væsker. ◗ Der må ikke komme vand ind i støvsugeren(motordele...
Page 94 - Opladning
C ◗ Begge mundstykkerne kan sættes fast påvægholderen ved at trykke dem ind i derespektive slidser. Opladning 1 Sørg for, at støvsugeren er slukket underopladning (afbryderen skal stå i stilling (0).Apparatet kan ikke oplades, hvisskydekontakten står i en anden stilling. 2 Sæt opladeenheden ind i en...
Page 95 - Tryk filteret godt ind i støvkammeret.
(også selvom de indbyggede batterier erfuldt opladede). Sådan bruges støvsugeren 1 Inden apparatet tages i brug, kontrolleresdet, at væskedeflektor og filter er sat ind istøvkammeret. Væskedeflektor og filter C 1 Tryk på udløserknappen og lukstøvsugeren op. C 2 Sæt væskedeflektoren og filteret ind i...
Page 96 - Opsugning af væske
Opsugning af væske C 1 Sæt væskeopsamlings-mundstykket på. C 2 Stop væskeopsugningen, når væskeniveaueti støvkammeret er nået op til maksimum-indikeringen. C 3 Ved opsugning af væske holdes apparatetsåledes, at støvkammeret vender vinkelretnedad. Sørg for, at væskeopsamlings-mundstykket er i kontakt...
Page 97 - Rens filteret og tøm støvkammeret.; Udskiftning af filter
Tilslutning af tilbehør C 1 Brug møbelmundstykket til støvsugningvanskeligt tilgængelige steder. Brug aldrig møbelmundstykket til opsugning afvæske. Tømning af støvkammeret C 1 Tryk på udløserknappen. Hold støvsugerenover en affaldsspand og luk den op. C 2 Tag filter og væskedeflektoren ud afstøvkam...
Page 100 - Miljøhensyn
Miljøhensyn NiCd/NiMH batterier kan være skadelige formiljøet og kan eksplodere, hvis de udsættes forhøje temperaturer eller ild. Når støvsugeren til sin tid kasseres, skalbatterierne tages ud. Bor tkast ikke batteriernesammen med det normale husholdningsaffaldmen aflevér dem på et officielt sted fo...
Page 101 - Information & service
Information & service For alle yderligere oplysninger eller ved eventuelleproblemer med apparatet henvises venligst tilPhilips hjemmeside på adressen: www.philips.comeller det lokale Philips Kundecenter (telefonnumrefindes i den verdensomspændende garantifolder).Hvis der ikke findes et kundecent...
Page 111 - Önemli; Kesinlikle yanıcı sıvı maddeleri süpürmeyiniz.; Cihazın kullanıma hazırlanması; Duvar aparatını duvara vidalayınız.; T Ü R K Ç E
Önemli ◗ Cihazı kullanmadan önce kullanma kılavuzunuşekilleri inceleyerek okuyunuz. ◗ El süpürgesini her kullanımınızdan sonrakapatınız. ◗ Sigara küllerini soğuğuncaya kadartemizlemeyiniz. ◗ Kesinlikle yanıcı sıvı maddeleri süpürmeyiniz. ◗ Cihazı veya duvara monte standını asla suylatemas ettirmeyin...
Page 112 - Şarj etme; Şarj cihazının fişini prize sorunuz.
C ◗ Oluklu başlığı, lastik süpürme aparatını duvarstandı üzerinde uygun saklama yerlerindemuhafaza edebilirsiniz. Şarj etme 1 Cihazı şarj ederken, açma/kapamadüğmesinin O (kapalı) pozisyonundaolduğundan emin olunuz. Eğer düğmedoğru ayara getirilmezse cihaz şarjolmayacaktır. 2 Şarj cihazının fişini p...
Page 113 - El süpürgesini tekrar kapatınız.
duvar aparatına yerleştiriniz. (Şarj pilleridolu olsada yerleştiriniz) Süpürme 1 Cihazı çalıştırmadan önce sıvı sızdırmazparçayı ve filtreyi toz torbasınıyerleştirdiğiniz bölüme taktığınızdan eminolunuz. Sıvı sızdırmaz parça ve filtre C 1 Cihazın gövdesinde bulunan açmadüğmesine basarak cihazı açını...
Page 114 - Sıvı maddelerin temizliği
C 2 Hız ayar düğmesini, normal emiş gücü içinI'e, turbo emiş gücü için II'ye getiriniz. Sıvı maddelerin temizliği C 1 Lastik sıvı süpürme aparatını toz toplamabölümüne takınız. C 2 Toz bölümündeki sıvı göstergesimaksimuma ulaştığında daha fazla sıvıyısüpürmeyiniz. C 3 Sıvıları süpürürken, cihazı baş...
Page 118 - Çevre
Çevre Cihaz da bulunan şarj pilleri NiCd/NiMH modelpiller olduğundan çevreye zarar verebilirlerPatlama tehlikesine karşılık çok sıcak ve atebulunan mekanlardan uzak tutunuz. Cihazı çöpe atacağınız zaman pillerini çıkar tınız.Pilleri normal ev çöpü ile birlikte atmayınız. Özelyetkili toplama noktalar...