Ryobi P20016BTL - User Manual

Ryobi P20016BTL Grass Trimmer – User Manual, read for free online in PDF format. We hope this helps you resolve any issues you may have. If you have further questions, please contact us through the contact form.


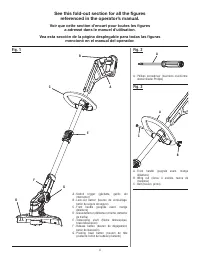


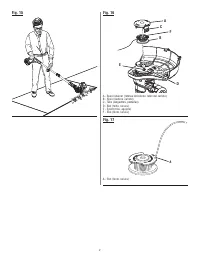


Table of Contents:
- Page 2 – Français
- Page 3 – OPERATOR’S MANUAL; 8 VOLT STRING TRIMMER/EDGER
- Page 4 – See this fold-out section for all the figures; Voir que cette section d’encart pour toutes les figures
- Page 8 – READ ALL INSTRUCTIONS; IMPORTANT SAFETY INSTRUCTIONS
- Page 10 – SYMBOLS
- Page 12 – ASSEMBLY; ATTACHING GRASS DEFLECTOR; OPERATION; INSTALLING/REMOVING BATTERY PACK
- Page 13 – CUTTING TIPS
- Page 14 – EDGING; ADVANCING THE LINE MANUALLY
- Page 15 – MAINTENANCE; GENERAL MAINTENANCE
- Page 16 – TROUBLESHOOTING; CALL US FIRST; PROBLEM; This product has a Three-year Limited Warranty for personal,
- Page 17 – NOTES
- Page 18 – LIRE TOUTES LES INSTRUCTIONS; INSTRUCTIONS IMPORTANTES CONCERNANT LA SÉCURITÉ
- Page 20 – SYMBOLES
- Page 21 – TÊTE PIVOTANTE À TROIS POSITIONS; ASSEMBLAGE
- Page 22 – FIXATION DU DÉFLECTEUR D’HERBE; INSTALLATION DE LA POIGNÉE AVANT; UTILISATION
- Page 23 – MISE EN MARCHE ET ARRÊT DU TAILLE-; CONSEILS
- Page 24 – TAILLE DES BORDURES
- Page 25 – ENTRETIEN; ENTRETIEN GÉNÉRAL
- Page 26 – DÉPANNAGE; PROBLÈME; NOUS APPELER D’ABORD; Ce produit est accompagné d’une garantie limitée de
- Page 28 – LEA TODAS LAS INSTRUCCIONES; INSTRUCCIONES DE SEGURIDAD IMPORTANTES
- Page 30 – SÍMBOLOS; SÍMBOLO
- Page 31 – CARACTERÍSTICAS; DIÁMETRO DE CORTE AJUSTABLE; ARMADO
- Page 32 – MONTAJE DEL MANGO DELANTERO; FUNCIONAMIENTO
- Page 33 – MANEJO DE LA RECORTADORA DE HILO/; RECOMENDACIONES DE CORTE
- Page 34 – RECORTE DE BORDES; AVANCE DEL HILO
- Page 35 – MANTENIMIENTO; MANTENIMIENTO GENERAL
- Page 36 – CORRECCIÓN DE PROBLEMAS; PROBLEMA; familiares o domésticos (30 días para usos trabajo; LLÁMENOS PRIMERO
- Page 37 – NOTAS
- Page 38 – MANUEL D’UTILISATION / MANUAL DEL OPERADOR
TECHTRONIC INDUSTRIES
POWER EQUIPMENT.
P.O. Box 1288, Anderson, SC 29622 • 1-800-525-2579
www.ryobitools.com
TRIMMER
MOWER DECK
CHASSIS DE TONDEUSE
ET DE TAILLE-BORDURE
PLATAFORMA DE PODADORA
PARA RECORTADORA DE HILO
ACMD01
This accessory is to be used ONLY with the P20023 RYOBI string
trimmer (sold separately).
WARNING:
To reduce the risk of injury, user must read and understand the operator’s
manual for their string trimmer before using this accessory. To reduce
the risk of injury or property damage, always hold firmly and support
the trimmer and mower deck. Never leave trimmer and mower deck
unattended in an upright position. Use only with the recommended
trimmer. Do not use if the trimmer does not securely lock into the mower
deck. Wear eye protection with side shields marked to comply with
ANSI Z87.1. Keep all people and pets clear of the mower deck while
in use. For outdoor use only – store indoors. Save these instructions.
Refer to them frequently and use them to instruct other users. If you
loan someone this tool, loan them these instructions also.
INSTALLING THE TRIMMER INTO THE MOWER DECK
See Figures 1 - 2.
Insert the front of the trimmer into the mower deck as shown.
Step down on the release lever on the back of the mower deck.
Lower the rear of the trimmer into the mower deck and press downward
to make sure the grass deflector locks into place under the locking tabs.
To remove:
Step down on the release lever on the back of the mower deck.
Raise the rear of the trimmer to release the grass deflector from the
locking tabs.
Once the grass deflector clears the locking tabs, lift the front of the
trimmer from the mower deck.
Always remove the trimmer from the mower deck for transporting or storage.
Avoid trying to raise the mower deck by the trimmer’s handle.
ADJUSTING THE CUTTING HEIGHT
See Figure 3.
When shipped, the height adjustment on the mower deck is set to a low
cutting position. Before using the mower deck for the first time, raise the
cutting position to the height best suited for your lawn.
To adjust the cutting height:
This trimmer deck’s cutting height adjusts from 1-1/2 in. to 3-1/2 in.
Remove the battery pack from the string trimmer.
To raise the cutting height, grasp the height adjustment lever, pull it out
and move it toward the back of the mower.
Release the lever to lock it into one of the preset spaces.
To lower the cutting height, grasp the height adjustment lever, pull it out
and move it toward the front of the mower.
Reinstall battery pack into the string trimmer when you are ready to mow.
Fig. 1
B
998000854
11-2-21 (REV:01)
Fig. 2
Fig. 3
A - Grass deflector (déflecteur d’herbe, deflector de pasto)
B - Locking tabs (languette de verrouillage, orejetas de fijación)
C - Release lever (levier de débrayage, palanca de liberación)
A
A
1
2
3
A - Release lever (levier de débrayage, palanca de liberación)
A - Height adjustment lever (levier de réglage de hauteur, palanca de ajuste de altura)
B - To raise (soulever, levantar)
C - To lower (abaisser, bajar)
C
B
1
3
A
2
C
"Loading the manual" means you need to wait until the file loads and becomes available for online reading. Some manuals are very large, and the time they take to appear depends on your internet speed.
Summary
Cet accessoire doit être utilisé UNIQUEMENT avec le taille-bordure de RYOBI P20023 (vendu séparément). AVERTISSEMENT : Pour réduire les risques de blessure, l’utilisateur doit lire et comprendre le manuel d’utilisation de sa taille-bordure avant de l’utiliser. Pour réduire les risques de blessures o...
OPERATOR’S MANUAL MANUEL D’UTILISATIONMANUAL DEL OPERADOR 18 VOLT STRING TRIMMER/EDGER 18 V TAILLE-BORDURE/TONDEUSE À FOUET18 V RECORTADORA DE HILO/ RECORTADORA DE BORDES P20023 WARNING: To reduce the risk of injury, the user must read and understand the operator’s manual before using this product. ...
ii See this fold-out section for all the figures referenced in the operator’s manual. Voir que cette section d’encart pour toutes les figures a adressé dans le manuel d’utilisation. Vea esta sección de la página desplegable para todas las figuras mencionó en el manual del operador. Fig. 1 Fig. 2 Fig...