Page 2 - Français
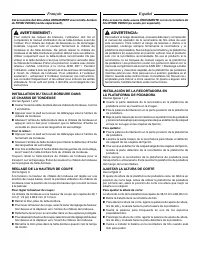
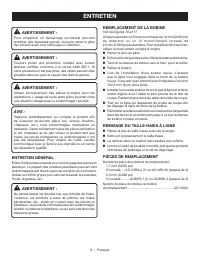
Cet accessoire doit être utilisé UNIQUEMENT avec le taille-bordure de RYOBI P20023 (vendu séparément). AVERTISSEMENT : Pour réduire les risques de blessure, l’utilisateur doit lire et comprendre le manuel d’utilisation de sa taille-bordure avant de l’utiliser. Pour réduire les risques de blessures o...
Page 3 - OPERATOR’S MANUAL; 8 VOLT STRING TRIMMER/EDGER
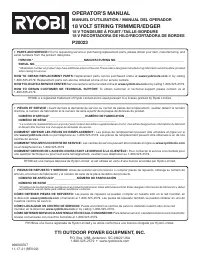
OPERATOR’S MANUAL MANUEL D’UTILISATIONMANUAL DEL OPERADOR 18 VOLT STRING TRIMMER/EDGER 18 V TAILLE-BORDURE/TONDEUSE À FOUET18 V RECORTADORA DE HILO/ RECORTADORA DE BORDES P20023 WARNING: To reduce the risk of injury, the user must read and understand the operator’s manual before using this product. ...
Page 4 - See this fold-out section for all the figures; Voir que cette section d’encart pour toutes les figures
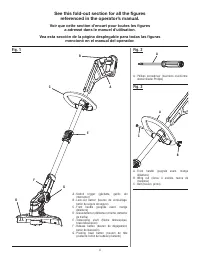
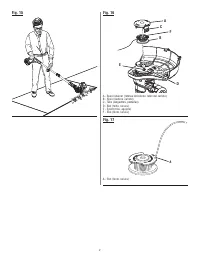
ii See this fold-out section for all the figures referenced in the operator’s manual. Voir que cette section d’encart pour toutes les figures a adressé dans le manuel d’utilisation. Vea esta sección de la página desplegable para todas las figuras mencionó en el manual del operador. Fig. 1 Fig. 2 Fig...
Page 8 - READ ALL INSTRUCTIONS; IMPORTANT SAFETY INSTRUCTIONS
2 — English WARNING: When using electric gardening appliances, basic safety precautions should always be followed to reduce the risk of fire, electric shock and personal injury. READ ALL INSTRUCTIONS For safe operation, read and understand all instructions before using this product. Follow all saf...
Page 10 - SYMBOLS
4 — English SYMBOLS The following signal words and meanings are intended to explain the levels of risk associated with this product. SYMBOL SIGNAL MEANING DANGER: Indicates a hazardous situation, which, if not avoided, will result in death or serious injury. WARNING: Indicates a hazardous situation,...
Page 12 - ASSEMBLY; ATTACHING GRASS DEFLECTOR; OPERATION; INSTALLING/REMOVING BATTERY PACK
6 — English ASSEMBLY ATTACHING GRASS DEFLECTOR See Figure 4. WARNING: The line cut-off blade on the grass deflector is sharp. Avoid contact with the blade. Failure to avoid contact can result in serious personal injury. Remove the battery pack. Fit the slot on the grass deflector onto the tab on...
Page 13 - CUTTING TIPS
7 — English For complete charging instructions, refer to the Operator’s Manuals for your battery pack and charger. WARNING: To avoid serious personal injury, always remove the bat-tery pack and keep hands clear of the lock-out button when carrying or transporting the tool. TELESCOPING SHAFT See Figu...
Page 14 - EDGING; ADVANCING THE LINE MANUALLY
8 — English OPERATION EDGING See Figures 14 - 15. Remove the battery pack. Slide the release button located near the head of the string trimmer. Rotate the trimmer head counterclockwise to the edging position. Make sure the button snaps into place and the trimmer head is secured before begin...
Page 15 - MAINTENANCE; GENERAL MAINTENANCE
9 — English MAINTENANCE WARNING: To avoid serious personal injury, always remove the bat-tery pack from the tool when cleaning or performing any maintenance. WARNING: Always wear eye protection with side shields marked to comply with ANSI Z87.1. Failure to do so could result in objects being thrown ...
Page 16 - TROUBLESHOOTING; CALL US FIRST; PROBLEM; This product has a Three-year Limited Warranty for personal,
10 — English 1-800-525-2579 TROUBLESHOOTING CALL US FIRST For any questions about operating or maintaining your product, call the Ryobi Help Line! Your product has been fully tested prior to shipment to ensure your complete satisfaction. PROBLEM POSSIBLE CAUSE SOLUTION Line will not advance when usi...
Page 17 - NOTES
Page 18 - LIRE TOUTES LES INSTRUCTIONS; INSTRUCTIONS IMPORTANTES CONCERNANT LA SÉCURITÉ
2 — Français AVERTISSEMENT : Lors de l’utilisation d’outils de jardinage, toujours suivre les consignes de sécurité de base pour éviter les risques d’incendie, d’électrocution et de blessures. LIRE TOUTES LES INSTRUCTIONS Pour travailler en toute sécurité, lire et veiller à bien comprendre toutes ...
Page 20 - SYMBOLES
4 — Français SYMBOLES Certains des symboles ci-dessous peuvent être utilisés sur produit. Veiller à les étudier et à apprendre leur signification. Une interprétation correcte de ces symboles permettra d’utiliser produit plus efficacement et de réduire les risques. SYMBOLE NOM DÉSIGNATION / EXPLICATI...
Page 21 - TÊTE PIVOTANTE À TROIS POSITIONS; ASSEMBLAGE
5 — Français VEILLER À BIEN CONNAÎTRE LA TAILLE-BORDURE/TONDEUSE À FOUET Voir la figure 1. L’utilisation sûre de ce produit exige une compréhension des renseignements figurant sur l’produit et contenus dans le manuel d’utilisation, ainsi qu’une bonne connaissance du projet entrepris. Avant d’utilise...
Page 22 - FIXATION DU DÉFLECTEUR D’HERBE; INSTALLATION DE LA POIGNÉE AVANT; UTILISATION
6 — Français ASSEMBLAGE Installer la poignée sur l’arbre de la poignée arrière dans l’espace indiqué sur la figure. Ajuster la poignée vers le haut ou vers le bas, si nécessaire, à la position d’opération désirée. Réinstaller le boulon et le écrou à oreilles. Serrer l’écrou à oreilles de ...
Page 23 - MISE EN MARCHE ET ARRÊT DU TAILLE-; CONSEILS
7 — Français RETRAIT/INSTALLATION DU BLOC-PILES Voir la figure 5. AVERTISSEMENT : Toujours retirer la pile de l’outil au moment d’assembler des pièces, d’effectuer des réglages et de procéder au nettoyage, ou lorsque l’outil n’est pas utilisé. Le fait de retirer la pile permet d’empêcher un démarrag...
Page 24 - TAILLE DES BORDURES
8 — Français UTILISATION Retirer le bloc de piles. Desserrer la tornillo de la hojatourne alors la lame 180°. Serrer la tornillo de la hoja. AVERTISSEMENT : La lame coupe ligne du déflecteur est tranchante. Porter des gants pour travailler avec la lame. Un contact direct avec la lame peut caus...
Page 25 - ENTRETIEN; ENTRETIEN GÉNÉRAL
9 — Français ENTRETIEN AVERTISSEMENT : Pour empêcher un démarrage accidentel pouvant entraîner des blessures graves, toujours retirer le piles de l’produit avant tout nettoyage ou entretien. AVERTISSEMENT : Toujours porter une protection oculaire avec écrans latéraux certifiée conforme à la norme AN...
Page 26 - DÉPANNAGE; PROBLÈME; NOUS APPELER D’ABORD; Ce produit est accompagné d’une garantie limitée de
10 — Français DÉPANNAGE PROBLÈME CAUSE POSSIBLE SOLUTION Le ligne n’avancera pas si une tête à avance automatique est utilisée Ligne soudée sur elle-même. Pas assez de ligne sur la bobine. Ligne trop courte. Ligne emmêlée sur la bobine. Lubrifier avec un produit au silicone. Rrmplacer la bobine. Voi...
Page 28 - LEA TODAS LAS INSTRUCCIONES; INSTRUCCIONES DE SEGURIDAD IMPORTANTES
2 — Español ¡ADVERTENCIA! Al utilizar herramientas eléctricas para el cuidado del jardín, con el fin de reducir el riesgo de incendio, descargas eléctricas y lesiones corporales, siempre deben seguirse ciertas medidas básicas de precaución. LEA TODAS LAS INSTRUCCIONES Para la operación segura, lea...
Page 30 - SÍMBOLOS; SÍMBOLO
4 — Español SÍMBOLOS Es posible que se empleen en este producto algunos de los siguientes símbolos. Le suplicamos estudiarlos y aprender su significado. Una correcta interpretación de estos símbolos le permitirá utilizar mejor y de manera más segura el producto. SÍMBOLO NOMBRE DENOMINACIÓN/EXPLICACI...
Page 31 - CARACTERÍSTICAS; DIÁMETRO DE CORTE AJUSTABLE; ARMADO
5 — Español CARACTERÍSTICAS ESPECIFICACIONES Motor ..................................................................... 18 V c.c.Ancho de corte .................254 mm/304,8 mm (10 po/12 po) FAMILIARÍCESE CON SU RECORTADORA DE HILO/RECORTADORA DE BORDES Vea la figura 1. El uso seguro que este produ...
Page 32 - MONTAJE DEL MANGO DELANTERO; FUNCIONAMIENTO
6 — Español ARMADO MONTAJE DEL MANGO DELANTERO Vea la figura 3. Afloje la tuerca de mariposa y retire el perno del mango. Instale el mango en el alojamiento del eje de impulsión, en el lugar que indica la etiqueta en el eje. Si es necesario, suba o baje el mango para ajustarlo a la posic...
Page 33 - MANEJO DE LA RECORTADORA DE HILO/; RECOMENDACIONES DE CORTE
7 — Español PARA DESMONTAR Y MONTAR EL PAQUETE DE BATERÍAS Vea la figura 5. ADVERTENCIA: Retire siempre el paquete de baterías de la herramienta antes de instalar las piezas, realizar ajustes. limpiarla o cuando no la utilice. Retirar el paquete de baterías evitará que la unidad se accione accidenta...
Page 34 - RECORTE DE BORDES; AVANCE DEL HILO
8 — Español FUNCIONAMIENTO en el recorte, avance el hilo hasta que la cuchilla lo corte a la longitud apropiada. Avance el hilo siempre que escuche que el motor está funcionando más rápido de lo normal, o cuando disminuya la eficiencia del recorte. Esto mantendrá un desempeño óptimo y mantendrá el h...
Page 35 - MANTENIMIENTO; MANTENIMIENTO GENERAL
9 — Español MANTENIMIENTO ADVERTENCIA: Para evitar lesiones serias, siempre retire el paquete de baterías de la herramienta cuando la limpie o durante cualquier mantenimiento. ADVERTENCIA: Siempre póngase protección ocular con protección lateral con la marca de cumplimiento de la norma ANSI Z87.1. L...
Page 36 - CORRECCIÓN DE PROBLEMAS; PROBLEMA; familiares o domésticos (30 días para usos trabajo; LLÁMENOS PRIMERO
10 — Español CORRECCIÓN DE PROBLEMAS PROBLEMA CAUSA POSIBLE SOLUCIÓN El hilo no avanza cuando se usa el cabezal con alimentación automática El hilo se pegó a sí mismo. No hay suficiente hilo en el carrete El hilo se desgastó hasta quedar muy corto. El hilo está enredado en el carrete. Lubrique con r...
Page 37 - NOTAS
Page 38 - MANUEL D’UTILISATION / MANUAL DEL OPERADOR
99800070711-17-21 (REV:02) TTI OUTDOOR POWER EQUIPMENT, INC. P.O. Box 1288, Anderson, SC 29622 USA 1-800-525-2579 • www.ryobitools.com OPERATOR’S MANUAL MANUEL D’UTILISATION / MANUAL DEL OPERADOR 18 VOLT STRING TRIMMER/EDGER 18 V TONDEUSE À FOUET / TAILLE-BORDURE18 V RECORTADORA DE HILO/RECORTADORA ...