Gorenje IS777USC - User Manual
Gorenje IS777USC Hob – User Manual, read for free online in PDF format. We hope this helps you resolve any issues you may have. If you have further questions, please contact us through the contact form.


Table of Contents:
- Page 2 – CONTENTS
- Page 3 – Introduction; YOUR INDUCTION HOB
- Page 4 – Control panel SIVK6GTS; button
- Page 5 – Control panel SIVK6ETS
- Page 6 – Description; SIVK6GTS; panel; SIVK6ETS
- Page 7 – What you should pay attention to; • Induction cooking is extremely safe. Various safety devices have; Connection and repair; Do not keep anything combustible in the drawer under the hob.; SAFETY INSTRUCTIONS
- Page 9 – Temperature safety
- Page 10 – USE; Using the touch controls; Induction cooking is fast; • Grains of sand may cause scratches which cannot be removed.
- Page 11 – How does induction work; A magnetic field is generated in the appliance. By placing a; Pans; Induction cooking requires a particular quality of pan.
- Page 13 – Switching on the hob and setting the power; • Put a pan on a cooking zone (In model SIVK6ETS, always place the; Switching off the hob; Switching off one cooking zone; • Touch and slide your finger (to the left) over the multi slider of the; Switching off all of the cooking zones at the same time; Several cooking zones are active.; OPERATION
- Page 14 – Boost function is not available in bridge mode!; The hob is switched on and a pan is on a cooking zone.; Switching off the boost function; Automatic heat-up function
- Page 15 – Switching on the automatic heat-up function; Switching off the automatic heat-up function; Two cooking zones behind each other
- Page 16 – boost will automatically be switched to a lower setting.; Bridge mode; Activating the bridge mode; • Put a pan (or two/three pans) on the cooking zones that you want; Deactivating the bridge mode; • Press the bridge button on the left (or on the right only for
- Page 17 – Keeping food warm; Switching on the function to keep food warm; The hob is switched on and a pan is on the cooking zone.; Switching off the keeping food warm function; The function to keep food warm is switched on. The display shows ‘u.’.; Child lock; Switching on the child lock; The lock mode can be activated in all modes.; Tip
- Page 18 – Cooking timer/Egg timer; Switching on the egg timer; The egg timer is now switched off.
- Page 19 – Assigning and switching on the cooking timer; • Press the timer button again to confirm the setting.; Attention; • Touch and hold the - button until ‘01.’ appears in the display.; Switching off the cooking timer/egg timer alarm
- Page 20 – Healthy cooking; Burning point of different types of oil; Cooking settings; Use setting ‘boost’ and setting 9 to:; COOKING
- Page 21 – Use setting 6 and 5 to:
- Page 22 – Cleaning; Set the child lock before you start cleaning the hob.; Daily cleaning; Best for daily cleaning is a damp cloth with a mild cleaning agent.; Stubborn stains; Never use anything sharp such as steel wool or scourers.; MAINTENANCE
- Page 23 – FAULTS
- Page 25 – What you need to consider; Safety instructions for the installation; • If the connecting cable is damaged, it may only be replaced by the; Clearance; INSTALLATION
- Page 26 – The dimensions and recesses are shown in the illustrations below.
- Page 27 – Ventilation; • An opening at least 140 mm high must be provided on the back wall
- Page 28 – Lower kitchen cabinet with an oven; • Installing the oven under an induction hob is possible with oven
- Page 29 – Electrical connection; The voltage between the phases and the neutral is 230 V~.
- Page 30 – Fix the cable with a pull relief and close the cover.
- Page 31 – Building in; Lay the hob upside down on the worktop.
- Page 32 – Technical details; Hob type
- Page 33 – ENVIRONMENTAL ASPECTS; Disposal of packaging and appliance; film
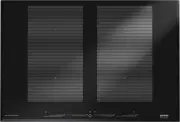
Your induction hob
MT
IE
GB
Instructions for use, installation,
and connection
"Loading the manual" means you need to wait until the file loads and becomes available for online reading. Some manuals are very large, and the time they take to appear depends on your internet speed.
Was this manual helpful?
About this manual
- Brand
- Gorenje
- Model
- IS777USC
- Document type
- User Manual
- Category
- Hob
- Language(s)
- English
- Pages
- 36
- File size
- 1.7 MB
- Format
Summary
GB 2 CONTENTS Your induction hob Introduction 3Control panel SIVK6GTS 4 Control panel SIVK6ETS 5 Description 6 Safety instructions What you should pay attention to 7 Connection and repair 7 During use 7 Temperature safety 9 Cooking-time limiter 9 Use Using the touch controls 10 Induction cooking 10 ...
GB 3 Introduction This hob has been designed for the real lover of cooking. Cooking with an induction hob has a number of advantages. It is easy, because the hob reacts quickly and can also be set to a very low power level. Because, moreover, it can also be set to a high power level, it can bring di...
GB 4 YOUR INDUCTION HOB Control panel SIVK6GTS 1. Bridge button for cooking zones left2. Multi slider cooking zone front left3. Multi slider cooking zone rear left4. On/Off button with lock mode indicator5. Timer button 6. Multi slider cooking zone rear right7. Multi slider cooking zone front right8...
Ask a question
Related manuals
More Gorenje Hobs models
Other Gorenje appliances
 Gorenje 2000 SP User Manual
 Gorenje 3500 DP User Manual
 Gorenje ATCM730T User Manual
 Gorenje B800ORAB User Manual
 Gorenje B800RL User Manual
 Gorenje B800RLBK User Manual
 Gorenje BCS798S24BG User Manual
 Gorenje BHI611ES User Manual
 Gorenje BHI681EB User Manual
 Gorenje BHI681ES User Manual
 Gorenje BHP62CLB User Manual
 Gorenje BHP62CLI User Manual
 Gorenje BHP623E8X User Manual
 Gorenje BHP623E10X User Manual
 Gorenje BHP623E11B User Manual
 Gorenje BHP623E11W User Manual
 Gorenje BHP623E12X User Manual
 Gorenje BHP 643 User Manual