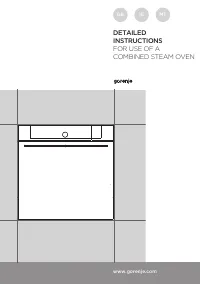
Page 2 - We thank you for your
We thank you for your trust in purchasing our appliance. This detailed instruction manual is supplied to allow you to learn about your new appliance as quickly as possible. Make sure you have received an undamaged appliance.Should you notice any transport damage, please notify your dealer or regiona...
Page 3 - CONTENTS
3 CONTENTS 697753 WARNINGS INITIAL PREPARATION OF THE APPLIANCE SETTINGS AND BAKING CLEANING AND MAINTENANCE PROBLEM SOLVING 4 IMPORTANT SAFETY INSTRUCTIONS 6 Before connecting the appliance 7 COMBINED STEAM OVEN 11 Information on the appliance - data plate (depending on the model) 12 Control unit 1...
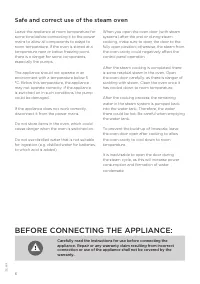
Page 6 - Safe and correct use of the steam oven; BEFORE CONNECTING THE APPLIANCE:
6 Safe and correct use of the steam oven Leave the appliance at room temperature for some time before connecting it to the power mains to allow all components to adapt to room temperature. If the oven is stored at a temperature near or below freezing point, there is a danger for some components, esp...
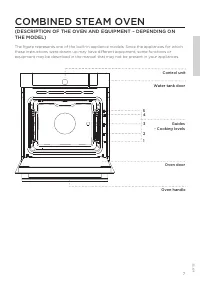
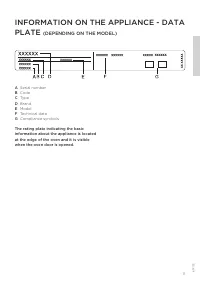
Page 7 - COMBINED STEAM OVEN
7 COMBINED STEAM OVEN (DESCRIPTION OF THE OVEN AND EQUIPMENT – DEPENDING ON THE MODEL) Guides - Cooking levels 4 3 2 1 5 Water tank door 697753 The figure represents one of the built-in appliance models. Since the appliances for which these instructions were drawn up may have different equipment, so...
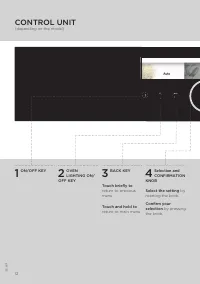
Page 12 - CONTROL UNIT
12 CONTROL UNIT (depending on the model) 1 ON/OFF KEY 2 OVEN LIGHTING ON/ OFF KEY 3 BACK KEY Touch briefly to return to previous menu. Touch and hold to return to main menu. 4 Selection and CONFIRMATION KNOB Select the setting by rotating the knob. Confirm your selection by pressing the knob. 697753
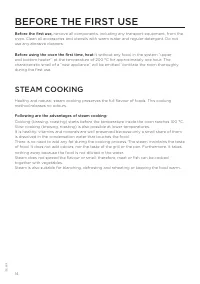
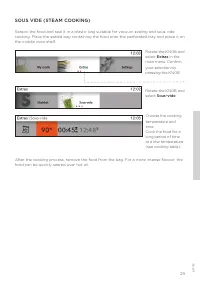
Page 14 - BEFORE THE FIRST USE; STEAM COOKING
14 697753 BEFORE THE FIRST USE Before the first use, remove all components, including any transport equipment, from the oven. Clean all accessories and utensils with warm water and regular detergent. Do not use any abrasive cleaners. Before using the oven the first time, heat it without any food, in...
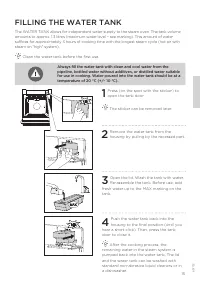
Page 15 - FILLING THE WATER TANK
15 697753 FILLING THE WATER TANK The WATER TANK allows for independent water supply to the steam oven. The tank volume amounts to approx. 1.3 litres (maximum water level – see marking). This amount of water suffices for approximately 3 hours of cooking time with the longest steam cycle (hot air with...
Page 16 - FIRST USE; LANGUAGE SELECTION; SETTING THE DATE
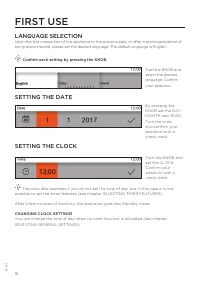
16 697753 FIRST USE LANGUAGE SELECTION Upon the first connection of the appliance to the power supply or after a prolonged period of being disconnected, please set the desired language. The default language is English. Confirm each setting by pressing the KNOB. By pressing the KNOB set the DAY, MONT...
Page 17 - TESTING WATER HARDNESS
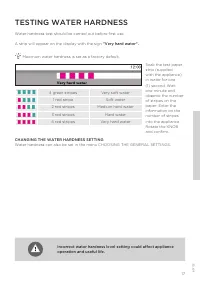
17 697753 Incorrect water hardness level setting could affect appliance operation and useful life. TESTING WATER HARDNESS Water hardness test should be carried out before first use. A strip will appear on the display with the sign "Very hard water". Maximum water hardness is set as a factory...
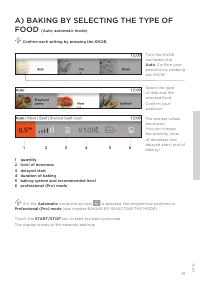
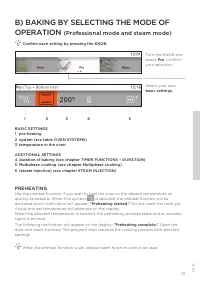
Page 21 - B) BAKING BY SELECTING THE MODE OF
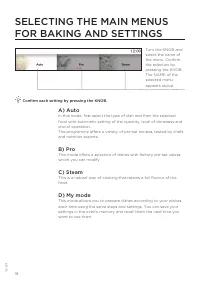
21 697753 BASIC SETTINGS 1 pre-heating 2 system (see table OVEN SYSTEMS) 3 temperature in the oven ADDITIONAL SETTINGS 4 duration of baking (see chapter TIMER FUNCTIONS – DURATION) 5 Multiphase cooking (see chapter Multiphase cooking) 6 (steam injection) (see chapter STEAM INJECTION) PREHEATING Use ...
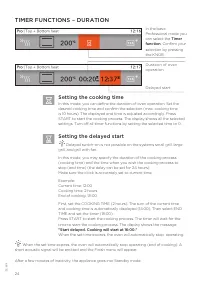
Page 24 - TIMER FUNCTIONS – DURATION; Setting the cooking time
24 697753 TIMER FUNCTIONS – DURATION Duration of oven operation Delayed start Setting the cooking time In this mode, you can define the duration of oven operation. Set the desired cooking time and confirm the selection (max. cooking time is 10 hours). The displayed end time is adjusted accordingly. ...
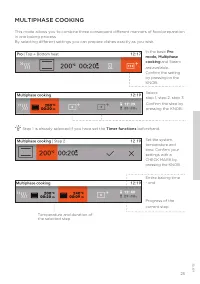
Page 25 - MULTIPHASE COOKING
25 697753 MULTIPHASE COOKING This mode allows you to combine three consequent different manners of food preparation in one baking process. By selecting different settings you can prepare dishes exactly as you wish. In the basic Pro mode, Multiphase cooking and Steam are available. Confirm the settin...
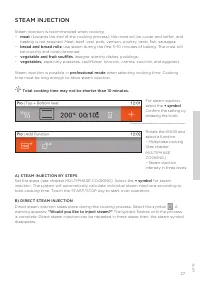
Page 27 - STEAM INJECTION
27 697753 STEAM INJECTION Steam injection is recommended when cooking: − meat (towards the end of the cooking process): the meat will be juicier and softer, and basting is not required. Meat: beef, veal, pork, venison, poultry, lamb, fish, sausages; − bread and bread rolls: use steam during the firs...
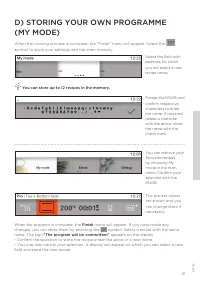
Page 31 - D) STORING YOUR OWN PROGRAMME
31 697753 D) STORING YOUR OWN PROGRAMME (MY MODE) Select the field with asterisks for which you will select a new recipe name. The pre-set values are shown and you can change them if necessary. When the program is complete, the Finish menu will appear. If you have made any changes, you can store the...
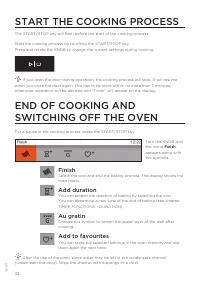
Page 32 - START THE COOKING PROCESS
32 697753 START THE COOKING PROCESS The START/STOP key will flash before the start of the cooking process. Start the cooking process by touching the START/STOP key. Press and rotate the KNOB to change the current settings during cooking. If you open the door during operation, the cooking process wil...
Page 35 - SELECTING GENERAL SETTINGS; General
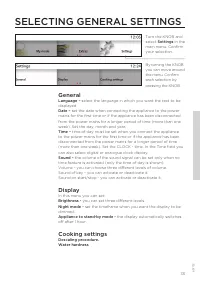
35 697753 SELECTING GENERAL SETTINGS Turn the KNOB and select Settings in the main menu. Confirm your selection. By turning the KNOB you can move around the menu. Confirm each selection by pressing the KNOB. General Language – select the language in which you want the text to be displayed. Date – se...
Page 36 - System; CHILD LOCK
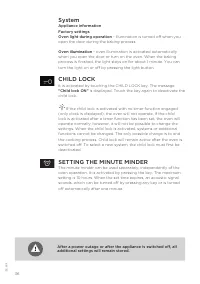
36 697753 System Appliance information Factory settings Oven light during operation - illumination is turned off when you open the door during the baking process. Oven illumination - oven illumination is activated automatically when you open the door or turn on the oven. When the baking process is f...
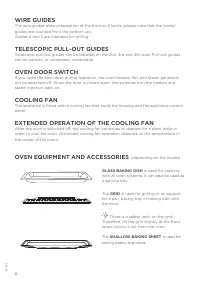
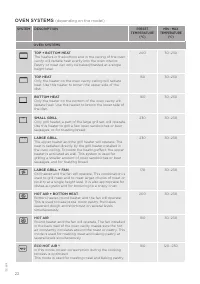
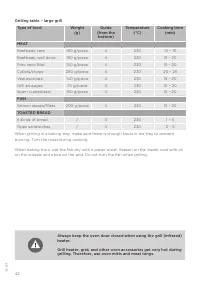
Page 41 - LARGE GRILL, SMALL GRILL
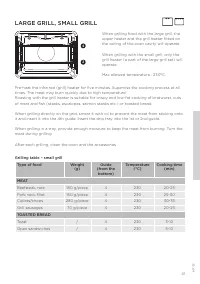
41 697753 Pre-heat the infra red (grill) heater for five minutes. Supervise the cooking process at all times. The meat may burn quickly due to high temperature! Roasting with the grill heater is suitable for crispy and low-fat cooking of bratwurst, cuts of meat and fish (steaks, escalopes, salmon st...
Page 44 - HOT AIR + BOTTOM HEAT
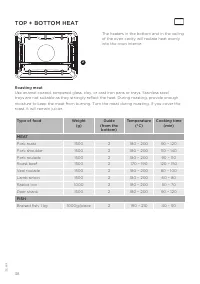
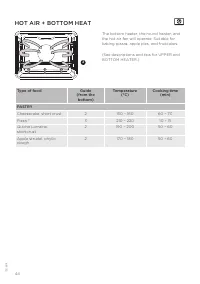
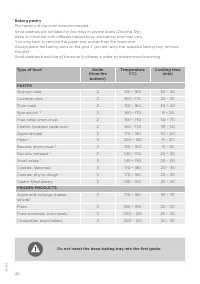
44 697753 Type of food Guide (from the bottom) Temperature (°C) Cooking time (min) PASTRY Cheesecake, short crust 2 150 – 160 60 – 70 Pizza * 3 210 – 220 10 – 15 Quiche Lorraine, shortcrust 2 190 – 200 50 – 60 Apple strudel, phyllo dough 2 170 – 180 50 – 60 HOT AIR + BOTTOM HEAT The bottom heater, t...
Page 45 - HOT AIR
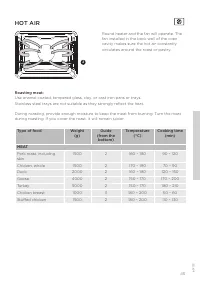
45 697753 Roasting meat: Use enamel coated, tempered glass, clay, or cast iron pans or trays. Stainless steel trays are not suitable as they strongly reflect the heat. During roasting, provide enough moisture to keep the meat from burning. Turn the meat during roasting. If you cover the roast, it wi...
Page 47 - ECO HOT AIR
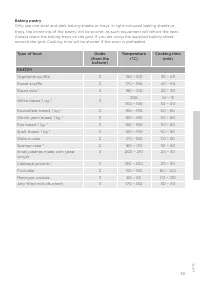
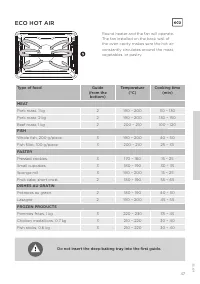
47 697753 Type of food Guide (from the bottom) Temperature (°C) Cooking time (min) MEAT Pork roast, 1 kg 2 190 – 200 110 – 130 Pork roast, 2 kg 2 190 – 200 130 – 150 Beef roast, 1 kg 2 200 – 210 100 – 120 FISH Whole fish, 200 g/piece 3 190 – 200 40 – 50 Fish fillet, 100 g/piece 3 200 – 210 25 – 35 P...
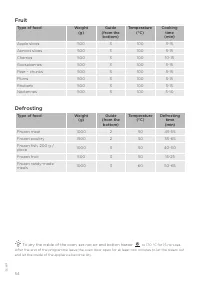
Page 48 - PRESERVATION
48 697753 PRESERVATION Prepare the food to be preserved and jars as usual. Use jars with a rubber sealing ring and a glass cover. Do not use jars with threaded or metal caps or metal tins. Make sure the jars are of equal size, filled with the same contents, and tightly sealed. Pour 1 litre of hot wa...
Page 49 - ROASTING
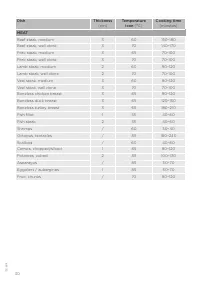
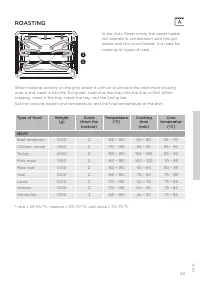
49 697753 Type of food Weight (g) Guide (from the bottom) Temperature (°C) Cooking time (min) Core temperatur (°C) MEAT Beef tenderloin 1000 2 160 – 180 60 – 80 55 – 75* Chicken, whole 1500 2 170 – 190 65 – 85 85 – 90 Turkey 4000 2 160 – 180 150 – 180 85 – 90 Pork roast 1500 2 160 – 180 100 – 120 70...
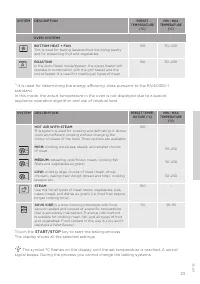
Page 50 - HOT AIR WITH STEAM
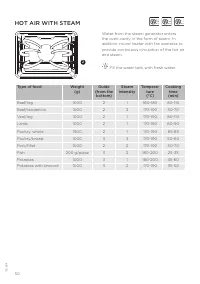
50 697753 HOT AIR WITH STEAM Type of food Weight (g) Guide (from the bottom) Steam intensity Tempera- ture (°C) Cooking time (min) Beef/leg 1000 2 1 160-180 80-110 Beef/tenderloin 1000 2 2 170-190 50-70 Veal/leg 1000 2 1 170-190 80-110 Lamb 1000 2 1 170-190 60-90 Poultry, whole 1500 2 1 170-190 65-8...
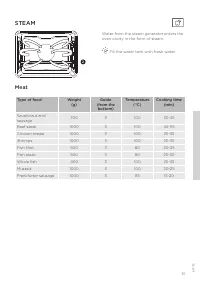
Page 51 - Meat; STEAM
51 697753 Meat Type of food Weight (g) Guide (from the bottom) Temperature (°C) Cooking time (min) Sauerkraut and sausage 700 3 100 35-45 Beef steak 1000 3 100 45-55 Chicken breast 1000 3 100 25-35 Shrimps 1000 3 100 25-35 Fish fillet 500 3 80 20-25 Fish steak 500 3 80 25-30 Whole fish 400 3 100 25-...
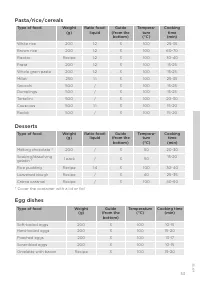
Page 52 - Vegetable
52 697753 Vegetable Type of food Weight (g) Ratio food: liquid Guide (from the bottom) Tempera- ture (°C) Cooking time (min) String beans 500 / 3 100 50-60 Beans – seeds 500 1:2 3 100 80-90 Peas 500 / 3 100 20-25 Caulifl ower – whole 500 / 3 100 20-30 Caulifl ower – chopped 500 / 3 100 15-20 Broccol...
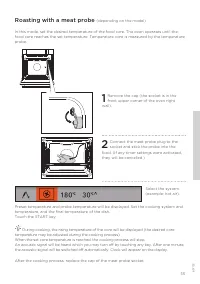
Page 55 - Roasting with a meat probe
55 697753 Roasting with a meat probe (depending on the model) In this mode, set the desired temperature of the food core. The oven operates until the food core reaches the set temperature. Temperature core is measured by the temperature probe. 1 Remove the cap (the socket is in the front upper corne...
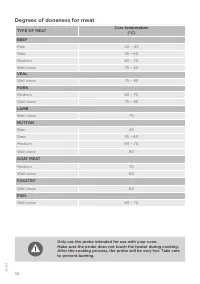
Page 56 - Degrees of doneness for meat
56 697753 Only use the probe intended for use with your oven.Make sure the probe does not touch the heater during cooking.After the cooking process, the probe will be very hot. Take care to prevent burning. Degrees of doneness for meat TYPE OF MEAT Core temperature (°C) BEEF Raw 40 – 45 Rare 55 – 60...
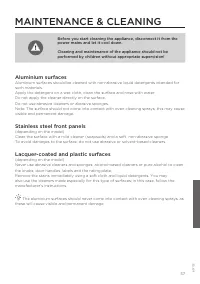
Page 57 - MAINTENANCE & CLEANING; Aluminium surfaces; Stainless steel front panels
57 MAINTENANCE & CLEANING 697753 Before you start cleaning the appliance, disconnect it from the power mains and let it cool down. Cleaning and maintenance of the appliance should not be performed by children without appropriate supervision! Aluminium surfaces Aluminium surfaces should be cleane...
Page 58 - CONVENTIONAL OVEN CLEANING
58 697753 CONVENTIONAL OVEN CLEANING You may use the standard cleaning procedure to clean stubborn dirt in the oven (using cleaners or an oven spray). After such cleaning, rinse the cleaner residues thoroughly. Clean the oven and the accessories after each use to prevent the dirt from burning into t...
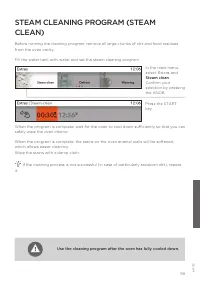
Page 59 - STEAM CLEANING PROGRAM (STEAM
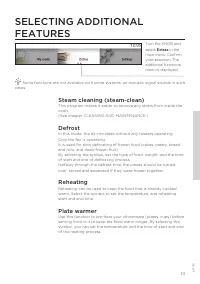
59 697753 In the main menu, select Extras and Steam clean . Confirm your selection by pressing the KNOB. When the program is complete, wait for the oven to cool down sufficiently so that you can safely wipe the oven interior. When the program is complete, the stains on the oven enamel walls will be ...
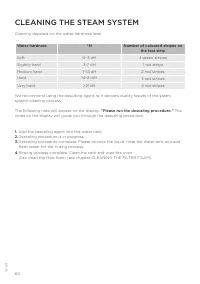
Page 60 - CLEANING THE STEAM SYSTEM
60 697753 CLEANING THE STEAM SYSTEM Cleaning depends on the water hardness level. Water hardness °N Number of coloured stripes on the test strip Soft 0–3 dH 4 green stripes Slightly hard 3-7 dH 1 red stripe Medium hard 7-14 dH 2 red stripes Hard 14-21 dH 3 red stripes Very hard >21 dH 4 red strip...
Page 61 - CLEANING THE FILTER FOAM
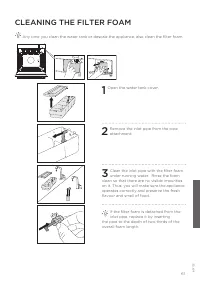
61 697753 CLEANING THE FILTER FOAM Any time you clean the water tank or descale the appliance, also clean the filter foam. 1 Open the water tank cover. 2 Remove the inlet pipe from the pipe attachment. 3 Clean the inlet pipe with the filter foam under running water. Rinse the foam clean so that ther...
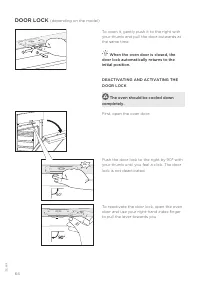
Page 64 - DOOR LOCK
64 697753 To open it, gently push it to the right with your thumb and pull the door outwards at the same time. When the oven door is closed, the door lock automatically returns to the initial position. DEACTIVATING AND ACTIVATING THE DOOR LOCK The oven should be cooled down completely. First, open t...
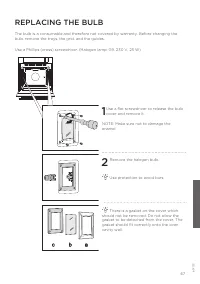
Page 67 - REPLACING THE BULB
67 697753 REPLACING THE BULB The bulb is a consumable and therefore not covered by warranty. Before changing the bulb, remove the trays, the grid, and the guides. Use a Phillips (cross) screwdriver. (Halogen lamp: G9, 230 V, 25 W) 1 Use a flat screwdriver to release the bulb cover and remove it. NOT...
Page 68 - TROUBLESHOOTING TABLE
68 TROUBLESHOOTING TABLE If the problems persist despite observing the advice above, call an authorized service technician. Repair or any warranty claim resulting from incorrect connection or use of the appliance shall not be covered by the warranty. In this case, the user will cover the cost of rep...
Page 69 - DISPOSAL
69 DISPOSAL 697753 We reserve the right to any changes and errors in the instructions for use. Packaging is made of environmentally friendly materials that can be recycled, disposed of, or destroyed without any hazard to the environment. To this end, packaging materials are labelled appropriately. T...


 Gorenje 2000 SP User Manual
 Gorenje 3500 DP User Manual
 Gorenje ATCM730T User Manual
 Gorenje B800ORAB User Manual
 Gorenje B800RL User Manual
 Gorenje B800RLBK User Manual
 Gorenje BHI611ES User Manual
 Gorenje BHI681EB User Manual
 Gorenje BHI681ES User Manual
 Gorenje BHP62CLB User Manual
 Gorenje BHP62CLI User Manual
 Gorenje BHP623E8X User Manual
 Gorenje BHP623E10X User Manual
 Gorenje BHP623E11B User Manual
 Gorenje BHP623E11W User Manual
 Gorenje BHP623E12X User Manual
 Gorenje BHP 643 User Manual
 Gorenje BHP643ORAW User Manual
 Gorenje BM 900 W (BM1310) User Manual