Page 2 - DEUTSCH; Lesen Sie diese Gebrauchsanwei-; WARNUNG
2 DEUTSCH Lesen Sie diese Gebrauchsanwei- sung sorgfältig durch, bewahren Sie sie für den späteren Gebrauch auf, machen Sie sie anderen Benutzern zugänglich und beachten Sie die Hinweise. WARNUNG • Das Gerät ist nur für den Ein- satz im häuslichen/privaten Umfeld bestimmt, nicht im ge- werblichen Be...
Page 3 - Sehr geehrte Kundin,
3 • Gerät vor Nässe schützen. Tau- chen Sie das Gerät niemals in Wasser. • Reinigung- und Benutzerwar- tung dürfen nicht von Kindern ohne Beaufsichtigung durchge- führt werden. Sehr geehrte Kundin, sehr geehrter Kunde, wir freuen uns, dass Sie sich für ein Produkt un- seres Sortimentes entschieden h...
Page 5 - Bestimmungsgemäßer Gebrauch
5 21 PAP Verpackung umweltgerecht ent- sorgenGleichstrom Zertifizierungszeichen für Pro- dukte, die in die Russische Fö- deration und in die Länder der GUS exportiert werden. 3. Bestimmungsgemäßer Gebrauch Der Präzisionstrimmer HR 2000 ist ausschließlich zum Entfernen von Nasen- und Ohren haaren bzw...
Page 6 - ACHTUNG; Hinweise zum Umgang mit Batterien
6 – Lassen Sie das Gerät während des Gebrauchs nie unbeaufsichtigt. – Verwenden Sie das Gerät nicht, wenn die Mini-Klin- ge beschädigt oder verbogen ist, da diese scharfe Kanten haben könnte - Verletzungsgefahr! – Wenn Sie das Gerät an Dritte weitergeben, müssen Sie diese Gebrauchsanweisung mitgeben...
Page 7 - Gerätebeschreibung; Batterie einlegen
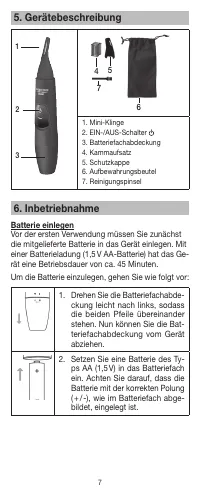
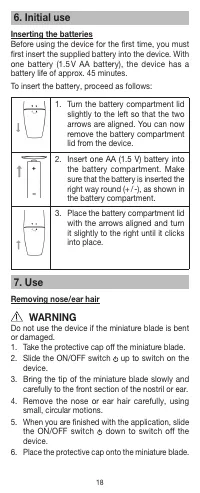
7 5. Gerätebeschreibung 1 2 3 4 7 5 6 1. Mini-Klinge2. EIN-/AUS-Schalter 3. Batteriefachabdeckung4. Kammaufsatz5. Schutzkappe6. Aufbewahrungsbeutel7. Reinigungspinsel 6. Inbetriebnahme Batterie einlegen Vor der ersten Verwendung müssen Sie zunächst die mitgelieferte Batterie in das Gerät einlegen. M...
Page 8 - Augenbrauen trimmen
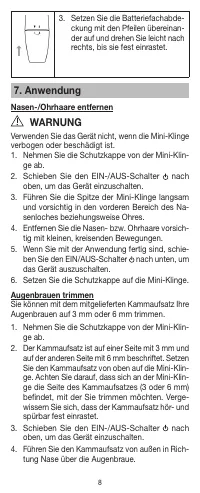
8 3. Setzen Sie die Batteriefachabde- ckung mit den Pfeilen übereinan- der auf und drehen Sie leicht nach rechts, bis sie fest einrastet. 7. Anwendung Nasen-/Ohrhaare entfernen WARNUNG Verwenden Sie das Gerät nicht, wenn die Mini-Klinge verbogen oder beschädigt ist. 1. Nehmen Sie die Schutzkappe von...
Page 9 - Kammaufsatz reinigen
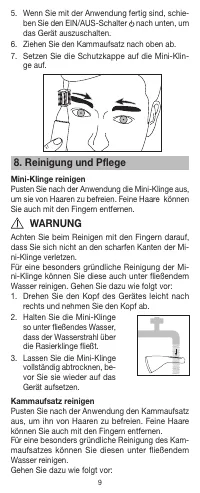
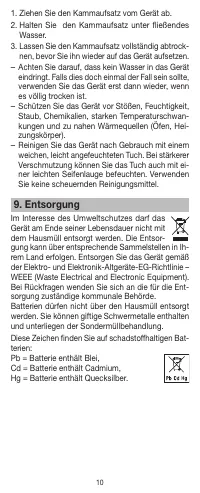
9 5. Wenn Sie mit der Anwendung fertig sind, schie- ben Sie den EIN/AUS-Schalter nach unten, um das Gerät auszuschalten. 6. Ziehen Sie den Kammaufsatz nach oben ab.7. Setzen Sie die Schutzkappe auf die Mini-Klin- ge auf. 8. Reinigung und Pflege Mini-Klinge reinigen Pusten Sie nach der Anwendung die ...
Page 11 - Technische Angaben
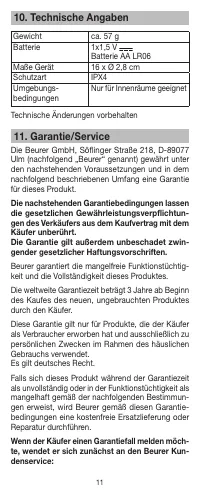
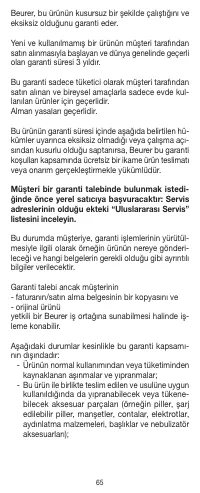
11 10. Technische Angaben Gewicht ca. 57 g Batterie 1x1,5 V Batterie AA LR06 Maße Gerät 16 x Ø 2,8 cm Schutzart IPX4 Umgebungs- bedingungen Nur für Innenräume geeignet Technische Änderungen vorbehalten 11. Garantie/Service Die Beurer GmbH, Söflinger Straße 218, D-89077 Ulm (nachfolgend „Beurer“ genan...
Page 12 - Beurer GmbH, Servicecenter
12 Irr tum und Änderungen vorbehalt en Beurer GmbH, Servicecenter Tel: +49 731 3989-144 Für eine zügige Bearbeitung nutzen Sie bitte unser Kontaktformular auf der Homepage www.beurer.com unter der Rubrik ‚Service‘.Der Käufer erhält dann nähere Informationen zur Ab- wicklung des Garantiefalls, z.B. w...
Page 13 - ENGLISH; Read these instructions for use; WARNING
13 ENGLISH Read these instructions for use carefully and keep them for later use, be sure to make them accessi- ble to other users and observe the information they contain. WARNING • The device is intended only for domestic/private use, not for commercial use. • This device can be used by children o...
Page 14 - Table of contents
14 • Protect device from moisture. Never submerge the device in water. • Cleaning and user maintenance must not be performed by children unless supervised. Dear customer, Thank you for choosing a product from our range. Our name stands for high-quality, thoroughly test- ed products for applications ...
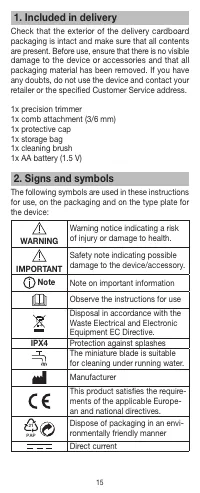
Page 15 - Included in delivery
15 1. Included in delivery Check that the exterior of the delivery cardboard packaging is intact and make sure that all contents are present. Before use, ensure that there is no visible damage to the device or accessories and that all packaging material has been removed. If you have any doubts, do n...
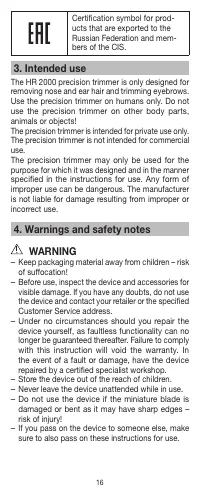
Page 17 - IMPORTANT; Notes on handling batteries; Device description
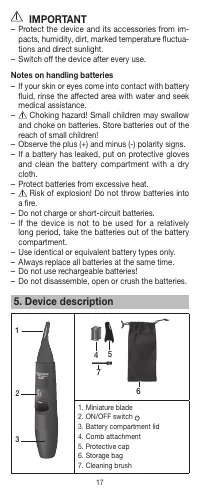
17 IMPORTANT – Protect the device and its accessories from im- pacts, humidity, dirt, marked temperature fluctua- tions and direct sunlight. – Switch off the device after every use. Notes on handling batteries – If your skin or eyes come into contact with battery fluid, rinse the affected area with wa...
Page 19 - Eyebrow trimming; Cleaning and maintenance; Cleaning the miniature blade
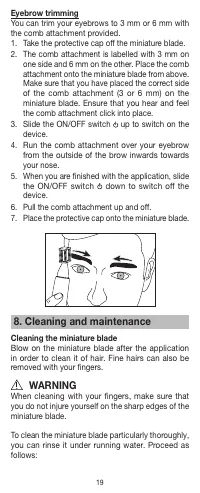
19 Eyebrow trimming You can trim your eyebrows to 3 mm or 6 mm with the comb attachment provided. 1. Take the protective cap off the miniature blade.2. The comb attachment is labelled with 3 mm on one side and 6 mm on the other. Place the comb attachment onto the miniature blade from above. Make sur...
Page 20 - Cleaning the comb attachment
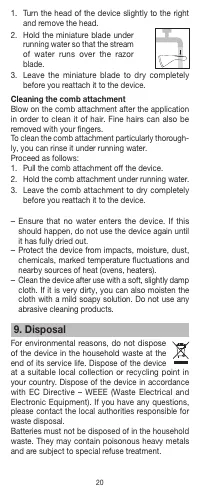
20 1. Turn the head of the device slightly to the right and remove the head. 2. Hold the miniature blade under running water so that the stream of water runs over the razor blade. 3. Leave the miniature blade to dry completely before you reattach it to the device. Cleaning the comb attachment Blow o...
Page 21 - The warranty conditions below shall not affect
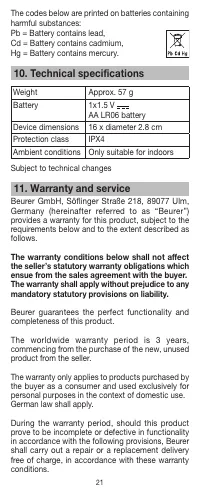
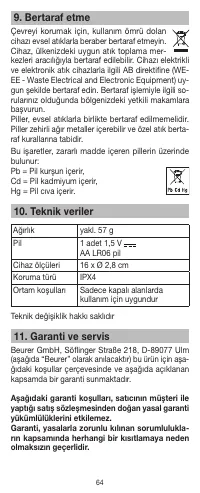
21 The codes below are printed on batteries containing harmful substances: Pb = Battery contains lead, Cd = Battery contains cadmium, Hg = Battery contains mercury. 10. Technical specifications Weight Approx. 57 g Battery 1x1.5 V AA LR06 battery Device dimensions 16 x diameter 2.8 cmProtection class...
Page 23 - FRANÇAIS; Lisez attentivement ce mode d’em-; AVERTISSEMENT
23 FRANÇAIS Lisez attentivement ce mode d’em- ploi, conservez-le pour un usage ultérieur, mettez-le à dispo sition des autres utilisateurs et suivez les consignes qui y figurent. AVERTISSEMENT • L’appareil ne doit être utilisé que dans un environnement domestique/privé et non dans un cadre professio...
Page 24 - Table des matières
24 • Protéger l’appareil contre l’humidité. N’immergez jamais l’appareil. • Le nettoyage et l’entretien ne doivent pas être effectués par des enfants sans surveillance. Chère cliente, cher client, Nous vous remercions d’avoir choisi l’un de nos produits. Notre société est réputée pour l’excel- lence...
Page 26 - Utilisation conforme aux
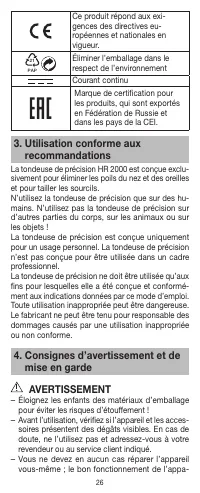
26 Ce produit répond aux exi- gences des directives eu- ropéennes et nationales en vigueur. 21 PAP Éliminer l’emballage dans le respect de l’environnementCourant continu Marque de certification pour les produits, qui sont exportés en Fédération de Russie et dans les pays de la CEI. 3. Utilisation co...
Page 27 - ATTENTION; Remarques relatives aux piles
27 reil ne serait plus assuré. Le non-respect de cette consigne annulera la garantie. En cas de panne ou d’endommagement, faites réparer l’appareil dans un atelier qualifié. – Conservez l’appareil hors de portée des enfants. – Ne laissez jamais l’appareil sans surveillance pen- dant son utilisation....
Page 28 - Description de l’appareil; Insérer la pile
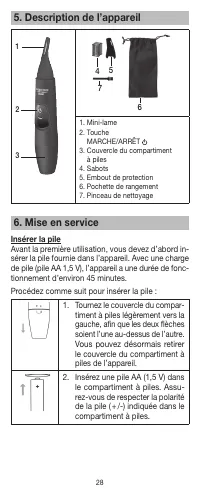
28 5. Description de l’appareil 1 2 3 4 7 5 6 1. Mini-lame 2. Touche MARCHE/ARRÊT 3. Couvercle du compartiment à piles 4. Sabots 5. Embout de protection 6. Pochette de rangement 7. Pinceau de nettoyage 6. Mise en service Insérer la pile Avant la première utilisation, vous devez d’abord in- sérer la ...
Page 29 - Éliminer les poils du nez/des oreilles; Tailler les sourcils
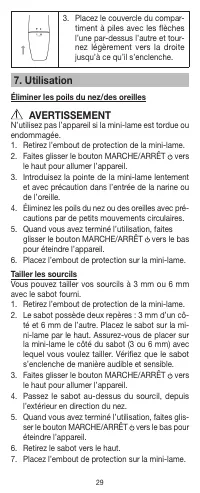
29 3. Placez le couvercle du compar- timent à piles avec les flèches l’une par-dessus l’autre et tour- nez légèrement vers la droite jusqu’à ce qu’il s’enclenche. 7. Utilisation Éliminer les poils du nez/des oreilles AVERTISSEMENT N’utilisez pas l’appareil si la mini-lame est tordue ou endommagée. 1....
Page 30 - Nettoyage et entretien; Nettoyer la mini-lame; Nettoyer le sabot
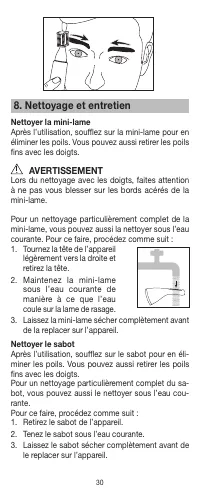
30 8. Nettoyage et entretien Nettoyer la mini-lame Après l’utilisation, soufflez sur la mini-lame pour en éliminer les poils. Vous pouvez aussi retirer les poils fins avec les doigts. AVERTISSEMENT Lors du nettoyage avec les doigts, faites attention à ne pas vous blesser sur les bords acérés de la m...
Page 31 - Caractéristiques techniques
31 – Assurez-vous que l’eau ne s’infiltre pas à l’intérieur. Si cela devait se produire, utilisez de nouveau l’ap- pareil uniquement lorsqu’il est complètement sec. – Protégez l’appareil contre les coups, l’humidité, la poussière, les produits chimiques, les fortes varia- tions de température et les...
Page 32 - Garantie et maintenance
32 11. Garantie et maintenance La société Beurer GmbH, sise Söflinger Straße 218, 89077 Ulm, Allemagne, (ci-après désignée « Beurer ») propose une garantie pour ce produit dans les condi- tions suivantes et dans la mesure prévue ci-après. Les conditions de garantie suivantes n’affectent en rien les o...
Page 34 - ESPAÑOL; Lea atentamente estas instrucciones; ADVERTENCIA
34 ESPAÑOL Lea atentamente estas instrucciones de uso, consérvelas para su futura utilización, póngalas a disposición de otros usuarios y respete las indicaciones. ADVERTENCIA • Este aparato está diseñado exclusivamente para su uso privado o en el hogar y no pa- ra uso industrial. • Este aparato pue...
Page 35 - Índice
35 • Proteger al aparato de la humedad. No sumerja nunca el aparato en agua. • Las tareas de limpieza y mantenimiento ordinario no deberán ser realizadas por niños sin supervisión. Estimada clienta, estimado cliente: Nos alegramos de que haya elegido un producto de nuestra gama. Nuestro nombre es si...
Page 36 - Artículos suministrados
36 1. Artículos suministrados Compruebe que el envoltorio de los artículos sumi- nistrados esté intacto y que su contenido esté com- pleto. Antes de utilizar el aparato deberá asegurarse de que ni este ni los accesorios presentan daños visibles y de que se retira el material de embalaje co- rrespond...
Page 37 - Indicaciones de advertencia
37 21 PAP Eliminar el embalaje respetando el medio ambienteCorriente continua Símbolo de certificación para aquellos productos que se ex- portan a la Federación Rusa y a los países de la CEI. 3. Uso correcto La recortadora de precisión HR 2000 se ha diseñado exclusivamente para eliminar el vello de ...
Page 38 - ATENCIÓN; Indicaciones para la manipulación de pilas
38 – No utilice el aparato si la minicuchilla está dañada o doblada, ya que podría tener bordes afilados. ¡Peligro de lesiones! – Si entrega el aparato a terceros deberá acompa- ñarlo de estas instrucciones de uso. ATENCIÓN – Proteja el aparato y los accesorios de impactos, humedad, suciedad, grande...
Page 39 - Descripción del aparato; Puesta en funcionamiento; Insertar la pila
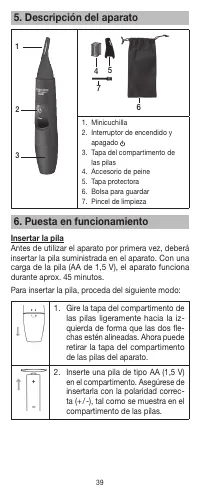
39 5. Descripción del aparato 1 2 3 4 7 5 6 1. Minicuchilla2. Interruptor de encendido y apagado 3. Tapa del compartimento de las pilas 4. Accesorio de peine5. Tapa protectora6. Bolsa para guardar7. Pincel de limpieza 6. Puesta en funcionamiento Insertar la pila Antes de utilizar el aparato por p...
Page 40 - Eliminar el vello de la nariz y de las orejas; Recortar las cejas
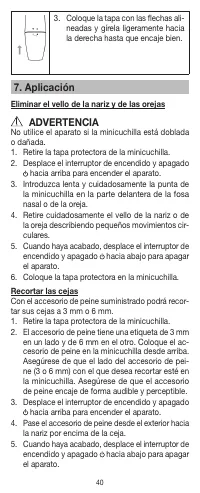
40 3. Coloque la tapa con las flechas ali- neadas y gírela ligeramente hacia la derecha hasta que encaje bien. 7. Aplicación Eliminar el vello de la nariz y de las orejas ADVERTENCIA No utilice el aparato si la minicuchilla está doblada o dañada. 1. Retire la tapa protectora de la minicuchilla. 2. De...
Page 41 - Limpieza y cuidado; Limpiar la minicuchilla; Limpiar el accesorio de peine
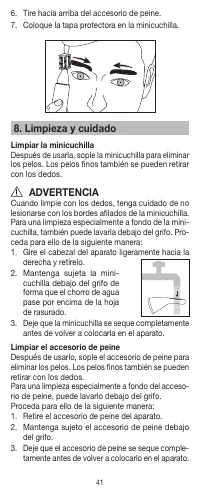
41 6. Tire hacia arriba del accesorio de peine.7. Coloque la tapa protectora en la minicuchilla. 8. Limpieza y cuidado Limpiar la minicuchilla Después de usarla, sople la minicuchilla para eliminar los pelos. Los pelos finos también se pueden retirar con los dedos. ADVERTENCIA Cuando limpie con los ...
Page 43 - Garantía y asistencia
43 11. Garantía y asistencia Beurer GmbH, Söflinger Straße 218, D-89077 Ulm (en lo sucesivo, “Beurer”) concede una garantía para este producto. La garantía está sujeta a las siguien- tes condiciones y el alcance de la misma se describe a continuación. Las siguientes condiciones de garantía no afec- t...
Page 45 - ITALIANO; Leggere attentamente le presenti; AVVERTENZA
45 ITALIANO Leggere attentamente le presenti istruzioni per l'uso, conservarle per impieghi futuri, renderle acces- sibili ad altri utenti e attenersi alle indicazioni. AVVERTENZA • L'apparecchio è destinato solo a uso domestico/privato e non commerciale. • Questo apparecchio può es- sere utilizzato...
Page 46 - Indice
46 • Proteggere l’apparecchio dall’umidità. Non immergere mai l’apparecchio in acqua. • La pulizia e la manutenzione a cura dell’utente non devono essere eseguite da bambini, a meno che non siano sorvegliati. Gentile cliente, siamo lieti che Lei abbia scelto un prodotto del nostro assortimento. Il n...
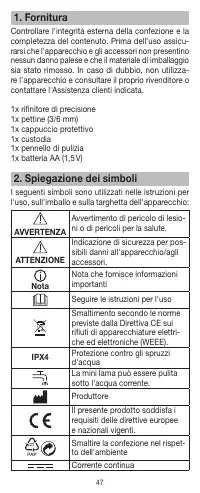
Page 47 - Spiegazione dei simboli
47 1. Fornitura Controllare l'integrità esterna della confezione e la completezza del contenuto. Prima dell'uso assicu- rarsi che l'appa recchio e gli accessori non presentino nessun danno palese e che il materiale di imballaggio sia stato rimosso. In caso di dubbio, non utilizza- re l'apparecchio e...
Page 49 - ATTENZIONE; Avvertenze sull’uso delle batterie
49 ATTENZIONE – Proteggere l’apparecchio e gli accessori da urti, umidità, sporco, forti variazioni termiche e irrag- giamento solare diretto. – Dopo ciascun utilizzo spegnere l’apparecchio. Avvertenze sull’uso delle batterie – Se il liquido delle batterie viene a contatto con la pelle e con gli occ...
Page 50 - Inserimento della batteria
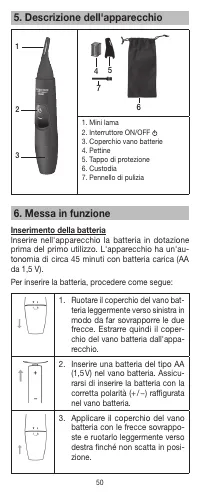
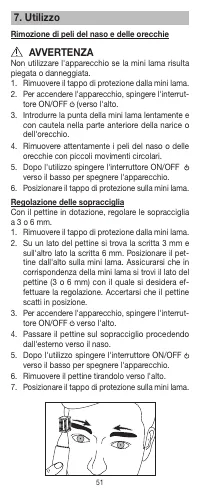
50 5. Descrizione dell'apparecchio 1 2 3 4 7 5 6 1. Mini lama 2. Interruttore ON/OFF 3. Coperchio vano batterie 4. Pettine 5. Tappo di protezione 6. Custodia 7. Pennello di pulizia 6. Messa in funzione Inserimento della batteria Inserire nell'apparecchio la batteria in dotazione prima del primo util...
Page 51 - Rimozione di peli del naso e delle orecchie; Regolazione delle sopracciglia
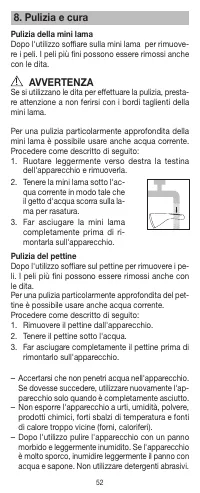
51 7. Utilizzo Rimozione di peli del naso e delle orecchie AVVERTENZA Non utilizzare l'apparecchio se la mini lama risulta piegata o danneggiata. 1. Rimuovere il tappo di protezione dalla mini lama. 2. Per accendere l'apparecchio, spingere l'interrut- tore ON/OFF (verso l'alto. 3. Introdurre la punt...
Page 52 - Pulizia della mini lama; Pulizia del pettine
52 8. Pulizia e cura Pulizia della mini lama Dopo l'utilizzo soffiare sulla mini lama per rimuove- re i peli. I peli più fini possono essere rimossi anche con le dita. AVVERTENZA Se si utilizzano le dita per effet tuare la pulizia, presta- re attenzione a non ferirsi con i bordi taglienti della mini...
Page 53 - Garanzia e assistenza; Le seguenti condizioni di garanzia lasciano inva-
53 9. Smaltimento A tutela dell'ambiente, al termine del suo ciclo di vita, l'apparecchio non deve essere smaltito nei rifiuti domestici, ma conferito negli appo- siti centri di raccolta. Smaltire l'apparecchio secon- do la direttiva europea sui rifiuti di apparecchiature elettriche ed elettroniche ...
Page 56 - TÜRKÇE; Lütfen bu kullanım kılavuzunu dik-; UYARI
56 TÜRKÇE Lütfen bu kullanım kılavuzunu dik- katle okuyun, ileride gerekebileceği için saklayın, diğer kullanıcıların erişebilmesini sağlayın ve içindeki yönergelere uyun. UYARI • Cihaz ticari kullanım için değil, yalnızca evde/kişisel amaçlarla kullanılmak üzere tasarlanmış- tır. • Bu cihaz, 8 yaş ...
Page 57 - İçindekiler
57 • Cihazı nemden koruyun. Cihazı kesinlikle suya daldırmayın. • Temizlik ve kullanıcı bakımı, gözetim altında olmadıkları sürece çocuklar tarafından yapılmamalıdır. Sayın müşterimiz, Ürünlerimizden birini seçtiğiniz için teşekkür ederiz. Isı, ağırlık, kan basıncı, vücut sıcaklığı, nabız, yumu- şak...
Page 58 - İşaretlerin açıklaması
58 1. Teslimat kapsamı Teslimat kapsamını kontrol ederek karton ambalajın dıştan hasar görmemiş ve içeriğin eksiksiz olduğun- dan emin olun. Cihazı kullanmadan önce, cihazda ve aksesuarlarında görünür hasarlar olmadığından ve tüm ambalaj malzemelerinin çıkarıldığından emin olun. Şüpheli durumlarda k...
Page 60 - DİKKAT; Pillerin kullanımıyla ilgili bilgiler
60 DİKKAT – Cihazı ve aksesuarlarını darbelerden, nemden, kir- den, aşırı sıcaklık değişimlerinden ve doğrudan gü- neş ışığından koruyun. – Her kullanımdan sonra cihazı kapatın. Pillerin kullanımıyla ilgili bilgiler – Pilden sızan sıvı cilt veya gözlerle temas ettiğinde, ilgili yer suyla yıkanmalı v...
Page 61 - Pillerin takılması
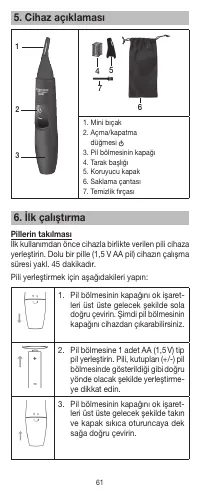
61 5. Cihaz açıklaması 1 2 3 4 7 5 6 1. Mini bıçak2. Açma/kapatma düğmesi 3. Pil bölmesinin kapağı4. Tarak başlığı5. Koruyucu kapak6. Saklama çantası7. Temizlik fırçası 6. İlk çalıştırma Pillerin takılması İlk kullanımdan önce cihazla birlikte verilen pili cihaza yerleştirin. Dolu bir pille (1,5 V A...
Page 62 - Burun ve kulak kıllarını alma; Kaş kısaltma
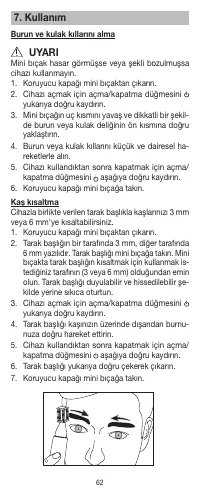
62 7. Kullanım Burun ve kulak kıllarını alma UYARI Mini bıçak hasar görmüşse veya şekli bozulmuşsa cihazı kullanmayın. 1. Koruyucu kapağı mini bıçaktan çıkarın. 2. Cihazı açmak için açma/kapatma düğmesini yukarıya doğru kaydırın. 3. Mini bıçağın uç kısmını yavaş ve dikkatli bir şekil- de burun veya ...
Page 63 - Mini bıçağın temizlenmesi; Tarak başlığın temizlenmesi
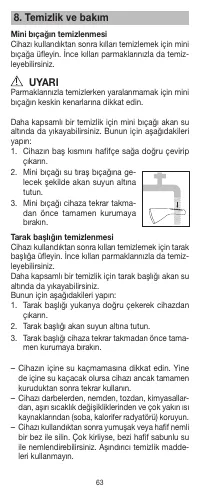
63 8. Temizlik ve bakım Mini bıçağın temizlenmesi Cihazı kullandıktan sonra kılları temizlemek için mini bıçağa üfleyin. İnce kılları parmaklarınızla da temiz- leyebilirsiniz. UYARI Parmaklarınızla temizlerken yaralanmamak için mini bıçağın keskin kenarlarına dikkat edin. Daha kapsamlı bir temizlik i...
Page 64 - Garanti ve servis
64 9. Bertaraf etme Çevreyi korumak için, kullanım ömrü dolan cihazı evsel atıklarla beraber bertaraf etmeyin. Cihaz, ülkenizdeki uygun atık toplama mer- kezleri aracılığıyla bertaraf edilebilir. Cihazı elektrikli ve elektronik atık cihazlarla ilgili AB direktifine (WE- EE - Waste Electrical and Ele...
Page 67 - РУССКИЙ; ПРЕДУПРЕЖДЕНИЕ
67 РУССКИЙ Внимательно прочтите инструк- цию по применению, сохраните ее для последующего исполь- зования, храните в доступном для других пользователей месте и следуйте ее указаниям. ПРЕДУПРЕЖДЕНИЕ • Прибор предназначен для дома шнего/частного исполь- зования. Использование при- бора в коммерческих ...
Page 68 - Уважаемый покупатель!
68 • Ни в коем случае не открывайте прибор и не ремонтируйте его самостоятельно, поскольку безупречная работа в этом случае не гарантируется. Несоблюдение этого требования ведет к потере гарантии. • Храните прибор в сухом месте. Не погружайте прибор в воду. • Очистка и техническое обслуживание детьм...
Page 69 - Содержание; Пояснения к символам; ЖДЕНИЕ
69 Содержание 1. Комплект поставки ...................................... 69 2. Пояснения к символам ................................ 69 3. Использование по назначению .................. 70 4. Предупреждения и указания по технике безопасности .............................................. 71 5. Опис...
Page 70 - Указание; Использование по назначению
70 Указание Важная информация Соблюдайте указания ин- струкции по применению Утилизация прибора в соот- ветствии с директивой ЕС об отходах электрического и электронного оборудова- ния — WEEE (Waste Electrical and Electronic Equipment). IPX4 Защита от брызг Мини-лезвие можно чистить под струей воды....
Page 71 - Указания по обращению с батарейками
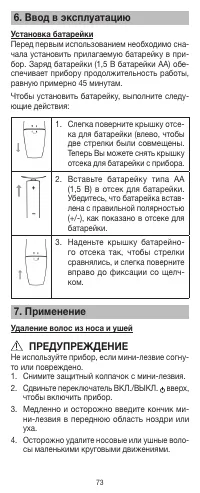
71 в данной инструкции по применению. Любое ис- пользование не по назначению может быть опас- ным. Изготовитель не несет ответственности за ущерб, вызванный неквалифицированным или ненадлежащим использованием прибора. 4. Предупреждения и указания по технике безопасности ПРЕДУПРЕЖДЕНИЕ – Не давайте у...
Page 73 - Ввод в эксплуатацию; Установка батарейки
73 6. Ввод в эксплуатацию Установка батарейки Перед первым использованием необходимо сна- чала установить прилагаемую батарейку в при- бор. Заряд батарейки (1,5 В батарейки АА) обе- спечивает прибору продолжительность работы, равную примерно 45 минутам.Чтобы установить батарейку, выполните следу- ющ...
Page 74 - Подравнивание бровей
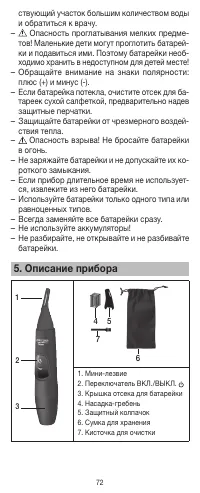
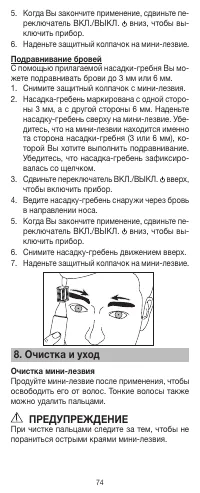
74 5. Когда Вы закончите применение, сдвиньте пе- реключатель ВКЛ./ВЫКЛ. вниз, чтобы вы- ключить прибор. 6. Наденьте защитный колпачок на мини-лезвие. Подравнивание бровей С помощью прилагаемой насадки-гребня Вы мо- жете подравнивать брови до 3 мм или 6 мм. 1. Снимите защитный колпачок с мини-лезвия...
Page 75 - Чистка насадки-гребня
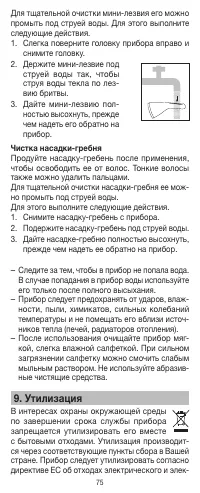
75 Для тщательной очистки мини-лезвия его можно промыть под струей воды. Для этого выполните следующие действия. 1. Слегка поверните головку прибора вправо и снимите головку. 2. Держите мини-лезвие под струей воды так, чтобы струя воды текла по лез- вию бритвы. 3. Дайте мини-лезвию пол- ностью высох...
Page 77 - POLSKI; Należy dokładnie przeczytać niniej-; OSTRZEŻENIE
77 POLSKI Należy dokładnie przeczytać niniej- szą instrukcję obsługi, zachować ją i przechowywać w miejscu do- stępnym dla innych użytkowników oraz przestrzegać podanych w niej wskazówek. OSTRZEŻENIE • Urządzenie jest przeznaczone wyłącznie do użytku domowe- go/prywatnego, a nie do celów komercyjnyc...
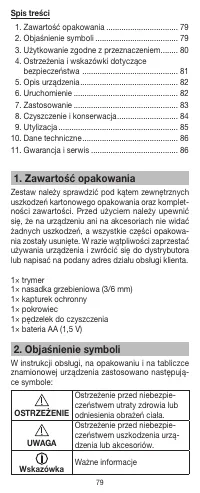
Page 79 - Spis treści; Zawartość opakowania
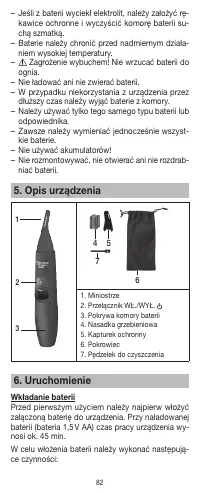
79 Spis treści 1. Zawartość opakowania ................................. 79 2. Objaśnienie symboli ...................................... 79 3. Użytkowanie zgodne z przeznaczeniem ........ 80 4. Ostrzeżenia i wskazówki dotyczące bezpieczeństwa ............................................ 81 5. Opis ...
Page 80 - Użytkowanie zgodne z
80 Należy przestrzegać instrukcji obsługi Utylizacja zgodna z dyrektywą WE o zużytych urządzeniach elektrycznych i elektronicznych EC – WEEE (Waste Electrical and Electronic Equipment). IPX4 Ochrona przed bryzgami wody Miniostrze nadaje się do czysz- czenia pod bieżącą wodą.ProducentNiniejszy produk...
Page 81 - Wskazówki dotyczące postępowania z bateriami
81 4. Ostrzeżenia i wskazówki dotyczące bezpieczeństwa OSTRZEŻENIE – Opakowanie należy trzymać w miejscu niedostęp- nym dla dzieci – niebezpieczeństwo uduszenia! – Przed użyciem należy sprawdzić urządze- nie i akcesoria pod kątem widocznych uszko- dzeń. W razie wątpliwości zaprzestać używania urządz...
Page 82 - Wkładanie baterii
82 – Jeśli z baterii wyciekł elektrolit, należy założyć rę- kawice ochronne i wyczyścić komorę baterii su- chą szmatką. – Baterie należy chronić przed nadmiernym działa- niem wysokiej temperatury. – Zagrożenie wybuchem! Nie wrzucać baterii do ognia. – Nie ładować ani nie zwierać baterii. – W przypad...
Page 83 - Usuwanie włosków z nosa i uszu; Trymowanie brwi
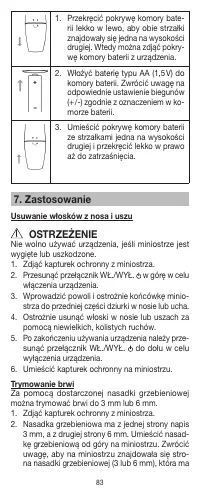
83 1. Przekręcić pokrywę komory bate- rii lekko w lewo, aby obie strzałki znajdowały się jedna na wysokości drugiej. Wtedy można zdjąć pokry- wę komory baterii z urządzenia. 2. Włożyć baterię typu AA (1,5 V) do komory baterii. Zwrócić uwagę na odpowiednie ustawienie biegunów (+ /-) zgodnie z oznacze...
Page 84 - Czyszczenie i konserwacja; Czyszczenie miniostrza
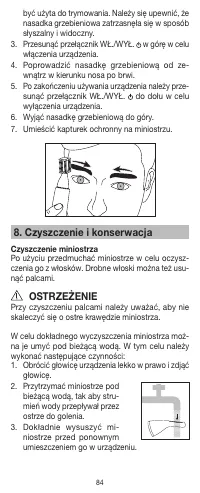
84 być użyta do trymowania. Należy się upewnić, że nasadka grzebieniowa zatrzasnęła się w sposób słyszalny i widoczny. 3. Przesunąć przełącznik WŁ./WYŁ. w górę w celu włączenia urządzenia. 4. Poprowadzić nasadkę grzebieniową od ze- wnątrz w kierunku nosa po brwi. 5. Po zakończeniu używania urządzeni...
Page 85 - Czyszczenie nasadki grzebieniowej
85 Czyszczenie nasadki grzebieniowej Po użyciu przedmuchać nasadkę grzebieniową w ce- lu oczyszczenia jej z włosków. Drobne włoski można też usunąć palcami. W celu dokładnego wyczyszczenia nasadki grzebie- niowej można ją umyć pod bieżącą wodą. W tym celu należy wykonać następujące czynności: 1. Wyj...
Page 86 - Gwarancja i serwis; Poniższe warunki gwarancji nie naruszają usta-
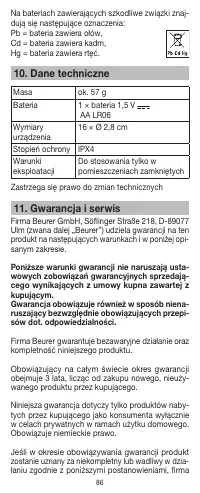
86 Na bateriach zawierających szkodliwe związki znaj- dują się następujące oznaczenia: Pb = bateria zawiera ołów, Cd = bateria zawiera kadm, Hg = bateria zawiera rtęć. 10. Dane techniczne Masa ok. 57 g Bateria 1 × bateria 1,5 V AA LR06 Wymiary urządzenia 16 × Ø 2,8 cm Stopień ochrony IPX4Warunki eks...