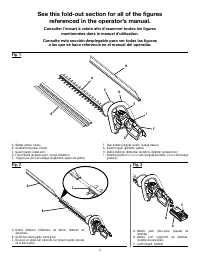
Page 2 - See this fold-out section for all the figures; Voir que cette section d’encart pour toutes les
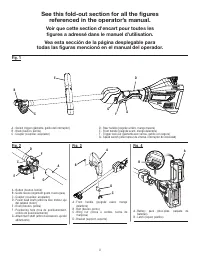
ii See this fold-out section for all the figures referenced in the operator’s manual. Voir que cette section d’encart pour toutes les figures a adressé dans le manuel d’utilisation. Vea esta sección de la página desplegable para todas las figuras mencionó en el manual del operador. A - Switch trigge...
Page 4 - READ ALL INSTRUCTIONS; IMPORTANT SAFETY INSTRUCTIONS
2 — English WARNING! When using electric gardening appliances, basic safety precautions should always be followed to reduce the risk of fire, electric shock and personal injury. READ ALL INSTRUCTIONS For safe operation, read and understand all instructions before using this product. Follow all saf...
Page 5 - ADDITIONAL SPECIFIC SAFETY RULES CAN BE FOUND
3 — English IMPORTANT SAFETY INSTRUCTIONS Remove or disconnect battery before servicing, cleaning or removing material from the gardening appliance. Use this product only with batteries and chargers listed in tool/appliance/battery pack/charger correlation supple-ment 988000-842. Do not dispos...
Page 6 - SYMBOLS
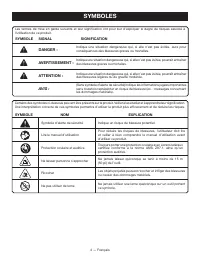
4 — English Some of the following symbols may be used on this product. Please study them and learn their meaning. Proper in-terpretation of these symbols will allow you to operate the product better and safer. SYMBOL NAME DESIGNATION/EXPLANATION Safety Alert Indicates a potential personal injury haz...
Page 8 - ATTACHING THE FRONT HANDLE; OPERATION
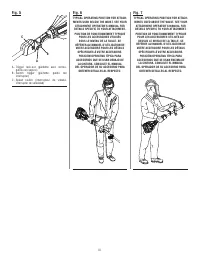
6 — English WARNING: Always wear eye protection with side shields marked to comply with ANSI Z87.1. Hearing and/or head protection may also be required depending on the type of attach-ment used and as prescribed in the attachment’s Opera-tor’s Manual. Failure to do so could result in objects being t...
Page 10 - This product has a Five-year Limited Warranty for personal,
8 — English WARNING: To avoid serious personal injury, always remove the bat-tery pack from the tool when cleaning or performing any maintenance. WARNING: Always wear eye protection with side shields marked to comply with ANSI Z87.1. Hearing and/or head protection may also be required depending on t...
Page 11 - LIRE TOUTES LES INSTRUCTIONS; INSTRUCTIONS IMPORTANTES CONCERNANT LA SÉCURITÉ
2 — Français AVERTISSEMENT ! Lors de l’utilisation d’outils de jardinage, toujours suivre les consignes de sécurité de base pour éviter les risques d’incendie, d’électrocution et de blessures. LIRE TOUTES LES INSTRUCTIONS Pour travailler en toute sécurité, lire et veiller à bien comprendre toutes ...
Page 12 - DE PRENDRE CONNAISSANCE DES RÈGLES DE SÉCURITÉ SUPPLÉMENTAIRES
3 — Français No utilice la unidad para recoger líquidos inflamables o combustibles, como la gasolina, ni la utilice en lugares donde pueda haber presentes dichos líquidos. Retirer ou débrancher la pile avant l’entretien ou le nettoyage de l’produit de jardin ou avant d’en retirer des matériaux. ...
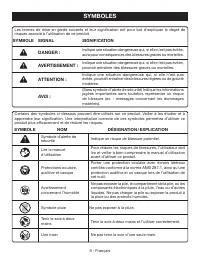
Page 13 - SYMBOLES
4 — Français Certains des symboles ci-dessous peuvent être utilisés sur produit. Veiller à les étudier et à apprendre leur signification. Une interprétation correcte de ces symboles permettra d’utiliser produit plus efficacement et de réduire les risques. SYMBOLE NOM DÉSIGNATION / EXPLICATION Symbol...
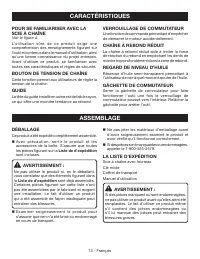
Page 14 - ASSEMBLAGE
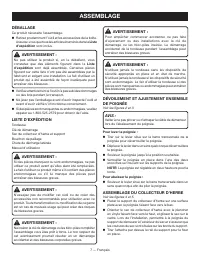
5 — Français DÉBALLAGE Ce produit nécessite un assemblage. Avec précaution, sortir l’produit et les accessoires de la boîte. S’assurer que toutes les pièces figurant sur la Liste de contrôle d’expédition sont incluses. AVERTISSEMENT : Ne pas utiliser le produit si, en le déballant, vous constatez ...
Page 15 - INSTALLATION DE LA POIGNÉE AVANT
6 — Français AVERTISSEMENT : Lire et veiller à bien comprendre tout le manuel d’utilisation de chaque accessoire facultatif employé avec l’ensemble moteur et respecter tous les avertissements et toutes les instructions. Le non-respect de l’ensemble des instructions peut entraîner une décharge électr...
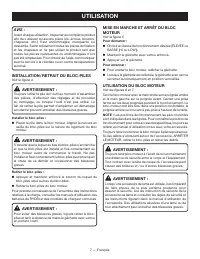
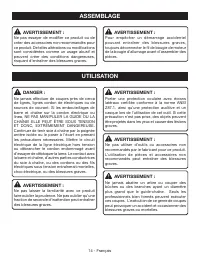
Page 16 - UTILISATION
7 — Français MISE EN MARCHE ET ARRÊT DU BLOC MOTEUR Voir la figure 5. Pour démarrer : Choisir la vitesse de fonctionnement désirée (ÉLEVÉE ou BASSE [HI ou LOW]). Maintenir le gâchette avec verrou enfoncé. Appuyer sur la gâchette. Pour arrancar : Pour arrêter le bloc moteur, relâcher la gâche...
Page 17 - ENTRETIEN; Ce produit est accompagné d’une garantie limitée de cinq (5) ans; DÉPANNAGE
8 — Français ENTRETIEN GÉNÉRAL Éviter d’utiliser des solvants pour le nettoyage des pièces en plastique. La plupart des matières plastiques peuvent être endommagées par divers types de solvants du commerce. Utiliser un chiffon propre pour éliminer la saleté, la poussière, l’huile, la graisse, etc. A...
Page 18 - LEA TODAS LAS INSTRUCCIONES; INSTRUCCIONES DE SEGURIDAD IMPORTANTES
2 — Español ¡ADVERTENCIA! Al utilizar herramientas eléctricas para el cuidado del jardín, con el fin de reducir el riesgo de incendio, descargas eléctricas y lesiones corporales, siempre deben seguirse ciertas medidas básicas de precaución. LEA TODAS LAS INSTRUCCIONES Para la operación segura, lea...
Page 19 - PODRÁ ENCONTRAR REGLAS DE SEGURIDAD ESPECÍFICAS
3 — Español No utilice la unidad para recoger líquidos inflamables o combustibles, como la gasolina, ni la utilice en lugares donde puedan estar presentes dichos líquidos. Quite o desconecte la batería antes de proporcionarle servicio, realizarle una limpieza o quitar material del aparato para e...
Page 20 - SÍMBOLO; SÍMBOLOS
4 — Español Es posible que se empleen en este producto algunos de los siguientes símbolos. Le suplicamos estudiarlos y aprender su significado. Una correcta interpretación de estos símbolos le permitirá utilizar mejor y de manera más segura el producto. SÍMBOLO NOMBRE DENOMINACIÓN/EXPLICACIÓN Alerta...
Page 21 - CABEZAL MOTOR; VARIABLE; CARACTERÍSTICAS
5 — Español DESEMPAQUETADO Este producto requiere armarse. Extraiga cuidadosamente de la caja la producto y los accesorios. Asegúrese de que estén presentes todos los artículos enumerados en la Lista de empaquetado . ADVERTENCIA: No utilice este producto si alguna pieza incluida en la Lista de emp...
Page 22 - ARMADO
6 — Español ADVERTENCIA: Nunca una ni ajuste ningún aditamento, desmontar o mientras esté funcionando el cabezal motor. Si no apaga el motor puede causarse lesiones serias a sí mismo y a otras personas. Nunca opere el cabezal motor sin un accesorio. Sólo es posible utilizar este cabezal del motor de...
Page 23 - INSTALACIÓN/EXTRACCIÓN DE LA BATERÍA; ENCENDIDO Y APAGADO DE LA CABEZAL; FUNCIONAMIENTO
7 — Español AVISO: Antes de cada uso, inspeccione todo el producto para detectar partes dañadas, faltantes o sueltas, como tornillos, tuercas, pernos, tapas, etc. Apriete firmemente todos los sujetadores y las tapas y no accione este producto hasta que todas las partes faltantes o dañadas sean reemp...
Page 24 - PROBLEMA; familiares o domésticos (90 días para usos trabajo o comercial).; MANTENIMIENTO
8 — Español tipos de solventes comerciales y pueden resultar dañados. Utilice paños limpios para eliminar la suciedad, el polvo, el aceite, la grasa, etc. ADVERTENCIA: No permita en ningún momento que fluidos para frenos, gasolina, productos a base de petróleo, aceites penetrantes, etc., lleguen a t...
Page 26 - OPERATOR’S MANUAL; TECHTRONIC INDUSTRIES POWER EQUIPMENT
9980001569-10-20 (REV:02) OPERATOR’S MANUAL MANUEL D’UTILISATION / MANUAL DEL OPERADOR40 VOLT POWER HEAD 40V BLOC MOTEUR SANS BALAI / 40V CABEZAL MOTOR SIN ESCOBILLAS RY40007/RY40009 TECHTRONIC INDUSTRIES POWER EQUIPMENT P.O. Box 1288, Anderson, SC 29622, USA 1-800-525-2579 • www.ryobitools.com RYOB...
Page 27 - ARBRE DROIT ACCESSOIRE
OPERATOR’S MANUAL MANUEL D’UTILISATIONMANUAL DEL OPERADOR STRAIGHT SHAFT TRIMMER ATTACHMENT WITH 3-IN-1 TRIMMER HEAD ACCESSORIES ARBRE DROIT ACCESSOIRE TAILLE-BORDURES AVEC ACCESSOIRES POUR TÊTE À TAILLE-BORDURES 3-EN-1 ACCESORIO PARA RECORTAR DE EJE RECTO CON ACCESORIOS DE CABEZAL DE RECORTADORA 3 ...
Page 32 - SAVE THESE INSTRUCTIONS; GENERAL SAFETY RULES
2 — English WARNING: Read and understand all instructions. Failure to follow all instructions listed below may result in electric shock, fire, and/or serious personal injury. SAVE THESE INSTRUCTIONS Read these instructions and the instructions for the power head thoroughly before using the straigh...
Page 33 - GRASS TRIMMER SAFETY WARNINGS
3 — English GRASS TRIMMER SAFETY WARNINGS Do not use the machine in bad weather conditions, especially when there is a risk of lightning. This de- creases the risk of being struck by lightning. Thoroughly inspect the area for wildlife where the machine is to be used. Wildlife may be injured by t...
Page 36 - ASSEMBLY; ATTACHING THE GRASS DEFLECTOR
6 — English ASSEMBLY WARNING: Do not connect to power head until assembly is complete. Failure to comply could result in accidental starting and possible serious personal injury. ATTACHING THE GRASS DEFLECTOR See Figure 2. WARNING: The line cut-off blade on the grass deflector is sharp. Avoid contac...
Page 37 - OPERATING THE TRIMMER
7 — English WARNING: Do not allow familiarity with this product to make you careless. Remember that a careless fraction of a second is sufficient to inflict serious injury. WARNING: Always wear eye protection with side shields marked to comply with ANSI Z87.1. Failure to do so could result in object...
Page 39 - MAINTENANCE; GENERAL MAINTENANCE
9 — English MAINTENANCE WARNING: Before inspecting, cleaning, or servicing the machine, shut off engine or motor, wait for all moving parts to stop, and disconnect spark plug wire and move it away from spark plug or disconnect from power supply. Failure to follow these instructions can result in ser...
Page 40 - TROUBLESHOOTING; CALL US FIRST; For any questions about operating or maintaining
10 — English MAINTENANCE Push the spool and bump knob through the string head housing and remove the string from the spool. If replacing the bump knob, remove the old knob from the spool. Align the knob ribs with the spool slots and place the new bump knob onto the spool. If you are not replacin...
Page 41 - CONSERVER CES INSTRUCTIONS; RÈGLES DE SÉCURITÉ GÉNÉRALES
2 — Français AVERTISSEMENT : Lire et veiller à bien comprendre toutes les instructions. Le non-respect de toutes les instructions ci-dessous peut entraîner un choc électrique, un incendie et/ou des blessures graves. CONSERVER CES INSTRUCTIONS Lire attentivement ces instructions et celles du moteur...
Page 42 - AVERTISSEMENTS DE SÉCURITÉ POUR COUPE-HERBE
3 — Français AVERTISSEMENTS DE SÉCURITÉ POUR COUPE-HERBE Ne pas utiliser la machine dans de mauvaises condi-tions météorologiques, surtout lorsqu’il y a un risque de foudre. Ceci évitera le risque d’être frappé par la foudre. Inspecter soigneusement la zone pour déterminer si un animal se trou...
Page 44 - CARACTÉRISTIQUES; BOÎTIER DE TÊTE À AVANCE PAR COUPS
5 — Français CARACTÉRISTIQUES APPRENDRE À CONNAÎTRE L’ACCESSOIRE TAILLE-BORDURES À ARBRE DROIT Voir la figure 1. La sécurité d’utilisation de ce produit exige la compréhension des informations apposées sur le produit et contenues dans ce manuel d’utilisation, ainsi que la connaissance du travail à e...
Page 45 - INSTALLATION DU DÉFLECTEUR D’HERBE
6 — Français ASSEMBLAGE AVERTISSEMENT : Ne pas brancher sur le bloc-moteur avant d’avoir terminé l’assemblage. Le non-respect de cet avertissement peut causer un démarrage accidentel, entraînant des blessures graves. INSTALLATION DU DÉFLECTEUR D’HERBE Voir la figure 2. AVERTISSEMENT : La lame coupe ...
Page 46 - UTILISATION DU TAILLE-BORDURES
7 — Français AVERTISSEMENT : Ne pas laisser la familiarité avec este produit faire oublier la prudence. Ne pas oublier qu’une fraction de seconde d’inattention peut entraîner des blessures graves. AVERTISSEMENT : Toujours porter une protection oculaire avec écrans latéraux certifiée conforme à la no...
Page 47 - AVANCE DE LA LIGNE DE COUPE SUR LA TÊTE; CONSEILS DE COUPE
8 — Français UTILISATION AVERTISSEMENT : Pour éviter d’endommager les lames ou boîtier de fil/lame fixe, laisser une distance d’au moins 304,8 mm (12 po) entre les lames et les objets avoisinants. Ne jamais utiliser de lames près de trottoirs, clôtures, poteaux, bâtiments ou autres objets fixes. Des...
Page 49 - MÉCANISME DE COUP DE BOÎTIER DE TÊTE; INSTALLATION DE L’ANNEAU DE SUSPENSION
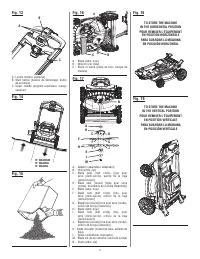
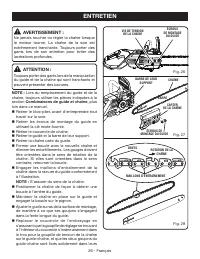
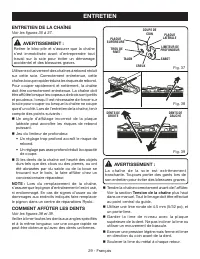
10 — Français ENTRETIEN DÉCOINCEMENT DU LIGNE ET/OU REMPLACEMENT DU CAPUCHON DU MÉCANISME DE COUP DE BOÎTIER DE TÊTE À AVANCE PAR COUPS Voir les figures 17 et 18. Arrêter le moteur, débrancher le fil de bougie s’il s’agit d’un ensemble moteur à essence, retirer le bloc-piles de l’ensemble moteur s...
Page 50 - PROBLÈME; NOUS APPELER D’ABORD
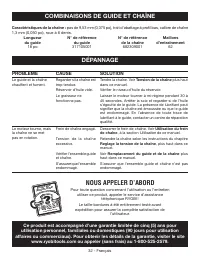
11 — Français U t i l i s e r e x c l u s i v e m e n t u n e l i g n e m o n o f i l a m e n t d e 2 , 4 m m (0,095 po) de diamètre. DÉPANNAGE PROBLÈME CAUSE POSSIBLE SOLUTION La ligne n’avance pas Ligne soudée sur elle-même. Pas assez de ligne sur la bobine. Ligne trop courte. Ligne emmêlée sur la...
Page 51 - GUARDE ESTAS INSTRUCCIONES; REGLAS DE SEGURIDAD GENERALES
2 — Español ADVERTENCIA: Lea y comprenda todas las instrucciones. El incumplimiento de las instrucciones señaladas abajo puede causar descargas eléctricas, incendios y lesiones serias. GUARDE ESTAS INSTRUCCIONES Lea detenidamente estas instrucciones y las instrucciones para su cabezal motor antes ...
Page 52 - ADVERTENCIAS DE SEGURIDAD DE LA RECORTADORA DE CÉSPED
3 — Español ADVERTENCIAS DE SEGURIDAD DE LA RECORTADORA DE CÉSPED No use la máquina en condiciones de clima adverso, especialmente cuando haya riesgo de relámpagos. Esto disminuye el riesgo de ser alcanzado por un relám-pago. Inspeccione cuidadosamente el área para cerciorarse de que no haya a...
Page 54 - DIÁMETRO DE CORTE AJUSTABLE; DESEMPAQUETADO; LISTA DE EMPAQUETADO
5 — Español CARACTERÍSTICAS FAMILIARÍCESE CON EL ACCESORIO PARA RECORTAR DE EJE RECTO Vea la figura 1. Para usar este producto con la debida seguridad se debe comprender la información indicada en la producto misma y en este manual, y se debe comprender también el trabajo que intenta realizar. Antes...
Page 55 - MONTAJE DEL DEFLECTOR DE PASTO
6 — Español ARMADO ADVERTENCIA: No conecte la unidad al cabezal motor antes de terminar de armarla. De lo contrario la unidad puede ponerse en marcha accidentalmente, con el consiguiente riesgo de lesiones serias. MONTAJE DEL DEFLECTOR DE PASTO Vea la figura 2. ADVERTENCIA: La cuchilla de cortar el ...
Page 56 - MANEJO DE LA RECORTADORA
7 — Español ADVERTENCIA: No permita que su familiarización con las productos lo vuelva descuidado. Tenga presente que un descuido de un instante es suficiente para causar una lesión grave. ADVERTENCIA: Siempre póngase protección ocular con protección lateral con la marca de cumplimiento de la norma ...
Page 57 - SUGERENCIAS PARA CORTAR
8 — Español FUNCIONAMIENTO ADVERTENCIA: Para evitar que se dañen las hojas o la carcasa de línea fija/hoja, deje al menos 304,8 mm (12 pulg.) de espacio libre entre las hojas y cualquier objeto cercano. Nunca utilice ninguna hoja cerca de aceras, cercas, postes, tinglados, edificaciones ni de ningún...
Page 58 - MANTENIMIENTO GENERAL; REABASTECIMIENTO DEL HILO Y DEL HOJA
9 — Español MANTENIMIENTO ADVERTENCIA: Antes de inspeccionar, limpiar o dar mantenimiento a la máquina, apague el motor, espere hasta que se detengan todas las piezas en movimiento, desconecte el cable de la bujía y apártelo de la bujía o desconecte la herramienta del suministro de corriente. El inc...
Page 59 - MONTAJE DEL COLGADOR DE
10 — Español MANTENIMIENTO ELIMINAR ATASCAMIENTO DEL HILO Y/O REEMPLAZAR LA PERILLA PERCUSIVA DEL CABEZAL DE RECORTADORA DE ALIMENTACIÓN POR GOLPE Vea las figuras 17 y 18. Detenga el motor, desconecte el cable de la bujía para los cabezales motores a gas, retire el paquete de baterías de las cabez...
Page 60 - CORRECCIÓN DE PROBLEMAS; LLÁMENOS PRIMERO; personales, familiares o domésticos (90 días para usos trabajo
11 — Español CORRECCIÓN DE PROBLEMAS PROBLEMA CAUSA POSIBLE SOLUCIÓN No avanza el hilo El hilo se pegó a sí mismo. No hay suficiente hilo en el carrete. El hilo se desgastó hasta quedar muy corto. El hilo está enredado en el carrete. Lubrique con rociador de silicón. Instale más hilo. Vea la sección...
Page 63 - See this fold-out section for all of the figures; Consulter l’encart à volets afin d’examiner toutes
ii See this fold-out section for all of the figures referenced in the operator’s manual. Consulter l’encart à volets afin d’examiner toutes les figures mentionnées dans le manuel d’utilisation. Consulte esta sección desplegable para ver todas las figuras a las que se hace referencia en el manual del...
Page 71 - FEATURES
6 — English PRODUCT SPECIFICATIONS Motor ...................................................................................................................................................................... 40 Volt DCDeck Size ...........................................................................
Page 72 - UNPACKING; PACKING LIST
7 — English ASSEMBLY UNPACKING This product requires assembly. Carefully remove the product and any accessories from the box. Make sure that all items listed in the Packing List are included. WARNING: Do not use this product if any parts on the Packing List are already assembled to your product wh...
Page 73 - INSTALLING THE GRASS CATCHER (FOR
8 — English ASSEMBLY WARNING: Do not allow familiarity with products to make you care-less. Remember that a careless fraction of a second is sufficient to inflict serious injury. WARNING: Always wear eye protection with side shields marked to comply with ANSI Z87.1. Failure to do so could result in ...
Page 74 - DUAL BATTERY PORTS
9 — English WARNING: Always remove battery packs and start key from your tool when you are assembling parts, making adjustments, cleaning, or when not in use. Following these instructions will prevent accidental starting that could cause serious personal injury. NOTICE: Before each use, inspect the ...
Page 75 - MAXIMUM SPEED SELECTOR
10 — English OPERATION Once the mower has been started, the self-propelled feature is engaged by pushing the self-propel paddle downward to meet the handle. To disengage the self-propelled feature, release the self-propel paddle. Press the paddle located on back of upper controls to increase t...
Page 77 - STORING THE MOWER
12 — English MAINTENANCE Wipe the mower clean with a dry cloth. Check all nuts, bolts, knobs, screws, fasteners, etc., for tightness. Inspect moving parts for damage, breakage, and wear. Have repairs made on any damaged or missing parts. Check blades for damage, uneven, or excessive wear a...
Page 78 - PROBLEM; MAKE THE MOST OF YOUR PURCHASE!
13 — English TROUBLESHOOTING IF THESE SOLUTIONS DO NOT SOLVE THE PROBLEM CONTACT YOUR AUTHORIZED SERVICE DEALER. PROBLEM POSSIBLE CAUSE SOLUTION Handle not in position. Handle adjustment knobs and/or handle lock levers are not secured. Make sure handle adjustment knobs are fully seated and handle lo...
Page 81 - SYMBOLE
4 — Français Les termes de mise en garde suivants et leur signification ont pour but d’expliquer le degré de risques associé à l’utilisation de ce produit. SYMBOLE SIGNAL SIGNIFICATION DANGER : Indique une situation dangereuse qui, si elle n’est pas évitée, aura pour conséquences des blessures grave...
Page 84 - ASSEMBLAGE DU COLLECTEUR D’HERBE
7 — Français DÉBALLAGE Ce produit nécessite l’assemblage. Retirez prudemment l’outil et les accessoires de la boîte. Assurez-vous que tous les articles énumérés dans la Liste d’expédition sont inclus. AVERTISSEMENT : Ne pas utiliser le produit si, en le déballant, vous constatez que des éléments f...
Page 86 - APPLICATIONS; DEUX PORTS DE PILE; DÉMARRAGE / ARRÊT DE LA TONDEUSE
9 — Français AVERTISSEMENT : N’utilisez aucun ajout ni accessoire non-recommandé par le fabricant de ce produit. L’utilisation des ajouts ou des accessoires non recommandés pourrait résulter en des blessures corporelles graves. AVERTISSEMENT : Inspectez toujours la tondeuse pour repérer les pièces e...
Page 87 - FONCTION D’AUTOPROPULSION
10 — Français Appuyer sur le bouton de démarrage, puis enclencher le levier pour démarrer le moteur et les lames. Pour arrêter la tondeuse, relâcher les leviers. NOTE : Le moteur et les lames démarreront également, si le levier est enclenché avant d’appuyer sur le bouton de démarrage. FONCTION D...
Page 88 - VIDER LE COLLECTEUR D’HERBE
11 — Français AVIS : Inspecter périodiquement au complet le produit afin de s’assurer qu’aucune pièce (vis, écrous, boulons, chapeaux, etc.) n’est endommagée, manquante ou desserrée. Serrer solidement toutes les pièces de fixation et les chapeaux et ne pas utiliser le produit tant que toutes les piè...
Page 89 - REMPLACEMENT DE LAS LAMES; ENTREPOSAGE DE LA TONDEUSE
12 — Français AVERTISSEMENT : Protégez toujours vos mains en portant des gants épais ou en enveloppant les bords tranchants de las lames avec des chiffons ou d’autre matériau quand vous effectuez l’entretien de las lames. Contact avec las lames résulter en des blessures graves. REMPLACEMENT DE LAS L...
Page 90 - TIREZ LE MEILLEUR PARTI DE VOTRE ACHAT!
13 — Français APPELER L E 1-800-525-2579 BESOIN D'A IDE? ¿NECESITA AYUDA? LLAME AL www.ryobit ools.com SI LES PRÉSENTES SOLUTIONS NE RÉSOLVENT PAS LE PROBLÈME, CONTACTER LE CENTRE DE RÉPARATIONS AGRÉÉ. PROBLÈME CAUSE POSSIBLE SOLUTION Poignée en mauvaise position. Les boutons de réglage de la poigné...
Page 95 - SELECTOR DE VELOCIDAD MÁXIMA
6 — Español ESPECIFICACIONES DEL PRODUCTO Motor ..........................................................................................................................................................................40 V CCTamaño de la unidad ..........................................................
Page 96 - ARMADO DEL RECEPTOR DE HIERBA
7 — Español DESEMPAQUETADO Este producto requiere armarse. Extraiga cuidadosamente de la caja la herramienta y los accesorios. Asegúrese de que estén presentes todos los artículos enumerados en la Lista de empaquetado . ADVERTENCIA: No utilice este producto si alguna pieza incluida en la Lista de ...
Page 97 - INSTALACIÓN DEL RECEPTOR DE HIERBA
8 — Español ADVERTENCIA: No permita que su familarización con este tipo de producto lo vuelva descuidado. Tenga presente que un descuido de un instante es suficiente para causar una lesión grave. ADVERTENCIA: Siempre utilice protección para los ojos con escudos laterales que cumplan con ANSI Z87.1. ...
Page 98 - PUERTOS DE BATERÍAS DOBLES; ENCENDIDO Y APAGADO DE LA PODADORA; USOS
9 — Español Extracción del paquetes de baterías: Abra la tapa de las baterías. Presione y mantenga presionado el botón de la traba de las baterías de la parte inferior del paquetes de baterías. Retire de la podadora el paquete de baterías. Repita los pasos para la segunda batería. Cierre l...
Page 100 - VACIADO DEL RECEPTOR DE HIERBA
11 — Español ADVERTENCIA: Antes de realizar tareas de mantenimiento o limpiar la podadora, asegúrese de que las hojas de la podadora se detengan por completo y de quitar las baterías y la llave de arranque para evitar el arranque accidental y posibles lesiones personales. ADVERTENCIA: Siempre póngas...
Page 101 - REEMPLAZO DE LAS CUCHILLAS; GUARDADO DE LA PODADORA
12 — Español REEMPLAZO DE LAS CUCHILLAS Vea las figuras 15 y 16. NOTA: Utilice únicamente piezas de repuesto autorizadas. Apague el motor y retire la llave del arranque. Permita que las cuchillsa se detenga por completo. Extraiga el paquetes de baterías del puerto de la batería. Gire la podado...
Page 102 - APROVECHE AL MÁXIMO SU COMPRA!
13 — Español SI CON ESTAS SOLUCIONES NO SE RESUELVE EL PROBLEMA, COMUNÍQUESE CON EL CONCESIONARIO DE SERVICIO AUTORIZADO DE SU PREFERENCIA. PROBLEMA CAUSA POSIBLE SOLUCIÓN El mango no está en posición. Las perillas de ajuste del mango y/o las trabas del mango no están trabadas. Asegúrese de que las ...
Page 105 - MANUEL D’UTILISATION / MANUAL DEL OPERADOR
OPERATOR’S MANUAL MANUEL D’UTILISATION / MANUAL DEL OPERADOR 21 in. 40 VOLT LAWN MOWER 21 po TONDEUSE 40 V21 pulg. PODADORA 40 V RY401015 99800042812-7-20 (REV:01) RYOBI is a registered trademark of Ryobi Limited and is used pursuant to a license granted by Ryobi Limited. TECHTRONIC INDUSTRIES POWER...
Page 106 - 0 VOLT HEDGE TRIMMER
WARNING: To reduce the risk of injury, the user must read and understand the operator’s manual before using this product. TABLE OF CONTENTS General Power Tool Safety Warnings .............................. 2-3 Hedge Trimmer Safety Warnings ........4 Symbols .......................................
Page 107 - Consulter l’encart à volets afin d’examiner toutes les figures
ii See this fold-out section for all of the figures referenced in the operator’s manual. Consulter l’encart à volets afin d’examiner toutes les figures mentionnées dans le manuel d’utilisation. Consulte esta sección desplegable para ver todas las figuras a las que se hace referencia en el manual del...
Page 109 - WORK AREA SAFETY; ELECTRICAL SAFETY; PERSONAL SAFETY; GENERAL POWER TOOL SAFETY WARNINGS
2 — English WARNING! Read all safety warnings and all instructions. Failure to follow the warnings and instructions may result in electric shock, fire and/or serious injury Save all warnings and instructions for future reference. The term “power tool” in the warnings refers to your mains-operated (c...
Page 110 - POWER TOOL USE AND CARE; BATTERY TOOL USE AND CARE
3 — English POWER TOOL USE AND CARE Do not force the power tool. Use the correct power tool for your application. The correct power tool will do the job better and safer at the rate for which it was designed. Do not use the power tool if the switch does not turn it on and off. Any power tool tha...
Page 111 - HEDGE TRIMMER SAFETY WARNINGS
4 — English Keep all parts of the body away from the cutter blade. Do not remove cut material or hold material to be cut when blades are moving. Make sure the switch is off when clearing jammed material. Blades coast after turn off. A moment of inattention while operating the hedge trimmer may res...
Page 113 - SYMBOL
6 — English SYMBOLS Some of the following symbols may be used on this product. Please study them and learn their meaning. Proper interpretation of these symbols will allow you to operate the product better and safer. SYMBOL NAME EXPLANATION Electric Shock Failure to use in dry conditions and to obse...
Page 115 - INSTALLING/REMOVING BATTERY PACK
8 — English OPERATION WARNING: Never use the debris deflector as a handle or attempt to hold or guide the hedge trimmer by gripping the debris deflector. Always keep both hands on the hedge trimmer handles. Improper handling of hedge trimmer could result in serious injury. INSTALLING/REMOVING BATTER...
Page 118 - CLEANING THE HEDGE TRIMMER
11 — English MAINTENANCE CLEANING THE HEDGE TRIMMER Remove the battery pack. Slide the scabbard over the blade. Clean dirt and debris from the body of the hedge trimmer, using a damp cloth with a mild detergent. NOTE: Do not use any strong detergents on the plastic housing or the handle. They ...
Page 119 - SÉCURITÉ DU LIEU DE TRAVAIL; SÉCURITÉ ÉLECTRIQUE; AVERTISSEMENTS DE SÉCURITÉ GÉNÉRAUX; SÉCURITÉ PERSONNELLE
2 — Français AVERTISSEMENT ! Lire tous les avertissements et toutes les instructions. Ne pas suivre l’ensemble des avertissements et des instructions peut entraîner une électrocution, un incendie ou des blessures graves. Conserver les avertissements et les instructions à des fins de référence ultéri...
Page 120 - UTILISATION ET ENTRETIEN DE LA PILE
3 — Français Porter des pantalons longs, manches longues, des chaussures de travail et des gants épais. Ne pas porter de vêtements amples, bijoux, shorts, sandales et ne pas travailler pieds nus. Ne porter aucun bijou. Gardez les poignées et les surfaces de prise sèches, propres et exemptes d’hu...
Page 121 - AVERTISSEMENTS DE SÉCURITÉ POUR LA TAILLE-HAIES
4 — Français Éloigner toute partie du corps des lames. Ne retirer les matériaux coincés ou suspendus ou de les tenir lorsque les lames sont en mouvement. S’assurer que l’interrupteur est à la position OFF (éteint) lorsque l’on déloge les débris de matériaux. La lame termine son mouvement une fois ...
Page 125 - DÉMARRAGE ET ARRÊT DU TAILLE-HAIES
8 — Français AVERTISSEMENT : Ne jamais se servir du déflecteur de débris comme d’une poignée ou tenter de tenir ou guider le taille-haies en agrippant le déflecteur. Toujours garder les deux mains Le fait d’utiliser le taille-haies de façon inappropriée peut entraîner de graves blessures. INSTALLATI...
Page 126 - POIGNÉE PIVOTANTE; TENUE DU TAILLE-HAIES
9 — Français AVERTISSEMENT : Déblayer la zone de travail avant chaque utilisation. Retirer tous les objets tels que les cordons, lumières, fil, ou câbles ont détaché qui peuvent s’emmêler dans la lame tranchante et créer un risque de blessure grave. Avant de mettre le taille-haies en marche, le te...
Page 127 - ENTRETIEN GÉNÉRAL
10 — Français AVERTISSEMENT : Pour empêcher un démarrage accidentel pouvant entraîner des blessures graves, toujours retirer le bloc-piles de l’outil avant tout nettoyage ou entretien. AVERTISSEMENT : Toujours porter une protection oculaire avec écrans latéraux certifiée conforme à la norme ANSI Z87...
Page 128 - NETTOYAGE DU TAILLE-HAIES; Ce produit est accompagné d’une garantie limitée; BESOIN D’AID
11 — Français ENTRETIEN Retirer le taille-haies de l’étau, remettre le bloc-piles en place et remettre l’outil en marche. Laisser les lames du taille-haies s’arrêter de manière à ce que les tranchants non affûtés des dents soient exposés. Retirer le bloc-piles du taille-haies et reprendre les pr...
Page 129 - SEGURIDAD EN EL ÁREA DE TRABAJO; SEGURIDAD ELÉCTRICA
2 — Español ADVERTENCIAS DE SEGURIDAD GENERALES PARA EL USO DE HERRAMIENTAS ELÉCTRICAS ¡ADVERTENCIA! Lea todas las advertencias de seguridad y las instrucciones. El incumplimiento de las advertencias e instrucciones puede ocasionar descarga eléctrica, fuego o lesiones graves. Guarde todas las advert...
Page 130 - EMPLEO Y CUIDADO DE LA HERRAMIENTA; ADVERTENCIAS DE SEGURIDAD GENERALES
3 — Español una superficie sólida permite un mejor control de la herramienta eléctrica en situaciones inesperadas. Póngase pantalones largos de tela gruesa, mangas largas, botas y guantes. No se ponga ropa holgada o pantalones cortos, sandales ni ande descalzo. No se ponga joyas de ninguna clase. ...
Page 131 - ADVERTENCIAS DE SEGURIDAD DE LA PODADORA DE SETOS
4 — Español Mantenga todas las partes del cuerpo alejadas de la hoja de corte. No retire material cortado ni sujete material por cortar mientras estén moviéndose las hojas. Asegúrese de apagar la máquina cuando retire el material atascado. La hoja de corte continúa girando por inercia después de a...
Page 134 - FAMILIARÍCESE CON LA PODADORA DE
7 — Español ESPECIFICACIONES DEL PRODUCTO Motor .......................................................... 40 V, corr. cont.Longitud de la hoja .............................. 660,4 mm (26 pulg.) Capacidad de corte ................................. 25,4 mm (1 pulg.)Velocidad de corte ...................
Page 136 - MANGO GIRATORIO
9 — Español ADVERTENCIA: Siempre despeje el área de trabajo antes de poner a funcionar la herramienta. Retire todos los objetos como cordones, luces, alambre, o cordones aflojadas, los cuales pueden enredarse en la hoja de corte y presentar un riesgo de lesiones graves. Antes de encender la podado...
Page 138 - AFILADO DE LA HOJA DE CORTE; personales, familiares o domésticos (90 días para usos trabajo o; ¿NECESITA A
11 — Español MANTENIMIENTO AFILADO DE LA HOJA DE CORTE Vea la figura 9. Permita que se detengan las hojas de la podadora de setos en la posición mostrada. De esta manera se da espacio libre para la lima, entre los dientes de corte y los de protección. Retire el paquete de baterías de la podadora...
Page 139 - TAILLE-HAIES 40 V / PODADORA DE SETOS DE 40 V
9980003649-9-20 (REV:01) OPERATOR’S MANUAL MANUEL D’UTILISATION / MANUAL DEL OPERADOR 40 VOLT HEDGE TRIMMER TAILLE-HAIES 40 V / PODADORA DE SETOS DE 40 V RY40604 TECHTRONIC INDUSTRIES POWER EQUIPMENT P.O. Box 1288, Anderson, SC 29622 USA 1-800-525-2579 • www.ryobitools.com RYOBI is a registered trad...
Page 140 - MANUEL D’UTILISATION; 8 in. 40 VOLT BRUSHLESS CHAIN SAW
OPERATOR’S MANUAL MANUEL D’UTILISATION MANUAL DEL OPERADOR 18 in. 40 VOLT BRUSHLESS CHAIN SAW SCIE À CHAÎNE SANS BALAI DE 40 V DE 45,7 cm (18 po) MOTOSIERRA SIN ESCOBILLAS DE 45,7 cm (18 pulg.), 40 V RY40508 WARNING: To reduce the risk of injury, the user must read and understand the operator’s manu...
Page 141 - GENERAL POWER TOOL SAFETY RULES
2 - English GENERAL POWER TOOL SAFETY RULES WARNING: Read all safety warnings, instructions, illus- trations and specifications provided with this power tool. Failure to follow all instructions listed below may result in electric shock, fire and/or serious injury. Save all warnings and instructions ...
Page 142 - Maintenance
3 - English GENERAL POWER TOOL SAFETY RULES POWER TOOL USE AND CARE Do not force the power tool. Use the correct power tool for your application. The correct power tool will do the job better and safer at the rate for which it was designed. Do not use the power tool if the switch does not turn i...
Page 143 - CHAIN SAW SAFETY WARNINGS; CAUSES AND OPERATOR
4 - English CHAIN SAW SAFETY WARNINGS Keep all parts of the body away from the saw chain when the chain saw is operating. Before you start the chain saw, make sure the saw chain is not contacting anything. A moment of inattention while operating chain saws may cause entanglement of your clothing o...
Page 145 - When clearing jammed material or servicing
6 - English CHAIN SAW SAFETY WARNINGS to reduce the risk of injury. Follow instructions for lubricating and changing accessories. Do not operate a chain saw with one hand! Use a firm grip with thumbs and fingers encircling the chain saw handles. Serious injury to the opera-tor, helpers, bystanders...
Page 146 - KICKBACK; • Always grip the saw firmly with both hands.
7 - English • Use replacement parts such as low kick- back chain, chain brakes and special guide bars that reduce the risks associated with rotational kickback. Use only the replacement guide bars and low kickback chains specified by the manufacturer for the saw. With a basic understanding of kick...
Page 147 - UNDERSTANDING YOUR CHAIN SAW; GUIDE BARS
8 - English Do not overreach. Keep proper footing and bal- ance at all times. Do not cut above chest height or overreach when cutting. Do not let the nose of the guide bar contact a log, branch, ground, or any other obstruction while you are operating the unit. Follow the sharpening and mainte...
Page 150 - GLOSSARY OF TERMS; A chain saw without the saw chain and guide bar.
11 - English GLOSSARY OF TERMS Automatic Oiler System Lubrication is provided by the automatic oiler sys-tem. The oiler is driven by the sprocket and adds lubrication only when the chain is moving. Bucking The process of cross cutting a felled tree or log into lengths. Chain Saw Power Head A chain s...
Page 151 - PRODUCT SPECIFICATIONS
12 - English FEATURES PRODUCT SPECIFICATIONS Motor ...................................................................................................................................... 40 Volt DCBar Length ................................................................................................
Page 153 - You may use this product for the following purposes:
14 - English WARNING: Do not use any attachments or accessories not recommended by the manufacturer of this product. The use of attachments or accessories not recommended can result in serious personal injury. WARNING: Never fell a tree or cut a log or limb that has a diameter greater than the lengt...
Page 154 - TO INSTALL/REMOVE BATTERY PACK; To avoid serious personal injury, always; BAR AND CHAIN LUBRICATION
15 - English TO INSTALL/REMOVE BATTERY PACK See Figure 5. WARNING: Always remove battery pack from your tool when you are assembling parts, making adjust-ments, cleaning, carrying, transporting or when not in use. Removing battery pack will prevent accidental starting that could cause serious person...
Page 155 - ADDING BAR AND CHAIN LUBRICANT; Adjusting the Chain Tension; OPERATING THE CHAIN BRAKE
16 - English WARNING: NEVER adjust the automatic oiler system when the engine is running. Doing so or failure to heed this warning could cause serious personal injury. ADDING BAR AND CHAIN LUBRICANT See Figure 6. NOTICE: Remove battery pack from unit. Fill oil tank with bar and chain lubricant (not ...
Page 156 - STARTING AND STOPPING THE; Starting the chain saw:; General Power Tool Safety Rules
17 - English SWITCH TRIGGER LOCK-OUT BUTTON Fig. 9 STARTING AND STOPPING THE CHAIN SAW See Figures 9 - 10. WARNING: Keep body to the left of the chain line. Never straddle the saw or chain, or lean over past the chain line. Improper operation of the chain saw could result in serious personal injury....
Page 158 - HAZARDOUS CONDITIONS
19 - English WORK AREA PRECAUTIONS See Figure 15. Cut only wood or materials made from wood, no sheet metal, no plastics, no masonry, no non-wood building materials. Never allow children to operate the saw. Allow no person to use this chain saw who has not read this Operator’s Manual or received...
Page 160 - BUCKING
21 - English tree). This is called “hinge” or “hingewood.” It controls the fall of the tree and prevents slip-ping or twisting or shoot-back of the tree off the stump. See Figures 16 - 17. On large diameter trees, stop the back cut before it is deep enough for the tree to either fall or settle bac...
Page 161 - LIMBING
22 - English footing is secure and your weight is distributed evenly on both feet. Leave the larger support limbs under the tree to keep the tree off the ground while cutting. Limbs should be cut one at a time. Remove the cut limbs from the work area often to help keep the work area clean and sa...
Page 162 - PRUNING; SPRINGPOLES
23 - English SPRINGPOLE Fig. 25 FINISHING CUT FIRST CUT 1/3 DIAMETER SECOND CUT LOAD Fig. 24 PRUNING See Figure 24. Pruning is trimming limbs from a live tree. Work slowly, keeping both hands on the chain saw with a firm grip. Always make sure your footing is secure and your weight is distributed ...
Page 164 - Bar and Chain Combinations
25 - English BAR GROOVE CHAIN DRIVE LINKS Fig. 29 CHAIN TENSION PIN HOLE ADJUSTING PIN Fig. 30 BAR STUDS BAR MOUNTING NUTS CHAIN COVER NOTE: When replacing the guide bar and chain, always use the specified bar and chain listed in the Bar and Chain Combinations section later in this manual. Remove ...
Page 165 - ADJUSTING THE CHAIN TENSION
26 - English CHAIN TENSIONING SCREW BAR MOUNTING NUTS APPROX. .050 in. Fig. 32 FLATS ON TIE STRAPS Fig. 33 Fig. 34 ≈ 0.050 in. LIFT THE TIP OF THE GUIDE BAR UP TO CHECK FOR SAG Fig. 31 Position the chain so there is a loop at the back of the bar. Hold the chain in position on the bar and place t...
Page 166 - CHAIN MAINTENANCE; If adjustment is needed:; Retighten the bar mounting nuts securely.
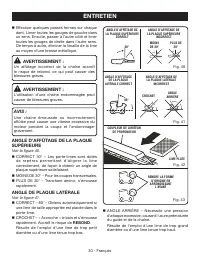
27 - English CHAIN MAINTENANCE See Figures 35 - 37. WARNING: Remove the battery pack and make sure the chain has stopped before you do any work on the saw to avoid accidental starting and pos-sible serious personal injury. Fig. 35 Fig. 36 CHECK FOR WEAR OR DAMAGE RAKER CLEARANCE .025 in. Fig. 37 CUT...
Page 167 - HOW TO SHARPEN THE CUTTERS; Chain Tension
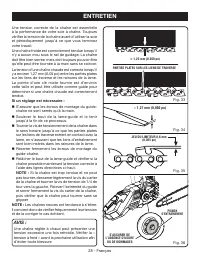
28 - English Lift file away from the steel on each return stroke. Put a few firm strokes on every tooth. File all left hand cutters in one direction. Then move to the other side and file the right hand cutters in the opposite direction. Occasionally remove filings from the file with a wire brush...
Page 168 - DEPTH GAUGE CLEARANCE
29 - English TOP PLATE FILING ANGLE See Figure 40. CORRECT 30° – File holders are marked with guide marks to align file properly to produce correct top plate angle. LESS THAN 30° – For Cross Cutting. MORE THAN 30° – Feathered Edge Dulls Quickly. SIDE PLATE ANGLE See Figure 41. CORRECT – 80° ...
Page 169 - MAINTAINING THE GUIDE BAR; A bar with any of the following faults should be; TRANSPORTING AND STORING
30 - English MAINTAINING THE GUIDE BAR See Figure 44. CAUTION: Remove the battery pack from the chain saw and make sure the chain has stopped before you do any work on the saw. Failure to do so may result in accidental starting and possible serious injury. Proper maintenance will maximize the useful...
Page 170 - Operation
31 - English Chain specifications: 3/8 in. pitch, low profile narrow kerf, .050 in. chain gauge, 6-tooth drive sprocket. Length of Bar Guide Bar Part Number Chain Part Number Drive Links 18 in. 317105001 682309001 62 BAR AND CHAIN COMBINATIONS TROUBLESHOOTING 1-800-525-2579 CALL US FIRST For any que...
Page 171 - AVERTISSEMENT
2 - Français AVERTISSEMENTS RÈGLES DE SÉCURITÉ RELATIVES AUX OUTILS ÉLECTRIQUES AVERTISSEMENT Lire les avertissements de sécurité, les instructions et les précisions et consulter les illustrations fournis avec cet outil électrique. Le fait de ne pas se conformer à l’ensemble des consignes présentées...
Page 172 - UTILISATION ET ENTRETIEN DES
3 - Français AVERTISSEMENTS RÈGLES DE SÉCURITÉ RELATIVES AUX OUTILS ÉLECTRIQUES amples, bijoux et cheveux longs peuvent se prendre dans les pièces en mouvement. Si les outils sont équipés de dispositifs de dépoussiérage, s’assurer qu’ils sont connectés et correctement utilisés. L’ u s a g e d e c ...
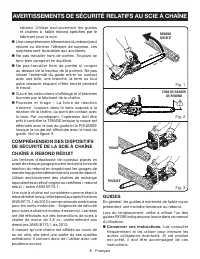
Page 173 - AVERTISSEMENTS DE SÉCURITÉ RELATIFS AU SCIE À CHAÎNE; AVERTISSEMENTS RÈGLES DE SÉCURITÉ
4 - Français Éloigner toutes les parties du corps de la scie à chaîne pendant que cette dernière fonctionne. Avant de démarrer la scie à chaîne, s’assurer que la scie à chaîne n’est pas en contact avec aucun objet. Un moment d’inattention pendant l’utilisation de la scie à chaîne peut causer l’enc...
Page 174 - Ne tentez pas d’abattre un arbre jusqu’à; L’utilisateur; CAUSES DU REBOND ET
5 - Français AVERTISSEMENTS DE SÉCURITÉ RELATIFS AU SCIE À CHAÎNE nettoyage du matériau coincé ou de l’entretien peut entraîner des blessures graves. Transporter la scie à chaîne par la poignée avant, avec l’interrupteur positionné à éteint et éloignée du corps. Toujours installer le couvercle du ...
Page 175 - Au moment de dégager les matériaux coincés; Le port d’un vêtement de protection lourd
6 - Français Ne pas tenir la scie d’une seule main ! La tenir fermement, les doigts et pouces encerclant les poignées. Ceci exposerait l’utilisateur, les autres travailleurs et toutes les personnes présentes à des risques de blessure grave. Les scies à chaîne sont conçues pour être utilisées à d...
Page 176 - REBOND; Voir les figures 1 à 3.; Pour minimaliser le risque de rebond, prendre
7 - Français déconnecté. Un actionnement inattendu du scie à chaîne lors du nettoyage du matériau coincé ou de l’entretien peut entraîner des blessures graves. Toujours utiliser l’outil adéquat pour le travail. La scie à chaîne ne doit être utilisée que pour couper du bois. Ne jamais l’utiliser po...
Page 177 - COMPRÉHENSION DES DISPOSITIFS; Conserver ces instructions.
8 - Français AVERTISSEMENTS DE SÉCURITÉ RELATIFS AU SCIE À CHAÎNE rebond. Utiliser exclusivement les guides et chaînes à faible rebond spécifiés par le fabricant pour la scie. Une compréhension élémentaire du rebond peut réduire ou éliminer l’élément de surprise. Les surprises sont favorables aux ...
Page 180 - GLOSSAIRE; Scie à chaîne sans la chaîne et le guide.
11 - Français GLOSSAIRE Système de lubrification automatique La lubrification est assurée par le système de lubrification automatique. Le système de lubrification est entraîné par le pignon et ne lubrifie l’outil que lorsque la chaîne est en mouvement. Tronçonnage Coupe transversale d’un arbre abatt...
Page 181 - FICHE TECHNIQUE
12 - Français CARACTÉRISTIQUES FICHE TECHNIQUE Moteur ....................................................................................................................................... 40 V c.c.Longueurs de guide .....................................................................................
Page 184 - Ébranchage, abattage et coupe élémentaires; PILES; Pour éviter des blessures graves, tojours
15 - Français BLOC-PILE LOQUET LOGEMENT DE PILES AVIS : Avant chaque utilisation, inspecter au complet le produit afin de s’assurer qu’aucune pièce (vis, écrous, boulons, chapeaux, etc.) n’est endommagée, manquante ou desserrée. Serrer solidement toutes les pièces de fixation et les chapeaux et ne p...
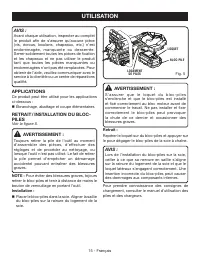
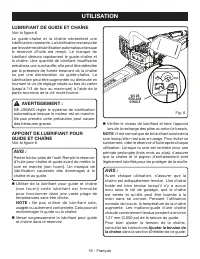
Page 185 - Entretien; LUBRIFIANT DE GUIDE ET CHAÎNE
16 - Français Vérifier le niveau de lubrifiant et faire l’appoint lors de la recharge des piles ou selon le besoin. NOTE : Il est normal que de la lubrifiant suinte de la scie lorsqu’elle n’est pas en usage. Pour éviter ce suintement, vider le réservoir d’huile après chaque utilisation. Lorsque la...
Page 186 - UTILISATION DU FREIN DE CHAÎNE; Voir les figures 7 et 8.; DÉMARRAGE ET ARRÊT DE LA SCIE À; Démarrage de la scie à chaîne :
17 - Français FREIN ENGAGÉ POSITION DE MARCHE Fig. 8 Fig. 7 COMMUTATEUR BOUTON DE VERROUILLAGE DE GÂCHETTE Fig. 9 UTILISATION DU FREIN DE CHAÎNE Voir les figures 7 et 8. Le fonctionnement du frein de chaîne doit être vérifié avant chaque utilisation. Avec le dos de la main gauche, engager le frein...
Page 187 - POIGNÉES; Voir
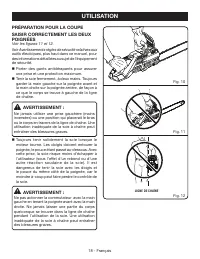
18 - Français PRÉPARATION POUR LA COUPESAISIR CORRECTEMENT LES DEUX POIGNÉES Voir les figures 11 et 12. Voir Avertissements règles de sécurité relatives aux outils électriques , plus haut dans ce manuel, pour des informations détaillées au sujet de l’équipement de sécurité. Porter des gants antidé...
Page 188 - POSITION DE COUPE CORRECTE
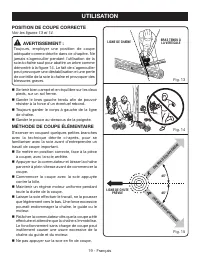
19 - Français 45° 45° Fig. 15 LIGNE DE CHUTE PRÉVUE CHEMIN D’ÉCHAPPEMENT CHEMIN D’ÉCHAPPEMENT POSITION DE COUPE CORRECTE Voir les figures 13 et 14. AVERTISSEMENT : Toujours, employer une position de coupe adéquate comme décrite dans ce chapitre. Ne jamais s'agenouiller pendant l'utilisation de la sc...
Page 189 - PRÉCAUTIONS DE CHANTIER; Voir la figure 15; ABATTAGE D’ARBRES; SITUATIONS DANGEREUSES
20 - Français PRÉCAUTIONS DE CHANTIER Voir la figure 15 Ne couper que du bois ou des matériaux dérivés du bois. Ne jamais couper de la tôle, des matières plastiques, du béton ou matériaux de construction autres que le bois. Ne jamais laisser un enfant utiliser la scie. Ne jamais laisser quiconqu...
Page 190 - Entaille de dessous.; Voir les figures
21 - Français UTILISATION Lorsque vous abattez un arbre, il est très important de respecter les avertissements et de suivre les instructions pour prévenir la possibilité de mort ou de blessures personnelles. Ne pas couper d’arbres extrêmement inclinés ou de gros arbres aux branches pourries, à l...
Page 192 - TYPES DE COUPE UTILISÉS; COUPE PAR LE DESSUS; tendance à pousser vers l’utilisateur. Être préparé à; ÉBRANCHAGE
23 - Français À mesure qu’elle est coupée, la bille a tendance à fléchir. Si la première coupe dépasse le tiers du diamètre de la bille, la lame risque d’être pincée ou bloquée dans l’entaille.Prêter une attention particulière aux billes sous contrainte pour éviter que le guide et la chaîne ne soien...
Page 193 - ÉLAGAGE; FOUET; FOUETS
24 - Français ÉLAGAGE Voir la figure 24. L’élagage consiste à couper les branches d’un arbre sur pied. Travailler lentement et tenir la scie fermement à deux mains. Toujours veiller à se tenir bien campé et en équilibre sur les deux pieds. Ne pas utiliser la scie en se tenant sur une échelle, ce...
Page 195 - Combinaisons de guide et chaîne
26 - Français AVERTISSEMENT : Ne jamais toucher ou régler la chaîne lorsque le moteur tourne. La chaîne de la scie est extrêmement tranchante. Toujours porter des gants lors de son entretien pour éviter des lacérations profondes. ATTENTION : Toujours porter des gants lors de la manipulation du guide...
Page 196 - RÉGLAGE DE TENSION DE LA CHAÎNE
27 - Français trous respectifs se trouvant dans le couvercle de l’embrayage. NOTE : Il peut être nécessaire de replacer légèrement la goupille de réglage avec le cadran de tension de la chaîne afin de faire en sorte qu’elle soit alignée avec le trou pour la goupille de tension de la chaîne sur le gu...
Page 197 - Si un réglage est nécessaire :
28 - Français Une tension correcte de la chaîne est essentielle à la performance de votre scie à chaîne. Toujours vérifier la tension de la chaîne avant d’utiliser la scie et périodiquement jusqu’à ce que vous terminez votre travail. Une chaîne froide est correctement tendue lorsqu’il n’y a aucun mo...
Page 198 - Tension de la chaîne
29 - Français ENTRETIEN DE LA CHAÎNE Voir les figures 35 à 37. AVERTISSEMENT : Retirer le bloc-pile et s’assurer que la chaîne s’est immobilisée avant d’entreprendre tout travail sur la scie pour éviter un démarrage accidentel et des blessures graves. Utiliser exclusivement des chaînes à rebond rédu...
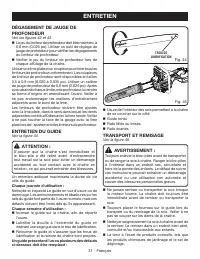
Page 200 - DÉGAGEMENT DE JAUGE DE; Chaque journée d’utilisation :; TRANSPORT ET REMISAGE
31 - Français TROU DE LUBRIFICATION DÉGAGEMENT DE JAUGE DE PROFONDEUR Voir les figures 42 et 43. Le jeu du limiteur de profondeur doit être maintenu à 0,6 mm (0,025 po). Utiliser un outil de réglage de jauge de profondeur pour vérifier les dégagements du limiteur de profondeur. Vérifier le jeu d...
Page 201 - COMBINAISONS DE GUIDE ET CHAÎNE; Pour toute question concernant l’utilisation ou l’entretien; Ce produit est accompagné d’une garantie limitée de cinq (5) ans pour; Utilisation; Reglage la tension de la chaîne
32 - Français APPELER L E 1-800-525-2579 BESOIN D'A IDE? ¿NECESITA AYUDA? LLAME AL www.ryobit ools.com COMBINAISONS DE GUIDE ET CHAÎNE Caractéristiques de la chaîne : pas de 9,53 mm (0,375 po), trait d'abattage à profil bas, calibre de chaîne 1,3 mm (0,050 po), roue à 6 dents. Longueur N° de référen...
Page 202 - ADVERTENCIAS DE SEGURIDAD; SEGURIDAD PERSONAL
2 - Español ADVERTENCIA Lea todas las advertencias de seguridad, instrucciones, ilustraciones y especificaciones p r o p o r c i o n a d a s c o n e s t a h e r r a m i e n t a eléctrica. No seguir las instrucciones indicadas a continuación puede provocar descargas eléctricas, incendios o lesiones g...
Page 203 - EMPLEO Y CUIDADO DE LA
3 - Español ADVERTENCIAS DE SEGURIDAD PARA HERRAMIENTAS ELÉCTRICAS giratoria de la herramienta eléctrica puede causar lesiones. No estire el cuerpo para alcanzar mayor distancia. Mantenga una postura firme y buen equilibrio en todo momento. De esta manera se logra un mejor control de la herramient...
Page 204 - SERVICIO
4 - Español M a n t e n g a t o d a s l a s p a r t e s d e l c u e r p o alejadas de la motosierra mientras esté en funcionamiento. Antes de encender la motosierra, asegúrese de que no esté en contacto con nada. Un momento de distracción mientras usa la motosierra puede hacer que la motosierra ag...
Page 205 - ADVERTENCIAS DE SEGURIDAD DE LA MOTOSIERRA; ejemplo: no use la motosierra para cortar; CAUSAS Y PREVENCIÓN DEL
5 - Español ADVERTENCIAS DE SEGURIDAD DE LA MOTOSIERRA Siempre mantenga un buen apoyo y utilice la motosierra únicamente sobre superficies fijas, firmes y niveladas. Las superficies resbaladizas o inestables como las escaleras pueden hacerle perder el equilibrio o el control de la motosierra. Cu...
Page 207 - Cuando extraiga material atascado o repare
7 - Español ADVERTENCIAS DE SEGURIDAD DE LA MOTOSIERRA completamente al soltarse el gatillo del interruptor. Si la cadena continúa desplazándose al soltarse el gatillo del interruptor, permita que presten servicio a la unidad en el establecimiento de servicio autorizado. Inspeccione para ver si ha...
Page 208 - CONTRAGOLPE; Vea las figuras 1 a 3.
8 - Español ADVERTENCIAS DE SEGURIDAD DE LA MOTOSIERRA CONTRAGOLPE Vea las figuras 1 a 3. ADVERTENCIA: El contragolpe ocurre cuando la cadena en movimiento hace contacto con un objeto en la parte superior de la punta de la barra, o cuando la madera se cierra y pellizca la cadena de la sierra en el p...
Page 209 - Vea la; EXPLICACIÓN DE LOS DISPOSITIVOS; Guarde estas instrucciones.
9 - Español No estire el cuerpo para alcanzar mayor distancia. Mantenga una postura firme y buen equilibrio en todo momento. No trate de cortar objetos fuera de su alcance, ni arriba de la altura del pecho. No permita que la punta de la barra guía entre en contacto con ningún tronco, rama, la ti...
Page 212 - Barra guía
12 - Español GLOSARIO DE T É RMINOS Sistema aplicador de aceite automático La lubricación es suministrada por el sistema de aplicador de aceite automático. La rueda dentada impulsa al aplicador de aceite y agrega lubricación solo cuando se mueve la cadena. Tronzado Es el proceso de cortar transversa...
Page 213 - ESPECIFICACIONES DEL PRODUCTO
13 - Español CARACTERÍSTICAS ESPECIFICACIONES DEL PRODUCTO Motor ........................................................................................................................................ 40 V C.C.Longitud de la barra .......................................................................
Page 214 - CADENA
14 - Español DESEMPAQUETADO Embarcamos este producto completamente armado. Extraiga cuidadosamente de la caja el producto y los accesorios. Asegúrese de que estén presentes todos los artículos enumerados en la Lista de empaquetado . ADVERTENCIA: No utilice este producto si alguna pieza incluida en...
Page 215 - n eléctrico o de otras fuentes eléctricas.
15 - Español ADVERTENCIA: Para evitar un arranque accidental que podría causar lesiones corporales graves, siempre desconecte el cable de la bujía del motor de la bujía misma al ensamblar las piezas. PELIGRO: Nunca couper cerca de líneas de corriente, cord ó n eléctrico o de otras fuentes eléctricas...
Page 216 - Para evitar lesiones corporales serias,
16 - Español PESTILLO RECEPTÁCULO DE LAS BATERÍAS PAQUETE DE BATERÍAS ADVERTENCIA: Asegúrese de que el pestillo (o los pestillos) del paquete de baterías entre adecuadamente en su lugar y que el paquete de baterías esté bien colocado y asegurado en el puerto de batería del cabezal motor antes de que...
Page 218 - Ajuste de; en la sección de; FUNCIONAMIENTO DEL FRENO DE LA; Vea las figuras 7 y 8.; ENCENDIDO Y APAGADO DE LA; Encendido de la motosierra:; Oprima y no suelte el botón de seguro del gatillo.; Apagado de la motosierra:; Suelte el gatillo del interruptor cuando desee
18 - Español BOTÓN DE SEGURO GATILLO DEL INTERRUPTOR AVISO: Antes de cada uso, asegúrese de que la cadena esté tensionada correctamente. Una cadena fría está tensionada correctamente cuando no hay flacidez en la parte inferior de la barra guía, la cadena está ajustada y puede girarse con la mano sin...
Page 219 - MANGOS; Advertencias de seguridadpara
19 - Español Esta sierra inalámbrica de cadena está diseñada para corte de desramado y poda, así como para talar pequeña árboles. PREPARACIÓN PARA EL CORTESUJECIÓN CORRECTA DE LOS MANGOS Vea las figuras 11 y 12. Con respecto al equipo de seguridad adecuado, consulte la sección Advertencias de seguri...
Page 220 - PRECAUCIONES EN EL ÁREA DE
20 - Español POSTURA CORRECTA PARA EL CORTE Vea las figuras 13 y 14. ADVERTENCIA: Siempre utilice la postura de corte correcta que se describe en esta sección. Nunca se arrodille cuando utilice la motosierra, salvo cuando tale un árbol según se ilustra en la figura 14. Si se arrodilla podría perder ...
Page 221 - TALA DE ÁRBOLES; CONDICIONES PELIGROSAS
21 - Español que no haya leído este manual del operador o no haya recibido instrucciones adecuadas sobre la forma correcta de emplear esta motosierra. Mantenga a todas las personas, ayudantes, circunstantes, niños y animales a una distancia segura del área de corte. Durante las operaciones de tala...
Page 222 - Corte trasero de tala.
22 - Español Al talar un árbol, es muy importante que siga estrictamente estas advertencias e instrucciones para evitar la muerte u otras lesiones personales serias. ■ No corte árboles extremadamente delgados ni árboles grandes con ramas podridas, corteza suelta o troncos huecos. Permita que exper...
Page 223 - TRONZADO
23 - Español o “madera de bisagra”. Controla la caída del árbol y evita el deslizamiento, el torcimiento o la separación violenta del árbol de su cepa. Vea las figuras 16 y 17. En árboles de diámetro grande, detenga el corte trasero antes de que esté tan profundo que el árbol pudiese caer o asenta...
Page 224 - TRONZADO POR ARRIBA
24 - Español Fig. 22 TRONZADO DE TRONCOS BAJO TENSIÓN Vea las figuras 21 y 22. Cuando el tronco está sostenido a lo largo de toda su longitud, debe cortarse a partir de la parte superior, o sea tronzado por arriba.Cuando el tronco está sostenido por un extremo, corte 1/3 del diámetro a partir de la ...
Page 226 - PÉRTIGAS; PÉRTIGA
26 - Español ADVERTENCIA: Nunca use agua ni otros líquidos para limpiar o enjuagar la product y no exponga la unidad a la lluvia ni de condiciones húmedas. Almacene la unidad en el interior en un lugar seco. Los líquidos corrosivos, el agua, y los productos químicos pueden ingresar los componentes e...
Page 228 - Combinaciones de barra y cadena,
28 - Español ADVERTENCIA: Nunca toque ni ajuste la cadena mientras esté funcionando el motor. La cadena de la sierra está sumamente afilada; siempre póngase guantes protectores al efectuar labores de mantenimiento de la cadena para evitar posibles heridas desgarradas serias. PRECAUCIÓN: Siempre póng...
Page 229 - AJUSTE DE LA TENSIÓN DE LA CADENA; espere a que se detengan todas; y quite el paquete
29 - Español NOTA: Es posible que haya que reposicionar levemente el pasador de ajuste con el tornillo de tensión de la cadena para alinearlo con la posición del orificio del pasador tensionador de la cadena de la barra. Vuelva a colocar la cubierta del embrague y las tuercas de montaje de la barr...
Page 230 - MANTENIMIENTO DE LA CADENA; Si es necesario un ajuste:
30 - Español MANTENIMIENTO DE LA CADENA Vea las figuras 35 a 37. ADVERTENCIA: Retire el paquete de baterías y asegúrese de que se haya detenido la cadena antes de realizar cualquier labor de mantenimiento de la sierra para evitar el arranque accidental y posibles lesiones personales graves. Sólo uti...
Page 231 - FORMA DE AFILAR LOS DIENTES DE
31 - Español Tense adecuadamente la cadena antes de afilarla. Consulte el apartado Tensado de la cadena , más arriba en este manual. Efectúe toda la limadura en el punto medio de la barra. Use una lima redonda de 5/32 pulg. de diámetro con mango. Mantenga la lima al nivel de la placa superior ...
Page 232 - ÁNGULO CORRECTO: 30o – Los mangos de; ÁNGULO DE LA PLACA LATERAL; Á N G U L O C O R R E C T O : 8 0 o; PENDIENTE HACIA ATRÁS – Se necesita; ESPACIO LIBRE DEL CALIBRE DE
32 - Español lado y lime los dientes de corte derechos en la dirección opuesta. Ocasionalmente, con un cepillo de alambre limpie las limaduras producidas por la lima. ADVERTENCIA: Un afilado inadecuado de la cadena aumenta el peligro de contragolpe, lo que podría resultar en lesiones personales grav...
Page 233 - profundidad; MANTENIMIENTO DE LA BARRA GUÍA; Vea; Debe cambiarse toda barra que presente; TRANSPORTE Y ALMACENAMIENTO; No guarde ni transporte la motosierra mientras
33 - Español profundidad vienen de 0,5 mm a 0,9 mm (0,020 pulg. a 0,035 pulg.). Use un igualador de calibres 0,6 mm (0,025 pulg.). Después de bajar cada calibre de profundidad, devuélvales su forma original redondeando la parte frontal de los mismos. Tenga cuidado de no dañar los eslabones de impuls...
Page 234 - CORRECIÓN DE PROBLEMAS; producto,llame al teléfono de atención al consumidor de RYOBI!; Mantenimiento; COMBINACIONES DE BARRA Y CADENA; Especificaciones de la cadena:
34 - Español APPELER L E 1-800-525-2579 BESOIN D'A IDE? ¿NECESITA AYUDA? LLAME AL www.ryobit ools.com CORRECIÓN DE PROBLEMAS LLÁMENOS PRIMERO Si tiene preguntas sobre el funcionamiento o el mantenimiento este producto,llame al teléfono de atención al consumidor de RYOBI! La recortadora ha sido proba...