Page 2 - See this fold-out section for all the figures referenced; Voir que cette section d’encart pour toutes les
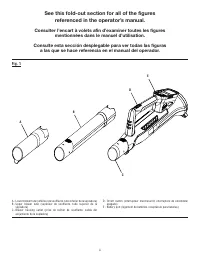
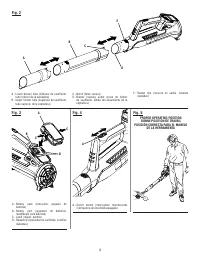
ii See this fold-out section for all the figures referenced in the operator’s manual. Voir que cette section d’encart pour toutes les figures a adressé dans le manuel d’utilisation. Vea esta sección de la página desplegable para todas las figuras mencionó en el manual del operador. Fig. 1 Fig. 2 A -...
Page 4 - TABLE OF CONTENTS; TABLE DES MATIÈRES / ÍNDICE DE CONTENIDO; INTRODUCTION; INTRODUCTION / INTRODUCCIÓN
2 — English Introduction ...................................................................................................................................................................... 2 Introduction / Introducción Important Safety Instructions ...............................................
Page 5 - READ ALL INSTRUCTIONS; IMPORTANT SAFETY INSTRUCTIONS
3 — English WARNING! When using electric gardening appliances, basic safety precautions should always be followed to reduce the risk of fire, electric shock and personal injury. READ ALL INSTRUCTIONS For safe operation, read and understand all instructions before using this product. Follow all saf...
Page 7 - SYMBOLS
5 — English SYMBOLS The following signal words and meanings are intended to explain the levels of risk associated with this product. SYMBOL SIGNAL MEANING DANGER: Indicates an imminently hazardous situation, which, if not avoided, will result in death or serious injury. WARNING: Indicates a potentia...
Page 9 - ASSEMBLY; ATTACHING GRASS DEFLECTOR; OPERATION; TO INSTALL BATTERY PACK
7 — English ASSEMBLY CAUTION: Be careful when sliding the two ends together to avoid pinching your hands or fingers. NOTE: Once assembled correctly, the upper and lower end of the tool should not separate when pulled. Repeat above steps if pieces can be separated. WARNING: Failure to properly assemb...
Page 10 - OPERATING THE TRIMMER; CUTTING TIPS; ADVANCING THE LINE MANUALLY
8 — English STARTING/STOPPING THE STRING TRIMMER See Figure 6. To start the string trimmer, push the lock-out button and pull the switch trigger. To stop the string trimmer, release the switch trigger. OPERATING THE TRIMMER See Figure 7. Follow these tips when using the string trimmer: Hold th...
Page 11 - MAINTENANCE; NOTICE; GENERAL MAINTENANCE; STORING THE TRIMMER
9 — English MAINTENANCE WARNING: When servicing, use only recommended or equivalent replacement parts. Use of any other parts may create a hazard or cause product damage. WARNING: Always wear eye protection with side shields marked to comply with ANSI Z87.1. Failure to do so could result in objects ...
Page 12 - TROUBLESHOOTING; PROBLEM; CALL US FIRST
10 — English TROUBLESHOOTING PROBLEM POSSIBLE CAUSE SOLUTION Line will not advance when using the auto-feed head Line is welded to itself. Not enough line on spool. Line is worn too short. Line is tangled on spool. Lubricate with silicone spray. Install more line. Refer to Line Replacement earlier i...
Page 13 - WARRANTY; LIMITED WARRANTY STATEMENT
11 — English WARRANTY LIMITED WARRANTY STATEMENT Techtronic Industries North America, Inc., warrants to the original retail purchaser that this RYOBI ® brand outdoor product is free from defect in material and workmanship and agrees to repair or replace, at Techtronic Industries North America, Inc.’...
Page 14 - LIRE TOUTES LES INSTRUCTIONS; INSTRUCTIONS IMPORTANTES CONCERNANT LA SÉCURITÉ
3 — Français AVERTISSEMENT ! Lors de l’utilisation d’outils de jardinage, toujours suivre les consignes de sécurité de base pour éviter les risques d’incendie, d’électrocution et de blessures. LIRE TOUTES LES INSTRUCTIONS Pour travailler en toute sécurité, lire et veiller à bien comprendre toutes ...
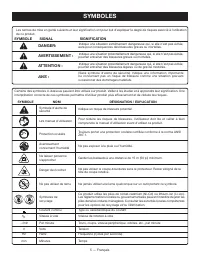
Page 16 - SYMBOLES; SYMBOLE
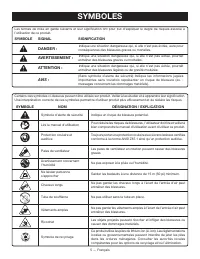
5 — Français SYMBOLES Certains des symboles ci-dessous peuvent être utilisés sur produit. Veiller à les étudier et à apprendre leur signification. Une interprétation correcte de ces symboles permettra d’utiliser produit plus efficacement et de réduire les risques. SYMBOLE NOM DÉSIGNATION / EXPLICATI...
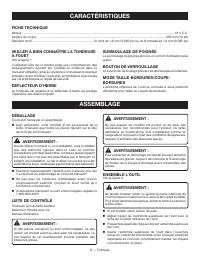
Page 17 - CARACTÉRISTIQUES
6 — Français CARACTÉRISTIQUES FICHE TECHNIQUE Moteur .................................................................................................................................................................................18 V C.C.Largeur de coupe ...............................................
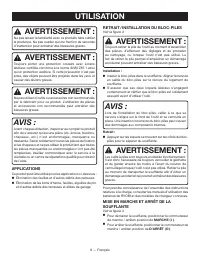
Page 18 - ASSEMBLAGE; FIXATION DU DÉFLECTEUR D’HERBE; UTILISATION; INSTALLATION DU BLOC-PILES
7 — Français ASSEMBLAGE ATTENTION : Être prudent lorsque l’on glisse les deux extrémités ensemble pour éviter le pincement des mains ou des doigts. NOTE : Une fois assemblées correctement, les extrémités supérieure et inférieure ne devraient pas se détacher l’une de l’autre lorsqu’elles sont tirées....
Page 19 - CONSEILS; AVANCE MANUELLE DU LIGNE
8 — Français Garder une prise ferme sur les deux poignées pendant le fonctionnement. Maintenir la tondeuse à fouet dans une position confortable, la poignée arrière à peu près à hauteur de la taille. Couper les herbes hautes de haut en bas. Ceci empêchera l’herbe de s’enrouler sur le perche et...
Page 20 - ENTRETIEN; REMPLACEMENT DU LIGNE; REMISAGE DE LA TONDEUSE À FOUET
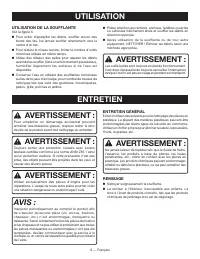
9 — Français AVERTISSEMENT : Utiliser exclusivement des pièces recommandées ou équivalentes pour les réparations. L’usage de toute autre pièce pourrait créer une situation dangereuse ou endommager l’produit. AVERTISSEMENT : Toujours porter une protection oculaire avec écrans latéraux certifiée confo...
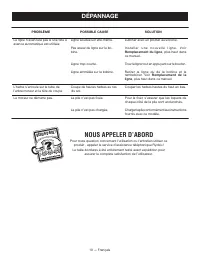
Page 21 - DÉPANNAGE; NOUS APPELER D’ABORD; BESOIN D’AID
10 — Français DÉPANNAGE PROBLÈME POSSIBLE CAUSE SOLUTION Le ligne n’avancera pas si une tête à avance automatique est utilisée Ligne soudée sur elle-même. Pas assez de ligne sur la bo-bine. Ligne trop courte. Ligne emmêlée sur la bobine. Lubrifier avec un produit au silicone. I n s t a l l e r u n e...
Page 22 - GARANTIE; ÉNONCÉ DE LA GARANTIE LIMITÉE
11 — Français GARANTIE ÉNONCÉ DE LA GARANTIE LIMITÉE Techtronic Industries North America, Inc., garantit à l’acheteur original que ce produit RYOBI ® est exempt de tous vices de matériaux ou de fabrication et s’engage à réparer ou remplacer gratuitement, à son choix, tout produit s’avérant défectueu...
Page 23 - NOTES
Page 24 - INSTRUCCIONES DE SEGURIDAD IMPORTANTES; LEA TODAS LAS INSTRUCCIONES
3 — Español INSTRUCCIONES DE SEGURIDAD IMPORTANTES ¡ADVERTENCIA! Al utilizar herramientas eléctricas para el cuidado del jardín, con el fin de reducir el riesgo de incendio, descargas eléctricas y lesiones corporales, siempre deben seguirse ciertas medidas básicas de precaución. LEA TODAS LAS INSTRU...
Page 26 - SÍMBOLOS
5 — Español SÍMBOLOS Es posible que se empleen en este producto algunos de los siguientes símbolos. Le suplicamos estudiarlos y aprender su significado. Una correcta interpretación de estos símbolos le permitirá utilizar mejor y de manera más segura el producto. SÍMBOLO NOMBRE DENOMINACIÓN/EXPLICACI...
Page 27 - CARACTERÍSTICAS
6 — Español CARACTERÍSTICAS ESPECIFICACIONES Motor ...................................................................................................................................................................................18 V c.c.Ancho de corte .................................................
Page 28 - ARMADO; ACOPLAMIENTO DEL DEFLECTOR DE HIERBA; FUNCIONAMIENTO; INSTALACIÓN DEL PAQUETE DE BATERÍAS
7 — Español ARMADO ADVERTENCIA: Sea precavido cuando deslice los dos extremos para unirlos: evite pellizcarse las manos o los dedos. NOTA: Una vez armado el conjunto correctamente, los extremos superior e inferior de la herramienta no debería separarse al aplicárseles fuerzas de tracción. Repita los...
Page 30 - MANTENIMIENTO; AVISO; MANTENIMIENTO GENERAL; ALMACENAMIENTO DE LA RECORTADORA
9 — Español MANTENIMIENTO ADVERTENCIA: Al dar servicio a la unidad, sólo utilice piezas de repuesto recomendados o equivalentes. El empleo de piezas diferentes puede causar un peligro o dañar el producto. ADVERTENCIA: Siempre póngase protección ocular con protección lateral con la marca de cumplimie...
Page 31 - CORRECCIÓN DE PROBLEMAS; LLÁMENOS PRIMERO
10 — Español CORRECCIÓN DE PROBLEMAS PROBLÈME POSSIBLE CAUSE SOLUTION La línea no avanza cuando se usa el cabezal con alimentación automática: La línea se pegó a sí mismo. No hay suficiente hilo en el carrete La línea se desgastó hasta quedar muy corto. La línea está enredado en el carrete. Lubrique...
Page 32 - GARANTÍA; DECLARACIÓN DE LA GARANTÍA LIMITADA
11 — Español GARANTÍA DECLARACIÓN DE LA GARANTÍA LIMITADA Techtronic Industries North America, Inc. garantiza al comprador original al menudeo que este producto de la marca RYOBI ® carece de defectos en los materiales y en la mano de obra, y acuerda reparar o remplazar, a la sola discreción de Techt...
Page 33 - NOTAS
Page 34 - TECHTRONIC INDUSTRIES POWER EQUIPMENT; OPERATOR’S MANUAL; MANUEL D’UTILISATION / MANUAL DEL OPERADOR; 8 VOLT STRING TRIMMER/EDGER; CALIFORNIA PROPOSITION 65
9900003602-3-15 (REV:03) TECHTRONIC INDUSTRIES POWER EQUIPMENT 1428 Pearman Dairy Road, Anderson, SC 29625 USA 1-800-860-4050 • www.ryobitools.com • PARTS AND SERVICE Prior to requesting service or purchasing replacement parts, please obtain your item and serial number from the product data plate. •...
Page 35 - CONSERVER CE MANUEL POUR; SAVE THIS MANUAL FOR FUTURE REFERENCE; 8 VOLT BLOWER
Your blower has been engineered and manufactured to our high standard for dependability, ease of operation, and operator safety. When properly cared for, it will give you years of rugged, trouble-free performance. WARNING: To reduce the risk of injury, the user must read and understand the operator’...
Page 36 - See this fold-out section for all of the figures; Consulter l’encart à volets afin d’examiner toutes les figures
ii Fig. 1 A - Lower blower tube (inférieur de soufflante, tubo inferior de la sopladora) B - Upper blower tube (supérieur de soufflante, tubo superior de la sopladora) C - Blower housing outlet (prise de boîtier de soufflante, salida del alojamiento de la sopladora) See this fold-out section for all...
Page 42 - PRODUCT SPECIFICATIONS; FEATURES; KNOW YOUR BLOWER; SYMBOL
6 — English PRODUCT SPECIFICATIONS Motor ..................................................................................................................................................................... 18 Volts DCAir Velocity ........................................................................
Page 43 - UNPACKING
7 — English ASSEMBLY UNPACKING This product requires assembly. Carefully remove the product and any accessories from the box. Make sure that all items listed in the packing list are included. WARNING: Do not use this product if any parts on the Packing List are already assembled to your product wh...
Page 44 - APPLICATIONS; TO INSTALL / REMOVE BATTERY PACK
8 — English WARNING: Do not allow familiarity with products to make you care-less. Remember that a careless fraction of a second is sufficient to inflict serious injury. WARNING: Always wear eye protection with side shields marked to comply with ANSI Z87.1, along with hearing protection. Failure to ...
Page 47 - RÈGLES DE SÉCURITÉ IMPORTANTES
3 — Français Ne recharger qu’avec l’appareil indiqué. Pour utiliser avec lithium-ion bloc-piles de 18 V, consulter le supplément de raccordement pour chargeur/outils/piles/appareil n˚ 987000-432. Ne pas utiliser une chargeur dont la prise ou le cordon sont endommagés au risque de causer un court...
Page 50 - FICHE TECHNIQUE; APPRENDRE À CONNAÎTRE LA SOUFFLANTE
6 — Français FICHE TECHNIQUE Moteur ........................................................................................................................................................................18 V c.c. Vitesse de l’air ........................................................................
Page 51 - DÉBALLAGE
7 — Français ASSEMBLAGE DÉBALLAGE Ce produit nécessite l’assemblage. Avec précaution, sortir le produit et les accessoires de la boîte. S’assurer que toutes les pièces figurant sur la liste de contrôle sont incluses. AVERTISSEMENT : Ne pas utiliser le produit si, en le déballant, vous constatez qu...
Page 53 - UTILISATION DE LA SOUFFLANTE
9 — Français ENTRETIEN GÉNÉRAL Éviter d’utiliser des solvants pour le nettoyage des pièces en plastique. La plupart des matières plastiques peuvent être endommagées par divers types de solvants du commerce. Utiliser un chiffon propre pour éliminer la saleté, la poussière, l’huile, la graisse, etc. A...
Page 55 - INSTRUCCIONES IMPORTANTES
3 — Español INSTRUCCIONES IMPORTANTES DE SEGURIDAD Cuando se usa un electrodoméstico, las precauciones básicas siempre se deben seguir, inclusive lo siguiente: ¡ADVERTENCIA! LEA Y COMPRENDA TODAS LAS INSTRUCCIONES ANTES DE UTILIZAR ESTE FUELLE. Para reducir el riesgo de calambre, el fuego y/o la her...
Page 58 - SÍMBOLO; ESPECIFICACIONES DEL PRODUCTO; FAMILIARÍCESE CON LA SOPLADORA
6 — Español Es posible que se empleen en este producto algunos de los siguientes símbolos. Le suplicamos estudiarlos y aprender su significado. Una correcta interpretación de estos símbolos le permitirá utilizar mejor y de manera más segura el producto. SÍMBOLO NOMBRE DENOMINACIÓN/EXPLICACIÓN V Volt...
Page 59 - DESEMPAQUETADO
7 — Español ARMADO DESEMPAQUETADO Este producto requiere armado. Extraiga cuidadosamente de la caja, el producto y los accesorios. Asegúrese de que estén presentes todos los artículos enumerados en la lista de empaquetado. ADVERTENCIA: No utilice este producto si alguna pieza incluida en la lista ...
Page 60 - USOS
8 — Español Para conectar: Coloque el paquete de baterías en la sopladora. Alinee la costilla realzada exterior del paquete de baterías con la ranura interior del receptáculo para pilas de la sopladora. Antes de empezar a utilizar la unidad, asegúrese de que los pestillos situados en ambos lados...
Page 61 - FUNCIONAMIENTO DE LA SOPLADORA
9 — Español Esté al cuidado de niños, mascotas, ventanas abiertas o coches recién lavados, y sople los desechos de manera segura. Después de utilizar sopladores o cualquier otro equipo, ¡LIMPIE! Deseche de forma adecuada los desechos. ADVERTENCIA: Las herramientas de baterías siempre están en co...