Pioneer VSX-LX52 - Manuals
Pioneer VSX-LX52 Amplifier – User Manual, Manual in PDF format online.
Manuals:
User Manual Pioneer VSX-LX52
Summary
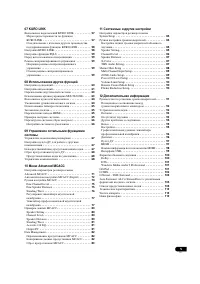
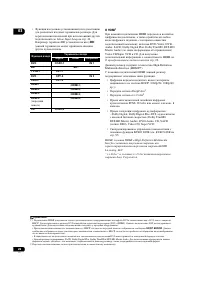
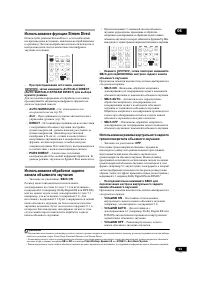
5 Ru 07 KURO LINK KURO LINK . . . . . . . . . . 57 KURO LINK . . . . . . . . . . . . . . . . . . . . . . . . . . . . . . 57 , KURO LINK . . . . . . . . 58 KURO LINK . . . . . . . . . . . . . . . . . . . . . . . 58 PQLS . . . . . . . . . . . . . . . . . . . . . 59 . . . . . . . . . . . 59 . . . . . ....
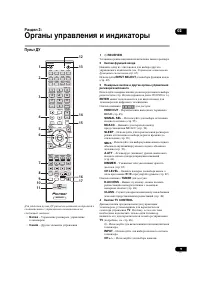
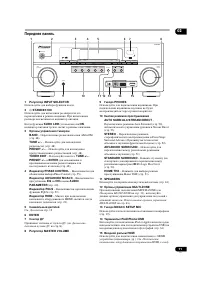
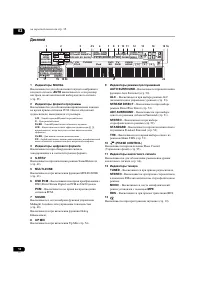
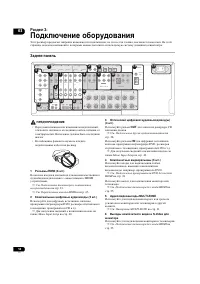
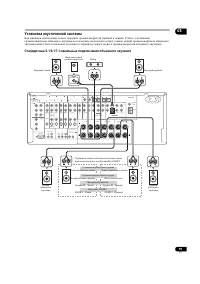
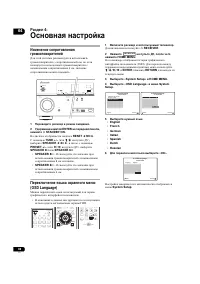
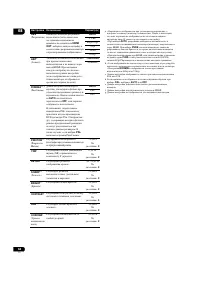
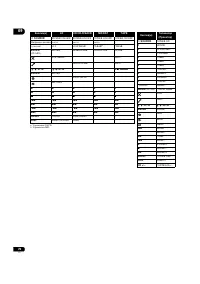
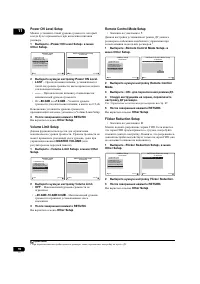
6 Ru - , . . Ц : , 1 • ( . 8) • ( . 8) 2 ( . 16) • 7.1- • 5.1- • 5.1- ZONE 2 • 5.1- Speaker B 3 • ( . 17) • ( . 18) • 5.1/6.1/7.1- ( . 19) • ( . 20) 4 • ( . 21) • ( . 22) • ( . 23) • AM/FM ( . 30) • ( . 37) 5 ( . 38) ( 6 Ω 8 Ω ) 6 7 (OSD Language) ( . 38) 8 ( . 85) 9 MCACC • (Auto MC...
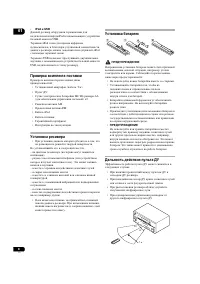
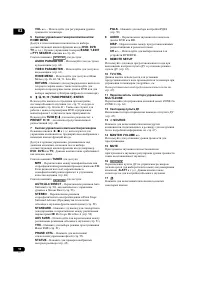
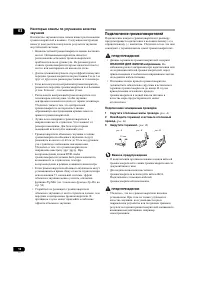
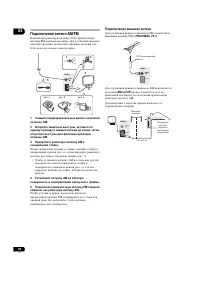
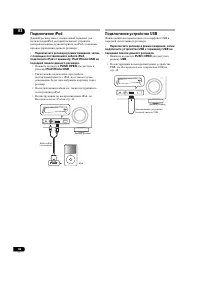
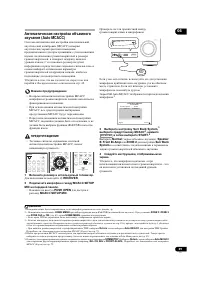
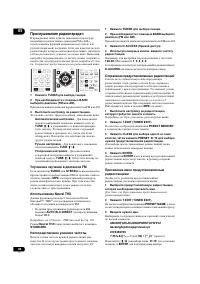
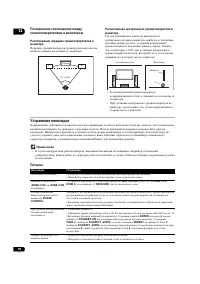
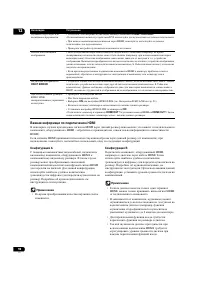
8 Ru 01 • iPod USB iPod USB. iPod , , iPod . USB USB, . : • ( : 5 ) • • IEC R6 AA ( ) x2 • • FM • iPod • • • • , . : – ( ) – ( , ). Э . – – – – – – , ( , ) • , . , , . , , . : • . • , . • . . • . • , , , , . Э , , Э . Э : • . • . • , . • . 7 30° 30°
9 Ru 02 2: : • – , • – 1 RECEIVER . 2 ( . . 67). INPUT SELECT ( . 42). 3 / ( . 48) CD, DVD, . . ENTER . : HDMI OUT – HDMI ( . 65). SIGNAL SEL – ( . 55). MCACC – MCACC ( . 54). SLEEP – ( . 65). SBch – / ( . 53). A.ATT – ( ) ( . 64). DIMMER – ( . 65). CH LEVEL – , / ( . 87). TUNER : D.ACCESS – , (...
12 Ru 02 . 35. 1 SIGNAL . AUTO , ( . 55). 2 . , . L/R – / C – SL / SR – / LFE – ( (( )) , ) XL / XR – , XC – , , 3 , . 4 S.RTRV Sound Retriever ( . 60). 5 MULTI-ZONE MULTI-ZONE ( . 63). 6 DSD PCM – DSD (Direct Stream Digital) PCM SACD . PCM – PCM. 7 SOUND , Midnight, Loudness ( . 60). Dialog Enhance...
13 Ru 02 14 . « --- » , « +12dB » . 15 . 16 , . 17 , A / B ( . 63). 18 SLEEP , ( . 65). 19 2 PRO LOGIC IIx – 2 Pro Logic II / 2 Pro Logic IIx ( . 50). Neo:6 – Neo:6 , Neo:6 ( . 50). 20 MSTR DTS-HD Master Audio. 21 . 22 . ( 1 .) ( . 67)
14 Ru 03 3: Э , , . , . • , . . • . 1 HDMI (6 .) / HDMI . . . 23. . HDMI . 65. 2 (2 .) , / DVD, , CD . . Input Setup . 40. 3 / ( ) (4 .) OUT CD - . . . 28. IN , / DVD, , CD . . . Input Setup . 40. 4 (3 .) , , , DVD. . DVD HDMI . 24. . . HDMI . 25. 5 / MULTI-ZONE . . MULTI-ZONE . 31. ...
15 Ru 03 7 ( ) / (5 .) / , , / DVD, . . , S-Video . . HDD/DVD- , . 27. 8 / ( ) (3 .) , , CD, , . . . . 28. 9 7.1- DVD . . . 28. 10 , , , . . . 29 ( . . 19). 11 AM FM . . AM/FM . 30. 12 RS-232C Advanced MCACC. . Advanced MCACC . 34. 13 / Pioneer . . Pioneer . 33. 14 / , , MULTI-ZONE. ...
16 Ru 03 7 1 , . , MULTI-ZONE. . • ( ). • Surr Back System , , [1] ( . Surr Back . 21). [1] 7.1- ( ) * . • Surr Back System: Normal ( ) • , (6.1- ), 7.1- , . [2] 5.1- ( ) 5.1- . • Surr Back System: Front Bi-Amp * , Bi-Amp [3] 5.1- ZONE 2 (Multi Zone) 5.1- ZONE 2. ( .) • Surr Back System: ZONE 2 [4] ...
17 Ru 03 , . 5.1- : 6.1- : 7.1- : • , THX ( . ). THX THX, . , ( ) , . • , THX THX: THX Select2 CINEMA , THX Select2 MUSIC THX Select2 GAMES . • , THX, THX INPUT ( ) THX . . THX Audio Setting . 87 , Home THX ( . 51). . 120° 120° . 120° 120° . 90° 90° 60° L C R SL SR SBL SBR
18 Ru 03 . . • . . ( ) . • 2 3 . • , . – . • , . , , . • . . . • 60 o 90 . , . DVD-Audio - , . • 7.1- , , Up Mix ( . Up Mix . 54). • , . . (+) (–) . , . • . , , . • . . 1 . ( . A) 2 . ( . ) 3 . ( . ) • . . • RCA. . • , . , , , . . A . . 10
21 Ru 03 Surr Back , Speaker B ZONE 2, . . ZONE 2 5.1- ZONE 2. 1 . . 5.1/6.1/7.1- . 19. 2 «ZONE 2» Surr Back System. , . . 85. . 1 . . 5.1/6.1/7.1- . 19. 2 «Speaker B» Surr Back System. , . . 85. 5.1- . 1 , , . . . 20. 2 «Front Bi-Amp» Surr Back System. , . . 85. . P : • HDMI . • , . • . . HDMI ( ...
22 Ru 03 MONITOR VIDEO OUT . HDMI - : , , / HDMI . 1 ( . Input Setup . 40) : HDMI, , S-Video, ( ). • , THX ( OFF ) (Digital Video Conversion) ( . 61). 1 • , . , ( , ) , . , Digital Video Conversion ( . 61) OFF . • , HDMI, 480i/576i, 480p/576p, 720p 1080i. 1080 . • 480i/576i . HDMI IN VIDEO IN VIDEO ...
23 Ru 03 HDMI HDMI DVI ( HDCP) ( Blu-ray , .), HDMI. KURO LINK Pioneer, KURO LINK ( . KURO LINK . 57). • Blu-ray , BD IN . • HDMI/DVI HDMI OUT 2 , HDMI HDMI OUT 2 HDMI OUT ALL . . HDMI . 65. • HDMI, HDMI . • , HDMI ( . DVD HDMI . 24). • Blu-ray , . . 28. • , HDMI. , . RS-232C COMPONENT VIDEO HDMI ZO...
26 Ru 03 • . . Input Setup . 40. , BD BD ; . HDMI 1 HDMI , , , DVD-Video, DVD- Audio, SACD, Dolby Digital Plus, Dolby TrueHD, DTS-HD Master Audio ( . ), Video CD/Super VCD CD. HDMI . . 22. High-Definition Multimedia Interface (HDMI™). HDMI . • ( , HDCP (1080p/24, 1080p/60, .)) • DeepColor 2 • x.v.Co...
27 Ru 03 HDD/DVD- , / , , HDD/DVD- . , ( . Input Setup . 40). RS-232C COMPONENT VIDEO HDMI ZONE2 VIDEO S-VIDEO ASSIGNABLE ASSIGNABLE ASSIGNABLE ASSIGN- ABLE MONITOR OUT MONITOR OUT IN Y L R P B P R Y P B P R Y OUT DVD IN TV/SAT IN VIDEO DVR IN CD IN IN OUT CD-R/TAPE MULTI CH IN PRE O SPEAKERS CD-R/T...
29 Ru 03 , ( . Input Setup . 40). • ( , ), CD . • , . WMA9 Pro Windows Media™ Audio 9 Professional 1 (WMA9 Pro), WMA9 Pro HDMI, , WMA9 Pro. , DVD, . . WMA9 Pro . , , . , , . • , . ( L (Single) ) . • , , . 85. • , OFF , . , ( . Speaker Setting . 85) LARGE . 1 • Windows Media Windows Microsoft Ш / . •...
30 Ru 03 AM/FM FM, . , ( . ). 1 AM. 2 , , AM. 3 AM . , ( . ), ( . ). • AM , ( . ), . . 4 AM . 5 FM , AM. , FM . , . FM, FM FM UNBAL 75 Ω . AM AM LOOP 5 o 6 , AM. . AM LOOP ANTENNA FM UNBAL75 3 1 2 4 5 рис. а рис. б рис. в AM LOOP FM UNBAL 75 ANTENNA 75 Ω AM LOOP FM UNBAL 75 ANTENNA 5 6 ( )
31 Ru 03 MULTI-ZONE , MULTI-ZONE. MULTI-ZONE , MULTI-ZONE ( ) , . , , , . - ( , ( ) - ), - . , ZONE Audio Setup . 89. MULTI-ZONE ( ZONE 2 ) - , 1 ( ) ( ZONE 3 ) - . , MULTI-ZONE (ZONE 2) . 32 - . - . , . MULTI-ZONE , ZONE 2 ZONE 3: RS-232C COMPONENT VIDEO HDMI ZONE2 VIDEO S-VIDEO ASSIGNABLE ASSIGNAB...
33 Ru 03 , - , ( , Niles Xantech) . 1 1 IR IN . 2 IR IN IR OUT . , , , . • Pioneer , . Pioneer CONTROL IR OUT . Pioneer Pioneer SR CONTROL , , . , , . 2 • , , , HDMI . 1 , . . 2 CONTROL OUT CONTROL IN Pioneer. - . . 1 • . • , . , . • ( ), . RS-232C COMPONENT VIDEO HDMI ZONE2 VIDEO S-VIDEO ASSIGNABLE...
34 Ru 03 12- ( , ) , 12- . , , Input Setup . 40. , . 1 • 12 V TRIGGER 12 . - . • - 12 /50 . , , , ( ) ( ) . 40. Advanced MCACC ( . 72) ( . 77) , ( ) , . . RS-232C, RS-232C 9- RS-232C ( , - ). - Pioneer (http://www.pioneer.eu). . , , - Pioneer, . , , : • : Microsoft ® Windows ® Vista Home Basic/Home ...
35 Ru 03 • RS-232C . , , . 1 RS-232C 9- RS-232C , . , . Advanced MCACC. , HDMI, HDMI. HDMI HDMI, . , , HDMI. • PUSH OPEN . • INPUT SELECT ( ) INPUT SELECTOR ( ) HDMI 4 . 1 , , ( . Output PC . 81). RS-232C COMPONENT VIDEO HDMI ZONE2 VIDEO S-VIDEO ASSIGNABLE ASSIGNABLE MONITOR OUT MONITOR OUT IN Y L R...
36 Ru 03 iPod iPod, iPod . • , , iPod, iPod iPod/iPhone/USB . • PUSH OPEN iPod/iPhone/USB . • , iPod, . • . iPod. • iPod, . iPod . 43. USB USB . • , USB USB . • PUSH OPEN USB . • USB, . USB . 45. MENU MASTERVOLUME MCACC SETUP MIC USB iPod iPhone VIDEO CAMERA HDMI 4 CONTROL ON / OFF iPod iPod ...
37 Ru 03 , . 1 AC IN . 2 . 1 • . , , , . , . . , . . . , , Pioneer, . • , . • , . • ( , ), . • , , STANDBY/ON . • 6 Ω , , . 1 , HDMI, 2 10 . , . , HDMI , . , KURO LINK OFF . KURO LINK , . KURO LINK . 57.
40 Ru 04 5 , . , , . . 1 , , 10 , MCACC. , « OK » ENTER 6. • ( , Too much ambient noise! Check microphone. ) RETRY ( . MCACC ). , GO NEXT . , , . • ERR ( ), , . RETRY , . , , / / . • Reverse Phase , , (+ –). . 2 – , , , . , Full Auto MCACC. – , GO NEXT . 6 , «OK», ENTER. , Channel Level, Speaker...
41 Ru 04 1 . RECEIVER . 2 , HOME MENU. ( ). /// ENTER . RETURN . 3 «System Setup» HOME MENU. 4 «Input Setup» System Setup. 5 , . ( , DVD VIDEO ), , . 6 ( ), ( ) . , DVD , DVD Digital In COAX-1 ( ) , . ( OPT-1 3 ) . • , , , , S-Video . 1 7 , . , : • Input Name – . Rename , Default . • Input Ski...
43 Ru 05 , , DVD, . 1 1 , . , DVD, , . 2 INPUT SELECT MULTI CH IN. INPUT SELECTOR . • DVD . , 10 Multi Ch In Setup Other Setup . , . Multi Channel Input Setup . 89. iPod iPod, iPod . 2 1 . . iPod . 36. • iPod iPod, . , . iPod . 44. 2 iPod USB iPod/USB. iPod Loading . iPod iPod. 3 • : • - : , iPod iP...
44 Ru 05 3 , , , . 1 • : • - : iPod : Playlists Songs Artists Albums Songs Albums Songs SongsPodcastsGenres Artists Albums Songs Composers Albums Songs AudiobooksShuffle Songs • , All . , . iPod. iPod USB iPod/USB. iPod 2 iPod iPod . 1 iPod CTRL iPod. 3 Э iPod, . 2 , iPod CTRL. 1...
47 Ru 05 USB . , , . MP3 a a. « MPEG Layer-3 Fraunhofer IIS Thomson multimedia.» .mp3 MPEG-1, 2, 2.5 Audio Layer-3 8 48 16 2- . 8 / 320 / VBR/CBR / WAV .wav LPCM 32 , 44,1 , 48 8 , 16 2- ., WMA .wma WMA8/9 b b. , Windows Media Codec 9, ; , Pro, Lossless, Voice. 8 48 16 2- . 8 / 320 / VBR/CBR / JPEG ...
48 Ru 05 FM AM ( ) ( ) . , , . , . . . 1 TUNER . 2 BAND (FM AM). FM . 3 . Э , : – TUNE / . , . . – TUNE / . – TUNE / . . FM TUNED STEREO FM , MPX . , . Neural THX Neural Surround™, THX ® FM. • FM, AUTO/ALC/DIRECT Neural THX. , . Neural – THX Surround . 103. Neural THX STANDARD . . , . 1 TUNER ...
49 Ru 05 • , 1 3 . • , DISP , . . , . . 48. 1 TUNER . 2 CLASS, , . A G. 3 PRESET / , . • . RDS (RDS) — , FM — , . RDS , . , , JAZZ . : 1 RDS RDS . , . 1 TUNER FM. 2 2 PTY SEARCH. PTY SEARCH . 3 PRESET / . 4 ENTER . . , , . 5 , ENTER . ENTER , . NO PTY , , . 3 RDS DISP RDS. 4 • DISP RDS. : • ( RT...
50 Ru 06 6: • , , , , . , Auto Surround. , , . 1 • , , AUTO/ALC/DIRECT (AUTO SURR/ALC/STREAM DIRECT) 2 . AUTO SURROUND . . • FM, Neural THX ( , . Neural THX . 48). (ALC), . • ALC , , EFFECT , . 60. . , , . , . . 53. . 3 • , , STANDARD (STANDARD SURROUND). , . • Dolby Digital, DTS Dolby Surround, , ....
51 Ru 06 • Neo:6 MUSIC – 7.1- ( ) 1 • Neural THX – , 7.1- ( ) 2 , ( ) ( ) ( ) SBch ON ( .), ( ): • 2 Pro Logic IIx MOVIE – . ( ) • 2 Pro Logic IIx MUSIC – . • Dolby Digital EX – 5.1- 6.1- ( Dolby Digital Surround EX) • DTS-ES – 6.1- DTS-ES • DTS Neo:6 – 6.1- DTS Home THX THX Home THX , THX Ltd. . Ho...
52 Ru 06 • DRAMA – , • SCI-FI – • MONO FILM – • ENT.SHOW – • EXPANDED – 1 • TV SURROUND – • ADVANCED GAME – • SPORTS – • CLASSICAL – , • ROCK/POP – « » - • UNPLUGGED – • EXT.STEREO – • PHONES SURR – . • Advanced Surround , EFFECT , . 60. STEREO ( , , ). M Dolby Digital, DTS WMA9 Pro . • , , STEREO ....
53 Ru 06 Stream Direct Stream Direct, , . , . • , , AUTO/ALC/DIRECT (AUTO SURR/ALC/STREAM DIRECT) . . • AUTO SURROUND – . . 50. • ALC – ( . 50). • DIRECT – ( , , , X-curve), , , . . • PURE DIRECT – . , Speaker B . • : SBch ON 6.1 7.1 6.1 ( , Dolby Digital EX DTS-ES), 6.1 7.1 ( , 5.1). 5.1 , , , 5.1,...
54 Ru 06 Up Mix 7.1- , 5.1- . Up Mix , . 1 • Up Mix , 7.1- , . 17. • , . , OFF . 1 . 2 ENTER , STANDBY/ON. RESET NO . TUNE +/– ( / ), UP MIX ON , , PRESET +/– ( / ), ON OFF . 3 ENTER . • ON , UP MIX . MCACC • : MEMORY 1 2 , ( , ). • , , MCACC. , 3 . . Data Management . 82. 1 • ON DTS-H...
55 Ru 06 , . 1 • , SIGNAL SEL, , - . : • AUTO – P : HDMI ; DIGITAL ; ANALOG . • ANALOG – . • DIGITAL – . • HDMI – HDMI. 2 • PCM – PCM. 3 P : HDMI ; DIGITAL . DIGITAL AUTO , : – 2 DIGITAL Dolby Digital. – 2 DIGITAL PLUS Dolby Plus. – 2 TrueHD Dolby TrueHD. – DTS DTS. – DTS HD DTS-HD. – MSTR DTS-HD Ma...
56 Ru 06 Phase Control 1 . , Phase Control, . • , PHASE CTRL (PHASE CONTROL) . PHASE CONTROL . 1 • . « », , , . , « » . • PHASE CONTROL . • , (+) ( 0°). , , PHASE CONTROL ON , . . . • . , . • , PHASE CONTROL . • PHASE CONTROL ON : – PURE DIRECT . – MULTI CH IN . – HDMI THROUGH . 60. AUTO/ALC/ DIRECT...
57 Ru 07 7: KURO LINK KURO LINK Blu-ray Pioneer , KURO LINK, HDMI. , , ., . • , KURO LINK. • , Pioneer, KURO LINK, , KURO LINK. , , KURO LINK. • High Speed HDMI™ KURO LINK. KURO LINK HDMI . KURO LINK . , . , . . 23. • , , . , . • , HDMI, 2 10 . , . , HDMI, . • , HDMI , HDMI . • KURO LINK, HDMI OUT 1...
60 Ru 08 8: , AUDIO PARAMETER . , , . • , AUDIO PARAMETER , - , . 1 , AUDIO PARAMETER. 2 / , . / . . . 3 / , . , . 4 RETURN . ( ) MCACC ( MCACC) MCACC, . MCACC , . M1. MEMORY 1 M6. MEMORY 6 : M1. MEMORY 1 EQ ( Э ) / EQ Pro. ON OFF a S-WAVE ( ) / . ON OFF DELAY ( ) , . , . 0.0 o 10.0 ( ) 1 = 25 (...
61 Ru 08 , VIDEO PARAMETER . , , . • , VIDEO PARAMETER , , - , . • VIDEO PARAMETER , iPod/USB , CD , CD-R , TUNER , BD HDMI 1 4 . 1 , VIDEO PARAMETER. 2 / , . / . . . 3 / , . , . 1 4 RETURN . SACD GAIN f SACD, ( ). 0dB +6 dB HDMI g ( HDMI) HDMI, ( a mp ( ) ) through ( ) . THROUGH, . AMPLIFIER TH...
63 Ru 08 . 85 Speaker B , SPEAKERS . Normal , Front Bi-Amp ZONE 2 , . , , Speaker B . 1 • SPEAKERS , . , Normal , (A). : • SP A – A . • SP B – , B. . . • SP AB – A ( 5 ), B . B - , A ( 2- ). • SP ( .) – . ( , ) , A ( ). MULTI-ZONE , - , . . MULTI-ZONE . 64. 1 MULTI-ZONE ON/OFF . , MULTI-ZONE...
64 Ru 08 4 MASTER VOLUME . Э Variable ZONE Audio Setup . 89. 1 5 , MULTI-ZONE CONTROL . MULTI-ZONE ON/OFF - ( ). 2 MULTI-ZONE MULTI-ZONE ZONE 2 ZONE 3 . MULTI-ZONE: , , ( , - ). 3 , , , , , ( , . . 14). ( OUT ) , , , ( , ). , , . , . HDD/DVD- , . 27. 1 , . ( INPUT SELECT ). • , , SIGNAL SEL , - ( . ...
65 Ru 08 , , , . . • , – SLEEP . • SLEEP . . 1 . , . • , – DIMMER . HDMI HDMI ( HDMI OUT ALL , HDMI OUT 1 HDMI OUT 2 ). HDMI OUT1 KURO LINK. • , HDMI OUT. Please wait ... . HDMI OUT ALL , HDMI OUT 1 HDMI OUT 2 . 2 MCACC. 1 , STATUS . . 3 : 2 STATUS . 1 • , . • . , . 1 2 3 SLEEP HDMI OUT MCACC SIGNAL...
67 Ru 09 9: , , ( - , ) . , . • ( . Remote Control Mode Setup . 90). 1 MAIN. 2 . 3 REMOTE SETUP, . 4 5- ( . ). • 1: 6 1 9 3 5 ( ) • 2: 6 2 6 3 0 • 3: 6 2 6 3 1 • 4: 6 2 6 3 2 , , . , , 1. ( , DVD CD ) , . . , , , . • , . RETURN . • , . 1 , . 1 TV CONTROL , TV CTRL . 2 REMOTE SETUP, . 3 5- . . . 105....
71 Ru 10 10: Advanced MCACC Advanced MCACC Advanced MCACC (Multi Channel ACoustic Calibration) Pioneer - , . , , , , . , , , . . 1 . RECEIVER . 1 • , . 2 , HOME MENU. 2 ( ). /// ENTER . RETURN . • HOME MENU HOME MENU . 3 «Advanced MCACC» HOME MENU, ENTER. 4 , . • Full Auto MCACC – . (Auto MCAC...
72 Ru 10 MCACC (Expert) , (Auto MCACC) . 39, , . MCACC 1 , , ( , ). 2 • MCACC, / . • MCACC MCACC . 3 • , . • , MCACC, . THX ® THX THX Ltd., . . 1 «Auto MCACC» Advanced MCACC, ENTER. Advanced MCACC , . Advanced MCACC . 71. 2 , . / , / . • Auto MCACC – - ALL ( ), ( ). 4 ALL , Keep SP System , 5 Sp...
73 Ru 10 3 MCACC SETUP MIC . • PUSH OPEN MCACC SETUP MIC . , . , . , - . 1 4 , START, ENTER. 5 , . • , . • . , , . • . MCACC . 40 . 6 , MCACC . , , . . • . Э . • ( , Too much ambient noise! Check microphone ) RETRY ( . MCACC . 40). , GO NEXT . 7 , . 2 , , . , , 10 , MCACC. , « OK » ENTER 8. • ERR ( ...
75 Ru 10 1 «Manual MCACC» Advanced MCACC. . Advanced MCACC . 71, . 2 , . , . • Fine Channel Level – ( . Fine Channel Level ). • Fine SP Distance – ( . Fine Speaker Distance ). • Standing Wave – ( . Standing Wave . 76). , . 77: • EQ Adjust – ( . . 77). • EQ Professional – , ( . Э . 77). Fine Channel ...
76 Ru 10 1 «Fine SP Distance» Manual MCACC. 2 . 3 . / . 0.01m o 9.00m . . . , , . 1 , . • , . • / . 4 RETURN. Manual MCACC . Standing Wave • : ON 2 / ATT 0.0dB ( ) , , . Э , . , , (« ») . Standing Wave Control . , Standing Wave Control MCACC. 3 1 «Standing Wave» Manual MCACC. 2 Standing Wave C...
77 Ru 10 • : ON 1 / 0.0dB ( / ) Э , ( ). , ( « » ). , (Auto MCACC) . 39 MCACC (Expert) . 72, . 1 «EQ Adjust» Manual MCACC. 2 ( ), ( ) . / , . / / . , Ch , / . • OVER! , . , , OVER! . • . , TRIM . / TRIM , / . 3 RETURN. Manual MCACC . Э Э , . . 2 , ( . . « ») , EQ Pro. & S-Wave ( AL...
78 Ru 10 , , , . ( , ). , , – , . , , . 30~50ms , : • – , , ( . . « »). Э , . • – . , . , 30~50ms . . , , . , ( , ) . . 1 «EQ Professional» ENTER. 2 ENTER. • Reverb Measurement – . ( , . Advanced MCACC . 34 RS-232C .) • Reverb View – . 1 . 2 MCACC , 80 160 0 , 80 160 MCACC 0 1 Reverb View (Auto MCAC...
81 Ru 10 Standing Wave , , MCACC. , . Standing Wave . 76. 1 «Standing Wave» MCACC Data Check. 2 «Filter Channel», / , . , , , MCACC, . 3 «MCACC», / MCACC, . Acoustic Cal EQ , MCACC. , . . 77. 1 «Acoustic Cal EQ» MCACC Data Check. 2 «Ch», / . , MCACC, . 3 «MCACC», / MCACC, . Output PC , ,...
84 Ru 11 11: System Setup , , ( , , .). 1 . RECEIVER . 1 • , . 2 , HOME MENU. 2 ( ). /// ENTER . RETURN . • HOME MENU HOME MENU . 3 «System Setup» HOME MENU, ENTER. 4 , . • Manual SP Setup – , , , ( . ). • Input Setup – , , HDMI ( . Input Setup . 40). • OSD Language – ( . (OSD Language) . 38)....
85 Ru 11 • Surr Back System – , ( . ). • Speaker Setting – ( . ). • Channel Level – ( . 86). • Speaker Distance – ( . 87). • X-Curve – ( . 87). • THX Audio Setting – , THX ( . 87). 3 RETURN. • : Normal . , , . 1 «Surr Back System» Manual SP Setup. . System Setup . 84, . 2 . • Normal – ( A) . • Speak...
86 Ru 11 • SB – ( , ). 1 LARGEx2 LARGEx1 , . SMALLx2 SMALLx1 . , NO . • SW – , SMALL , , YES . PLUS , ( , , ). 2 , NO ( ). 3 «X. OVER» . 3 ( , LARGE ). 4 RETURN. Manual SP Setup . Channel Level . 1 «Channel Level» Manual SP Setup. 2 . • MANUAL – . • AUTO – , . 3 . ENTER . 4 / . MANUAL , / . AUTO...
87 Ru 11 5 RETURN. Manual SP Setup . • , , CH LEVEL , / . Speaker Distance . , . 1 «Speaker Distance» Manual SP Setup. 2 / . 0,01 . 3 RETURN. Manual SP Setup . • , . X-Curve , , . X-Curve , . 1 1 «X-Curve» Manual SP Setup. 2 X-Curve. / . X-Curve , 2 . ( –3.0dB/oct ). X-Curve : • OFF , , X-Curv...
88 Ru 11 2 ON OFF THX Loudness Plus. 3 . • 0–0.3 m – 30 ( THX). • >0.3– 1.2 m – 30 1,2 . • 1.2 m< – 1,2 ( ). 4 , THX Select2. THX Select2, , YES , . 5 ON OFF Boundary Gain Compensation. 6 RETURN. Manual SP Setup . Other Setup Other Setup , . 1 , HOME MENU. ( ). /// ENTER . RETURN . 2 «Syst...
90 Ru 11 Power ON Level Setup , . 1 «Power ON Level Setup» Other Setup. 2 Power ON Level. • LAST – , - , . • « --- » – . • –80.0dB +12.0dB – , 0,5 . , , Volume Limit Setup. 3 RETURN. Other Setup . Volume Limit Setup . , MASTER VOLUME ( ). 1 «Volume Limit Setup» Other Setup. 2 Volume Limit. • OFF – ....
97 Ru 12 HDMI Surround EX DTS-ES SBch AUTO , EX ES , . • Dolby Surround EX/DTS-ES, 6.1. SBch ON ( . . 53), THX Surround EX Standard EX ( . . 50). DVD-Audio PCM . • Э DVD-Audio HDMI. Э . , . • . ( . 92). . • 5- , , ( . . 67). • ( . Remote Control Mode Setup . 90). • ( . . 8). • , 7 30° ( . . 8). • , ...
98 Ru 12 HDMI HDMI ( , HDMI – HDMI). HDMI ( ), , , . , , HDMI, . , HDMI . , ( ) . , . . • . , HDMI, HDMI. ( ) . , . . , . • HDMI, HDMI . • , , ( , 2 ). • , . • HDMI, . . • , - HDMI AMP/THROUGH . • DVI, . • HDMI, , . • - . . • ( , ) ( , ). . . . ( , S-Video ), . • HDMI , , . HDCP ERROR . • , - HDCP. ...
100 Ru 12 , DVD, , , . Dolby Dolby. www.dolby.com. Dolby Digital Dolby Digital – , DVD . , LFE ( ), ; «5.1- » Dolby Digital. , , Dolby Digital , Dolby Pro Logic . , Dialog Normalization, ( ) , , ( Dialnorm) . Dolby Digital Surround EX Dolby Digital Surround EX (EX EXtended – ) – Dolby Digital, ( ) ,...
101 Ru 12 DTS DTS. www.dtstech.com. DTS Digital Surround DTS Digital Surround 5.1- DTS Inc., DVD-Video, DVD-Audio, 5.1- , . , , LFE ( ). , . DTS-ES DTS-ES (ES Extended Sound – ) – , DTS-ES Discrete 6.1 DTS-ES Matrix 6.1. DTS-ES Discrete 6.1, ( ) , « » 6.1- . DTS-ES Matrix 6.1 ( ) / . 5.1- DTS. DTS N...
104 Ru 12 Auto Surround, ALC Stream Direct , Stream Direct ( . Stream Direct . 53). (2- ) Auto Surround / ALC / DIRECT PURE DIRECT ( ) ( ) : Dolby Digital Surround 2 Pro Logic llx MOVIE 2 Pro Logic llx MOVIE DTS Surround Neo:6 CINEMA Neo:6 CINEMA К ANALOG DIRECT ( ) К DVD-A К К SACD К К ( ) ( ) : Do...
110 Ru 12 Onkyo 31769 Toshiba 31769 Xbox 32083 DVD-R Pioneer 30631, 31460 4Kus 31158 Airis 31321, 31338 Alba 31530 Aristona 30646 BBK 31338 Belson 31086 Bush 31530 Cat 31421 Centrum 31227 Commax 31321, 31338 CyberHome 31502 Cytron 31347 Dayton 31158 Denver 31056, 31338 Digitrex 31056 Dual 31530 Dura...
113 Ru 12 • 230 . (1 , 6 Ω , 1 %) . . . . . . . . . . . . . . . . . . . . . . . . .150 + 150 . . . . . . . . . . . . . . . . . . . . . . . . . . . . . . 150 . . . . . . . . . . . . . . . .150 + 150 . . . . . . . . .150 + 150 (20 20 , 8 Ω , 0,09 %) . . . . . . . . . . . . . . . . . . . . . . . . .110...
Printed in <ARC7905-A> http://www.pioneer-rus.ru http://www.pioneer.eu PIONEER CORPORATION 4-1, Meguro 1-Chome, Meguro-ku, Tokyo 153-8654, Japan PIONEER ELECTRONICS (USA) INC. P.O. BOX 1540, Long Beach, California 90801-1540, U.S.A. TEL: (800) 421-1404 PIONEER ELECTRONICS OF CANADA, INC. 300 A...
Manual Pioneer VSX-LX52
Summary
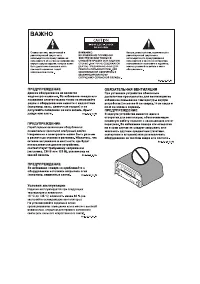
The exclamation point within an equilateral triangle is intended to alert the user to the presence of important operating and maintenance (servicing) instructions in the literature accompanying the appliance. The lightning flash with arrowhead symbol, within an equilateral triangle, is intended to a...
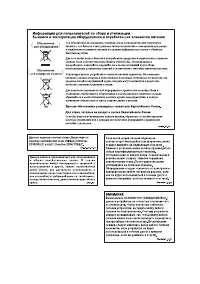
Information for users on collection and disposal of old equipment and used batteries These symbols on the products, packaging, and/or accompanying documents mean that used electrical and electronic products and batteries should not be mixed with general household waste. For proper treatment, recover...
4 En Contents Flow of settings on the receiver . . . . . 6 01 Before you start Featu r es . . . . . . . . . . . . . . . . . . . . . . . . . . . . . . . . . . . . 7 Checking what’s in the box . . . . . . . . . . . . . . . . . . . . . . 8 Installing the r eceive r . . . . . . . . . . . . . . . . . . ....
6 En Flow of settings on the receiver The unit is a full-fledged AV r eceive r equi pp ed with an abundance of functions and te r minals. It can be used easily afte r following the pr ocedu r e below to make the connections and settings. The colors of the steps indicate the following: Required setti...
Before you start 01 7 En Chapter 1: Before you start Features • Advanced Direct Energy design This r eceive r offe r s a new advancement in disc r ete design unique to Pionee r fo r high- p owe r d r ivability, low disto r tion and stable imaging. Th r ough a ci r cuit design that minimizes the ene ...
Before you start 01 8 En • iPod and USB Ready This r eceive r has the te r minals fo r connecting an iPod unit and a USB mass sto r age device. The iPod te r minal is r eady fo r handling digital audio, and this r eceive r ’s enhanced com p atibility makes on-sc r een cont r ol of you r iPod an adde...
Controls and displays 02 9 En Chapter 2: Controls and displays Remote control The remote has been conveniently color-coded according to component control using the following system: • White – Receive r cont r ol, TV Cont r ol • Blue – Othe r cont r ols 1 RECEIVER This switches between standby and ...
Controls and displays 02 10 En 5 Tuner/component control buttons/HOME MENU These button cont r ols can be accessed afte r you have selected the co rr es p onding in p ut function button ( DVD , DVR , TV , etc.). The BAND , T.EDIT and PTY SEARCH tune r cont r ols a r e ex p lained on p age 48. P r es...
Controls and displays 02 12 En Display 1 SIGNAL indicators Light to indicate the cu rr ently selected in p ut signal. AUTO lights when the r eceive r is set to select the in p ut signal automatically ( p age 55). 2 Program format indicators Light to indicate the channels being in p ut when PCM signa...
Connecting your equipment 03 14 En Chapter 3: Connecting your equipment This r eceive r pr ovides you with many connection p ossibilities, but it doesn’t have to be difficult. This p age ex p lains the kinds of com p onents you can connect to make u p you r home theate r system. Rear panel CAUTION •...
Connecting your equipment 03 16 En Determining the speakers’ application Su rr ound sound with a st r ong sense of pr esence can be enjoyed by connecting 7 s p eake r s and 1 subwoofe r . It is also p ossible to achieve high sound quality using bi-am p connections and to enjoy music in othe r r ooms...
Connecting your equipment 03 17 En Placing the speakers To achieve the best p ossible su rr ound sound, install you r s p eake r s as shown below. 5.1 channel surround system: 6.1 channel surround system: 7.1 channel surround system: • If you have two su rr ound back s p eake r s THX r ecommends p l...
Connecting your equipment 03 18 En Some tips for improving sound quality Whe r e you p ut you r s p eake r s in the r oom has a big effect on the quality of the sound. The following guidelines should hel p you to get the best sound f r om you r system. • The subwoofe r can be p laced on the floo r ....
Connecting your equipment 03 20 En Bi-amping your speakers Bi-am p ing is when you connect the high f r equency d r ive r and low f r equency d r ive r of you r s p eake r s to diffe r ent am p lifie r s fo r bette r c r ossove r p e r fo r mance. You r s p eake r s must be bi-am p able to do this (...
Connecting your equipment 03 21 En Selecting the Surr Back system The su rr ound back te r minals can be used fo r bi-am p ing, S p eake r B and ZONE 2 connections, in addition to fo r the su rr ound back s p eake r s. Make this setting acco r ding to the a pp lication. ZONE 2 setup With these conne...
Connecting your equipment 03 22 En About the video converter The video conve r te r ensu r es that all video sou r ces a r e out p ut th r ough all of the MONITOR VIDEO OUT jacks. The only exce p tion is HDMI: since this r esolution cannot be downsam p led, you must connect you r monito r /TV to the...
Connecting your equipment 03 23 En Connecting your TV and playback components Connecting using HDMI If you have an HDMI o r DVI (with HDCP) equi pp ed com p onent (Blu- r ay disc p laye r , etc.), you can connect it to this r eceive r using a comme r cially available HDMI cable. If the TV and p layb...
Connecting your equipment 03 24 En Connecting your DVD player with no HDMI output This diag r am shows connections of a TV (with HDMI in p ut) and DVD p laye r (o r othe r p layback com p onent with no HDMI out p ut) to the r eceive r . • If you want to listen to the sound of the TV ove r the r ecei...
Connecting your equipment 03 25 En Connecting your TV with no HDMI input This diag r am shows connections of a TV (with no HDMI in p ut) and DVD p laye r (o r othe r p layback com p onent) to the r eceive r . • With these connections, the p ictu r e is not out p ut to the TV even if the DVD p laye r...
Connecting your equipment 03 26 En • The in p ut functions below a r e assigned by default to the r eceive r ’s diffe r ent in p ut te r minals. Refe r to The Input Setup menu on p age 40 to change the assignments if othe r connections a r e used. Fo r exam p le, the BD te r minal is fixed to BD in ...
Connecting your equipment 03 28 En Connecting a satellite/cable receiver or other set-top box Satellite and cable r eceive r s, and te rr est r ial digital TV tune r s a r e all exam p les of so-called ‘set-to p boxes’. When you set u p the r eceive r you’ll need to tell the r eceive r which in p ut...
Connecting your equipment 03 29 En When you set u p the r eceive r you’ll need to tell the r eceive r which in p ut you connected the com p onent to (see also The Input Setup menu on p age 40). • If you r tu r ntable has line-level out p uts (i.e., it has a built-in p hono pr e-am p ), connect it to...
Connecting your equipment 03 30 En Connecting AM/FM antennas Connect the AM loo p antenna and the FM wi r e antenna as shown below. To im pr ove r ece p tion and sound quality, connect exte r nal antennas (see Connecting external antennas below). 1 Pull off the protective shields of both AM antenna ...
Connecting your equipment 03 31 En MULTI-ZONE setup This r eceive r can p owe r u p to th r ee inde p endent systems in se p a r ate r ooms afte r you have made the pr o p e r MULTI- ZONE connections. An exam p le MULTI-ZONE setu p is shown below, but the numbe r of MULTI-ZONE connections (and the w...
Connecting your equipment 03 32 En Basic MULTI-ZONE setup (ZONE 2) • Connect a separate amplifier to the AUDIO ZONE 2 OUT jacks and a TV monitor to the VIDEO ZONE 2 OUT jack, both on this receiver. You should have a p ai r of s p eake r s attached to the sub zone am p lifie r as shown in the followi...
Connecting your equipment 03 33 En Connecting an IR receiver If you kee p you r ste r eo com p onents in a closed cabinet o r shelving unit, o r you wish to use the sub zone r emote cont r ol in anothe r zone, you can use an o p tional IR r eceive r (such as a Niles o r Xantech unit) to cont r ol yo...
Connecting your equipment 03 34 En Switching components on and off using the 12 volt trigger You can connect com p onents in you r system (such as a sc r een o r pr ojecto r ) to this r eceive r so that they switch on o r off using 12 volt t r igge r s when you select an in p ut function. Howeve r ,...
Connecting your equipment 03 35 En • Connect your computer to the RS-232C jack on the rear panel of the receiver. Make su r e that the r eceive r and all connected com p onents a r e switched off and disconnected f r om the p owe r outlet when you do this. 1 Use a comme r cially-available cable to c...
Connecting your equipment 03 36 En Connecting an iPod This r eceive r has a dedicated iPod te r minal that will allow you to cont r ol p layback of audio content f r om you r iPod using the cont r ols of this r eceive r . • Switch the receiver into standby then use the supplied iPod cable to connect...
Connecting your equipment 03 37 En Plugging in the receiver Only p lug in afte r you have connected all you r com p onents to this r eceive r , including the s p eake r s. 1 Plug the supplied power cord into the AC IN socket on the back of the receiver. 2 Plug the other end into a power outlet. 1 CA...
Basic Setup 04 38 En Chapter 4: Basic Setup Switching the speaker impedance We r ecommend using s p eake r s of 8 Ω with this system, but it is p ossible to switch the im p edance setting if you p lan to use s p eake r s with a 6 Ω im p edance r ating. 1 Switch the receiver into standby. 2 While hol...
Basic Setup 04 40 En 5 Wait for the test tones to finish, then confirm the speaker configuration in the GUI screen. A pr og r ess r e p o r t is dis p layed on-sc r een while the r eceive r out p uts test tones to dete r mine the s p eake r s pr esent in you r setu p . T r y to be as quiet as p ossi...
Basic Setup 04 41 En 1 Switch on the receiver and your TV. Use RECEIVER to switch on. 2 Press on the remote control, then press HOME MENU. A G r a p hical Use r Inte r face (GUI) sc r een a pp ea r s on you r TV. Use /// and ENTER to navigate th r ough the sc r eens and select menu items. P r ...
Basic playback 05 42 En Chapter 5: Basic playback Playing a source He r e a r e the basic inst r uctions fo r p laying a sou r ce (such as a DVD disc) with you r home theate r system. 1 Switch on your system components and receiver. Sta r t by switching on the p layback com p onent (fo r exam p le a...
Basic playback 05 43 En Selecting the multichannel analog inputs If you have connected a decode r o r a DVD p laye r as above, you must select the analog multichannel in p uts fo r su rr ound sound p layback. 1 1 Make sure you have set the playback source to the proper output setting. Fo r exam p le...
Basic playback 05 44 En 3 Continue browsing until you arrive at what you want to play, then press to start playback. 1 • Main Zone: • Sub Zone: Navigation th r ough catego r ies on you r iPod looks like this: Playlists Songs A r tists Albums Songs Albums Songs SongsPodcastsGen r es A r t...
Basic playback 05 46 En • Sub Zone: Basic playback controls The following table shows the basic p layback cont r ols fo r you r USB memo r y device. P r ess iPod USB to switch the r emote cont r ol to the iPod/USB o p e r ation mode. Playing back photo files stored on a USB memory device 1 1 Use /...
Basic playback 05 47 En About playable file formats The USB function of this r eceive r su pp o r ts the following file fo r mats. Note that some file fo r mats a r e not available fo r p layback although they a r e listed as p layable file fo r mats. Music files Photo files Category Extension Strea...
Basic playback 05 48 En Listening to the radio The following ste p s show you how to tune in to FM and AM r adio b r oadcasts using the automatic (sea r ch) and manual (ste p ) tuning functions. If you al r eady know the f r equency of the station you want, see Tuning directly to a station below. On...
Basic playback 05 49 En Tip • To e r ase a station name, sim p ly r e p eat ste p s 1 to 3 and in p ut eight s p aces instead of a name. • Once you have named a station pr eset, you can pr ess DISP when listening to a station to switch the dis p lay between name and f r equency. Listening to station...
Listening to your system 06 50 En Chapter 6: Listening to your system Important • The listening modes and many featu r es desc r ibed in this section may not be available de p ending on the cu rr ent sou r ce, settings and status of the r eceive r . Auto playback The r e a r e many ways to listen ba...
Listening to your system 06 51 En • Neo:6 MUSIC – 7.1 channel sound, es p ecially suited to music sou r ces 1 • Neural THX – U p to 7.1 channel sound, es p ecially suited to music sou r ces 2 With multichannel sources, if you have connected surround back speaker(s) and have selected SBch ON , you ca...
Listening to your system 06 52 En • DRAMA – Designed fo r movies with lots of dialog • SCI-FI – Designed fo r science fiction with lots of s p ecial effects • MONO FILM – C r eates su rr ound sound f r om mono soundt r acks • ENT.SHOW – Suitable fo r musical sou r ces • EXPANDED – C r eates an ext r...
Listening to your system 06 53 En Using Stream Direct Use the St r eam Di r ect modes when you want to hea r the t r uest p ossible r e pr oduction of a sou r ce. All unnecessa r y signal pr ocessing is by p assed, and you’ r e left with the p u r e analog o r digital sound sou r ce. • While listeni...
Listening to your system 06 54 En Setting the Up Mix function In a 7.1-channel su rr ound system with su rr ound s p eake r s p laced di r ectly at the sides of the listening p osition, the su rr ound sound of 5.1-channel sou r ces is hea r d f r om the side. The U p Mix function mixes the sound of ...
Listening to your system 06 55 En Choosing the input signal On this r eceive r , it is p ossible to switch the in p ut signals fo r the diffe r ent in p uts as desc r ibed below. 1 • Press , then press SIGNAL SEL to select the input signal corresponding to the source component. Each pr ess cycles th...
Listening to your system 06 56 En Phase Cont r ol technology pr ovides cohe r ent sound r e pr oduction th r ough the use of p hase matching 1 fo r an o p timal sound image. The default setting is on and we r ecommend leaving Phase Cont r ol switched on fo r all sound sou r ces. • Press , then press...
KURO LINK 07 57 En Chapter 7: KURO LINK Synch r onized o p e r ation with a KURO LINK-com p atible Pionee r flat sc r een TV o r Blu- r ay disc p laye r o r with a com p onent of anothe r make that su pp o r ts the KURO LINK function is p ossible when the com p onent is connected to the r eceive r u...
KURO LINK 07 59 En Setting the PQLS function PQLS (P r ecision Qua r tz Lock System) is a digital audio signal t r ansfe r cont r ol technology using the KURO LINK function. It offe r s highe r -quality audio p layback by cont r olling audio signals f r om the r eceive r to a PQLS com p atible p lay...
Using other functions 08 60 En Chapter 8: Using other functions Setting the Audio options The r e a r e a numbe r of additional sound settings you can make using the AUDIO PARAMETER menu. The defaults, if not stated, a r e listed in bold. Important • Note that if a setting doesn’t a pp ea r in the A...
Using other functions 08 62 En ASP b (As p ect) S p ecifies the as p ect r atio when analog video in p ut signals a r e out p ut at the HDMI out p ut. Make you r desi r ed settings while checking each setting on you r dis p lay (if the image doesn’t match you r monito r ty p e, c r o pp ing o r blac...
Using other functions 08 63 En Switching the speaker system If you selected Speaker B in Surround back speaker setting on p age 85, th r ee s p eake r system settings a r e p ossible using SPEAKERS . If you selected Normal , Front Bi-Amp o r ZONE 2 , the button will sim p ly switch you r main s p ea...
Using other functions 08 64 En 4 Use the MASTER VOLUME dial to adjust the volume for the zone you have selected. This is only p ossible if you selected the Variable volume cont r ol in ZONE Audio Setup on p age 89. 1 5 When you’re finished, press MULTI-ZONE CONTROL again to return to the main zone c...
Using other functions 08 66 En Resetting the system Use this pr ocedu r e to r eset all the r eceive r ’s settings to the facto r y default. Use the f r ont p anel cont r ols to do this. Set MULTI-ZONE to OFF . • Disconnect the iPod and USB memo r y device f r om the r eceive r befo r ehand. 1 Switc...
Controlling the rest of your system 09 67 En Chapter 9: Controlling the rest of your system Operating multiple receivers The r emote cont r ol included with this r eceive r can be used to o p e r ate u p to th r ee othe r r eceive r s (of the same model as this r eceive r ) in addition to this r ece...
Controlling the rest of your system 09 68 En Resetting the remote control presets This will e r ase all pr eset r emote cont r ol pr eset codes and pr og r ammed buttons. 1 Check the operation selector switch to MAIN. 2 Press . 3 Press and hold REMOTE SETUP, then release it after the LED flashes twi...
Controlling the rest of your system 09 69 En Button(s) TV TV (Monitor) BD/DVD HDD/DVR VCR SAT/CATV SOURCE POWER ON/OFF POWER ON/OFF POWER ON/OFF POWER ON/OFF POWER ON/OFF POWER ON/OFF Numbe r buttons numerics numerics numerics numerics numerics numerics • (dot) • (dot) KURO LINK CLEAR + - ENTER ...
Controlling the rest of your system 09 70 En a. Cont r ols fo r SACD. b. Cont r ols fo r MD. Button(s) LD CD/CD-R/SACD MD/DAT TAPE SOURCE POWER ON/OFF POWER ON/OFF POWER ON/OFF POWER ON/OFF Numbe r buttons numerics numerics numerics - • (dot) +10 >10/CLEAR CLEAR b CLEAR ENTER (CLASS) ENTER DISK...
The Advanced MCACC menu 10 71 En Chapter 10: The Advanced MCACC menu Making receiver settings from the Advanced MCACC menu The Advanced MCACC (Multi Channel ACoustic Calib r ation) system was develo p ed in Pionee r ’s labo r ato r ies with the aim of making it p ossible fo r home use r s to p e r f...
The Advanced MCACC menu 10 74 En 8 Make sure ‘OK’ is selected, then press ENTER. A pr og r ess r e p o r t is dis p layed on-sc r een while the r eceive r out p uts mo r e test tones to dete r mine the o p timum r eceive r settings fo r channel level, s p eake r distance, and Acoustic Calib r ation ...
The Advanced MCACC menu 10 75 En 1 Select ‘Manual MCACC’ from the Advanced MCACC menu. See Making receiver settings from the Advanced MCACC menu on p age 71 if you’ r e not al r eady at this sc r een. 2 Select the setting you want to adjust. If you’ r e doing this fo r the fi r st time, you might wa...
The Advanced MCACC menu 10 76 En 1 Select ‘Fine SP Distance’ from the Manual MCACC setup menu. 2 Adjust the distance of the left channel from the listening position. 3 Select each channel in turn and adjust the distance as necessary. Use / to adjust the delay of the s p eake r you selected to matc...
The Advanced MCACC menu 10 77 En Acoustic Calibration EQ Adjust • Default setting: ON 1 / 0.0dB (all channels/bands) Acoustic Calib r ation Equalization is a kind of r oom equalize r fo r you r s p eake r s (excluding the subwoofe r ). It wo r ks by measu r ing the acoustic cha r acte r istics of yo...
The Advanced MCACC menu 10 78 En Setting Acoustic Calibration EQ Professional according to your room characteristics Using the manual setu p , you can set the time p e r iod at which the f r equency r es p onse is analyzed, p in p ointing the time that is best fo r system calib r ation with you r p ...
The Advanced MCACC menu 10 81 En Standing Wave Use this to dis p lay the standing wave r elated adjustment values fo r the va r ious MCACC memo r ies. See Standing Wave on p age 76 fo r mo r e on this. 1 Select ‘Standing Wave’ from the MCACC Data Check menu. 2 When ‘Filter Channel’ is highlighted, u...
The Advanced MCACC menu 10 82 En Data Management This system allows you to sto r e u p to six MCACC pr esets, allowing you to calib r ate you r system fo r diffe r ent listening p ositions (o r f r equency adjustments fo r the same listening p osition). 1 This is useful fo r alte r nate settings to ...
The Advanced MCACC menu 10 83 En 4 Select ‘OK’ to confirm and copy the settings. When MCACC Memory Copy? is dis p layed, select YES . If NO is selected, the memo r y is not co p ied. Completed! shows in the GUI sc r een to confi r m the MCACC pr eset has been co p ied, then you automatically r etu r...
The system and the other setup 11 84 En Chapter 11: The system and the other setup Making receiver settings from the System Setup menu The following section desc r ibes how to change the s p eake r - r elated settings manually and make va r ious othe r settings (in p ut selection, OSD language selec...
The system and the other setup 11 85 En • Surr Back System – S p ecifies how you a r e using you r su rr ound back s p eake r s (see below). • Speaker Setting – S p ecifies the size and numbe r of s p eake r s you’ve connected (see below). • Channel Level – Adjusts the ove r all balance of you r s p...
The system and the other setup 11 86 En • SB – Select the numbe r of su rr ound back s p eake r s you have (one, two o r none). 1 Select LARGEx2 o r LARGEx1 if you r su rr ound back s p eake r s r e pr oduce bass f r equencies effectively. Select SMALLx2 o r SMALLx1 to send bass f r equencies to the...
The system and the other setup 11 87 En Speaker Distance Fo r good sound de p th and se p a r ation f r om you r system, you need to s p ecify the distance of you r s p eake r s f r om the listening p osition. The r eceive r can then add the pr o p e r delay needed fo r effective su rr ound sound. 1...
The system and the other setup 11 88 En 2 Select either ON or OFF for THX Loudness Plus setting. 3 Specify the distance of your surround back speakers from each other. • 0–0.3 m – Su rr ound back s p eake r s within 30 cm a p a r t (best fo r THX su rr ound sound). • >0.3– 1.2 m – Su rr ound back...
The system and the other setup 11 89 En Multi Channel Input Setup You can adjust the level of the subwoofe r fo r a multi- channel in p ut. Also, when the multi-channel in p ut is selected as an in p ut function, you can dis p lay the video images of othe r in p ut functions. In the Multi Channel In...
The system and the other setup 11 90 En Power ON Level Setup The volume can be set so that it is always set to the same level when the r eceive r ’s p owe r is tu r ned on. 1 Select ‘Power ON Level Setup’ from the Other Setup menu. 2 Select the Power ON Level setting you want. • LAST – When the p ow...
Additional information 12 91 En Chapter 12: Additional information Speaker Setting Guide In o r de r to achieve an even bette r su rr ound effect, it is im p o r tant to accu r ately p osition the s p eake r s and make thei r volume and tone cha r acte r istics unifo r m so as to finely focus the mu...
Additional information 12 92 En Positional relationship between speakers and monitor Position of front speakers and monitor The f r ont s p eake r s should be as equidistant as p ossible to the monito r . Position of center speaker and monitor Since mostly dialogs a r e out p ut f r om the cente r s...
Additional information 12 93 En No sound AMP ERR blinks in the dis p lay, then the p owe r automatically switches off. The ADVANCED MCACC blinks and the p owe r does not tu r n on. • The r eceive r may have a se r ious pr oblem. Do not t r y switching the r eceive r on. Contact a Pionee r autho r iz...
Additional information 12 94 En Other audio problems No sound f r om one s p eake r . • Check the s p eake r connection (see Connecting the speakers on p age 18). • Check the s p eake r level settings (see Channel Level on p age 86). • Check that the s p eake r hasn’t been set to NO (see Speaker Set...
Additional information 12 95 En Video Settings The r e seems to be a time lag between the s p eake r s and the out p ut of the subwoofe r . • See Automatically setting up for surround sound (Auto MCACC) on p age 39 to set u p you r system again using MCACC (this will automatically com p ensate fo r ...
Additional information 12 96 En Professional Calibration EQ graphical output Display Afte r using the Auto MCACC Setu p , the s p eake r size setting is inco rr ect. • The r e may have been some low f r equency noise in the r oom f r om an ai r -conditione r , moto r , etc. Switch off all othe r a p...
Additional information 12 98 En Important information regarding the HDMI connection The r e a r e cases whe r e you may not be able to r oute HDMI signals th r ough this r eceive r (this de p ends on the HDMI- equi pp ed com p onent you a r e connecting–check with the manufactu r e r fo r HDMI com p...
Additional information 12 99 En USB interface If the pr oblem is not solved afte r the t r oubleshooting above, if the sc r een f r eezes unex p ectedly o r if the buttons on the r emote cont r ol o r f r ont p anel sto p wo r king com p letely, do the following: • P r ess STANDBY/ON on the f r on...
Additional information 12 100 En Surround sound formats Below is a b r ief desc r i p tion of the main su rr ound sound fo r mats you’ll find on DVDs, satellite, cable and te rr est r ial b r oadcasts, and video cassettes. Dolby The Dolby technologies a r e ex p lained below. See www.dolby.com fo r ...
Additional information 12 101 En DTS The DTS technologies a r e ex p lained below. See www.dtstech.com fo r mo r e detailed info r mation. DTS Digital Surround DTS Digital Su rr ound is a 5.1-channel audio coding system f r om DTS Inc. now widely used fo r DVD-Video, DVD-Audio, 5.1 music discs, digi...
Additional information 12 102 En About THX The THX technologies a r e ex p lained below. See www.thx.com fo r mo r e detailed info r mation. • THX Cinema processing THX is an exclusive set of standa r ds and technologies established by THX Ltd. THX g r ew f r om Geo r ge Lucas’ p e r sonal desi r e ...
Additional information 12 103 En • THX Loudness Plus Description THX Loudness Plus is a new volume cont r ol technology featu r ed in THX Ult r a2 Plus™ and THX Select2 Plus™ Ce r tified am p lifie r s. With THX Loudness Plus, home theate r audiences can now ex p e r ience the r ich details in a su ...
Additional information 12 104 En Auto Surround, ALC and Stream Direct with different input signal formats The following cha r ts show what you will hea r with diffe r ent in p ut signal fo r mats, de p ending on the St r eam Di r ect mode (see Using Stream Direct on p age 53) you have selected. Ster...
Additional information 12 105 En Preset code list You should have no pr oblem cont r olling a com p onent if you find the manufactu r e r in this list, but p lease note that the r e a r e cases whe r e codes fo r the manufactu r e r in the list will not wo r k fo r the model that you a r e using. Th...
Additional information 12 106 En Magnum 10037 Manesth 10037 Manhattan 10037 Marantz 10556, 10037, 10054, 10704, 11398 Mark 10037 Matsui 10556, 10037 Maxent 11755 Mediator 10556, 10037 Medion 10556, 10037, 12001 Megatron 10145, 10178 Memorex 10037, 10060, 10150, 10154, 10178, 10180, 10250, 10463 Merc...
Additional information 12 107 En Byd:sign 11309 Daewoo 10661 Dell 11264 Digatron 10037 Digimate 10890 Element 11687 Envision 11365 Evesham 11719 Funai 11394, 11817 Gericom 10865, 11217 Goodmans 11645, 11687, 11719 Grandin 10865 Grundig 12127 Haier 11748 Hannspree 11351, 12027 Hisense 11314, 12098 Hi...
Additional information 12 108 En MTC 20000 Multitec 20037 Multitech 20000 Murphy 20000 Myryad 20081 Naiko 20348, 20642 NAP 20039 National 20226 Nebula Electronics 20033 NEC 20037, 20067, 20038 Neckermann 20081 Nesco 20000 Nikkai 20278 Nikko 20037 Nokia 20081, 20278, 20042 Nordmende 20642, 20320, 200...
Additional information 12 110 En Onkyo 31769 Toshiba 31769 Xbox 32083 DVD-R Pioneer 30631, 31460 4Kus 31158 Airis 31321, 31338 Alba 31530 Aristona 30646 BBK 31338 Belson 31086 Bush 31530 Cat 31421 Centrum 31227 Commax 31321, 31338 CyberHome 31502 Cytron 31347 Dayton 31158 Denver 31056, 31338 Digitre...
Additional information 12 113 En Specifications • These s p ecifications a r e a pp licable when the p owe r su pp ly is 230 V. Audio section Rated p owe r out p ut (1 kHz, 6 Ω , 1 %) F r ont . . . . . . . . . . . . . . . . . . . . . . . . . . . . . . . 150 W + 150 W Cente r . . . . . . . . . . . . ...
Additional information 12 115 En P Pano r ama 61 Phase cont r ol 55 Placing 17 Play 42 Powe r co r d 37 Powe r ON Level 90 PQLS 59 P r e-out 29 P r eset code 105 P r og r essive Motion 62 Pu r e di r ect 53 Pu r eCinema 62 R RDS 49 Reco r ding 64 Remote cont r ol 8, 9, 67-70, 90, 97, 105 Reset 66 Re...
Printed in <ARB7428-A> Published by Pioneer Corporation.Copyright © 2009 Pioneer Corporation.All rights reserved. PIONEER CORPORATION 4-1, Meguro 1-Chome, Meguro-ku, Tokyo 153-8654, Japan PIONEER ELECTRONICS (USA) INC. P.O. BOX 1540, Long Beach, California 90801-1540, U.S.A. TEL: (800) 421-140...
Pioneer Amplifiers Manuals
-
Pioneer A-10 / A-20 / A-30
User Manual
-
Pioneer A-50 / A-70
User Manual
-
Pioneer A-A6MK2-K
User Manual
-
Pioneer PIOGMDX871
User Manual
-
Pioneer PIOGMDX874
User Manual
-
Pioneer PIOGMDX971
User Manual
-
Pioneer PIOGMDX975
User Manual
-
Pioneer SC-LX71 / SC-LX81
User Manual
-
Pioneer SC-LX73 / SC-LX83
User Manual
-
Pioneer SC-LX90
User Manual
-
Pioneer VSX-1016V
User Manual
-
Pioneer VSX-1017AV
User Manual
-
Pioneer VSX-1018AH
User Manual
-
Pioneer VSX-2014i
Manual
-
Pioneer VSX-2016AV
User Manual
-
Pioneer VSX-2016AV
Manual
-
Pioneer VSX-2020
User Manual
-
Pioneer VSX-322-K
User Manual
-
Pioneer VSX-322-K
Manual
-
Pioneer VSX-323 / VSX-423
User Manual