Page 2 - CAUTION; IMPORTANT
The exclamation point within an equilateral triangle is intended to alert the user to the presence of important operating and maintenance (servicing) instructions in the literature accompanying the appliance. The lightning flash with arrowhead symbol, within an equilateral triangle, is intended to a...
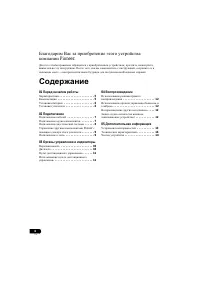
Page 4 - Thank you for buying this Pioneer product.; Contents; 1 Before you start
4 En Thank you for buying this Pioneer product. Please read through these operating instructions so that you will know how to operate your model properly. After you have finished reading the instructions, put them in a safe place for future reference . Contents 01 Before you start Features . . . . ....
Page 5 - English; Before you start; Features; What’s in the box
Before you start 01 5 En English Français Deutsch Nederlands Italiano Español Chapter 1: Before you start Features • Quick response power supply circuit The superior power supply circuit adopted by this unit achieves vastly improved response by employing ‘no feedback’ circuitry and low impedence par...
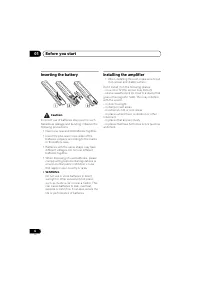
Page 6 - Installing the amplifier
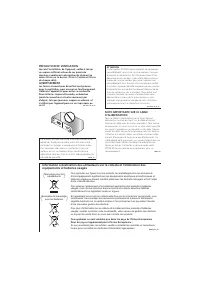
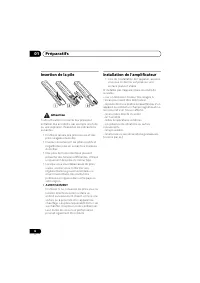
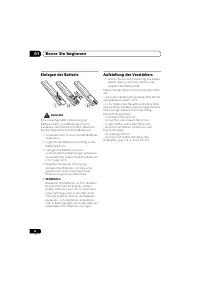
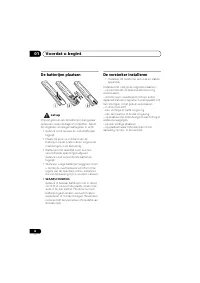
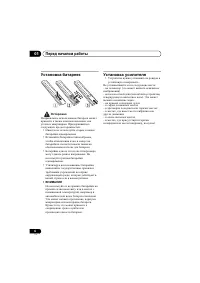
Before you start 01 6 En Inserting the battery Caution Incorrect use of batteries may result in such hazards as leakage and bursting. Observe the following precautions: • Never use new and old batteries together.• Insert the plus and minus sides of the batteries properly according to the marks in th...
Page 7 - Connecting up; Making cable connections; Connecting audio components
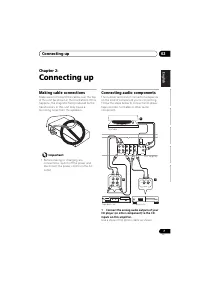
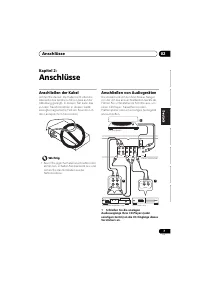
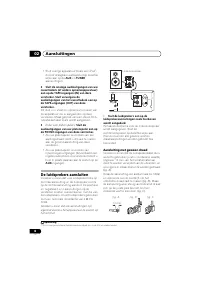
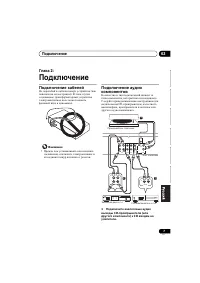
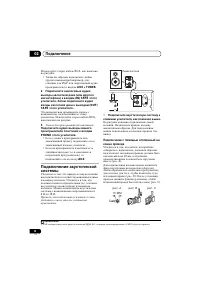
Connecting up 02 7 En English Français Deutsch Nederlands Italiano Español Chapter 2: Connecting up Making cable connections Make sure not to bend the cables over the top of this unit (as shown in the illustration). If this happens, the magnetic field produced by the transformers in this unit may ca...
Page 8 - Bare wire connections
Connecting up 02 8 En • Connect any other components (such as an iPod 1 dock or a portable audio player) to the AUX and TUNER inputs in the same way. 2 Connect the analog outputs of your tape deck (or other recorder) to the TAPE inputs (IN) on this amplifier. Then connect the audio inputs on the tap...
Page 9 - Plugging in
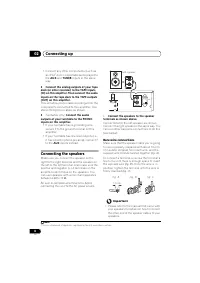
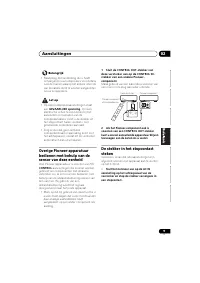
Connecting up 02 9 En English Français Deutsch Nederlands Italiano Español Caution • These speaker terminals carry HAZARDOUS live voltage . To prevent the risk of electric shock when connecting or disconnecting the speaker cables, disconnect the power cord before touching any uninsulated parts. • Ma...
Page 10 - Controls and displays; Front panel
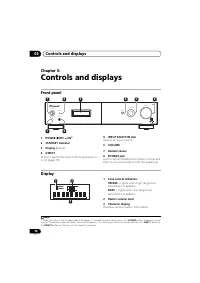
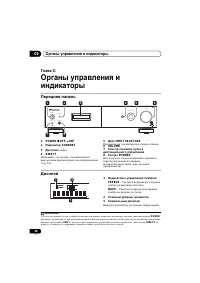
Controls and displays 03 10 En Chapter 3: Controls and displays Front panel 1 POWER OFF ON 1 2 STANDBY indicator 3 Display (below) 4 DIRECT Press to switch the Direct listening feature on or off (page 12). 5 INPUT SELECTOR dial Selects an input source. 6 VOLUME 7 Remote sensor 8 PHONES jack Use ...
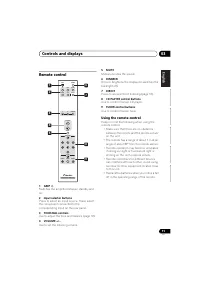
Page 11 - Remote control; Using the remote control
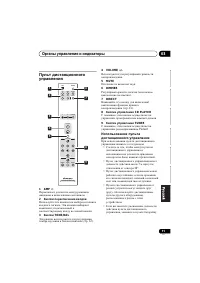
Controls and displays 03 11 En English Français Deutsch Nederlands Italiano Español Remote control 1 AMP Switches the amplifier between standby and on. 2 Input selector buttons Press to select an input source. These select the component connected to the corresponding input on the rear panel. 3 TON...
Page 12 - Listening to your system; Using Direct listening
Listening to your system 04 12 En Chapter 4: Listening to your system Using Direct listening Use the Direct listening feature when you want to hear the truest possible reproduction of a source. All unnecessary signal processing 1 is bypassed, and you’re left with the pure sound source. • While liste...
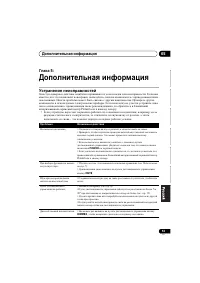
Page 13 - Additional information; Troubleshooting
Additional information 05 13 En English Français Deutsch Nederlands Italiano Español Chapter 5: Additional information Troubleshooting Incorrect operations are often mistaken for trouble and malfunctions. If you think that there is something wrong with this component, check the points below. Sometim...
Page 14 - Amplifier section; Audio section; Miscellaneous; Accessories; Cleaning the unit
Additional information 05 14 En Specifications Amplifier section Power output specification is for when power supply is 230 V. • Continuous power output (both channels driven at 20 Hz to 20 kHz)** THD 0.2 % . . . . . . . . . . . . . . . . . . . . . 60 W + 60 WTHD 0.2 % . . . . . . . . . . . . . . . ...
Page 16 - ATTENTION
Ce point d’exclamation, placé dans un triangle équilatéral, a pour but d’attirer l’attention de l’utilisateur sur la présence, dans les documents qui accompagnentl’appareil, d’explications importantes du point de vue de l’exploitation ou del’entretien. Ce symbole de l’éclair, placé dans un triangle ...
Page 18 - Merci d’avoir acheté ce produit Pioneer.; Table des matières; 1 Préparatifs
4 Fr Merci d’avoir acheté ce produit Pioneer. Veuillez lire entièrement ce mode d’emploi afin de pouvoir faire fonctionner correctement le modèle que vous avez choisi. Après avoir fini la lecture du mode d’emploi, placez-le dans un endroit sûr afin de pouvoir vous y référer plus tard . Table des mat...
Page 19 - Préparatifs; Caractéristiques
Préparatifs 01 5 Fr Chapitre 1 : Préparatifs Caractéristiques • Circuit d’alimentation électrique à réponse rapide Le circuit d’alimentation électrique supérieur adopté par cette unité permet une bien meilleure réponse en employant une circuiterie ‘no feedback (sans retour)’, et des condensateurs pr...
Page 20 - Installation de l’amplificateur
Préparatifs 01 6 Fr Insertion de la pile Attention Toute utilisation incorrecte des piles peut entraîner des accidents, par exemple une fuite ou une explosion. Respectez les précautions suivantes : • N’utilisez jamais des piles neuves et des piles usagées ensemble. • Insérez correctement les pôles p...
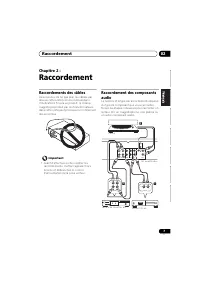
Page 21 - Raccordement; Raccordements des câbles
Raccordement 02 7 Fr Chapitre 2 : Raccordement Raccordements des câbles Assurez-vous de ne pas plier les câbles par dessus cette unité (comme indiqué dans l’illustration). Si cela se produit, le champ magnétique produit par les transformateurs dans cette unité peut provoquer un ronflement des encein...
Page 22 - Raccordement des enceintes; Raccordements avec fil dénudé
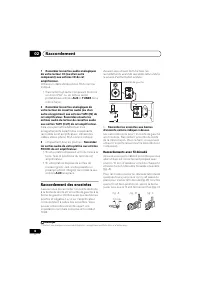
Raccordement 02 8 Fr 1 Raccordez les sorties audio analogiques de votre lecteur CD (ou d’un autre composant) aux entrées CD de cet amplificateur. Utilisez un câble stéréo phono RCA comme indiqué. • Raccordez tout autre composant (comme un dock iPod 1 ou un lecteur audio portable) aux entrées AUX et ...
Page 23 - Branchement
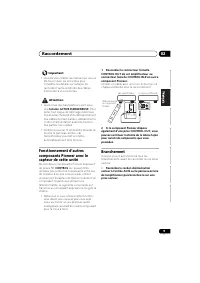
Raccordement 02 9 Fr Important • Veuillez vous référer au manuel qui vous a été fourni avec les enceintes pour connaître les détails sur la façon de raccorder l’autre extrémité des câbles d’enceinte à vos enceintes. Attention • Les bornes des haut-parleurs sont sous une tension ACTIVE DANGEREUSE . P...
Page 24 - Commandes et afficheur; Panneau avant
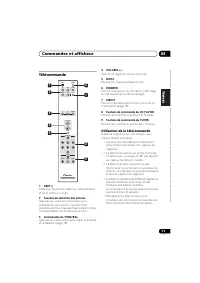
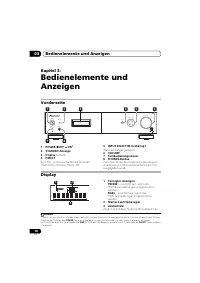
Commandes et afficheur 03 10 Fr Chapitre 3 : Commandes et afficheur Panneau avant 1 POWER OFF ON 1 2 Voyant STANDBY 3 Afficheur (ci-dessous) 4 DIRECT Permet d’activer ou de désactiver la fonction d’écoute en mode direct (page 12). 5 Cadran INPUT SELECTOR Permet de sélectionner une source d’entré...
Page 25 - Utilisation de la télécommande
Commandes et afficheur 03 11 Fr Télécommande 1 AMP Cette touche permet d’allumer l’amplificateur et de le mettre en veille. 2 Touches de sélection des entrées Appuyez sur l’une de ces touches pour sélectionner une source d’entrée. Elles sélectionnent le composant raccordé à l’entrée correspondante...
Page 26 - Écoute de votre système; Lecture d’autres sources
Écoute de votre système 04 12 Fr Chapitre 4 : Écoute de votre système Utilisation de l’écoute en mode direct Utilisez la fonction d’écoute en mode direct lorsque vous souhaitez écouter la reproduction la plus fidèle possible d’une source. Tous les traitements de signaux 1 inutiles sont ignorés et il...
Page 27 - Informations supplémentaires; Guide de dépannage
Informations supplémentaires 05 13 Fr Chapitre 5 : Informations supplémentaires Guide de dépannage Des opérations incorrectes sont souvent interprétées comme des problèmes et des mauvais fonctionnements. Si vous pensez qu’il y a un problème avec ce composant, vérifiez les points ci-dessous. Parfois ...
Page 28 - Section amplificateur; Section audio; Divers; Accessoires; Nettoyage de l’unité
Informations supplémentaires 05 14 Fr Spécifications Section amplificateur La spécification pour la puissance de sortie concerne les cas où l’alimentation électrique est de 230 V. • Puissance de sortie continue (les deux canaux fonctionnant entre 20 Hz et 20 kHz)** 0,2 % THD . . . . . . . . . . . . ...
Page 30 - WICHTIG
Ein Ausrufezeichen in einem Dreieck weistden Benutzer auf wichtige Bedienungs- und Wartungsanweisungen in den Dokumentenhin, die dem Gerät beiliegen. Das Blitzsymbol in einem Dreieck weist den Benutzer darauf hin, dass eineBerührungsgefahr mit nicht isolierten Teilenim Geräteinneren, die eine gefähr...
Page 32 - Vielen Dank für den Erwerb dieses Pioneer Produkts.; 1 Bevor Sie beginnen
4 De Vielen Dank für den Erwerb dieses Pioneer Produkts. Lesen Sie bitte zum korrekten Betrieb Ihres Modells die gesamte Bedienungsanleitung durch. Bewahren Sie sie nach dem Durchlesen zur Einsicht an einem sicheren Ort auf . Contents 01 Bevor Sie beginnen Funktionen . . . . . . . . . . . . . . . . ...
Page 33 - Bevor Sie beginnen; Funktionen
Bevor Sie beginnen 01 5 De Kapitel 1: Bevor Sie beginnen Funktionen • Quick Response-Stromkreis Durch den von diesem Gerät verwendeten übergeordneten Stromkreis wird die Resonanz erheblich verbessert, da dieser mit einem nicht rückgekoppelten Regelkreis und überwiegend zur professionellen Audioüberw...
Page 34 - Aufstellung des Verstärkers
Bevor Sie beginnen 01 6 De Einlegen der Batterie Vorsicht Eine unsachgemäße Verwendung der Batterien kann zu Gefährdungen durch Auslaufen oder Explosion führen. Beachten Sie die folgenden Vorsichtsmaßnahmen: • Verwenden Sie nie neue und alte Batterien zusammen. • Legen Sie die Batterien polrichtig i...
Page 35 - Anschlüsse; Anschließen der Kabel; Anschließen von Audiogeräten
Anschlüsse 02 7 De Kapitel 2: Anschlüsse Anschließen der Kabel Achten Sie darauf, die Kabel nicht über die Oberseite des Geräts zu führen (wie auf der Abbildung gezeigt). In diesem Fall kann das von den Transformatoren in diesem Gerät erzeugte magnetische Feld ein Brummen in den Lautsprechern hervor...
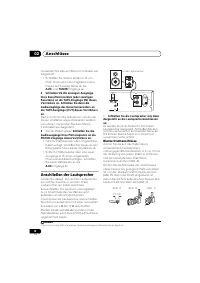
Page 36 - Anschließen der Lautsprecher; Blanke Drahtanschlüsse
Anschlüsse 02 8 De Verwenden Sie dazu ein Stereo-Cinchkabel wie dargestellt. • Schließen Sie andere Geräte (z. B. ein iPod 1 -Dock oder einen tragbaren Audio- Player) auf dieselbe Weise an die AUX - und TUNER -Eingänge an. 2 Schließen Sie die analogen Ausgänge Ihres Kassettenrecorders (oder sonstige...
Page 37 - Anschließen
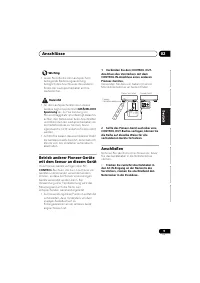
Anschlüsse 02 9 De Wichtig • Lesen Sie bitte die den Lautsprechern beiliegende Bedienungsanleitung bezüglich des Anschlusses des anderen Endes der Lautsprecherkabel an Ihre Lautsprecher. Vorsicht • An den Lautsprecherklemmen dieses Gerätes liegt eine potentiell GEFÄHRLICHE Spannung an. Zur Vermeidun...
Page 39 - Verwendung der Fernbedienung
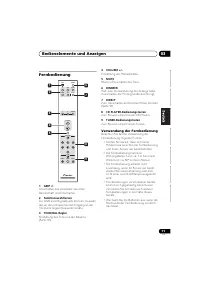
Bedienelemente und Anzeigen 03 11 De Fernbedienung 1 AMP Umschalten des Verstärker zwischen Bereitschaft und Einschalten. 2 Funktionswahltasten Zur Wahl einer Signalquelle drücken. Auswahl des an den entsprechenden Eingang an der Rückseite angeschlossenen Geräts. 3 TONE/BAL-Regler Einstellung des ...
Page 40 - Hören der Anlage; Wiedergabe anderer Quellen
Hören der Anlage 04 12 De Kapitel 4: Hören der Anlage Verwendung der Direkten Hörfunktion Verwenden Sie die Direkte Hörfunktion, wenn Sie eine möglichst getreue Wiedergabe einer Quelle hören möchten. Jegliche unnötige Signalverarbeitung 1 wird umgangen, so dass Sie eine unverfälschte Tonquelle erhal...
Page 41 - Zusätzliche Informationen; Fehlerbehandlung
Zusätzliche Informationen 05 13 De Kapitel 5: Zusätzliche Informationen Fehlerbehandlung Häufig ist eine vermeintliche Störung oder Fehlfunktion durch einen Bedienungsfehler bedingt. Wenn das Gerät nicht richtig arbeitet, gehen Sie zunächst die unten stehenden Punkte durch. Manchmal könnte die Störu...
Page 42 - Verstärkereinheit; Audioeinheit; Verschiedenes; Zubehör; Reinigung des Geräts
Zusätzliche Informationen 05 14 De Technische Daten Verstärkereinheit Die Angaben zur Leistungsausgabe beziehen sich auf eine Stromversorgung von 230 V. • Kontinuierliche Leistungsausgabe (beide Kanäle laufen auf 20 Hz bis 20 kHz)** THD 0,2 % . . . . . . . . . . . . . . . . . . . . 60 W + 60 WTHD 0,...
Page 44 - BELANGRIJK
Het uitroepteken in een gelijkzijdige driehoek is bedoeld om de aandacht van de gebruiker te trekken op de aanwezigheid van belangrijke bedienings- en onderhoudsinstructies in de handleiding bij dit toestel. De lichtflash met pijlpuntsymbool in een gelijkzijdige driehoek is bedoeld om de aandacht va...
Page 46 - Bedankt voor de aanschaf van dit Pioneer product.; 1 Voordat u begint
4 Nl Bedankt voor de aanschaf van dit Pioneer product. Lees a.u.b. deze handleiding door om u ervan te verzekeren dat u de werking van uw model volledig begrijpt. Bewaar deze handleiding zorgvuldig ter referentie na hem te hebben doorgelezen . Contents 01 Voordat u begint Kenmerken . . . . . . . . ....
Page 47 - Voordat u begint; Kenmerken
Voordat u begint 01 5 Nl Hoofdstuk 1: Voordat u begint Kenmerken • Stroomvoorzieningcircuit met een snelle response Het superieure stroomvoorzieningcircuit dat wordt gebruikt door deze eenheid verzorgt een buitengewoon vergrootte response door gebruik te maken van een no feedback schakelsysteem en p...
Page 48 - De versterker installeren
Voordat u begint 01 6 Nl De batterijen plaatsen Let op Onjuist gebruik van de batterijen kan gevaar opleveren, zoals lekkage of ontploffen. Neem de volgende voorzorgsmaatregelen in acht: • Gebruik nooit nieuwe en oude batterijen tegelijk. • Plaats de plus- en minkant van de batterijen op de juiste m...
Page 49 - Aansluitingen; De kabels aansluiten; Audioapparatuur aansluiten
Aansluitingen 02 7 Nl Hoofdstuk 2: Aansluitingen De kabels aansluiten Zorg ervoor dat de kabels niet over het apparaat heen liggen (zoals aangegeven in de afbeelding). Anders produceert het magnetische veld van de transformatoren in het apparaat een brom in de luidsprekers. Belangrijk • Voordat u aa...
Page 50 - De luidsprekers aansluiten; Aansluiting met gewoon draad
Aansluitingen 02 8 Nl • Sluit overige apparatuur (zoals een iPod 1 - dock of draagbare audiospeler) op dezelfde wijze aan op de AUX en TUNER aansluitingen. 2 Sluit de analoge audiouitgangen van uw cassettedeck (of andere opnameapparatuur) aan op de TAPE-ingangen (IN) van deze versterker. Sluit vervo...
Page 52 - Functies en displays; Voorpaneel
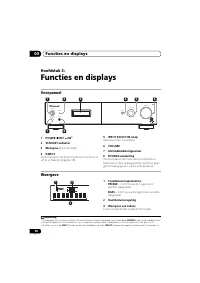
Functies en displays 03 10 Nl Hoofdstuk 3: Functies en displays Voorpaneel 1 POWER OFF ON 1 2 STANDBY-indicator 3 Weergave (zie hieronder) 4 DIRECT Druk hierop om de Direct luisteren functie in of uit te schakelen (pagina 12). 5 INPUT SELECTOR-knop Selecteert een invoerbron. 6 VOLUME 7 Afstandsb...
Page 53 - Gebruik van de afstandsbediening
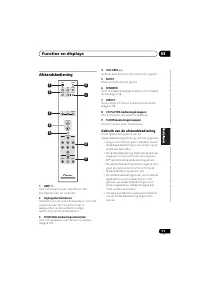
Functies en displays 03 11 Nl Afstandsbediening 1 AMP Voor het kiezen tussen stand-by en het inschakelen van de versterker. 2 Ingangselectietoetsen Indrukken om een input te selecteren. Voor het selecteren van het component dat is aangesloten op de overeenkomstige aansluiting op het achterpaneel. ...
Page 54 - Luisteren naar uw systeem; Direct luisteren gebruiken
Luisteren naar uw systeem 04 12 Nl Hoofdstuk 4: Luisteren naar uw systeem Direct luisteren gebruiken Gebruik de Direct luisteren functie om de meest waarheidsgetrouwe weergave van een bron te verkrijgen. Alle onnodige signaalverwerkingsfuncties 1 worden omzeild waardoor enkel het pure geluid van de ...
Page 55 - Bijkomende informatie; Problemen oplossen
Bijkomende informatie 05 13 Nl Hoofdstuk 5: Bijkomende informatie Problemen oplossen Vaak worden onjuiste handelingen verward met problemen of storingen. Wanneer u denkt dat er iets mis is met dit apparaat, controleer dan eerst de onderstaande punten. Soms kan de storing veroorzaakt worden door een ...
Page 56 - Versterkergedeelte; Audiogedeelte; Diversen; Reiniging van het toestel
Bijkomende informatie 05 14 Nl Specificaties Versterkergedeelte Het aangeduide uitgangsvermogen is van toepassing bij gebruik van een stroomvoorziening van 230 V. • Continu uitgangsvermogen (beide kanalen bij 20 Hz t/m 20 kHz)** THD 0,2 % . . . . . . . . . . . . . . . . . . . . 60 W + 60 WTHD 0,2 % ...
Page 58 - IMPORTANTE
Il punto esclamativo in un triangolo equilatero serve ad avvisare l’utilizzatoredella presenza di importanti istruzioni difunzionamento e manutenzione riportate nel libretto allegato al prodotto. Il simbolo del lampo con terminale a forma di freccia situato all’interno di un triangolo equilatero ser...
Page 60 - Grazie per aver acquistato questo prodotto Pioneer.; contenuto; 1 Prima di iniziare
4 It Grazie per aver acquistato questo prodotto Pioneer. Leggere atentamente queste istruzioni per l’uso in modo da imparare come azionare correttamente il modello. Dopo aver terminato la lettura delle istruzioni, conservarle in un luogo sicuro per consultazione futura . contenuto 01 Prima di inizia...
Page 61 - Prima di iniziare; Caratteristiche
Prima di iniziare 01 5 It Capitolo 1: Prima di iniziare Caratteristiche • Circuito di alimentazione a risposta rapida Il circuito di alimentazione superiore adottato da questa unità garantisce una risposta nettamente migliorata, grazie allutilizzo di un circuito privo di feedback e condensatori prin...
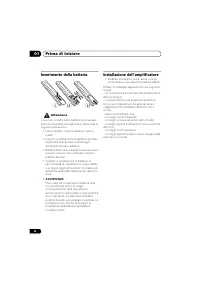
Page 62 - Installazione dell’amplificatore
Prima di iniziare 01 6 It Inserimento della batteria Attenzione L’uso non corretto delle batterie può causare pericolo di perdite e di esplosione. Osservare le seguenti precauzioni: • Non utilizzare insieme batterie nuove e usate. • Inserire correttamente le batterie secondo la polarità indicata dai...
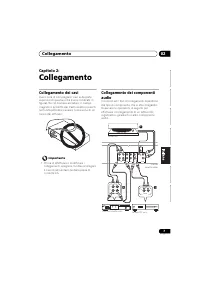
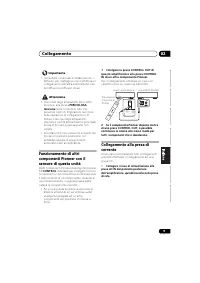
Page 63 - Collegamento; Collegamento dei cavi
Collegamento 02 7 It Capitolo 2: Collegamento Collegamento dei cavi Avere cura di non piegare i cavi sulla parte superiore di questa unità (come mostrato in figura). Se ciò dovesse accadere, il campo magnetico prodotto dai trasformatori presenti nell’unità potrebbe causare l’emissione di un ronzio d...
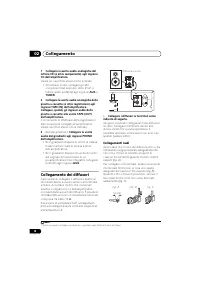
Page 64 - Collegamento dei diffusori; Collegamenti nudi
Collegamento 02 8 It 1 Collegare le uscite audio analogiche del lettore CD (o altro componente) agli ingressi CD dell’amplificatore. Usare un cavo RCA stereo come indicato. • Allo stesso modo, collegare gli altri componenti (ad esempio, dock iPod 1 o lettore audio portatile) agli ingressi AUX e TUNE...
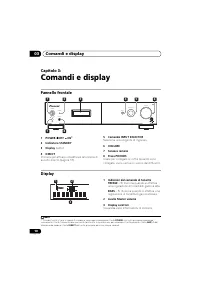
Page 66 - Comandi e display; Pannello frontale
Comandi e display 03 10 It Capitolo 3: Comandi e display Pannello frontale 1 POWER OFF ON 1 2 Indicatore STANDBY 3 Display (sotto) 4 DIRECT Premere per attivare o disattivare la funzione di ascolto directo (pagina 12). 5 Comando INPUT SELECTOR Seleziona una sorgente di ingresso. 6 VOLUME 7 Senso...
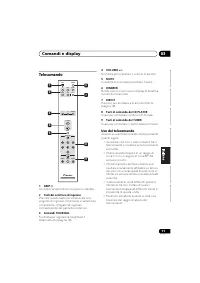
Page 67 - Uso del telecomando
Comandi e display 03 11 It Telecomando 1 AMP Accende l’amplificatore o lo pone in standby. 2 Tasti del selettore di ingresso Premere questo tasto per selezionare una sorgente di ingresso. In tal modo si seleziona il componente collegato all’ingresso corrispondente del pannello posteriore. 3 Comand...
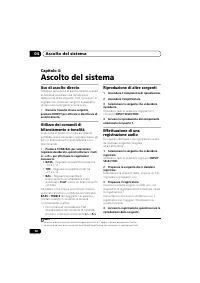
Page 68 - Ascolto del sistema; Uso di ascolto directo
Ascolto del sistema 04 12 It Capitolo 4: Ascolto del sistema Uso di ascolto directo Utilizzare la funzione di ascolto directo quando si desidera ascoltare una riproduzione fedelissima della sorgente. Tutti i processi 1 di segnale non necessari vengono bypassati e rimane solo la sorgente sonora pura....
Page 69 - Informazioni supplementari; Risoluzione dei problemi
Informazioni supplementari 05 13 It Capitolo 5: Informazioni supplementari Risoluzione dei problemi Operazioni non corrette sono spesso scambiate per guasti o malfunzionamenti. Se si ritiene che vi siano problemi a carico di questo componente, controllare i punti indicati di seguito. A volte il guas...
Page 70 - Sezione amplificatore; Sezione audio; Varie; Accessori; Pulizia dell’unità
Informazioni supplementari 05 14 It Dati tecnici Sezione amplificatore Specifica di potenza in uscita quando l’alimentazione è a 230 V. • Potenza continua in uscita (entrambi i canali da 20 Hz a 20 kHz)** DAT 0,2 % . . . . . . . . . . . . . . . . . . . . 60 W + 60 WDAT 0,2 % . . . . . . . . . . . . ...
Page 74 - Gracias por la adquisición de este producto Pioneer.; Contenido; 1 Antes de comenzar
4 Es Gracias por la adquisición de este producto Pioneer. Lea completamente este manual de instrucciones para aprender a utilizar correctamente el aparato. Después de haber terminado la lectura de las instrucciones, guarde el manual en un lugar seguro para poderlo consultar en el futuro . Contenido ...
Page 75 - Antes de comenzar; Características
Antes de comenzar 01 5 Es Capítulo 1: Antes de comenzar Características • Circuito de alimentación de respuesta rápida El circuito de alimentación de grandes prestaciones de esta unidad consigue niveles de respuesta muy mejorados gracias al uso de un conjunto de circuitos sin retorno y condensadores...
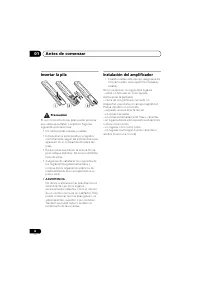
Page 76 - Instalación del amplificador
Antes de comenzar 01 6 Es Insertar la pila Precaución El uso incorrecto de las pilas puede provocar que estas se sulfaten o exploten. Siga las siguientes precauciones: • No mezcle pilas nuevas y usadas.• Introduzca los polos positivo y negativo correctamente según las indicaciones que aparecen en el...
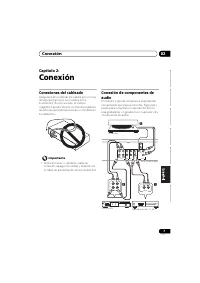
Page 77 - Conexión; Conexiones del cableado
Conexión 02 7 Es Capítulo 2: Conexión Conexiones del cableado Asegúrese de no doblar los cables por encima del equipo (tal como se muestra en la ilustración). Si esto sucede, el campo magnético producido por los transformadores de este equipo podría provocar un zumbido en los altavoces. Importante •...
Page 78 - Conexión de los altavoces; Conexiones de cable pelado
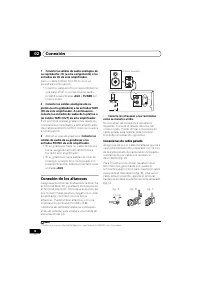
Conexión 02 8 Es 1 Conecte las salidas de audio analógico de su reproductor CD (u otro componente) a las entradas de CD de este amplificador. Use un cable estéreo fono RCA como se muestra a continuación. • Conecte cualquier otro componente (como una base iPod 1 o un reproductor audio portátil) a las...
Page 79 - Enchufado
Conexión 02 9 Es Importante • Le rogamos que consulte el manual entregado con sus altavoces si necesita más detalles sobre cómo conectar el otro extremo de los cables de altavoz a sus altavoces. Precaución • Por estos terminales de altavoz circula tensión ACTIVA que es PELIGROSA . Para evitar el pel...
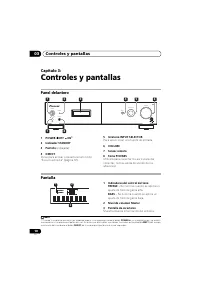
Page 80 - Controles y pantallas; Panel delantero
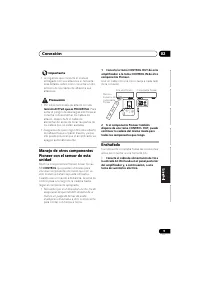
Controles y pantallas 03 10 Es Capítulo 3: Controles y pantallas Panel delantero 1 POWER OFF ON 1 2 Indicador STANDBY 3 Pantalla (rebajada) 4 DIRECT Pulse para activar o desactivar la función “Escucha directa” (página 12). 5 Giratorio INPUT SELECTOR Para seleccionar una fuente de entrada. 6 VOLU...
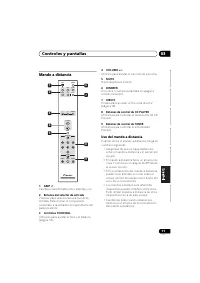
Page 81 - Uso del mando a distancia
Controles y pantallas 03 11 Es Mando a distancia 1 AMP Cambia el amplificador entre standby y on. 2 Botones del selector de entrada Púlselos para seleccionar una fuente de entrada. Seleccionan el componente conectado a la entrada correspondiente del panel posterior. 3 Controles TONE/BAL Utilícelos...
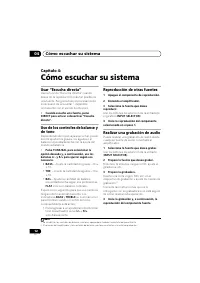
Page 82 - Cómo escuchar su sistema; Usar “Escucha directa”
Cómo escuchar su sistema 04 12 Es Capítulo 4: Cómo escuchar su sistema Usar “Escucha directa” Use la función “Escucha directa” cuando desee oír la reproducción más fiel posible de una fuente. Se ignora todo el procesamiento innecesario de una señal 1 , dejándole únicamente con el sonido fuente puro....
Page 83 - Información adicional; Resolución de problemas
Información adicional 05 13 Es Capítulo 5: Información adicional Resolución de problemas Las operaciones incorrectas se malinterpretan a menudo como problemas y errores de funcionamiento. Si cree que este componente presenta algún defecto, compruebe los puntos siguientes. En ocasiones, el problema p...
Page 84 - Sección del amplificador; Sección Audio; Misceláneo; Accesorios; Limpieza de la unidad
Información adicional 05 14 Es Especificaciones Sección del amplificador La especificación de la salida de potencia es para alimentación a 230 V. • Salida de potencia continua (ambos canales entre 20 Hz y 20 kHz)** DAT 0,2 % . . . . . . . . . . . . . . . . . . . . . 60 W + 60 WDAT 0,2 % . . . . . . ...