Page 2 - SPECIFICATIONS; Applicable battery cartridge and charger; SAFETY WARNINGS; IMPORTANT SAFETY INSTRUCTIONS; Read All Instructions
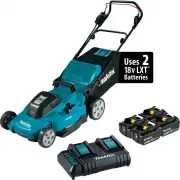
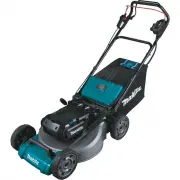
2 ENGLISH ENGLISH (Original instructions) SPECIFICATIONS Model: XML10 XML11 Mowing width (blade diameter) 534 mm (21″) No load speed 3,000 /min Part number of replacement mower blade 191V96-5 Dimensions (L x W x H) L: 1,780 mm to 1,840 mm (70″ to 72-1/2″) W: 580 mm (22-3/4″) H: 970 mm to 1,100 mm (3...
Page 4 - SAVE THESE INSTRUCTIONS.
4 ENGLISH 8. Check the blade mounting bolt at frequent intervals for proper tightness. 9. Keep all nuts, bolts, and screws tight to be sure the equipment is in safe working condition. 10. Never remove or tamper with safety devices. Check their proper operation regularly. Never do anything to interfe...
Page 5 - Symbols; Important safety instructions for
5 ENGLISH WARNING: Use of this product can create dust containing chemicals which may cause respiratory or other illnesses. Some examples of these chemicals are compounds found in pesti- cides, insecticides, fertilizers and herbicides.Your risk from these exposures varies, depending on how often you...
Page 6 - ASSEMBLY; Installing the handle
6 ENGLISH ASSEMBLY WARNING: Always be sure that the lock key and battery cartridge are removed before carrying out any work on the mower. Failure to remove the lock key and the battery cartridge may result in seri - ous personal injury from accidental start-up. WARNING: Never start the mower unless ...
Page 7 - Removing the mulching plug; Assembling the grass basket
7 ENGLISH Removing the mulching plug 1. Open the rear cover. 1 Fig.4 ► 1. Rear cover 2. Lift up the mulching plug slightly, and then remove it. 1 Fig.5 ► 1. Mulching plug Assembling the grass basket 1. Pick up the upper clip of the grass basket. 1 Fig.6 ► 1. Upper clip 2. Insert the frame into the g...
Page 8 - Installing or removing the grass; Attaching the mulching plug
8 ENGLISH 5. Attach all the other clips as shown in the figure. Make sure that all the clips are securely attached to the frame. 1 1 1 Fig.10 ► 1. Clip Installing or removing the grass basket To install the grass basket, follow the steps below. 1. Open the rear cover. 1 Fig.11 ► 1. Rear cover 2. Hol...
Page 9 - FUNCTIONAL; Installing or removing battery
9 ENGLISH 2. Attach the mulching plug by pushing it as far as it will go so that the protrusions on the mulching plug fit into the holes on the machine. 1 2 Fig.14 ► 1. Mulching plug 2. Protrusion FUNCTIONAL DESCRIPTION Installing or removing battery cartridge CAUTION: Always switch off the machine ...
Page 10 - Indicating the remaining battery
10 ENGLISH To remove the battery cartridge;1. Pull up the locking lever and open the battery cover. 2. Pull out the battery cartridge from the machine while sliding the button on the front of the cartridge. 3. Pull out the lock key. 4. Close the battery cover. Machine / battery protection system The...
Page 11 - Main power switch; Switch action
11 ENGLISH Indicator lamps Remaining capacity Lighted Off Blinking The battery may have malfunctioned. NOTE: Depending on the conditions of use and the ambient temperature, the indication may differ slightly from the actual capacity. NOTE: The first (far left) indicator lamp will blink when the batt...
Page 12 - Adjusting the mowing height; Grass level indicator
12 ENGLISH 5. Release the drive lever and the switch lever to stop the machine. For XML101. Install the battery cartridges. Insert the lock key, and then close the battery cover. 2. Press the main power switch. 3. Pull the switch lever toward you while holding down the switch button. Release the swi...
Page 14 - OPERATION; Mowing
14 ENGLISH Using mulching plug The mulching plug allows you to return the cut grass to the ground without gathering the cut grass in the grass basket. When you operate the machine with the mulch - ing plug, be sure to remove the grass basket. NOTICE: When using the machine with the mulching plug, ma...
Page 15 - MAINTENANCE
15 ENGLISH The center lines of the front wheels are guidelines to mowing width. Using the center lines as guidelines, mow in strips. Overlap by one half to one third the previ - ous strip to mow the lawn evenly. 1 2 3 Fig.34 ► 1. Mowing width 2. Overlapping area 3. Center line Change the mowing dire...
Page 18 - Removing or installing the mower; Installing the mower blade
18 ENGLISH 6. Store the grass basket as shown in the figure. 1 Fig.45 ► 1. Grass basket 1 Fig.46 ► 1. Grass basket Removing or installing the mower blade WARNING: The blade coasts for a few sec- onds after releasing the switch. Do not start any operation until the blade comes to a complete stop. WAR...
Page 19 - TROUBLESHOOTING; OPTIONAL; MAKITA LIMITED WARRANTY
19 ENGLISH TROUBLESHOOTING Before asking for repairs, conduct your own inspection first. If you find a problem that is not explained in the manual, do not attempt to disassemble the machine. Instead, ask Makita Authorized Service Centers, always using Makita replacement parts for repairs. State of a...
Page 20 - ESPECIFICACIONES; Cartucho de batería y cargador aplicables; ADVERTENCIAS DE; INSTRUCCIONES IMPORTANTES; Lea todas las instrucciones
20 ESPAÑOL ESPAÑOL (Instrucciones originales) ESPECIFICACIONES Modelo: XML10 XML11 Amplitud de corte del césped (diámetro de la cuchilla) 534 mm (21″) Velocidad sin carga 3 000 r/min Número de pieza de la cuchilla de repuesto de la cortadora de césped 191V96-5 Dimensiones (La x An x Al) L: 1 780 mm ...
Page 23 - GUARDE ESTAS; Símbolos
23 ESPAÑOL 7. No utilice un paquete de baterías o una herra- mienta que esté dañado/dañada o haya sido modificado/modificada. Las baterías dañadas o modificadas podrían comportarse de manera impredecible causando un incendio, explosión o riesgo de lesión. 8. No exponga un paquete de baterías o una h...
Page 25 - MONTAJE; Instalación del mango
25 ESPAÑOL MONTAJE ADVERTENCIA: Asegúrese siempre de que la llave de cierre y el cartucho de batería se hayan extraído antes de realizar cualquier trabajo en la cortadora de césped. El no extraer la llave de cierre y el cartucho de batería puede ocasionar lesiones personales graves debido a un encen...
Page 26 - Extracción del tapón para mantillo; Montaje del canasto para césped
26 ESPAÑOL Extracción del tapón para mantillo 1. Abra la cubierta posterior. 1 Fig.4 ► 1. Cubierta posterior 2. Levante el tapón para mantillo ligeramente, y luego quítelo. 1 Fig.5 ► 1. Tapón para mantillo Montaje del canasto para césped 1. Levante el sujetador de presión superior del canasto para c...
Page 28 - Instalación o extracción del
28 ESPAÑOL 2. Coloque el tapón para mantillo al empujarlo hasta el máximo que avance, de modo que las protuberancias del tapón para mantillo encajen dentro de los orificios de la máquina. 1 2 Fig.14 ► 1. Tapón para mantillo 2. Protuberancia DESCRIPCIÓN DEL FUNCIONAMIENTO Instalación o extracción del...
Page 29 - Indicación de capacidad restante de
29 ESPAÑOL Para retirar el cartucho de batería;1. Jale hacia arriba la palanca de bloqueo y abra la cubierta de la batería. 2. Jale el cartucho de batería para extraerlo de la máquina mientras desliza el botón en la parte delantera del cartucho. 3. Saque la llave de cierre. 4. Cierre la cubierta de ...
Page 30 - Interruptor de alimentación principal
30 ESPAÑOL Luces indicadoras Capacidad restante Iluminadas Apagadas Parpadeando 75% a 100% 50% a 75% 25% a 50% 0% a 25% Cargar la batería. La batería pudo haber funcionado mal. NOTA: Dependiendo de las condiciones de uso y la temperatura ambiente, la indicación podrá diferir ligeramente de la capaci...
Page 33 - Uso de la descarga trasera
33 ESPAÑOL 2. Ajuste la altura del mango, y luego gire la perilla en ambos lados 90°. Asegúrese de que las perillas estén bien fijadas. 1 Fig.29 ► 1. Perilla Ajuste de la velocidad de recorrido Para la XML11 1 Fig.30 ► 1. Palanca de velocidad La velocidad de recorrido se puede ajustar con la palanca...
Page 34 - OPERACIÓN; Corte del césped
34 ESPAÑOL OPERACIÓN Corte del césped ADVERTENCIA: Antes de cortar el césped, despeje las ramas y piedras del área de podado. Asimismo, despeje con antelación cualquier maleza en el área de podado. ADVERTENCIA: Use siempre gafas protecto- ras o gafas de seguridad con protección lateral al usar la co...
Page 35 - MANTENIMIENTO; Mantenimiento
35 ESPAÑOL Corte de césped largo No intente cortar el césped largo en una sola pasada. Procure podarlo en diferentes pasos. Deje pasar uno o dos días entre cada corte hasta lograr que el césped quede cortado de manera uniforme. Fig.36 NOTA: Cortar el césped largo a corto de una sola pasada podría ha...
Page 38 - Instalación de la cuchilla de la
38 ESPAÑOL Extracción o instalación de la cuchilla de la cortadora de césped ADVERTENCIA: La cuchilla continuará moviéndose por inercia durante algunos segun- dos tras haber soltado el interruptor. No realice ninguna operación hasta que la cuchilla se haya detenido por completo. ADVERTENCIA: Retire ...
Page 39 - RESOLUCIÓN DE PROBLEMAS; ACCESORIOS; GARANTÍA LIMITADA DE MAKITA; Ésta Garantía no aplica para México
39 ESPAÑOL RESOLUCIÓN DE PROBLEMAS Antes de solicitar alguna reparación, primero realice una inspección por su cuenta. Si detecta algún problema que no esté explicado en el manual, no intente desarmar la máquina. En vez de esto, solicite la reparación a un centro de servicio autorizado de Makita, us...
Page 40 - Makita Corporation
Makita Corporation 3-11-8, Sumiyoshi-cho, Anjo, Aichi 446-8502 Japan www.makita.com 885927A940 XML10-1 EN, ESMX 20210908