Page 2 - Intended use
Contents Introduction..................................................................... 2Safety..............................................................................4Assembly........................................................................ 9Operation...................................
Page 3 - Symbols on the product
11. Chain oil tank12. Oil pump adjustment screw13. Air purge bulb14. Choke15. Throttle trigger lockout16. Throttle trigger17. Start/stop switch18. Guide bar19. Saw chain20. Bar tip sprocket21. Belt eyelet22. Rope eyelet23. Clutch cover24. Product and serial number plate25. Chain tensioning screw26. ...
Page 4 - Euro V Emissions; Safety; Safety definitions
Work position. Choke. yyyywwxxxx The rating plate shows se- rial number. yyyy is the production year and ww is the production week. Note: Other symbols/decals on the product refer to certification requirements for some markets. Euro V Emissions WARNING: Tampering with the engine voids the EU type-ap...
Page 9 - Assembly; Introduction
chain and chain drive sprocket. Refer to To adjust the tension of the saw chain on page 24. • Do maintenance on the cutting equipment regularly and keep it correctly lubricated. If the saw chain is not correctly lubricated, the risk of wear on the guide bar, saw chain and chain drive sprocket increa...
Page 10 - Operation; Premixed fuel
Operation Introduction WARNING: Read and understand the safety chapter before you use the product. To do a function check before you use the product 1. Make sure that the chain brake operates correctly and that it is not damaged. 2. Make sure that the throttle trigger lockout operates correctly and ...
Page 11 - Kickback information
1. Fill half the quantity of gasoline in a clean container for fuel. 2. Add the full quantity of oil.3. Shake the fuel mixture.4. Add the remaining quantity of gasoline to the container. 5. Carefully shake the fuel mixture. CAUTION: Do not mix fuel for more than 1 month at a time. To fill the fuel t...
Page 12 - Common questions about kickback; To start the product; To prepare to start with a cold engine
and with large force, which throws the product in the direction of the operator. Kickback always occurs in the cutting plane of the guide bar. Usually, the product is thrown against the operator but can also move in a different direction. It is how you use the product when the kickback occurs that c...
Page 14 - Information about working technique; Pull stroke and push stroke
7. Move the front hand guard rearward to disengage the chain brake. 8. Use the product. To start the product in the tree Note: Make sure that you have sufficient fuel before you start the product. 1. Engage the chain brake.2. Hold the product on the left or right side of your body when you start the...
Page 15 - Ground operator; To operate the product in a tree
WARNING: If the saw chain is caught in the trunk, the product can be pushed at you. Hold the product tightly and make sure that the kickback zone of the guide bar does not touch the tree and causes a kickback. To prepare the product for operation in the tree Ground operator As a ground operator, do ...
Page 16 - To remove a trapped product
• Make sure that you are stable on your feet and keep a low lateral force when you cut vertical branches. Steer the safety line through a different connection point to remove or prevent increasing lateral forces. You can also use an adjustable strop directly from the harness to a different connectio...
Page 17 - Maintenance
Maintenance Introduction WARNING: Read and understand the safety chapter before you do maintenance on the product. Maintenance schedule Daily maintenance Weekly maintenance Monthly maintenance Clean the external parts of the prod- uct and make sure that there is no oil on the handles. Clean the cool...
Page 18 - To do a check of the brake band
Daily maintenance Weekly maintenance Monthly maintenance Do a check of the stop switch. Refer to To do a check of the start/stop switch on page 19. Make sure that these are no fuel leaks from the engine, tank or fuel lines. Make sure that the saw chain does not rotate when the engine is at idle spee...
Page 20 - Carburetor adjustment; Basic adjustments and run-in
3. Loosen the screws and nuts. 4. Remove the muffler and make sure that it is not defective. 5. Assemble the muffler and make sure that it is correctly attached to the product. 6. Some mufflers have a special spark arrestor mesh. Clean the spark arrestor mesh one time each week if your product has t...
Page 21 - To replace a broken or worn starter
temperatures it can be necessary to adjust the high speed needle.• Turn the high speed needle to make adjustments. CAUTION: Do not turn the high speed needle screw across the adjustment limitation stop. This can cause damage to the piston and the cylinder. To examine if the carburetor is correctly a...
Page 22 - Information about the guide bar and saw chain
3. Tighten the screws that hold the starter. To clean the air filter Clean the air filter from dirt and dust regularly. This prevents carburetor malfunctions, starting problems, loss of engine power, wear to engine parts and more fuel consumption than usual.1. Remove the air filter cover and the air...
Page 24 - To adjust the tension of the saw chain
To sharpen the cutters 1. Use a round file and a file gauge to sharpen the cutting teeth. Note: Refer to Accessories on page 30 for information about which file and gauge that Husqvarna recommends for your saw chain. 2. Apply the file gauge correctly on to the cutter. Refer to the instruction suppli...
Page 27 - Troubleshooting; The engine does not start
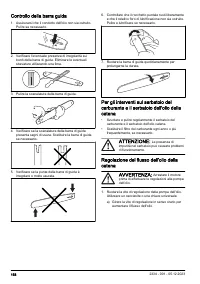
To do maintenance on the fuel tank and the chain oil tank • Drain and clean the fuel tank and the chain oil tank regularly. • Replace the fuel filter yearly or more frequently if necessary. CAUTION: Contamination in the tanks causes malfunction. To adjust the chain oil flow WARNING: Stop the engine ...
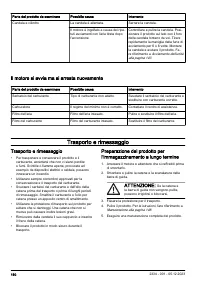
Page 28 - The engine starts but stops again; Transportation and storage
Product part to examine Possible cause Action Ignition, no spark The spark plug is dirty or wet. Make sure that the spark plug is dry and clean. The electrode gap is incorrect. Clean the spark plug. Make sure that the electrode gap and spark plug is correct, and that the correct spark plug type is t...
Page 29 - Technical data
4. Clean the product. Refer to Maintenance on page 17 for instructions. 5. Do a complete servicing of the product. Technical data Technical data Husqvarna T435 Engine Cylinder displacement, cm 3 35.2 Idle speed, rpm 2900 Maximum engine power acc. to ISO 8893, kW/hp @ rpm 1.5/2.0@10000 Ignition syste...
Page 30 - Accessories; Recommended cutting equipment
Husqvarna T435 Saw chain speed at maximum engine power speed, m/s. 19.0 Accessories Recommended cutting equipment Chainsaw model Husqvarna T435 have been evaluated for safety according to EN ISO 11681-2:2022 (Machinery for forestry - Portable chainsaws - Safety requirements and testing. Part 2: Chai...
Page 32 - Declaration of Conformity; EU Declaration of Conformity
Declaration of Conformity EU Declaration of Conformity We, Husqvarna AB, SE-561 82 Huskvarna, Sweden, tel: +46-36-146500, declare on our sole responsibility that the product: Description Chainsaws for tree service Brand Husqvarna Type / Model T435 Identification Serial numbers dating from 2024 and o...
Page 33 - UK Declaration of Conformity
UK Declaration of Conformity We, Husqvarna AB, SE-561 82 Huskvarna, Sweden, tel: +46-36-146500, declare on our sole responsibility that the product: Description Chainsaws for tree service Brand Husqvarna Type / Model T435 Identification Serial numbers dating from 2024 and onwards complies fully with...
Page 34 - Verwendungszweck
Inhalt Einleitung...................................................................... 34Sicherheit...................................................................... 36Montage........................................................................ 42Betrieb.........................................
Page 35 - Symbole auf dem Gerät
9. Startseilgriff10. Vorderer Handgriff11. Kettenöltank12. Stellschraube, Ölpumpe13. Kraftstoffpumpe14. Choke15. Gashebelsperre16. Gashebel17. Start-/Stoppschalter18. Führungsschiene19. Sägekette20. Umlenkstern21. Riemenöse22. Seilöse23. Kupplungsdeckel24. Produkt- und Seriennummernschild25. Schraub...
Page 36 - Emissionen nach Euro V; Sicherheit; Sicherheitsdefinitionen
Diese Motorsäge darf nur von Personen be- nutzt werden, die speziell für Waldarbeiten ausgebil- det wurden. Siehe Bedie- nungsanleitung! Arbeitsstellung. Choke. yyyywwxxxx Auf dem Typenschild ist die Seriennummer ange- geben. yyyy ist das Pro- duktionsjahr, und ww steht für die Produktionswoche. Hin...
Page 37 - Sicherheitshinweise für den Betrieb
Sicherheitshinweise für den Betrieb WARNUNG: Lesen Sie die folgenden Warnhinweise, bevor Sie das Gerät benutzen. • Diese Obergriff-Kettensäge wurde speziell für die Baumchirurgie und -pflege entworfen. Aufgrund des besonders kompakten Griffdesigns (nah beieinander platzierte Griffe) besteht eine erh...
Page 38 - Persönliche Schutzausrüstung
• Greifen Sie die Motorsäge immer fest, mit der rechten Hand am oberen Griff und der linken Hand am vorderen Griff. Daumen und Finger sollen die Handgriffe fest umschließen. Alle Anwender, ob Links- oder Rechtshänder, müssen die Griffe so greifen. Durch diesen Griff kann man die Rückschlagkraft am b...
Page 39 - Sicherheitsvorrichtungen am Gerät
• Bei Kontakt mit der Sägekette können schwerste Verletzungen auftreten. Sie müssen während des Betriebs eine zugelassene persönliche Schutzausrüstung tragen. Die persönliche Schutzausrüstung schützt Sie zwar nicht vollständig vor Verletzungen, vermindert aber den Umfang der Verletzungen bei einem U...
Page 40 - Sicherer Umgang mit Kraftstoff
zurückgestellt. Dadurch wird der Gashebel im Leerlauf gesperrt. B A KettenfängerDer Kettenfänger fängt die Kette, wenn sie bricht oder abspringt. Eine korrekte Spannung der Sägekette und richtige Anwendung der Wartung der Sägekette und Führungsschiene verringern die Gefahr von Unfällen. Antivibratio...
Page 41 - Sicherheitshinweise für die Wartung
• Bewegen Sie das Gerät vor dem Start immer mindestens 3 Meter aus dem Auftankbereich und von der Kraftstoffauftankquelle weg. Min. 3m(10 ft) Nach dem Tanken gibt es einige Situationen, in denen das Gerät niemals gestartet werden darf:• Sie haben Kraftstoff oder Kettenöl über das Gerät verschüttet. ...
Page 42 - Montage; Einleitung
Gefahr von Verschleiß an der Führungsschiene, der Sägekette dem und Kettenantriebsrad. Montage Einleitung WARNUNG: Lesen Sie vor der Montage des Geräts das Kapitel über Sicherheit, und machen Sie sich damit vertraut. So montieren Sie Führungsschiene und Kette 1. Deaktivieren Sie die Kettenbremse.2. ...
Page 43 - Betrieb; Vorgemischter Kraftstoff
Betrieb Einleitung WARNUNG: Lesen Sie vor Gebrauch des Geräts das Kapitel über Sicherheit, und machen Sie sich damit vertraut. So führen Sie eine Funktionsprüfung vor Verwendung des Geräts durch 1. Stellen Sie sicher, dass die Kettenbremse ordnungsgemäß funktioniert und unbeschädigt ist. 2. Stellen ...
Page 45 - Informationen zu Rückschlägen; Häufig gestellte Fragen über Rückschläge; So starten Sie das Gerät; So bereiten Sie einen kalten Motor auf den
zu dickflüssig, was zu Schäden an der Ölpumpe führen kann. • Verwenden Sie die empfohlene Schneidausrüstung. Siehe Zubehör auf Seite 64. Informationen zu Rückschlägen WARNUNG: Ein Rückschlag kann schwere Verletzungen des Bedieners oder anderer Personen verursachen. Um das Risiko zu mindern, müssen S...
Page 47 - Informationen zur Arbeitstechnik
4. Ziehen Sie den Startseilgriff langsam mit der rechten Hand, bis Sie einen Widerstand spüren. WARNUNG: Wickeln Sie die Starterzugschnur nicht um die Hand. ACHTUNG: Ziehen Sie das Startseil nicht vollständig aus, und lassen den Startseilgriff nicht los. a) Wenn Sie das Gerät mit kaltem Motor starte...
Page 48 - Ziehende und schiebende Kette; So bereiten Sie das Gerät für den; Anwender am Boden
zum Tode des Benutzers oder anderer Personen kommen. • Setzen Sie die volle Leistung beim Schneiden ein und reduzieren Sie die Geschwindigkeit nach jedem Schnitt in den Leerlauf. ACHTUNG: Am Motor können Schäden auftreten, wenn der Motor zu lange mit voller Leistung ohne Last läuft. • Setzen Sie bei...
Page 49 - Anwender im Baum; So bedienen Sie das Gerät in einem
8. Heben Sie das Gerät mit Hebewerkzeugen zum Bediener im Baum an. WARNUNG: Stellen Sie sicher, dass das Gerät sicher befestigt ist, wenn Sie es zum Bediener im Baum befördern. Anwender im Baum Befolgen Sie als Anwender im Baum die Anweisungen unten.1. Bevor Sie die Sicherheitsschlinge von den Hebew...
Page 50 - Wartung
• Wenn Sie mit dem Gerät klettern müssen, befestigen Sie das Gerät an dem hinteren Verbindungspunkt am Tragegurt. Am hinteren Verbindungspunkt ist das Gerät nicht im Weg. Es wird von den Kletterseilen ferngehalten, und das Gewicht wird mittig auf Ihre Wirbelsäule verteilt. WARNUNG: Sie müssen die Ke...
Page 52 - So kontrollieren Sie das Bremsband
Wartung und Prüfung der Sicherheitseinrichtungen auf dem Gerät So kontrollieren Sie das Bremsband 1. Reinigen Sie die Kettenbremse und Kupplungstrommel mit einer Bürste von Spänen, Harz und Schmutz. Verschmutzung und Abnutzung beeinträchtigen die Bremsfunktion . 2. Prüfen Sie das Bremsband. Das Brem...
Page 54 - Vergasereinstellung
5. Montieren Sie den Schalldämpfer und stellen Sie sicher, dass er richtig am Gerät befestigt ist. 6. Einige Schalldämpfer verfügen über ein spezielles Funkenfängernetz. Reinigen Sie das Funkenfängernetz einmal pro Woche, wenn Ihr Gerät mit einem derartigen Schalldämpfer ausgerüstet ist. Vergaserein...
Page 55 - So tauschen Sie ein gerissenes oder
ACHTUNG: Drehen Sie die Schraube der Nadel für hohe Drehzahl nicht weiter als zum Begrenzungsanschlag. Dies kann Schäden an Zylinder und Kolben zur Folge haben. So prüfen Sie, ob der Vergaser richtig eingestellt ist • Stellen Sie sicher, dass das Gerät die richtige Beschleunigungskapazität hat. • St...
Page 56 - So montieren Sie die Führungsschiene und
3. Ziehen Sie die Befestigungsschrauben der Startvorrichtung fest. So reinigen Sie den Luftfilter Reinigen Sie den Luftfilter regelmäßig von Staub und Schmutz. Dies verhindert Fehlfunktionen des Vergasers, Probleme beim Anlassen, Leistungsverlust des Motors, Verschleiß der Motorteile und einen Kraft...
Page 62 - Fehlerbehebung; Der Motor springt nicht an
zur Überhitzung des Gerätes, was das Gerät beschädigen kann. Fehlerbehebung Der Motor springt nicht an Zu überprüfendes Bauteil des Pro- dukts Mögliche Ursache Maßnahme Starterklinken Die Starterklinken sind blockiert. Stellen Sie die Starterklinken ein oder tauschen Sie sie aus. Reinigen Sie den Be...
Page 63 - Transport und Lagerung; Technische Angaben; Technische Daten
Zu überprüfendes Bauteil des Pro- dukts Mögliche Ursache Maßnahme Vergaser Die Leerlaufdrehzahl ist falsch. Wenden Sie sich an Ihren Service- händler. Luftfilter Verstopfter Luftfilter. Reinigen oder ersetzen Sie den Luft- filter. Kraftstofffilter Verstopfter Kraftstofffilter. Tauschen Sie den Kraft...
Page 64 - Zubehör; Empfohlene Schneidausrüstung
Husqvarna T435 Elektrodenabstand, mm 0,65 Kraftstoff- und Schmiersystem Füllmenge Kraftstofftank, l/cm 3 0,26/260 Füllmenge Öltank, l/cm 3 0,17/170 Ölpumpentyp Einstellbar Gewicht Gewicht, kg 3,4 Geräuschemissionen Schallleistungspegel, gemessen dB (A) 112 Schallleistungspegel, garantiert L WA dB (A...
Page 66 - Konformitätserklärung; EU-Konformitätserklärung
Konformitätserklärung EU-Konformitätserklärung Die Husqvarna AB, SE-561 82 Huskvarna, Schweden, Tel.: +46-36-146500, erklärt in alleiniger Verantwortung, dass das Gerät: Beschreibung Motorsägen für die Baumpflege Marke Husqvarna Typ/Modell T435 Identifizierung Seriennummern ab 2024 die folgenden EU-...
Page 67 - Utilisation prévue
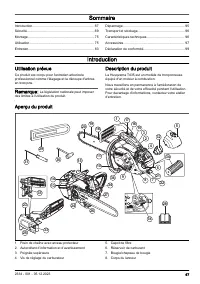
Sommaire Introduction................................................................... 67Sécurité.........................................................................69Montage........................................................................ 75Utilisation....................................
Page 68 - Symboles concernant le produit
9. Poignée du câble du démarreur10. Poignée avant11. Réservoir d’huile pour chaîne12. Vis de réglage de la pompe à huile13. Poire de la pompe à carburant14. Starter15. Blocage de la gâchette d'accélération16. Gâchette d'accélération17. Interrupteur marche/arrêt18. Guide-chaîne19. Chaîne20. Pignon av...
Page 69 - Émissions Euro V; Sécurité; Définitions de sécurité
Cette tronçonneuse est uniquement destinée aux personnes qui ont une for- mation spéciale pour l'en- tretien des arbres. Consul- tez le manuel d'utilisation ! Position de travail. Starter. yyyywwxxxx La plaque signalétique in- dique le numéro de série. aaaa désigne l'année de production et ww désign...
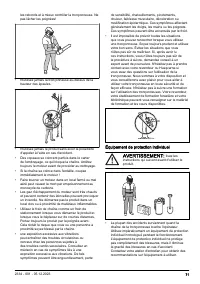
Page 71 - Équipement de protection individuel
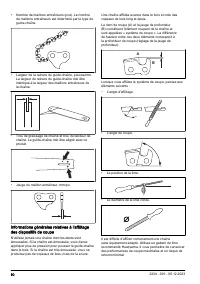
les rebonds et à mieux contrôler la tronçonneuse. Ne pas lâcher les poignées! • N'utilisez jamais la tronçonneuse au-dessus de la hauteur des épaules. • N'utilisez jamais le produit sans avoir la possibilité d'appeler à l'aide en cas d'accident. • Des copeaux se coincent parfois dans le carter de l'...
Page 72 - Dispositifs de sécurité sur le produit
• Portez des vêtements près du corps qui n'entravent toutefois pas vos mouvements. Vérifiez régulièrement l'état de votre équipement de protection individuel. • Utilisez un casque de protection homologué.• Utilisez des protège-oreilles homologués. Une exposition prolongée au bruit risque de causer d...
Page 73 - Sécurité carburant
approprié de la chaîne et du guide-chaîne diminuent le risque d'accident. Système anti-vibrationsLe système anti-vibrations réduit les vibrations dans les poignées. Les dispositifs anti-vibrations agissent comme une séparation entre le corps du produit et les poignées.Reportez-vous à la section Aper...
Page 74 - Consignes de sécurité pour l'entretien
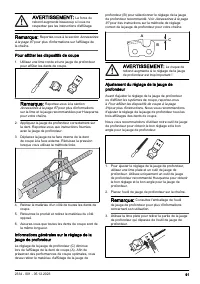
• En cas de fuite de carburant. Vérifiez régulièrement que le réservoir de carburant, le bouchon du réservoir et les conduites de carburant ne fuient pas. Consignes de sécurité pour l'entretien AVERTISSEMENT: Lisez les instructions qui suivent avant d'effectuer l'entretien du produit. • Effectuez un...
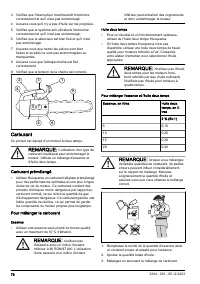
Page 76 - Carburant; Carburant prémélangé
3. Vérifiez que l'interrupteur marche/arrêt fonctionne correctement et qu'il n'est pas endommagé. 4. Assurez-vous qu'il n'y a pas d'huile sur les poignées.5. Vérifiez que le système anti-vibrations fonctionne correctement et qu'il n'est pas endommagé. 6. Vérifiez que le silencieux est bien fixé et q...
Page 77 - Informations sur le rebond
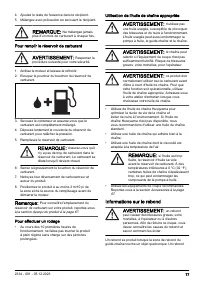
4. Ajoutez le reste de l'essence dans le récipient.5. Mélangez avec précaution en secouant le récipient. REMARQUE: Ne mélangez jamais plus d'un mois de carburant à chaque fois. Pour remplir le réservoir de carburant AVERTISSEMENT: Respectez la procédure suivante pour votre sécurité. 1. Arrêtez le mo...
Page 78 - Questions fréquentes concernant le rebond; Pour démarrer le produit; Pour préparer le démarrage avec un moteur
peut être soudain et fort et projeter le produit vers l'opérateur. Le rebond se produit toujours dans le plan du guide- chaîne. Généralement, le produit est projeté contre l'opérateur, mais il peut aussi se déplacer dans une autre direction. C'est la façon dont vous utilisez le produit au moment du ...
Page 80 - Informations sur la méthode de travail
et ne lâchez pas la poignée du câble du démarreur. a) Si vous démarrez votre produit avec un moteur froid, tirez la poignée du câble du démarreur jusqu'à ce que le moteur démarre. Remarque: vous savez que le moteur démarre lorsque vous entendez un « soufflement ». b) Placez la commande de starter en...
Page 81 - Méthode tirée et méthode poussée; Pour préparer le produit pour une; Opérateur au sol
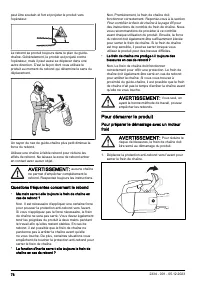
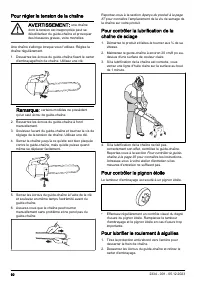
Méthode tirée et méthode poussée Vous pouvez couper le bois avec le produit dans 2 positions différentes.• La méthode tirée consiste à couper à l'aide de la partie inférieure du guide-chaîne. La chaîne est tirée à travers l'arbre pendant la coupe. Dans cette position, vous avez un meilleur contrôle ...
Page 82 - Pour utiliser le produit dans un arbre
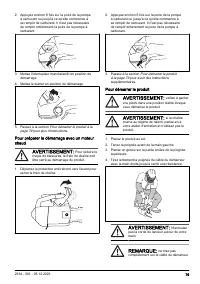
1. Avant de décrocher l'estrope de sécurité des outils de levage, vous devez attacher le produit au harnais. Attachez le produit au harnais à travers l'œillet de courroie ou un anneau d'acier sur l'estrope de sécurité. AVERTISSEMENT: attachez l'estrope de sécurité à l'un des points de raccordement r...
Page 83 - Pour dégager un produit bloqué; Entretien
• Si vous devez grimper avec le produit, attachez-le au point de raccordement arrière du harnais. Le point de raccordement arrière permet d'éloigner le produit des cordages et de veiller à ce que le poids soit réparti au centre de votre colonne vertébrale. AVERTISSEMENT: vous devez serrer le frein d...
Page 85 - Pour contrôler la bande de frein
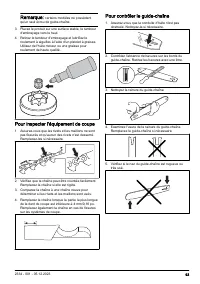
Entretien et contrôle des dispositifs de sécurité du produit Pour contrôler la bande de frein 1. À l'aide d'une brosse, nettoyez le frein de chaîne et le tambour d'embrayage (copeaux, résine, saletés). La saleté et l'usure peuvent nuire au bon fonctionnement du frein. 2. Contrôlez la bande de frein....
Page 87 - Réglage du carburateur; Réglages de base et rodage
5. Montez le silencieux et assurez-vous qu'il est correctement fixé au produit. 6. Certains silencieux sont dotés d'une grille antiflamme spéciale. Nettoyez la grille antiflamme une fois par semaine si votre produit est équipé de ce type de silencieux. Réglage du carburateur En raison de lois sur l'...
Page 88 - Pour remplacer un câble de démarreur
Pour vérifier si le carburateur est correctement réglé • Assurez-vous que le produit a la bonne capacité d'accélération. • Assurez-vous que le produit effectue 4 cycles à plein régime pendant un court moment. • Assurez-vous que la chaîne ne tourne pas lorsque le moteur tourne au ralenti. • Si le pro...
Page 89 - Informations relatives au guide-chaîne et à la
Pour nettoyer le filtre à air Éliminez la saleté et la poussière du filtre à air régulièrement. Cela permet d'éviter un dysfonctionnement du carburateur, des problèmes de démarrage, une perte de puissance du moteur, l'usure des pièces du moteur et l'augmentation de la consommation de carburant.1. Re...
Page 95 - Dépannage; Le moteur ne démarre pas
Dépannage Le moteur ne démarre pas Pièce du produit à examiner Cause possible Action Cliquets du lanceur Les cliquets du démarreur sont blo- qués. Réglez ou remplacez les cliquets du démarreur. Nettoyez le pourtour des cliquets. Contactez un atelier de service après-vente agréé. Réservoir de carbura...
Page 96 - Transport et stockage; Caractéristiques techniques
Pièce du produit à examiner Cause possible Action Carburateur Le régime de ralenti n'est pas cor- rect. Contactez votre atelier d'entretien. Filtre à air Filtre à air bouché. Nettoyez ou remplacez le filtre à air. Filtre à carburant Filtre à carburant bouché. Remplacez le filtre à carburant. Transpo...
Page 97 - Accessoires; Équipement de coupe recommandé
Husqvarna T435 Système de lubrification et de carburant Capacité du réservoir de carburant, litres/cm 3 0,26/260 Capacité du réservoir d'huile, litre/cm 3 0,17/170 Type de pompe à huile Réglable Poids Poids, kg 3,4 Émissions sonores Niveau de puissance acoustique mesuré dB (A) 112 Niveau de puissanc...
Page 99 - Déclaration de conformité; Déclaration de conformité UE
Déclaration de conformité Déclaration de conformité UE Nous, Husqvarna AB, SE-561 82 Huskvarna, Suède, tél : +46-36-146500, déclarons sous notre entière responsabilité que le produit : Description Tronçonneuses pour l'entretien des arbres Marque Husqvarna Type/Modèle T435 Identification Les numéros ...
Page 100 - Gebruik
Inhoud Inleiding...................................................................... 100Veiligheid.................................................................... 102Montage...................................................................... 107Werking...........................................
Page 101 - Symbolen op het product
9. Startkoordhendel10. Voorste handgreep11. Kettingolietank12. Afstelschroef, oliepomp13. Primerbalg van brandstofpomp14. Choke15. Gashendelvergrendeling16. Gashendel17. Start/stop-schakelaar18. Geleider19. Zaagketting20. Neuswiel21. Gordeloog22. Kabeloog23. Koppelingsdeksel24. Product- en serienumm...
Page 102 - Veiligheid; Veiligheidsdefinities
Deze kettingzaag is alleen bedoeld voor personen die speciaal opgeleid zijn in onderhoudswerk aan bomen. Raadpleeg de be- dieningshandleiding! Werkpositie. Choke. yyyywwxxxx Het serienummer staat op het productplaatje. yyyy is het productiejaar en ww is de productieweek. Let op: Andere symbolen/stick...
Page 104 - Persoonlijke beschermingsuitrusting
over de motorkettingzaag. Laat de handvatten niet los! • Gebruik de motorkettingzaag nooit boven schouderhoogte. • Gebruik het product nooit als u niet de mogelijkheid heeft om hulp in te roepen in het geval van een ongeval. • Soms komen snippers vast te zitten in het koppelingsdeksel, waardoor de ke...
Page 105 - Veiligheidsvoorzieningen op het product
• Uw kleding moet nauwsluitend zijn zonder uw bewegingsvrijheid te beperken. Controleer regelmatig de toestand van uw persoonlijke beschermingsmiddelen. • Draag een goedgekeurde veiligheidshelm.• Gebruik goedgekeurde gehoorbescherming. Langdurige blootstelling aan lawaai kan leiden tot permanente gehoo...
Page 106 - Brandstofveiligheid
acht te nemen en de zaagketting en geleider goed te onderhouden, verkleint u de kans op ongevallen. TrillingdempingssysteemHet trillingdempingssysteem vermindert trillingen in de handgrepen. Trillingdempers fungeren als scheiding tussen de productbehuizing en de handgreep.Raadpleeg Productoverzicht ...
Page 107 - Veiligheidsinstructies voor onderhoud; Inleiding
Veiligheidsinstructies voor onderhoud WAARSCHUWING: Lees de volgende waarschuwingen voordat u onderhoud aan het product gaat uitvoeren. • De gebruiker mag alleen de onderhouds- en servicewerkzaamheden uitvoeren die in deze bedieningshandleiding zijn beschreven. Laat professioneel onderhoudspersoneel ...
Page 108 - Het gordeloog monteren; Werking
Let op: Als het koppelingsdeksel moeilijk te verwijderen is, draait u de zaagbladmoer aan en schakelt u de kettingrem in en weer uit. U hoort een klik als de kettingrem goed vrijkomt. 3. Plaats het zaagblad op de zaagbladbout. Duw het zaagblad in de achterste positie. 4. Monteer de zaagketting rond het...
Page 109 - Brandstof; Voorgemengde brandstof
9. Zorg dat de zaagketting correct is gespannen. 9 2 7 5 1 3 8 4 6 Brandstof Dit product is uitgerust met een tweetaktmotor. OPGELET: Een verkeerde soort brandstof kan leiden tot motorschade. Gebruik een mengsel van benzine en tweetaktolie. Voorgemengde brandstof • Gebruik voorgemengde Husqvarna-alk...
Page 110 - Informatie over terugslag
2. Maak het gebied rondom de brandstoftankdop goed schoon. 3. Schud de container en zorg ervoor dat de brandstof volledig is gemengd. 4. Draai de brandstoftankdop langzaam los om de druk te laten ontsnappen. 5. Vul de brandstoftank. OPGELET: Zorg dat er niet te veel brandstof in de brandstoftank zit...
Page 111 - Veelgestelde vragen over terugslag; Product starten; Starten als de motor koud is
waarop u het product gebruikt op het moment dat de terugslag optreedt. Een kleinere neusradius vermindert de kracht van de terugslag.Gebruik een zaagketting met geringe terugslag om de effecten van terugslag te beperken. Laat de terugslagzone geen objecten raken. WAARSCHUWING: Geen enkele zaagkettin...
Page 113 - Algemene informatie over werktechniek; Trekslag en duwslag
8. Gebruik het product. De motor starten terwijl u in een boom aan het werk bent Let op: Zorg dat u over voldoende brandstof beschikt voordat u het product start. 1. Schakel de kettingrem in.2. Houd het product aan de linker- of rechterzijde van uw lichaam tijdens het starten.a) Als u het product aan u...
Page 114 - Gebruiker op de grond; Het product gebruiken in de boom
Het product voorbereiden voor gebruik in de boom Gebruiker op de grond Wanneer u op de grond blijft bij boomonderhoud, doe dan het volgende.1. Inspecteer het product.2. Vul de brandstof- en kettingolietanks bij.3. Bevestig het uiteinde van een goedgekeurde veiligheidsstrop aan het kabeloog. Let op: Een...
Page 115 - Een vastgelopen product losmaken; Onderhoud
• Zaag horizontale secties op heuphoogte en verticale secties op borsthoogte. • Houd het apparaat met beide handen vast.• Zorg dat uw voeten op een stabiele ondergrond staan en gebruik weinig dwarskracht wanneer u verticale takken zaagt. Leid de veiligheidslijn via een ander bevestigingspunt om grote...
Page 116 - Onderhoudsschema
Onderhoudsschema Dagelijks onderhoud Wekelijks onderhoud Maandelijks onderhoud Reinig de externe onderdelen van het product en zorg dat de handgre- pen vrij zijn van olie. Reinig het koelsysteem. Zie Koelsys- teem reinigen op pagina 126. Controleer de remband. Zie De rem- band controleren op pagina 117. ...
Page 117 - De remband controleren
Dagelijks onderhoud Wekelijks onderhoud Maandelijks onderhoud Controleer of de geluiddemper cor- rect is bevestigd, niet is beschadigd en of er geen delen van de demper ontbreken. De veiligheidsvoorzieningen op het product onderhouden en controleren De remband controleren 1. Verwijder met een borstel ho...
Page 119 - Afstelling van de carburateur; Basisafstellingen en inlopen
5. Monteer de geluiddemper en controleer of deze correct is bevestigd op het product. 6. Sommige geluiddempers hebben een speciaal vonkenopvangnet. Reinig het vonkenopvangnet minimaal één keer per week indien uw product voorzien is van dit type geluiddemper. Afstelling van de carburateur Ingevolge d...
Page 121 - Informatie over de geleider en zaagketting
van motoronderdelen en een hoger brandstofverbruik dan normaal.1. Verwijder het luchtfilterdeksel en het luchtfilter.2. Borstel of schud het luchtfilter schoon. Gebruik een reinigingsmiddel en water om het filter goed te reinigen. Let op: Een luchtfilter dat lange tijd is gebruikt, kan niet volledig w...
Page 123 - De spanning van de zaagketting
Let op: Raadpleeg Accessoires op pagina 129 voor informatie over het slijpen van de zaagketting. De zaagtanden slijpen 1. Gebruik voor het slijpen van de snijtanden een ronde vijl en een vijlmal. Let op: Raadpleeg Accessoires op pagina 129 voor informatie over welke vijl en vijlmal wordt Husqvarna aangerade...
Page 126 - Probleemoplossing; De motor start niet
6. Controleer of het neuswiel van het zaagblad soepel draait en of de smeeropening in het neuswiel van het zaagblad open is. Maak schoon en smeer indien nodig. 7. Draai de geleider dagelijks om de levensduur te verlengen. Onderhoud uitvoeren aan de brandstoftank en de kettingolietank • Tap regelmatig...
Page 127 - De motor start, maar stopt weer; Transport en opslag
Te inspecteren onderdeel Mogelijke oorzaak Actie Brandstoftank Verkeerd type brandstof. Tap de brandstoftank af en vul hem met de juiste brandstof. De brandstoftank is gevuld met ket- tingolie. Als u heeft geprobeerd de motor te starten, neem dan contact op met uw servicedealer. Als u niet heeft gepr...
Page 128 - Technische gegevens
Uw product voorbereiden op langdurige opslag 1. Stop het product en laat het afkoelen voordat u het uit elkaar haalt. 2. Demonteer en reinig de zaagketting en de groef in het zaagblad. OPGELET: Als u de zaagketting en het zaagblad niet reinigt, kunnen ze star of geblokkeerd raken. 3. Bevestig de tra...
Page 129 - Aanbevolen snijuitrusting
Husqvarna T435 Equivalente trillingsniveaus, a hveq 12 Voorste handgreep, m/s 2 4,8 Achterste handgreep, m/s 2 3,9 Zaagketting/geleider Type aandrijfwielen/aantal tanden 3/8"/Spur 6, 1/4"/Spur 8, 0,325''/Spur 7 Zaagkettingtoerental op maximale motortoerental, m/s. 19,0 Accessoires Aanbevolen ...
Page 130 - Vijlbenodigdheden en vijlhoeken
Vijlbenodigdheden en vijlhoeken Gebruik een Husqvarna-vijlmal om de zaagketting te slijpen. Een Husqvarna-vijlmal zorgt ervoor dat u de tanden in de juiste hoek kunt vijlen. De onderdeelnummers vindt u in onderstaande tabel. Als u niet zeker weet hoe u het type zaagketting op uw product kunt herkennen, ra...
Page 131 - Verklaring van overeenstemming; EU-verklaring van overeenstemming
Verklaring van overeenstemming EU-verklaring van overeenstemming Wij, Husqvarna AB, SE-561 82 Huskvarna, Zweden, tel: +46-36-146500, verklaren onder onze alleenverantwoordelijkheid dat het product: Beschrijving Kettingzagen voor boomverzorging Merk Husqvarna Type/model T435 Identificatie Serienummers v...
Page 132 - Uso previsto
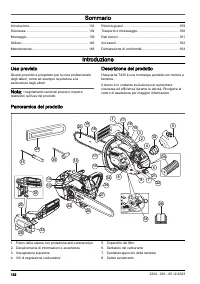
Sommario Introduzione................................................................ 132Sicurezza.................................................................... 134Montaggio................................................................... 139Utilizzo.............................................
Page 133 - Simboli riportati sul prodotto
9. Impugnatura cavo di avviamento10. Impugnatura anteriore11. Serbatoio dell'olio della catena12. Vite di regolazione pompa dell’olio13. Primer del carburante14. Valvola dell'aria15. Blocco del grilletto acceleratore16. Grilletto acceleratore17. Interruttore di avviamento/arresto18. Barra di guida19...
Page 134 - Emissioni Euro V; Sicurezza; Definizioni di sicurezza
Questa motosega è desti- nata unicamente all’uso da parte di personale spe- cializzato nel campo della silvicoltura. Vedere il ma- nuale operatore! Posizione di lavoro. Comando dell'aria. aaaassxxxx La targhetta dati di funzio- namento mostra il numero di serie. aaaa è l'anno di produzione e aa è la...
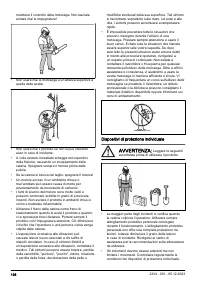
Page 136 - Dispositivi di protezione individuale
mantiene il controllo della motosega. Non lasciare andare mai le impugnature! • Non usare mai la motosega a un'altezza superiore a quella della spalla. • Non usare mai il prodotto se non si può chiedere aiuto in caso di incidente. • A volte restano incastrate schegge nel coperchio della frizione, ca...
Page 137 - Dispositivi di sicurezza sul prodotto
• Utilizzare un elmetto protettivo omologato.• Usare cuffie protettive omologate. Una lunga esposizione al rumore può comportare lesioni permanenti all'udito. • Indossare occhiali protettivi approvati o una visiera per ridurre il rischio di danni legati alla proiezione di oggetti. Il prodotto può la...
Page 138 - Sicurezza nell'uso del carburante
guida applicata correttamente diminuiscono il rischio di incidenti. Sistema di smorzamento delle vibrazioniIl sistema di smorzamento delle vibrazioni riduce le vibrazioni all'impugnatura. Gli smorzatori funzionano come separazione tra il corpo del prodotto e l'impugnatura.Per le informazioni su dove...
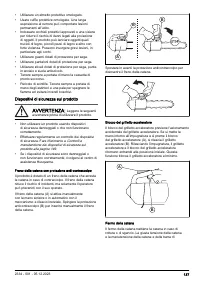
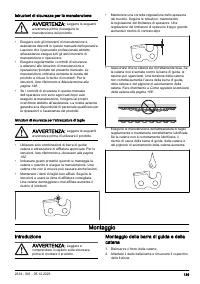
Page 139 - Istruzioni di sicurezza per la manutenzione; Montaggio; Introduzione
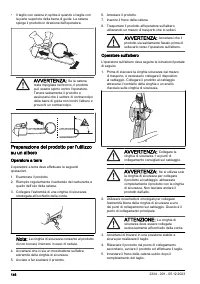
Istruzioni di sicurezza per la manutenzione AVVERTENZA: Leggere le seguenti avvertenze prima di eseguire la manutenzione del prodotto. • Eseguire solo gli interventi di manutenzione e assistenza descritti in questo manuale dell'operatore. Lasciare che il personale professionale addetto all'assistenz...
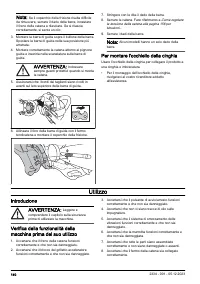
Page 140 - Per montare l'occhiello della cinghia; Utilizzo
Nota: Se il coperchio della frizione risulta difficile da rimuovere, serrare il dado della barra, innestare il freno della catena e rilasciare. Se si rilascia correttamente, si sente un clic. 3. Montare la barra di guida sopra il bullone della barra. Spostare la barra di guida nella sua posizione pi...
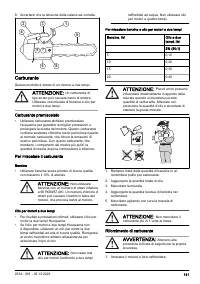
Page 141 - Carburante; Carburante premiscelato
9. Accertarsi che la tensione della catena sia corretta. 9 2 7 5 1 3 8 4 6 Carburante Questo prodotto è dotato di un motore a due tempi. ATTENZIONE: Un carburante di tipo errato può causare danni al motore. Utilizzare una miscela di benzina e olio per motori a due tempi. Carburante premiscelato • Ut...
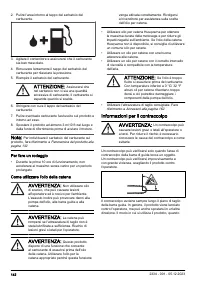
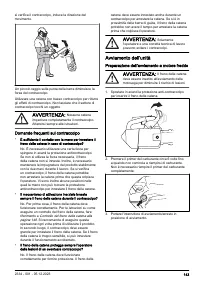
Page 142 - Informazioni per il contraccolpo
2. Pulire l'area intorno al tappo del serbatoio del carburante. 3. Agitare il contenitore e assicurarsi che il carburante sia ben mescolato. 4. Rimuovere lentamente il tappo del serbatoio del carburante per rilasciare la pressione. 5. Riempire il serbatoio del carburante. ATTENZIONE: Assicurarsi che...
Page 143 - Domande frequenti sul contraccolpo; Avviamento dell’unità; Preparazione dell'avviamento a motore freddo
si verifica il contraccolpo, induce la direzione del movimento. Un piccolo raggio sulla punta della barra diminuisce la forza del contraccolpo.Utilizzare una catena con basso contraccolpo per ridurre gli effetti di contraccolpo. Non lasciare che il settore di contraccolpo tocchi un oggetto. AVVERTEN...
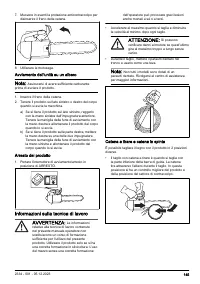
Page 145 - Informazioni sulla tecnica di lavoro; Catena a tirare e catena in spinta
7. Muovere in avanti la protezione anticontraccolpo per disinserire il freno della catena. 8. Utilizzare la motosega. Avviamento dell'unità su un albero Nota: Assicurarsi di avere sufficiente carburante prima di avviare il prodotto. 1. Inserire il freno della catena.2. Tenere il prodotto sul lato si...
Page 146 - Operatore a terra
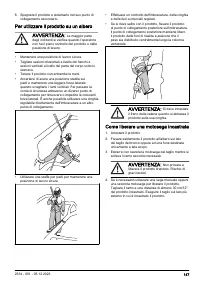
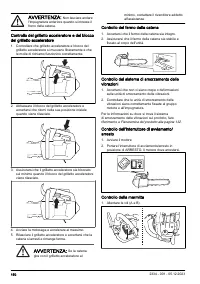
• Il taglio con catena in spinta è quando si taglia con la parte superiore della barra di guida. La catena spinge il prodotto in direzione dell'operatore. AVVERTENZA: Se la catena resta impigliata nel tronco, il prodotto può essere spinto contro l'operatore. Tenere saldamente il prodotto e assicurar...
Page 148 - Manutenzione
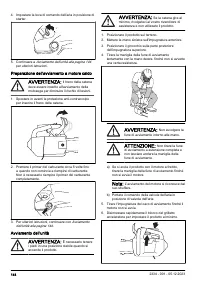
Manutenzione Introduzione AVVERTENZA: Leggere attentamente il capitolo sulla sicurezza prima di eseguire la manutenzione del prodotto. Programma di manutenzione Manutenzione giornaliera Manutenzione settimanale Manutenzione mensile Pulire i componenti esterni del pro- dotto e verificare che non vi s...
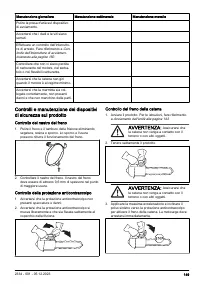
Page 149 - Controllo del nastro del freno
Manutenzione giornaliera Manutenzione settimanale Manutenzione mensile Pulire la presa d'aria sul dispositivo di avviamento. Accertarsi che i dadi e le viti siano serrati. Effettuare un controllo dell'interrutto- re di arresto. Fare riferimento a Con- trollo dell’interruttore di avviamen- to/arresto...
Page 151 - Regolazione del carburatore; Regolazioni di base e rodaggio
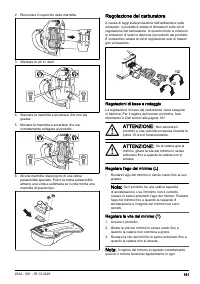
2. Rimuovere il coperchio della marmitta. 3. Allentare le viti e i dadi. 4. Staccare la marmitta e accertarsi che non sia guasta. 5. Montare la marmitta e accertarsi che sia correttamente collegata al prodotto. 6. Alcune marmitte dispongono di una retina parascintille speciale. Pulire la retina para...
Page 152 - Sostituzione di una fune di avviamento
posizione. Il regime del minimo deve inoltre essere al di sotto della velocità alla quale la catena inizia a ruotare. AVVERTENZA: Se la catena non si ferma quando si gira la vite del minimo, rivolgersi al più vicino centro assistenza. Non usare il prodotto fino a quando non è stata eseguita la corre...
Page 153 - Informazioni sulla barra di guida e la catena
3. Assicurarsi che sia possibile far ruotare la puleggia di mezzo giro dopo che la fune di avviamento è completamente estesa. Montare il carter avviamento sul prodotto 1. Estrarre la fune di avviamento e collocare l'avviamento nella sua posizione contro il carter motore. 2. Rilasciare lentamente la ...
Page 154 - Informazioni generali su come affilare le lame
catena che non si muove può causare anche lesioni. Sostituire la barra di guida se usurata o danneggiata con le combinazioni di barra di guida e catena consigliate da Husqvarna. Questa operazione è necessaria per mantenere le funzioni di sicurezza del prodotto. Per un elenco delle combinazioni di ba...
Page 159 - Per pulire il sistema di raffreddamento; Ricerca guasti; Il motore non si avvia
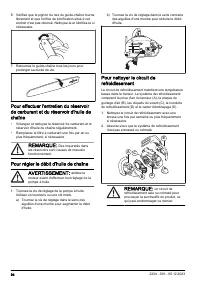
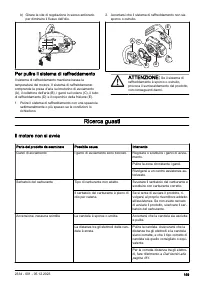
b) Girare la vite di regolazione in senso antiorario per diminuire il flusso dell'olio. Per pulire il sistema di raffreddamento Il sistema di raffreddamento mantiene bassa la temperatura del motore. Il sistema di raffreddamento comprende la presa d'aria sul motorino di avviamento (A), il collettore ...
Page 160 - Il motore si avvia ma si arresta nuovamente; Trasporto e rimessaggio
Parte del prodotto da esaminare Possibile causa Intervento Candela e cilindro La candela è allentata. Serrare la candela. Il motore è ingolfato a causa dei ripe- tuti avviamenti con l'aria tirata dopo l'accensione. Controllare e pulire la candela. Posi- zionare il prodotto sul lato con il foro della...
Page 161 - Dati tecnici
Dati tecnici Dati tecnici Husqvarna T435 Motore Cilindrata, cm 3 35,2 Regime minimo, giri/min 2900 Potenza max. motore a norma ISO 8893, kW/hp @ giri/ min. 1,5/2,0 @10000 Impianto di accensione 13 Candela NGK CMR6H Distanza tra gli elettrodi, mm 0,65 Carburante e sistema di lubrificazione Capacità d...
Page 162 - Accessori; Attrezzatura di taglio consigliata
Husqvarna T435 Velocità della catena al regime motore massimo, m/s. 19,0 Accessori Attrezzatura di taglio consigliata La sicurezza del modello di motosega Husqvarna T435 è stata valutata in conformità allo standard EN ISO 11681-2:2022 (macchinari per silvicoltura - motoseghe portatili - requisiti di...
Page 164 - Dichiarazione di conformità; Dichiarazione di conformità UE
Dichiarazione di conformità Dichiarazione di conformità UE Husqvarna AB, SE-561 82 Huskvarna, Svezia, tel.: +46-36-146500, dichiara sotto la propria esclusiva responsabilità che il prodotto indicato: Descrizione Motoseghe per potatura Marchio Husqvarna Tipo/Modello T435 Identificazione Numeri di ser...
Page 166 - Símbolos que aparecen en el producto
9. Empuñadura de la cuerda de arranque10. Mango delantero11. Depósito de aceite de cadena12. Tornillo de ajuste, bomba de aceite13. Perilla de la bomba de combustible14. Estrangulador15. Bloqueo del acelerador16. Acelerador17. Interruptor de arranque/parada18. Espada19. Cadena de sierra20. Cabezal d...
Page 167 - Emisiones Euro V; Seguridad; Definiciones de seguridad
Esta motosierra solo debe ser utilizada por personas con formación especial en silvicultura. ¡Consulte el manual de usuario! Posición de trabajo. Estrangulador. aaaassxxxx La placa de característi- cas técnicas indica el nú- mero de serie. aaaa es el año de producción yss es la semana de producción....
Page 169 - Equipo de protección individual
todos los usuarios, incluso los zurdos. Este agarre es la mejor forma de reducir el efecto de una reculada y, al mismo tiempo, mantener el control de la motosierra. ¡No suelte los mangos! • No utilice nunca la motosierra por encima de los hombros. • No utilice el producto sin que haya alguien a quie...
Page 170 - Dispositivos de seguridad en el producto
lesiones en caso de accidente. Consulte a su taller de servicio para que le informe sobre el equipo que puede utilizar. • La ropa debe ser ceñida pero debe permitirle total libertad de movimiento. Compruebe periódicamente el estado del equipo de protección individual. • Utilice un casco protector ho...
Page 171 - Seguridad en el uso del combustible
el mantenimiento adecuado tanto de la cadena como de la espada ayudan a reducir el riesgo de accidentes. Sistema amortiguador de vibracionesEl sistema amortiguador de vibraciones disminuye la vibración en los mangos. Los amortiguadores de vibraciones actúan como separadores entre el cuerpo del produ...
Page 174 - Combustible premezclado
7. Asegúrese de que todas las piezas estén bien montadas y en perfectas condiciones, y que no falte ninguna. 8. Asegúrese de que el captor de cadena esté bien montado. 9. Asegúrese de que la tensión de la cadena de sierra sea correcta. 9 2 7 5 1 3 8 4 6 Carburante Este producto tiene un motor de dos...
Page 175 - Información sobre reculada
3. Agite la mezcla de combustible.4. Añada el resto de gasolina al recipiente.5. Agite bien la mezcla de combustible. PRECAUCIÓN: No mezcle combustible para más de 1 mes como máximo. Llenado del depósito de combustible ADVERTENCIA: Por su seguridad, siga el procedimiento que se indica a continuación...
Page 176 - Preguntas frecuentes acerca de las reculadas; Arranque del producto.; Preparación para arrancar con el motor en frío
puede producirse de forma repentina y violenta; esta situación lanza el producto contra el operador. La reculada sigue siempre el sentido del plano de la espada. Por lo general, el producto sale despedido contra el operador, pero también puede moverse en cualquier otra dirección. La dirección depend...
Page 178 - Información sobre técnica de trabajo; Cadena tirante y cadena impelente
a) Si arranca el producto con el motor frío, tire de la empuñadura de arranque hasta que el motor intente arrancar. Nota: Podrá identificar que el motor está intentando arrancar cuando escuche una especie de soplido. b) Ponga el estrangulador en la posición de estrangulamiento. 5. Tire de la empuñad...
Page 179 - Operador de tierra
de sierra tira a través del árbol para cortar. Esta posición permite un control óptimo del producto y del sector de riesgo de reculada. • Cuando se corta con cadena impelente, el corte se efectúa con la parte superior de la espada. La cadena de sierra empujará el producto en la dirección del operado...
Page 180 - Uso del producto en un árbol
ADVERTENCIA: Si utiliza únicamente la correa de seguridad para fijar el producto al arnés, baje el producto totalmente con la correa de seguridad. No suelte el producto cuando se encuentre en altura. 2. Utilice mosquetones homologados para asegurar el extremo libre de la correa de seguridad a uno de...
Page 181 - Mantenimiento; Introducción
ADVERTENCIA: Debe activar el freno de cadena cuando baje el producto por la correa. Liberación de un producto que haya quedado atrapado 1. Pare el producto.2. Sujete el producto de forma segura en el interior del corte del árbol, hacia el lado del tronco, o en una cuerda de otra herramienta. 3. Extr...
Page 182 - Comprobación de la cinta de freno
Mantenimiento diario Mantenimiento semanal Mantenimiento mensual Realice una comprobación de la ca- dena de sierra. Consulte la sección Para afilar la cadena de sierra en la página 187. Limpie el espacio entre las aletas del cilindro. Vacíe el depósito de aceite. Afile la cadena de sierra y comprue-...
Page 184 - Ajuste del carburador; Ajustes básicos y rodaje
Consulte Descripción del producto en la página 165 para obtener más información sobre la ubicación del sistema amortiguador de vibraciones en el producto. Comprobación del interruptor de arranque/ parada 1. Arranque el motor.2. Ponga el interruptor de arranque/parada en la posición de parada. El mot...
Page 185 - Sustitución de una cuerda de arranque
PRECAUCIÓN: No utilice el producto a un régimen demasiado alto durante las primeras 10 horas de funcionamiento. PRECAUCIÓN: Si la cadena de sierra gira a ralentí, gire el tornillo de ralentí hacia la izquierda hasta que la cadena de sierra se detenga. Ajuste de la aguja de régimen bajo (L) • Gire la...
Page 187 - Para afilar la cadena de sierra; Información sobre la espada y la cadena de
3. Compruebe que la distancia entre los electrodos sea correcta. Consulte la sección Datos técnicos en la página 194. 4. Cambie la bujía todos los meses o más a menudo si es necesario. Para afilar la cadena de sierra Información sobre la espada y la cadena de sierra ADVERTENCIA: Use guantes protecto...
Page 189 - Ajuste de la tensión de la cadena de
5. Dé la vuelta al producto y afile el otro lado.6. Asegúrese de que todos los dientes de corte tengan la misma longitud. Información general acerca de cómo regular el ajuste de calibre de profundidad El ajuste de calibre de profundidad (C) disminuye al afilar los dientes de corte (A). Para conserva...
Page 192 - Para limpiar el sistema de refrigeración; Resolución de problemas; El motor no arranca
b) Para reducir el flujo de aceite, gire el tornillo de ajuste hacia la izquierda. Para limpiar el sistema de refrigeración El sistema de refrigeración ayuda a reducir la temperatura del motor. El sistema de refrigeración incluye la toma de aire del mecanismo de arranque (A), el deflector de aire (B...
Page 193 - El motor arranca pero se para de nuevo; Transporte y almacenamiento
Parte del producto que se debe exa- minar Causa posible Acción No hay chispa al arrancar La bujía está sucia o mojada. Asegúrese de que la bujía de encen- dido está seca y limpia. La distancia entre los electrodos es incorrecta. Limpie la bujía. Asegúrese de que la distancia entre los electrodos sea...
Page 194 - Datos técnicos
2. Desmonte y limpie la cadena de sierra y la ranura de la espada. PRECAUCIÓN: Si la cadena de sierra y la espada no se limpian, pueden endurecerse o bloquearse. 3. Coloque la protección de transporte.4. Limpie el producto. Consulte Mantenimiento en la página 181 para ver las instrucciones. 5. Reali...
Page 195 - Accesorios; Equipo de corte recomendado
Husqvarna T435 Cadena de sierra/espada Tipo de piñón de arrastre/número de dientes 3/8"/Spur 6, 1/4"/Spur 8, 0,325"/Spur 7 Velocidad de la cadena de sierra al régimen máximo del motor, m/s. 19,0 Accesorios Equipo de corte recomendado El modelo de motosierra Husqvarna T435 se ha sometido ...
Page 197 - Declaración de conformidad; Declaración de conformidad CE
Declaración de conformidad Declaración de conformidad CE Nosotros, Husqvarna AB, SE-561 82 Huskvarna (Suecia), tel. +46-36-146500, declaramos bajo nuestra exclusiva responsabilidad que el producto: Descripción Motosierras para servicio forestal Marca Husqvarna Tipo/Modelo T435 Identificación Números...
Page 198 - Finalidade
ÍNDICE Introdução................................................................... 198Segurança.................................................................. 200Montagem................................................................... 205Funcionamento............................................
Page 199 - Símbolos no produto
9. Punho do cabo de arranque10. Punho dianteiro11. Depósito de óleo da corrente12. Parafuso de ajuste, bomba do óleo13. Ampola da purga de ar14. Estrangulador15. Bloqueio do acelerador16. Acelerador17. Interruptor de arranque/paragem18. Barra guia19. Corrente da serra20. Roleto21. Ilhó de cinto22. I...
Page 200 - Emissões Euro V; Segurança; Definições de segurança
Esta motosserra só deve ser utilizada por pessoas com formação especial para trabalhos de silvicul- tura. Leia o manual do uti- lizador! Posição de trabalho. Estrangulador. aaaassxxxx A etiqueta de tipo apre- senta o número de série. aaaa é o ano de fabrico e ss é a semana de fabrico. Nota: Os resta...
Page 202 - Equipamento de proteção pessoal
e, simultaneamente, manter o controlo sobre a motosserra. Não solte os punhos! • Nunca utilize a motosserra acima da altura dos ombros. • Não utilize o produto sem ter a possibilidade de pedir ajuda em caso de acidente. • Por vezes, ficam aparas presas na cobertura da embraiagem, bloqueando a corren...
Page 203 - Dispositivos de segurança no produto
• Utilize um capacete de proteção aprovado.• Utilize protetores acústicos aprovados. A exposição prolongada a ruídos pode provocar danos auditivos permanentes. • Use óculos de proteção aprovados ou viseira para reduzir o risco de ferimentos causados por objetos arremessados. O produto pode projetar ...
Page 204 - Segurança no manuseamento do combustível
na corrente da serra e na lâmina-guia diminuem o risco de acidentes. Sistema anti-vibraçãoO sistema antivibração reduz a vibração nos punhos. As unidades antivibração funcionam como uma separação entre o corpo do produto e a unidade do punho.Consulte Vista geral do produto na página 198 para obter i...
Page 205 - Instruções de segurança para manutenção; Montagem; Introdução
Instruções de segurança para manutenção ATENÇÃO: Leia as instruções de aviso que se seguem antes de efetuar tarefas de manutenção no produto. • Efetue apenas as tarefas de manutenção e reparação descritas neste manual do utilizador. As outras tarefas de manutenção e reparação devem ser efetuadas por...
Page 206 - Montagem do ilhó do cinto; Funcionamento
Nota: Se tiver dificuldade em remover a cobertura da embraiagem, aperte a porca da lâmina, engate o travão da corrente e solte. Se ouvir um estalido, significa que foi libertada corretamente. 3. Monte a lâmina-guia no perno da lâmina. Desloque a lâmina-guia para a sua posição mais traseira. 4. Insta...
Page 207 - Combustível; Combustível previamente misturado
9. Certifique-se de que a tensão da corrente da serra está correta. 9 2 7 5 1 3 8 4 6 Combustível Este produto tem um motor de dois tempos. CUIDADO: O tipo errado de combustível pode resultar em danos no motor. Utilize uma mistura de gasolina e óleo para motor de dois tempos. Combustível previamente...
Page 208 - Informação sobre retrocesso
Para encher o depósito de combustível ATENÇÃO: Cumpra o procedimento que se segue para sua segurança. 1. Desligue o motor e deixe-o arrefecer.2. Limpe bem à volta da tampa do depósito de combustível. 3. Agite ligeiramente o recipiente e certifique-se de que o combustível fica totalmente misturado. 4...
Page 209 - Perguntas comuns sobre o retrocesso; Arranque; Preparar o arranque com o motor frio
utiliza o produto quando ocorre um retrocesso que condiciona a direção do movimento. Um raio da ponta da lâmina inferior diminui a força do retrocesso.Utilize uma corrente da serra de baixo retrocesso para diminuir os efeitos do retrocesso. Não permita que o setor de risco de retrocesso entre em con...
Page 211 - Informações sobre técnicas de trabalho; Corrente a puxar e corrente a empurrar
7. Desloque a proteção dianteira para a mão para trás para desengatar o travão da corrente. 8. Utilize o produto. Arrancar o produto na árvore Nota: Confirme que tem combustível suficiente antes de ligar o produto. 1. Engate o travão da corrente.2. Ao arrancar, segure no produto no lado esquerdo ou ...
Page 212 - Operador em terra
• Serrar com a corrente a empurrar significa serrar com a parte superior da lâmina-guia. A corrente da serra empurra o produto na direção do operador. ATENÇÃO: Se a corrente da serra ficar presa no tronco, o produto pode ser empurrado contra o operador. Segure o produto com firmeza e certifique-se d...
Page 214 - Manutenção
Manutenção Introdução ATENÇÃO: Certifique-se de que leu e compreendeu o capítulo sobre segurança antes de realizar tarefas de manutenção no produto. Esquema de manutenção Manutenção diária Controle semanal Manutenção mensal Limpe as peças externas do produto e certifique-se de que não existe óleo no...
Page 215 - Verificar a faixa do travão
Manutenção diária Controle semanal Manutenção mensal Verifique o interruptor de paragem. Consulte Verificar o interruptor de ar- ranque/paragem na página 216. Certifique-se de que não há fugas de combustível do motor, depósito ou tubagem de combustível. Certifique-se de que a corrente da serra não r...
Page 217 - Afinação do carburador; Ajustes básicos e rodagem
3. Solte os parafusos e as porcas. 4. Retire o silenciador e certifique-se de que não está defeituoso. 5. Monte o silenciador e certifique-se de que está devidamente montado no produto. 6. Alguns silenciadores têm uma rede redentora de faíscas especial. Se o seu produto tiver este tipo de silenciado...
Page 218 - Substituição de um cabo de arranque
assistência. Não utilize o produto até que esteja devidamente ajustado. Ajustar a agulha de alta rotação (H) O motor é ajustado na fábrica para funcionar ao nível do mar. A altitudes mais elevadas, em diferentes condições climatéricas ou temperaturas, pode ser necessário ajustar a agulha de alta rot...
Page 219 - Informações sobre a lâmina-guia e a corrente
Montar a caixa do dispositivo de arranque no produto 1. Puxe o cabo de arranque e coloque o dispositivo de arranque na devida posição, contra o cárter. 2. Lentamente, solte o cabo de arranque até o carretel engatar com os prendedores. 3. Aperte os parafusos que prendem o dispositivo de arranque. Par...
Page 225 - Resolução de problemas; O motor não arranca
Resolução de problemas O motor não arranca Peça do produto a examinar Causa possível Ação Prendedores de arranque Os prendedores do dispositivo de ar- ranque estão obstruídos. Ajuste ou substitua os prendedores do dispositivo de arranque. Limpe a área em redor dos prende- dores. Contacte uma oficina...
Page 226 - Transporte e armazenamento; Especificações técnicas
Peça do produto a examinar Causa possível Ação Filtro de ar Filtro de ar entupido. Limpe ou substitua o filtro de ar. Filtro de combustível Filtro de combustível entupido. Substitua o filtro de combustível. Transporte e armazenamento Transporte e armazenamento • Para o transporte e armazenamento do ...
Page 227 - Acessórios; Equipamento de corte recomendado
Husqvarna T435 Tipo de bomba de óleo Ajustável Peso Peso, kg 3,4 Emissões de ruído Nível de potência sonora, medido, dB(A) 112 Nível de potência sonora, garantido L WA dB(A) 114 Níveis sonoros 20 Nível de pressão sonora equivalente ao nível do ouvido do operador, dB(A) 100 Níveis de vibração equival...
Page 229 - Declaração de conformidade; Declaração UE de conformidade
Declaração de conformidade Declaração UE de conformidade A Husqvarna AB, SE‐561 82 Huskvarna, Suécia, tel.: +46-36-146500, declara, sob sua inteira responsabilidade, que o produto: Descrição Motosserras para silvicultura Marca Husqvarna Tipo/Modelo T435 Identificação Números de série referentes a 20...
Page 230 - Namen uporabe
VSEBINA Uvod........................................................................... 230Varnost....................................................................... 232Montaža...................................................................... 237Delovanje........................................
Page 231 - Simboli na izdelku
11. Posoda za verižno olje12. Nastavitveni vijak za oljno črpalko13. Membrana črpalke goriva14. Čok15. Zaklep ročice plina16. Ročica plina17. Vklopno/izklopno stikalo18. Meč19. Veriga motorne žage20. Zobnik konice meča21. Zaponka za jermen22. Zaponka za vrv23. Pokrov sklopke24. Ploščica s proizvodno...
Page 232 - Stopnja emisij Euro V; Varnost; Varnostne definicije
Čok. yyyywwxxxx Na tipski ploščici je na- vedena serijska številka. yyyy je proizvodno leto in ww je proizvodni teden. Opomba: Ostali simboli in oznake na izdelku se nanašajo na zahteve za certifikacijo, ki veljajo za nekatere trge. Stopnja emisij Euro V OPOZORILO: Zaradi predelave motorja se razvel...
Page 237 - Montaža; Uvod
verige in pogonskega zobnika verige. Glejte poglavje Nastavitev napetosti verige na strani 252. • Redno vzdržujte rezalno opremo in jo ustrezno mažite. Če verige ne mažete ustrezno, se poveča tveganje za obrabo meča, verige in pogonskega zobnika verige. Montaža Uvod OPOZORILO: Preden začnete sestavl...
Page 238 - Delovanje; Predhodno zmešano gorivo
Delovanje Uvod OPOZORILO: Preden začnete uporabljati izdelek, morate prebrati in razumeti poglavje o varnosti. Preverjanje delovanja pred uporabo izdelka 1. Prepričajte se, da zavora verige pravilno deluje in ni poškodovana. 2. Prepričajte se, da zaklep ročice plina pravilno deluje in ni poškodovan....
Page 239 - Informacije o povratnem udarcu
1. Dolijte polovico bencina v čisto posodo za gorivo.2. Dodajte celotno količino olja.3. Pretresite mešanico goriva.4. V posodo dodajte še preostalo količino bencina.5. Temeljito pretresite mešanico goriva. POZOR: Naenkrat ne pripravite mešanice goriva za več kot en mesec. Polnjenje posode za gorivo...
Page 240 - Zagon izdelka; Priprava zagona s hladnim motorjem
zgodi nenadoma in z veliko silo, ki izdelek odbije proti upravljavcu. Do povratnega udarca pride vedno v rezalni ravnini meča. Običajno se izdelek odbije v upravljavca, vendar lahko odboj poteka v različne smeri. Na smer odboja vpliva način uporabe izdelka v času povratnega udarca. Pri manjšem polme...
Page 242 - Informacije o načinih dela; Žaganje z vlečenjem in potiskanjem motorne
7. Premaknite sprednji ščitnik roke nazaj, da izklopite zavoro verige. 8. Uporabite izdelek. Zagon izdelka na drevesu Opomba: Pred zagonom izdelka se prepričajte, da je dovolj goriva. 1. Aktivirajte zavoro verige.2. Med zagonom izdelek držite na levi ali desni strani svojega telesa.a) Če držite izde...
Page 243 - Uporabnik na tleh; Uporaba izdelka na drevesu
OPOZORILO: Če se veriga zagozdi v hlodu, lahko izdelek odbije proti vam. Izdelek držite trdno in pazite, da se območje povratnega udarca meča ne dotakne drevesa in povzroči povratnega udarca. Priprava izdelka za uporabo na drevesu Uporabnik na tleh Kot uporabnik na tleh opravite naslednje.1. Preglej...
Page 244 - Odstranitev ukleščenega izdelka
• Stabilno stojte in navpične veje žagajte z nizko stransko silo. Varnostno vrv napeljite skozi različne pritrdilne točke, da izničite ali zmanjšate rastoče stranske sile. Uporabite lahko tudi nastavljivo kovinsko zanko z oprtnika za drugo pritrdilno točko. • Varen položaj ohranjajte z zanko za nogo...
Page 245 - Vzdrževanje
Vzdrževanje Uvod OPOZORILO: Pred izvajanjem vzdrževalnih del na izdelku morate prebrati in razumeti poglavje o varnosti. Urnik vzdrževanja Dnevno vzdrževanje Tedenska vzdrževalna opravila Mesečna vzdrževalna opravila Očistite zunanje dele izdelka in se prepričajte, da na ročajih ni olja. Očistite hl...
Page 246 - Preverjanje zavornega traku
Dnevno vzdrževanje Tedenska vzdrževalna opravila Mesečna vzdrževalna opravila Prepričajte se, da motor, rezervoar za gorivo in vodi za gorivo ne pušča- jo goriva. Prepričajte se, da se veriga med de- lovanjem motorja v prostem teku ne vrti. Prepričajte se, da je dušilnik pravilno nameščen in da ni p...
Page 248 - Nastavitev uplinjača; Osnovne nastavitve in utekanje
3. Zrahljajte vijake in matice. 4. Odstranite dušilec in se prepričajte, da ni okvarjen.5. Sestavite dušilec in se prepričajte, da je pravilno pritrjen na izdelek. 6. Nekateri dušilniki so opremljeni s posebnim lovilnikom isker. Če je izdelek opremljen s to vrsto dušilnika, mrežico lovilnika isker č...
Page 249 - Preverjanje, ali je uplinjač ustrezno nastavljen; Zamenjava poškodovane ali obrabljene
najbližjega servisnega zastopnika. Izdelka ne uporabljajte, dokler ni pravilno nastavljen. Nastavitev igle za visoko hitrost (H) Motor je tovarniško nastavljen za uporabo pri ničelni nadmorski višini. Na višjih nadmorskih višinah, v drugačnih vremenskih razmerah ali pri drugačnih temperaturah, boste...
Page 250 - Informacije o meču in verigi
Namestitev ohišja zaganjalnika na izdelek 1. Izvlecite zaganjalno vrvico in zaganjalnik postavite na mesto ob ohišju motorne gredi. 2. Počasi sproščajte zaganjalno vrvico, dokler se jermenica ne zaskoči v zaskočne kljukice. 3. Privijte vijake, s katerimi je pritrjen zaganjalnik. Čiščenje zračnega fi...
Page 251 - Splošne informacije o brušenju rezil
• Korak verige v palcih. Razmik med gonilnimi členi verige se mora ujemati z razmikom med zobmi na zobniku konice meča in pogonskemu zobniku. PITCH = D D 2 • Število gonilnih členov Število gonilnih členov določa vrsta meča. • Širina utora na meču v palcih/mm. Širina utora v meču mora biti enaka kot...
Page 252 - Nastavitev napetosti verige
OPOZORILO: Sila povratnega udarca se znatno poveča, če ne upoštevate navodil za brušenje. Opomba: Glejte, Dodatna oprema na strani 258 za informacije o brušenju verige. Brušenje rezil 1. Rezalne zobe nabrusite z okroglo pilo in šablono. Opomba: Glejte, Dodatna oprema na strani 258 za informacije o t...
Page 255 - Odpravljanje težav; Motorja ni mogoče zagnati
Vzdrževanje posode za gorivo in posode za verižno olje • Izpraznite in očistite posodo za gorivo in posodo za verižno olje. • Filter goriva zamenjajte enkrat letno ali po potrebi pogosteje. POZOR: Umazana posoda za gorivo povzroča motnje pri delovanju. Nastavitev pretoka verižnega olja OPOZORILO: Pr...
Page 256 - Motor se zažene, vendar se ponovno zaustavi; Prevoz in skladiščenje
Del izdelka, ki ga je treba preveriti Možen vzrok Ukrep Vžig, ni iskre Svečka je umazana ali mokra. Poskrbite, da je svečka suha in čista. Razmak med elektrodama ni pravi- len. Očistite svečko. Prepričajte se, da sta razmak med elektrodama in sveč- ka ustrezna ter da uporabljate pripo- ročeno ali en...
Page 257 - Tehnični podatki
Tehnični podatki Tehnični podatki Husqvarna T435 Motor Gibna prostornina valja, cm 3 35,2 Število vrtljajev prostega teka, vrt/min 2900 Največja izhodna moč motorja, v skladu z ISO 8893, kW/KM pri vrt/min 1,5/2,0 pri 10000 Vžigalni sistem 22 Svečka NGK CMR6H Razmak med elektrodama, mm 0,65 Sistem za...
Page 258 - Dodatna oprema; Priporočena rezalna oprema
Husqvarna T435 Hitrost verige pri najvišji hitrosti motorja v m/s. 19,0 Dodatna oprema Priporočena rezalna oprema Ocena varnosti modela motornih žag Husqvarna T435 je izdelana v skladu s standardom EN ISO 11681-2:2022 (Gozdarski stroji – Zahteve za varnost in preskušanje prenosnih motornih verižnih ...
Page 260 - Izjava o skladnosti; Izjava EU o skladnosti
Izjava o skladnosti Izjava EU o skladnosti Mi, Husqvarna AB, SE‐-561 82 Huskvarna, Švedska, tel.: +46-36-146500, izjavljamo na lastno odgovornost, da je izdelek: Opis Verižne žage za nego dreves Znamka Husqvarna Vrsta/model T435 Identifikacija Serijske številke od letnika 2024 dalje v celoti skladen...


 Husqvarna 115iHD55
User Manual
Husqvarna 115iHD55
User Manual
 Husqvarna 115iL
User Manual
Husqvarna 115iL
User Manual
 Husqvarna 115iPT4
User Manual
Husqvarna 115iPT4
User Manual
 Husqvarna 120
User Manual
Husqvarna 120
User Manual
 Husqvarna 120iTK4-P
User Manual
Husqvarna 120iTK4-P
User Manual
 Husqvarna 120 Mark II
User Manual
Husqvarna 120 Mark II
User Manual
 Husqvarna 122C
User Manual
Husqvarna 122C
User Manual
 Husqvarna 122HD45
User Manual
Husqvarna 122HD45
User Manual
 Husqvarna 122L
Quick Guide
Husqvarna 122L
Quick Guide
 Husqvarna 122LK
User Manual
Husqvarna 122LK
User Manual
 Husqvarna 122LKE
Quick Guide
Husqvarna 122LKE
Quick Guide
 Husqvarna 122LKH
Quick Guide
Husqvarna 122LKH
Quick Guide
 Husqvarna 122LKP
Quick Guide
Husqvarna 122LKP
Quick Guide
 Husqvarna 122RJ
Quick Guide
Husqvarna 122RJ
Quick Guide
 Husqvarna 125B
User Manual
Husqvarna 125B
User Manual