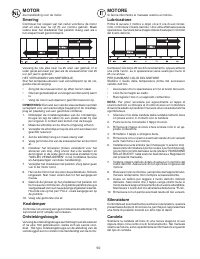
Page 3 - SAFE OPERATION PRACTICES FOR SNOW THROWERS; Training
3 SAFE OPERATION PRACTICES FOR SNOW THROWERS Training 1. Read the operating and service instruction manual carefully. Be thoroughly familiar with the controls and the proper use of the equipment. Know how to stop the unit and disengage the controls quickly. 2. Never allow children to operate the equ...
Page 4 - SICHERE BEDIENUNG EINER SCHNEEFRÄSE; Vorkenntnisse
4 SICHERE BEDIENUNG EINER SCHNEEFRÄSE Vorkenntnisse 1. Lesen Sie die Bedienungs- und Wartungsanleitung sorgfältig. Machen Sie sich sorgfältigst mit den Steuerelementen und dem sachgemäßen Gebrauch des Gerätes vertraut. Eignen Sie sich die Fähigkeit an, das Gerät schnell stoppen und die Steuerelement...
Page 5 - Instructions
5 MÉTHODES DE FONCTIONNEMENT DANS DES CONDITIONS DE SÉCURITÉ POUR SOUFFLEUSES Instructions 1. Lisez attentivement le manuel des notices techniques d’utilisation et de service d’instruction. Soyez parfaite- ment familier avec les commandes et l’utilisation ap- propriée de l’équipement. Apprenez à arr...
Page 6 - TÉCNICAS DE FUNCIONAMIENTO SEGURO PARA MÁQUINAS QUITANIEVES; Formación
6 TÉCNICAS DE FUNCIONAMIENTO SEGURO PARA MÁQUINAS QUITANIEVES Formación 1. Leer atentamente el manual de instrucciones de func- ionamiento y mantenimiento. Familiarizarse completa- mente con los mandos y el uso correcto de la máquina. Conocer como parar la unidad y desconectar los mandos rápidamente...
Page 7 - Instructies
7 VEILIGHEIDSVOORSCHRIFTEN VOOR HET GEBRUIK VAN DE SNEEUWRUIMER Instructies 1. Lees de gebruiksaanwijzing en bedieningsvoorschriften zorgvuldig door. Zorg dat u vertrouwd raakt met de besturing en het juiste gebruik van het apparaat. Weet hoe u het toestel moet uitzetten en hoe u de besturing snel k...
Page 8 - PROCEDURE DI SICUREZZA PER L’UTILIZZO DI SPAZZANEVE; Addestramento
8 PROCEDURE DI SICUREZZA PER L’UTILIZZO DI SPAZZANEVE Addestramento 1. Lettura attenta del manuale di istruzioni. Esercitazioni all’utilizzo corretto dei comandi e della strumentazione. Essere in grado di riconoscere quando è il momento di fermare l’unità e disinnestare velocemente i comandi. 2. Non...
Page 13 - How to set up your snow thrower; Unfold upper handle; Zusammensetzen der Schneefräse; Oberen griff aufklappen; Comment installer votre souffleuse; Dépliez le levier de commande supérieur
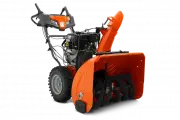
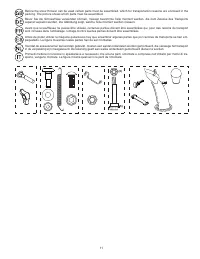
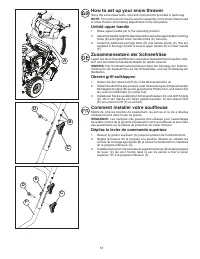
13 A How to set up your snow thrower Store the extra shear bolts, nuts and multi-wrench provided in parts bag. NOTE: The multi-wrench may be used for assembly of the chute rotator head to snow thrower and making ad just ments to the skid plates. Unfold upper handle 1. Raise upper handle (A) to the o...
Page 14 - Como preparar su máquina quitanieves; Abrir la empuñadura superior; Hoe uw sneeuwruimer te monteren; Het uitpakken van de bovenste hendel; Come preparare lo spazzaneve; Impugnatura superiore aperta
14 A Como preparar su máquina quitanieves Guarde los pernos de seguridad adicionales, las tuercas y la llave múltiple suministrados en la bolsa de piezas. NOTA: La llave de apriete múltiple se puede usar para montar la cabeza rotante del conducto a la máquina quitanieves y para hacer regulaciones de...
Page 15 - Install discharge chute / chute rotator head; Installation der auswurfrinne / der drehvorrichtung; Installez la goulotte d’évacuation / tête rotative de la
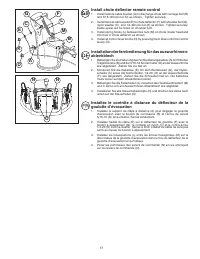
15 Install discharge chute / chute rotator head 1. Place discharge chute assembly on top of chute base with discharge opening toward front of snow thrower. 2. Position chute rotater head (A) over chute bracket (B). If necessary, rotate chute assembly to align square and pin on underside of chute rot...
Page 16 - Het installeren van de afvoertrechter / rotorkop; Montaggio della bocca di scarico/ testa dispositivo
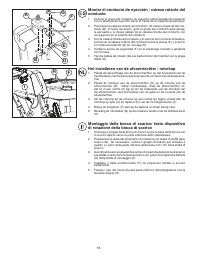
16 Montar el conducto de eyección / cabeza rotante del conducto 1. Colocar el grupo del conducto de eyección sobre la base del conducto con la abertura de eyección hacia el frente de la máquina quitanieves. 2. Posicionar la cabeza rotante del conducto (A) sobre el soporte del con- ducto (B). Si fuer...
Page 18 - Montar el mando a distancia del de flec tor del conducto; Het installeren van de afstandsbesturing van de de-; Montaggio del telcomando del deflettore del canale
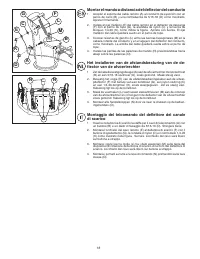
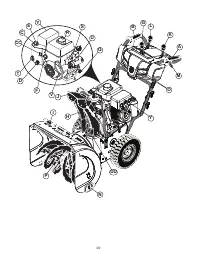
18 M K E C G L F D B A N O N Montar el mando a distancia del de flec tor del conducto 1. Acoplar el soporte del cable remoto (A) al conducto de eyección con un perno de carro (B) y una contratuerca de 5/16-18 (D) como mostrado. Apretar firmemente. 2. Instale el ojal metálico (E) del cable remoto en ...
Page 20 - DD; CC
20 L K M J Y I G B A N P O H DD F V T S Y E D C Q U R CC
Page 23 - Pour utiliser la commande d’étrangleur (E)
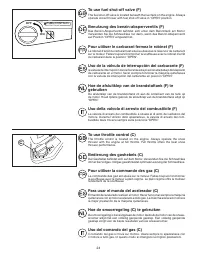
23 CHOKE CONTROL TRUC TIONS E To use choke control (E) The choke control is located on the engine. Use the choke control whenever you are starting a cold engine. Do not use to start a warm engine.• To engage choke, turn knob clockwise to “FULL”. Slowly turn knob clockwise to disengage. Bedienung des...
Page 25 - To control snow discharge
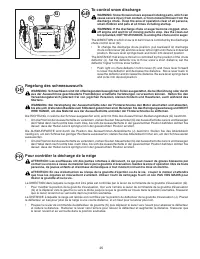
25 Regelung des schneeauswurfs WARNUNG: Schneefräsen sind mit offenliegenden beweglichen Teilen ausgestattet, die bei Berührung oder durch aus der Auswurfrinne geschleuderte Fremdkörper ernsthafte Verletzungen verursachen können. Halten Sie den Verwendungsbereich jederzeit frei von jeglichen Persone...
Page 26 - Het bedienen van de sneeuwuitstoot; Regolare la bocca di scarico della neve
26 Het bedienen van de sneeuwuitstoot WAARSCHUWING: Sneeuwruimers hebben open roterende onderdelen, die ernstige verwondingen kunnen veroorzaken bij contact of bij contact met materiaal dat in de afvoertrechter terecht is gekomen en is uitgestoten. Houd het schoon te maken gebied altijd vrij van per...
Page 28 - Using the clean-out tool; Verwendung des reinigungsgeräts
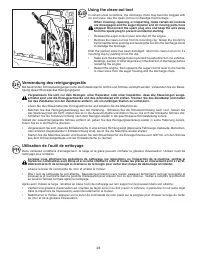
28 Using the clean-out tool In certain snow conditions, the discharge chute may become clogged with ice and snow. Use the clean-out tool to dislodge this blockage. When cleaning, repairing, or in spect ing, make certain all controls are disengaged and the auger/impeller and all moving parts have sto...
Page 29 - Usar la herramienta para la limpieza; De ontstopper gebruiken; Utilizzo dello strumento di pulitura
29 Usar la herramienta para la limpieza En algunas condiciones de nieve, el pasillo de eyección puede obstruirse con hielo y nieve. Usar la herramienta de limpieza para desalojar este atasco. Cuando se limpia, repara o inspecciona, asegurarse de que todos los mandos estén desconectados y que la barr...
Page 30 - To move forward and backward; Vorwärts und rückwärts fahren; Pour se déplacer vers l’avant et vers l’arrière
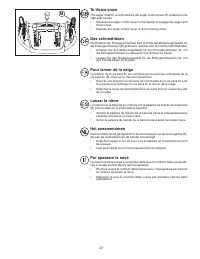
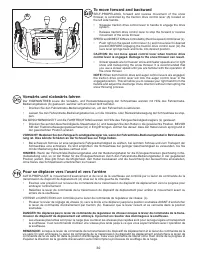
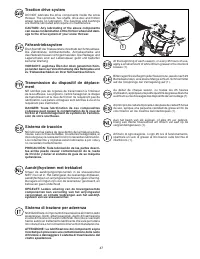
30 To move forward and backward SELF-PROPELLING, forward and reverse movement of the snow thrower, is controlled by the traction drive control lever (A) located on the left side handle.• Squeeze traction drive control lever to handle to engage the drive system. • Release traction drive control lever...
Page 31 - Moverse adelante y atrás; Voorwaarts en achterwaarts bewegen; Per spostarsi in avanti o all’indietro
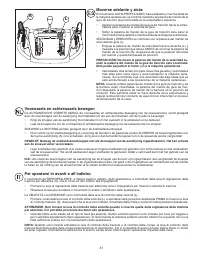
31 Moverse adelante y atrás El movimiento AUTO-PROPULSADO, hacia adelante y marcha atrás de la máquina quitanieves, se controla mediante la palanca de mando de la guía de tracción (A) posicionada en la empuñadura izquierda.• Apretar la palanca de mando de la guía de tracción hacia la empu- ñadura pa...
Page 33 - Pour ajuster les plaques de protection du carter inférieur (N)
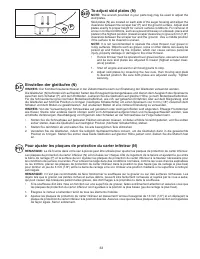
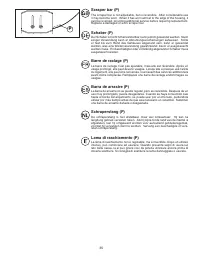
33 To adjust skid plates (N) NOTE: The wrench provided in your parts bag may be used to adjust the skid plates.Skid plates (N) are located on each side of the auger housing and adjust the clearance between the scraper bar (P) and the ground surface. Adjust skid plates evenly to proper height for cur...
Page 34 - Per regoalre la piastra di slittamento (N)
34 Regular las placas de deslizamiento (N) NOTA: La llave de apriete proporcionada en su bolsa de partes puede uti- lizarse para regular las placas de deslizamiento.Las placas de deslizamiento (N) están posicionadas a cada lado del aloja- miento de la barrena y regulan la distancia entre la barra de...
Page 36 - BEFORE STARTING THE ENGINE
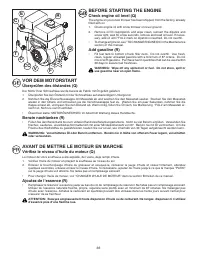
36 VOR DEM MOTORSTART Überprüfen des ölstandes (Q) Der Motor Ihrer Schneefräse wurde bereits ab Fabrik mit Öl gefüllt geliefert.1. Überprüfen Sie den Ölstand mit der Schneefräse auf ebenerdigem Untergrund.2. Nehmen Sie die Ölverschlusskappe mit Messstab ab und wischen Sie den Messstab sauber. Stecke...
Page 37 - ANTES DE PONER EN MARCHA EL MOTOR; Controlar el nivel de aceite del motor (Q); VOORDAT U DE MOTOR START
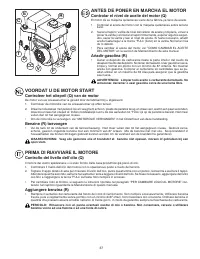
37 ANTES DE PONER EN MARCHA EL MOTOR Controlar el nivel de aceite del motor (Q) El motor de su máquina quitanieves viene de la fábrica ya lleno de aceite.1. Controlar el aceite del motor con la máquina quitanieves sobre terreno llano. 2. Sacar el tapón / varilla de nivel del relleno de aceite y limp...
Page 52 - Snow thrower; Schneefräse; Souffleuse
52 WARNING: To avoid serious injury, before per form ing any service or adjustments:1. Be sure ON/OFF switch is in OFF position.2. Remove safety ignition key.3. Make sure the augers and all moving parts have completely stopped.4. Disconnect wire from spark plug and place wire where it cannot come in...
Page 53 - Máquina quitanieves; Sneeuwruimer; Spazzaneve
53 ATENCIÓN: Para evitar heridas graves, antes de efectuar operaciones de mantenimiento o regulaciones:1. Asegurarse de que el interruptor de ON/OFF esté en la posición OFF.2. Quitar la llave de encendido de seguridad.3. Asegurarse de que las barrenas y todas las partes en movimiento se hayan parado...
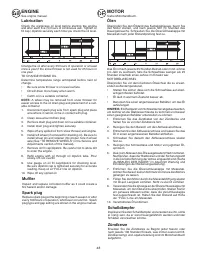
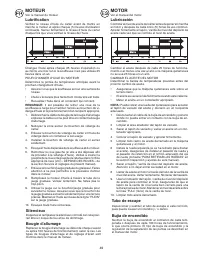
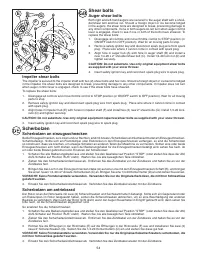
Page 54 - Impeller shear bolts; Scherbolzen; Scherbolzen an einzugsschnecken; Shear bolts; Auger shear bolts
54 Impeller shear bolts The impeller is secured to the impeller shaft with two (2) shear bolts and hex nuts. Should a foreign object or ice become lodged in the impeller, the shear bolts are de signed to break, preventing damage to any other com po nents. If impeller does not turn when auger control...
Page 55 - Vis de cisaillement; Vis de cisaillement de la vis sans fin; Vis de cisaillement de la roue à aube; Pernos de seguridad; Pernos de seguridad de la barrena
55 Vis de cisaillement Vis de cisaillement de la vis sans fin Les deux vis sans fin de gauche et de droite sont fixées à l’arbre des vis sans fin avec une vis à épaulement /de cisaillement et un écrou hexagonal. Si un objet étranger ou de la glace en venait à se loger dans les tarières, les vis de c...
Page 56 - Schuifbouten; Boorschuifbouten; Rotorschuifbouten; Perni di sicurezza; Perni di sicurezza della coclea; Perni di sicurezza del ventilatore espulsore
56 Schuifbouten Boorschuifbouten Zowel de rechter- als de linkerboren zijn bevestigd aan de booras met een borstbout/schuifbout en een zeskantmoer. De schuifbouten zijn zo ontworpen, dat ze breken als er voorwerpen of ijs in de boren vast te komen zitten en behoeden zo voor schade aan andere compone...
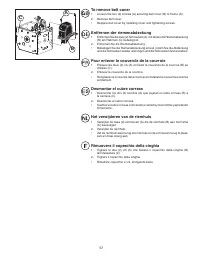
Page 58 - To replace belts; BEFORE REPLACING BELTS; TO REMOVE AUGER BELT
58 B E H I F G D C A To replace belts The auger and traction drive belts are not adjustable. If the belts are damaged or begin to slip from wear, they should be re- placed. It is recommended that the belt(s) be replaced by a qualified service center. NOTE: It is recommended that both the auger and t...
Page 59 - DRIVE BELT REPLACEMENT; TO REMOVE DRIVE BELT
59 J O K P L Q M R N S DRIVE BELT REPLACEMENT TO REMOVE DRIVE BELT 1. Remove auger belt. See “TO REMOVE AUGER BELT” in this section.2. Remove tensioner spring (J) attached to drive belt tensioner arm (K).3. Remove return spring (L) holding the swing plate (M) in place.4. Remove arm bolt (N) and driv...
Page 60 - Erneuern der riemen; VOR DEM AUSTAUSCH DER RIEMEN; SO BAUEN SIE DEN AUGER-RIEMEN AUS
60 Erneuern der riemen Der Einzugsschnecken- und der Fahrantriebsriemen sind nicht verstellbar. Wenn die Riemen beschädigt sind oder wegen Ab- nutzung lose sitzen, sollten Sie ersetzt werden. Es wird empfohlen, den/die Riemen von einer qualifizierten Kundendienststelle austauschen zu lassen. HINWEIS...
Page 61 - AUSTAUSCH DES ANTRIEBSRIEMENS
61 AUSTAUSCH DES ANTRIEBSRIEMENS AUSTAUSCH DES ANTRIEBSRIEMENS 1. Entfernen Sie den Auger-Riemen. Näheres hierzu siehe "SO BAUEN SIE DEN AUGER-RIEMEN AUS" in diesem Abschnitt. 2. Lösen Sie die Spannrollenfeder (J), die am Spannrollenarm (K) des Antriebsriemens befestigt ist. 3. Entfernen Sie...
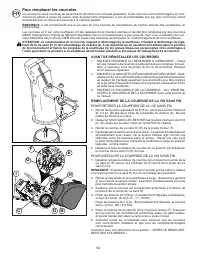
Page 62 - Pour remplacer les courroies; AVANT DE RÉINSTALLER LES COURROIES; POUR RETIRER LA COURROIE DE LA VIS SANS FIN
62 Pour remplacer les courroies La vis sans fin et les courroies de transmission de traction ne sont pas ajustables. Si les courroies sont endommagées ou com- mencent à glisser à cause de l’usure, elles devraient être remplacées. Il est recommandable que (la) (les) courroie(s) soient remplacées par ...
Page 63 - REMPLACEMENT DE LA COURROIE D'ENTRAÎNEMENT; POUR RETIRER LA COURROIE D'ENTRAÎNEMENT
63 REMPLACEMENT DE LA COURROIE D'ENTRAÎNEMENT POUR RETIRER LA COURROIE D'ENTRAÎNEMENT 1. Retirer la courroie de la vis sans fin. Se reporter au paragraphe « POUR DÉPOSER LA COURROIE DE LA VIS SANS FIN » dans la présente section. 2. Déposer le ressort tendeur (J) fixé au bras du tendeur de courroie d...
Page 64 - Sustituir las correas; ANTES DE REEMPLAZAR LAS CORREAS; PARA EXTRAER LA CORREA DE LA BARRENA
64 Sustituir las correas Las correas de la barrena y de la tracción no se pueden regular. Si las correas están dañadas o empiezan a resbalar por el desgaste, se tendrían que sustituir. Se recomienda que la(s) correa(s) sean sustituidas por un centro de servicio calificado. NOTA: Se recomienda que se...
Page 65 - REEMPLAZO DE LA CORREA DE TRANSMISIÓN; PARA EXTRAER LA CORREA DE TRANSMISIÓN; DESPUÉS DE REEMPLAZAR LAS CORREAS
65 REEMPLAZO DE LA CORREA DE TRANSMISIÓN PARA EXTRAER LA CORREA DE TRANSMISIÓN 1. Retire la correa de la barrena. Consulte “PARA EXTRAER LA CORREA DE LA BARRENA” en esta sección. 2. Retire el muelle tensor (J) fijado al brazo tensor de la correa de transmisión (K). 3. Retire el muelle de retorno (L)...
Page 66 - Het vervangen van de riemen; VOOR HET VERVANGEN VAN RIEMEN; AVEGAARRIEM VERWIJDEREN
66 Het vervangen van de riemen De boorriemen en aandrijfriemen zijn niet afstelbaar. Als de riemen zijn beschadigd of tekenen van slijtage beginnen te vertonen, dienen ze vervangen te worden. Het wordt aanbevolen de riem(en) door een gekwalificeerde reparateur te laten vervangen. N.B.: Wij raden u a...
Page 67 - AANDRIJFRIEM VERVANGEN; AANDRIJFRIEM VERWIJDEREN; AANDRIJFRIEM MONTEREN
67 AANDRIJFRIEM VERVANGEN AANDRIJFRIEM VERWIJDEREN 1. Verwijder de avegaarriem. Zie "AVEGAARRIEM VERWIJDEREN" in dit hoofdstuk. 2. Verwijder de spanveer (J) die is bevestigd aan de spannerarm van de aandrijfriem (K). 3. Verwijder de retourveer (L) die de slingerplaat (M) op zijn plaats houdt...
Page 68 - Sostituire le cinghie; PRIMA DI SOSTITUIRE CINGHIE; PROCEDURA DI RIMOZIONE DELLA CINGHIA DELLA COCLEA
68 Sostituire le cinghie Le cinghie della coclea e della trazione non sono riparabili. Se presentano dei danni o cominciano ad allentarsi troppo per via dell’usura, vanno sostituite. Si consiglia di far cambiare la(e) cinghia(e) da un centro di assistenza qualificato. NOTA: Si consiglia di sostituir...
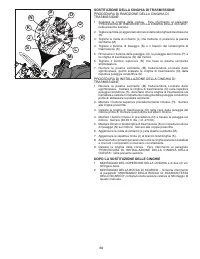
Page 69 - SOSTITUZIONE DELLA CINGHIA DI TRASMISSIONE; PROCEDURA DI RIMOZIONE DELLA CINGHIA DI; DOPO LA SOSTITUZIONE DELLE CINGHIE
69 SOSTITUZIONE DELLA CINGHIA DI TRASMISSIONE PROCEDURA DI RIMOZIONE DELLA CINGHIA DI TRASMISSIONE 1. Scalzare la cinghia della coclea. Fare riferimento al paragrafo "PROCEDURA DI RIMOZIONE DELLA CINGHIA DELLA COCLEA", nella presente sezione. 2. Togliere la molla (J) agganciato al braccio de...
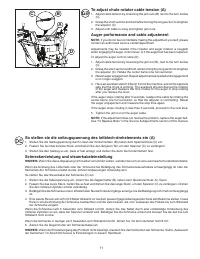
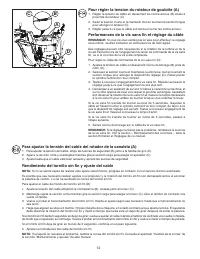
Page 71 - To adjust chute rotator cable tension (A); Auger performance and cable adjustment; Schneckenleistung und steuerkabeleinstellung
71 To adjust chute rotator cable tension (A) 1. Adjust cable tension by loosening the jam nuts (B) next to the turn buckle (C). 2. Grasp the short section and hold while turning the long section to lengthen the adjuster (C). 3. Adjust until cable is snug and tighten jam nuts. Auger performance and c...
Page 75 - Storage; Lagerung; Entreposage; Almacenaje
75 Storage Immediately prepare your snow thrower for storage at the end of the season or if the unit will not be used for 30 days or more. WARNING: Never store the snow thrower with gasoline in the tank inside a building where fumes may reach an open flame, spark or pilot light as on a furnace, wate...


 Husqvarna 115iHD55
User Manual
Husqvarna 115iHD55
User Manual
 Husqvarna 115iL
User Manual
Husqvarna 115iL
User Manual
 Husqvarna 115iPT4
User Manual
Husqvarna 115iPT4
User Manual
 Husqvarna 120
User Manual
Husqvarna 120
User Manual
 Husqvarna 120iTK4-P
User Manual
Husqvarna 120iTK4-P
User Manual
 Husqvarna 120 Mark II
User Manual
Husqvarna 120 Mark II
User Manual
 Husqvarna 122C
User Manual
Husqvarna 122C
User Manual
 Husqvarna 122HD45
User Manual
Husqvarna 122HD45
User Manual
 Husqvarna 122L
Quick Guide
Husqvarna 122L
Quick Guide
 Husqvarna 122LK
User Manual
Husqvarna 122LK
User Manual
 Husqvarna 122LKE
Quick Guide
Husqvarna 122LKE
Quick Guide
 Husqvarna 122LKH
Quick Guide
Husqvarna 122LKH
Quick Guide
 Husqvarna 122LKP
Quick Guide
Husqvarna 122LKP
Quick Guide
 Husqvarna 122RJ
Quick Guide
Husqvarna 122RJ
Quick Guide
 Husqvarna 125B
User Manual
Husqvarna 125B
User Manual