Husqvarna AUTOMOWER 520 - Manuals

Husqvarna AUTOMOWER 520 – User Manual, Quick Guide in PDF format online.
Manuals:
User Manual Husqvarna AUTOMOWER 520


Summary
Contents 1 Safety 1.1 Safety definitions................................................... 31.2 General safety instructions....................................31.3 Safety instructions for installation..........................41.4 Safety instructions for operation............................41.5 Sa...
1 Safety 1.1 Safety definitions Warnings, cautions and notes are used to point out specially important parts of the manual. WARNING: Used if there is a risk of injury or death for the operator or bystanders if the instructions in the manual are not obeyed. CAUTION: Used if there is a risk of damage ...
of electrical/mechanical abuse. Avoid storage in direct sunlight. 1.7 To lift and move the product WARNING: The product must be set to OFF before you lift the product. The product is disabled when the Main switch is set to the 0 position. CAUTION: Do not lift the product when it is parked in the cha...
Quick Guide Husqvarna AUTOMOWER 520


Summary
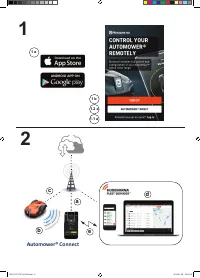
I T Per ulteriori informazioni e istruzioni, consultare il Manuale operatore completo sul sito Web Husqvarna (www.husqvarna.com). 1. I N T R O D U Z I O N E A A U T O M O W E R ® C O N N E C T Automower® Connect trasferisce il menu del sistema del prodotto sul dispositivo mobile; in questo modo è po...
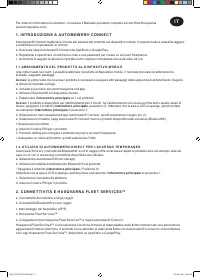
I T Per l’abbinamento del prodotto quando si utilizza l’app Husqvarna Fleet Services™: 1. Scaricare le app Husqvarna Fleet Services™ e Automower® Connect app da AppStore o GooglePlay. 2. Creare un account Husqvarna Fleet Services™ (www.husqvarna.com). 3. Portare l’ interruttore principale in posizio...
E S Para obtener más información e instrucciones, lea detenidamente el manual del usuario completo en el sitio web de Husqvarna (www.husqvarna.com). 1. P R I M E R O S PA S O S C O N A U T O M O W E R ® C O N N E C T Automower® Connect lleva el sistema del menú del producto a su dispositivo móvil, f...
Husqvarna Manuals
-
 Husqvarna 115iHD55
User Manual
Husqvarna 115iHD55
User Manual
-
 Husqvarna 115iL
User Manual
Husqvarna 115iL
User Manual
-
 Husqvarna 115iPT4
User Manual
Husqvarna 115iPT4
User Manual
-
 Husqvarna 120
User Manual
Husqvarna 120
User Manual
-
 Husqvarna 120iTK4-P
User Manual
Husqvarna 120iTK4-P
User Manual
-
 Husqvarna 120 Mark II
User Manual
Husqvarna 120 Mark II
User Manual
-
 Husqvarna 122C
User Manual
Husqvarna 122C
User Manual
-
 Husqvarna 122HD45
User Manual
Husqvarna 122HD45
User Manual
-
 Husqvarna 122L
Quick Guide
Husqvarna 122L
Quick Guide
-
Husqvarna 122L
User Manual
-
 Husqvarna 122LK
User Manual
Husqvarna 122LK
User Manual
-
 Husqvarna 122LKE
Quick Guide
Husqvarna 122LKE
Quick Guide
-
 Husqvarna 122LKH
Quick Guide
Husqvarna 122LKH
Quick Guide
-
Husqvarna 122LKH
User Manual
-
 Husqvarna 122LKP
Quick Guide
Husqvarna 122LKP
Quick Guide
-
Husqvarna 122LKP
User Manual
-
 Husqvarna 122RJ
Quick Guide
Husqvarna 122RJ
Quick Guide
-
Husqvarna 122RJ
User Manual
-
 Husqvarna 125B
User Manual
Husqvarna 125B
User Manual
-
Husqvarna 125B
Manual