Grizzly Industrial G1014ZX - Manuals

Grizzly Industrial G1014ZX Grinding Machine – User Manual, Manual in PDF format online.
Manuals:
User Manual Grizzly Industrial G1014ZX


Summary
Table of Contents INTRODUCTION ............................................... 2 Contact Info.................................................... 2Machine Description ...................................... 2Manual Accuracy ........................................... 2Identification ....................
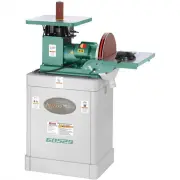
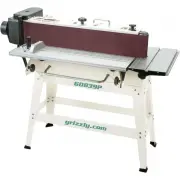
-2- Model G1014Z/G1014ZX (Mfd. Since 07/17) INTRODUCTION This combination sander can be used to smooth the faces, edges, or ends of workpieces using the sanding belt or the sanding disc. The sanding belt can be used in either the hori-zontal position or vertical position. The back stop supports work...
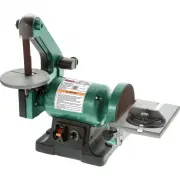
Model G1014Z/G1014ZX (Mfd. Since 07/17) -3- Identification To reduce your risk of serious injury, read this entire manual BEFORE using machine. Figure 1. G1014ZX identification. 9" Sanding Disc Miter Gauge 2" Dust Port Door Handle 2 1 ⁄ 2 " Dust Port Quick Release Tension Lever Tracking ...
Manual Grizzly Industrial G1014ZX


Summary
Table of Contents INTRODuCTION ............................................... 2 manual accuracy ........................................... 2Contact info.................................................... 2machine description ...................................... 2identification ....................
-2- model g1014z/g1014zX (mfg. 11/07+) INTRODuCTION Manual Accuracy We are proud to offer this manual with your new machine! We've made every effort to be exact with the instructions, specifications, drawings, and photographs of the machine we used when writ-ing this manual. however, sometimes error...
model g1014z/g1014zX (mfg. 11/07+) -3- figure 1. g1014zX identification. Identification NOTICE If you have never used this type of machine or equipment before, WE STRONGLy RECOMMEND that you read books, review industry trade magazines, or get formal training before beginning any projects. Regardless...
Grizzly Industrial Grinding Machines Manuals
-
 Grizzly Industrial G0450
User Manual
Grizzly Industrial G0450
User Manual
-
Grizzly Industrial G0450
Manual
-
 Grizzly Industrial G0459
User Manual
Grizzly Industrial G0459
User Manual
-
Grizzly Industrial G0459
Manual
-
 Grizzly Industrial G0489
User Manual
Grizzly Industrial G0489
User Manual
-
Grizzly Industrial G0489
Manual
-
 Grizzly Industrial G0529
User Manual
Grizzly Industrial G0529
User Manual
-
Grizzly Industrial G0529
Manual
-
 Grizzly Industrial G0538
User Manual
Grizzly Industrial G0538
User Manual
-
Grizzly Industrial G0538
Manual
-
 Grizzly Industrial G0582
User Manual
Grizzly Industrial G0582
User Manual
-
Grizzly Industrial G0582
Manual
-
 Grizzly Industrial G0716
User Manual
Grizzly Industrial G0716
User Manual
-
 Grizzly Industrial G0723
User Manual
Grizzly Industrial G0723
User Manual
-
Grizzly Industrial G0723
Manual
-
 Grizzly Industrial G0739
User Manual
Grizzly Industrial G0739
User Manual
-
 Grizzly Industrial G0787
User Manual
Grizzly Industrial G0787
User Manual
-
 Grizzly Industrial G0839P
User Manual
Grizzly Industrial G0839P
User Manual
-
 Grizzly Industrial G0864
User Manual
Grizzly Industrial G0864
User Manual
-
 Grizzly Industrial G0897
User Manual
Grizzly Industrial G0897
User Manual