Page 3 - Table of Contents
Table of Contents INTRODUCTION ............................................... 2 Contact Info.................................................... 2Machine Description ...................................... 2Manual Accuracy ........................................... 2Identification ....................
Page 4 - INTRODUCTION; Machine Description; Contact Info; Manual Accuracy
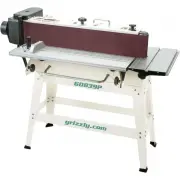
-2- Model G1014Z/G1014ZX (Mfd. Since 07/17) INTRODUCTION This combination sander can be used to smooth the faces, edges, or ends of workpieces using the sanding belt or the sanding disc. The sanding belt can be used in either the hori-zontal position or vertical position. The back stop supports work...
Page 5 - Identification
Model G1014Z/G1014ZX (Mfd. Since 07/17) -3- Identification To reduce your risk of serious injury, read this entire manual BEFORE using machine. Figure 1. G1014ZX identification. 9" Sanding Disc Miter Gauge 2" Dust Port Door Handle 2 1 ⁄ 2 " Dust Port Quick Release Tension Lever Tracking ...
Page 6 - DISC Z SERIES
-4- Model G1014Z/G1014ZX (Mfd. Since 07/17) The information contained herein is deemed accurate as of 4/18/2018 and represents our most recent product specifications. Due to our ongoing improvement efforts, this information may not accurately describe items previously purchased. PAGE 1 OF 2 Model G1...
Page 8 - MODEL G1014ZX COMBINATION SANDER WITH CABINET
-6- Model G1014Z/G1014ZX (Mfd. Since 07/17) The information contained herein is deemed accurate as of 4/18/2018 and represents our most recent product specifications. Due to our ongoing improvement efforts, this information may not accurately describe items previously purchased. PAGE 1 OF 2 Model G1...
Page 10 - NOTICE; Safety Instructions for Machinery
-8- Model G1014Z/G1014ZX (Mfd. Since 07/17) ELECTRICAL EQUIPMENT INJURY RISKS. You can be shocked, burned, or killed by touching live electrical components or improperly grounded machinery. To reduce this risk, only allow qualified service personnel to do electrical installation or repair work, and ...
Page 12 - Additional Safety for Belt & Disc Sanders
-10- Model G1014Z/G1014ZX (Mfd. Since 07/17) Additional Safety for Belt & Disc Sanders Serious injury or death can occur from fingers, clothing, jewelry, or hair getting entangled in rotating disc, belt, spindle or other moving components. Abrasion injuries can occur from touching moving sandpap...
Page 13 - SECTION 2: POWER SUPPLY; Availability
Model G1014Z/G1014ZX (Mfd. Since 07/17) -11- SECTION 2: POWER SUPPLY Availability Before installing the machine, consider the avail-ability and proximity of the required power supply circuit. If an existing circuit does not meet the requirements for this machine, a new circuit must be installed. To ...
Page 15 - Needed for Setup; Unpacking
Model G1014Z/G1014ZX (Mfd. Since 07/17) -13- SECTION 3: SETUP Description Qty• Safety Glasses ............................................ 1 • Cleaner/Degreaser ...................... As Needed • Disposable Shop Rags ................ As Needed • Forklift ................................................
Page 16 - Hardware Recognition Chart
-14- Model G1014Z/G1014ZX (Mfd. Since 07/17) 5mm Hardware Recognition Chart
Page 19 - Floor Load; Placement Location; Site Considerations
Model G1014Z/G1014ZX (Mfd. Since 07/17) -17- Floor Load Refer to the Machine Data Sheet for the weight and footprint specifications of your machine. Some residential floors or workbenches may require additional reinforcement to support the machine and operator or machine and workpiece. Placement Loc...
Page 20 - Bolting to Concrete Floors; Mounting to Shop; Mobile Base
-18- Model G1014Z/G1014ZX (Mfd. Since 07/17) Although not required, we recommend that you mount your new Model G1014Z sander to the floor. The Model G1014ZX sander cabinet cannot be mounted to the floor because the mounting holes cannot be accessed through the cabinet. However, you can use machine m...
Page 21 - Assembly
Model G1014Z/G1014ZX (Mfd. Since 07/17) -19- G1014Z Stand Assembly The Model G1014Z stand can be assembled with the included feet or mounted directly to a concrete floor (refer to Mounting to Shop Floor on Page 18 for further details). To assemble the G1014Z Stand: 1. Insert a 5 ⁄ 16 "-18 x 1...
Page 23 - Sanding Unit
Model G1014Z/G1014ZX (Mfd. Since 07/17) -21- G1014ZX Cabinet Assembly To assemble the G1014ZX cabinet: 1. Place the stand flat on its side, but do not lay it down on the switch or door handle. 2. Insert a 5 ⁄ 16 "-18 x 1" hex bolt through the bot- tom of each of the four rubber feet, then in...
Page 30 - Dust Collection
-28- Model G1014Z/G1014ZX (Mfd. Since 07/17) Figure 45 shows a 2" dust hose connected to the dust collection port with a hose clamp. Figure 46. Hose attached to 2 1 ⁄ 2 " dust port. Figure 45. Hose attached to 2" dust port. The Model G1014Z/G1014ZX features a 2" dust port and a 2 1 ⁄...
Page 31 - Test Run
Model G1014Z/G1014ZX (Mfd. Since 07/17) -29- 7. Loosen the lock nut on the tracking control knob, and carefully adjust the tracking in small increments toward the front or back of the sander frame until the sanding belt remains centered on the main roller (see Figure 43, Page 27). 8. When the tracki...
Page 32 - SECTION 4: OPERATIONS; Basic Controls
-30- Model G1014Z/G1014ZX (Mfd. Since 07/17) SECTION 4: OPERATIONS Basic Controls Refer to Figures 48–52 and the following descrip- tions to become familiar with the basic controls of this machine. Paddle Switch: Turns the motor ON when flipped up; turns motor OFF when pressed down (see Figure 49). ...
Page 33 - Operation Overview
Model G1014Z/G1014ZX (Mfd. Since 07/17) -31- Table Tilt: Use to tilt the table relative to the sanding disc or the sanding belt. To tilt the table, loosen the table tilt lock knob (see Figure 50), tilt the work table to the desired angle, then retighten the lock knob. The work table should be set ap...
Page 34 - Sanding Tips
-32- Model G1014Z/G1014ZX (Mfd. Since 07/17) Stock Inspection and Requirements Some workpieces are not safe or may require modification before they are safe to sand. Before sanding, inspect all workpieces for the following: • Material Type: This machine is intended for ONLY sanding natural and man-m...
Page 35 - Sanding
Model G1014Z/G1014ZX (Mfd. Since 07/17) -33- Horizontal & Edge Sanding If the sanding belt frame is in the vertical posi-tion, proceed to "Setting Up Sander for Horizontal and Edge Sanding" below to setup the sander for horizontal sanding. If the sander is already in the horizontal posit...
Page 36 - Contour Sanding
-34- Model G1014Z/G1014ZX (Mfd. Since 07/17) 4. While holding the back end of the workpiece against the backstop with both hands, and while keeping your fingers away from the belt, slowly feed the workpiece into the belt, as shown in Figures 56 & 57. Figure 56. Sanding workpiece in horizontal po...
Page 37 - Disc Sanding
Model G1014Z/G1014ZX (Mfd. Since 07/17) -35- Disc Sanding To use the sanding disc: 1. DISCONNECT SANDER FROM POWER! 2. Adjust the angles of the work table and the miter gauge for your operation. 3. Connect the sander to power, turn it ON, and allow it to reach full speed. 4. Place the workpiece on t...
Page 38 - Vertical Sanding
-36- Model G1014Z/G1014ZX (Mfd. Since 07/17) Vertical Sanding If the sanding belt frame is in the horizontal posi-tion, proceed to Setting up Sander for Vertical Sanding. If the sander is already in the vertical position, skip to Performing Vertical Sanding on Page 38. Setting up Sander for Vertical...
Page 40 - Performing Vertical Sanding
-38- Model G1014Z/G1014ZX (Mfd. Since 07/17) —If the distance is not the same from side- to-side, loosen the screws that secure the work table arm to the work table. Then adjust the table until the miter slot-belt distance is even side-to-side and the table is approximately 1 ⁄ 16 " away from th...
Page 42 - Tracking Belt
-40- Model G1014Z/G1014ZX (Mfd. Since 07/17) Changing Sanding Disc The model G1014Z/G1014ZX accepts 9" diameter paper-backed pressure sensitive adhesive (PSA) discs (refer to Accessories on Page 41). To change the sanding disc: 1. DISCONNECT SANDER FROM POWER! 2. Remove the work table and miter ...
Page 43 - SECTION 5: ACCESSORIES; order online at
Model G1014Z/G1014ZX (Mfd. Since 07/17) -41- SECTION 5: ACCESSORIES Accessories 9" PSA Aluminum Oxide Sanding DiscsOur aluminum oxide sanding discs are manufac-tured in ISO 9002 factories to ensure the highest quality and are available in packs of two. Grit Model 60 Grit ...........................
Page 44 - SECTION 6: MAINTENANCE; Schedule
-42- Model G1014Z/G1014ZX (Mfd. Since 07/17) SECTION 6: MAINTENANCE For optimum performance from this machine, this maintenance schedule must be strictly followed. Ongoing• Loose mounting bolts. • Worn or damaged sanding belt or disc. • Worn or damaged wires. • Wipe the work table clean after every ...
Page 45 - Rocker Plate
Model G1014Z/G1014ZX (Mfd. Since 07/17) -43- Figure 82. Table support rod lubrication. Figure 83. Rocker plate lubrication. Rocker Plate Rocker Plate Oil Type ....................................... NLGI#2 GreaseOil Amount .................................................. DollopLubrication Frequenc...
Page 46 - Troubleshooting
-44- Model G1014Z/G1014ZX (Mfd. Since 07/17) Symptom Possible Cause Possible Solution Machine does not start or a breaker trips. 1. Switch disabling key removed.2. Motor cord not connected to power cord (G1014ZX only). 3. Power supply switched OFF or at fault.4. Plug/receptacle at fault/wired wrong....
Page 47 - Machine Operation
Model G1014Z/G1014ZX (Mfd. Since 07/17) -45- Symptom Possible Cause Possible Solution Machine vibrates excessively. 1. Sander not secured properly to stand (G1014Z) or cabinet (G1014ZX). 2. Stand not stable on floor. 3. Incorrect motor mounting.4. Idler roller is too loose.5. Broken/defective sandin...
Page 48 - Replacement
-46- Model G1014Z/G1014ZX (Mfd. Since 07/17) V-Belt Tension & Replacement The V-belt is pre-installed and tensioned at the factory. However, we recommend you verify this setting and also check the V-belt tension after the first 16 hours of operation, during which the belt will stretch and seat. ...
Page 51 - Parallelism
Model G1014Z/G1014ZX (Mfd. Since 07/17) -49- Miter Slot-Disc Parallelism If the miter slot is not parallel with the disc, workpieces may not be sanded correctly when using the miter gauge. Tools Needed Qty Combination Square ........................................... 1 To check and adjust the miter...
Page 52 - Wiring Safety Instructions
-50- Model G1014Z/G1014ZX (Mfd. Since 07/17) SHOCK HAZARD. Working on wiring that is con-nected to a power source is extremely dangerous. Touching electrified parts will result in personal injury including but not limited to severe burns, electrocution, or death. Disconnect the power from the machin...