Bosch RH328VCQ - User Manual
Bosch RH328VCQ Hammer Drill – User Manual, read for free online in PDF format. We hope this helps you resolve any issues you may have. If you have further questions, please contact us through the contact form.
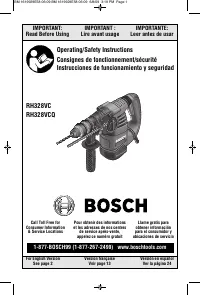


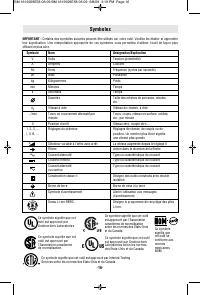
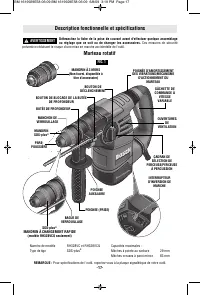
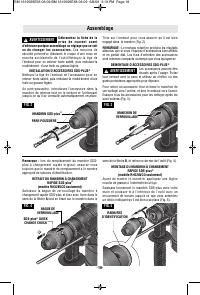
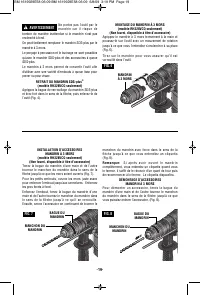

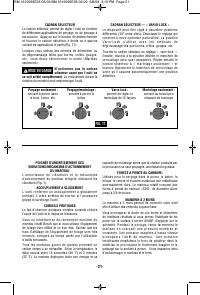
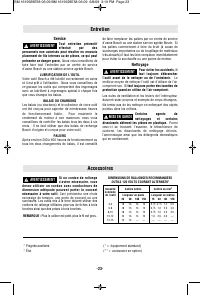


Table of Contents:
- Page 2 – Work area safety; Keep work area clean and well lit.; Electrical safety; Read all safety warnings and instructions.; SAVE ALL WARNINGS AND INSTRUCTIONS FOR FUTURE REFERENCE; General Power Tool Safety Warnings
- Page 3 – Keep cutting tools sharp and clean.; Service; Additional Safety Warnings; WARNING
- Page 4 – Rotary Hammer Safety Rules; Wear ear protectors.
- Page 5 – Symbols
- Page 6 – Functional Description and Specifications; Rotary Hammer; QUICK CHANGE
- Page 7 – ACCESSORIES; REMOVING THE SDS-plus; QUICK CHANGE CHUCK; Assembly
- Page 8 – INSTALLING ACCESSORIES; REMOVING ACCESSORIES
- Page 9 – VARIABLE SPEED CONTROLLED; CAUTION; Operating Instructions
- Page 12 – Accessories; TOOL LUBRICATION; Cleaning; Always wear safety gog gles when; Maintenance
- Page 13 – AVERTISSEMENT; Sécurité du lieu de travail; Sécurité électrique
- Page 14 – Entretien; Avertissements supplémentaires concernant la sécurité
- Page 15 – Règles de sécurité concernant les marteaux rotatifs
- Page 16 – Symboles
- Page 17 – Description fonctionnelle et spécifications; Marteau rotatif; MANDRIN À CHANGEMENT RAPIDE
- Page 18 – Assemblage
- Page 20 – Consignes de fonctionnement; MISE EN GARDE
- Page 23 – Accessoires
- Page 24 – GUARDE TODAS LAS ADVERTENCIAS E INSTRUCCIONES; ADVERTENCIA; Seguridad del área de trabajo; Seguridad eléctrica
- Page 25 – Advertencias de seguridad adicionales
- Page 26 – Normas de seguridad para martillos giratorios
- Page 27 – Símbolos
- Page 28 – Descripción funcional y especificaciones; Martillo giratorio
- Page 29 – Ensamblaje
- Page 31 – PRECAUCION; Instrucciones de funcionamiento
- Page 34 – Accesorios; Servicio; Mantenimiento
IMPORTANT:
IMPORTANT :
IMPORTANTE:
Read Before Using
Lire avant usage
Leer antes de usar
For English Version
Version française
Versión en español
See page 2
Voir page 13
Ver la página 24
Operating/Safety Instructions
Consignes de fonctionnement/sécurité
Instrucciones de funcionamiento y seguridad
1-877-BOSCH99 (1-877-267-2499) www.boschtools.com
Call Toll Free for
Consumer Information
& Service Locations
Pour obtenir des informations
et les adresses de nos centres
de service après-vente,
appelez ce numéro gratuit
Llame gratis para
obtener información
para el consumidor y
ubicaciones de servicio
RH328VC
RH328VCQ
BM 1619929E58 06-09:BM 1619929E58 06-09 6/8/09 3:19 PM Page 1
"Loading the manual" means you need to wait until the file loads and becomes available for online reading. Some manuals are very large, and the time they take to appear depends on your internet speed.
Other Manuals for Bosch RH328VCQ
Summary
-2- Work area safety Keep work area clean and well lit. Cluttered or dark areas invite accidents. Do not operate power tools in explosiveatmospheres, such as in the presence offlammable liquids, gases or dust. Power tools create sparks which may ignite the dustor fumes. Keep children and bystanders ...
Disconnect the plug from the power sourceand/or the battery pack from the power toolbefore making any adjustments, changingaccessories, or storing power tools. Such preventive safety measures reduce the risk ofstarting the power tool accidentally. Store idle power tools out of the reach ofchildren a...
-4- Rotary Hammer Safety Rules Wear ear protectors. Exposure to noise can cause hearing loss. Use auxiliary handles supplied with thetool. Loss of control can cause personal injury. Hold power tools by insulated grippingsurfaces when performing an operationwhere the cutting tool may contact hiddenwi...