Page 2 - Risk of damaging the appliance
4 - PRECAUTIONS 91477A296/B of electrical appliances, provided that they are supervised or instructed by adults who are responsible for their safety. • Children must not play with the appliance. • Keep children under the age of 8 at a safe distance unless they are constantly supervised. • Keep child...
Page 3 - Installation and maintenance; MUST NOT
PRECAUTIONS - 5 91477A296/B e • Racks and trays should be inserted as far as they will go into the side guides. The mechanical safety locks that prevent them from being removed must face downwards and towards the back of the oven cavity. • Do not use steam jets to clean the appliance. • Do not spray...
Page 5 - Appliance purpose; This user manual; • This user manual is an integral part of the; Manufacturer’s liability; • failure to comply with the instructions in the; Identification plate
PRECAUTIONS - 7 91477A296/B e handling the temperature probe. • Take care not to scratch or damage enamelled or chrome-plated surfaces with the tip or the plug of the temperature probe. • Do not insert the temperature probe into openings and slots on the appliance. • When the temperature probe is no...
Page 6 - Energy efficiency technical data; Power voltage
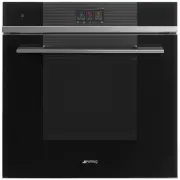
8 - PRECAUTIONS 91477A296/B with current European directives. To dispose of the appliance:• Cut the power cable and remove it.• Deliver the appliance to the appropriate recycling centre for electrical and electronic equipment waste, or return it to the retailer when purchasing an equivalent product,...
Page 7 - DESCRIPTION; General Description; Display
DESCRIPTION - 9 91477A296/B e DESCRIPTION General Description 1 Control panel 2 Seal3 Temperature probe socket (on some models only) 4 Light bulb 5 Door6 Fan7 Loading tray Frame shelf Control panel 1 ON/OFF key The ON/OFF button turns the appliance on or off. 2 Display The touch-screen display allow...
Page 8 - Built-in oven connectivity; Other parts; Accessories
10 - DESCRIPTION 91477A296/B controlled remotely via a smartphone or tablet (see the " Built-in oven connectivity " user manual). SmegConnect (on some models only) The appliance is equipped with SmegConnect technology that allows the user to control the appliance operation via an App on his/...
Page 10 - Cooking containers; USE; Preliminary operations; First heating; Using the accessories; Racks and trays
12 - USE 91477A296/B the wished gastronomic result to be achieved.The addition of steam allows the use of less fat in favour of a healthier and more genuine cuisine. It also minimizes the loss of weight and volume in food while cooking.Steam cooking is particularly suitable for cooking meat: in addi...
Page 11 - Display; Information area
USE - 13 91477A296/B e this way fat can be collected separately from the food which is being cooked. Display The parameters and values for the currently selected function will be indicated on the display. To use it, simply touch the "virtual" buttons and/or scroll through the values shown (t...
Page 12 - First use; Deactivating the display; To deactivate the display manually:
14 - USE 91477A296/B RAPID PREHEATING PROBE (on some models only) Connectivity (on some models only) Connectivity requirements:• Smartphone or PC tablet with IOS or Android operating system. The minimum versions of the operating systems are available at the following link: www.smeg.com/smegconnect/ ...
Page 13 - Reactivating the display; To reactivate the display when it is off:; Using the oven; Traditional cooking
USE - 15 91477A296/B e sound. Reactivating the display To reactivate the display when it is off: • Press and hold the ON-OFF button for a few seconds until you hear a series of sounds. The display turns on after a few seconds. The display shows the main menu when it is switched on again. Using the o...
Page 20 - Reservoir filling
22 - USE 91477A296/B 12. Touch the CONFIRM button to confirm the selected cooking duration. 13. Touch the START button (at the lower right ) to start to fill the reservoir. Reservoir filling 14. Open the door and pull the loading drawer out of its housing. 15. Insert the funnel provided in the loadi...
Page 23 - Cooking advice; General advice
USE - 25 91477A296/B e cooking rice, place a lid on the container or cover with aluminium foil. This procedure allows the rice to absorb all the water, and it can then be served directly to the table. • Eggs: these may be boiled , scrambled or poached by using the steam function at 100°C. To obtain ...
Page 26 - Smart Cooking
28 - USE 91477A296/B 3. Close the door. 4. Touch the START button to start cooking. This stage is indicated by a progressive increase in the cooking level. End of cooking At the end of cooking, "Function ended" displays and a buzzer sounds briefly, which can be deactivated by touching any po...
Page 27 - Multistep cooking
USE - 29 91477A296/B e Sametime 1. Touch the SMART COOKING button on the "main menu". 2. Scroll through the functions until you select SAMETIME . 3. Select the desired SAMETIME recipe and follow the instructions on the display. Quick recipes 1. Touch the SMART COOKING button on the "main...
Page 28 - History; Deleting the history; Mini guide to accessories; Fan forced mode
30 - USE 91477A296/B 11. Touch the START button (at the right in the lower area) to start Multistep cooking. History This menu is particularly useful for viewing and reusing the last programs or personal recipes that were used. 1. Touch the HISTORY button on the "main menu" (at the left in t...
Page 29 - My recipes; Adding a recipe
USE - 31 91477A296/B e My recipes This menu allows you to enter a personal program with the parameters you wish to use. On first use, the appliance will only offer you to add a new recipe. After storing your personal recipes these will then be available in the dedicated menu. 1. Touch the MY RECIPES...
Page 30 - Other functions; DEFROST BY WEIGHT
32 - USE 91477A296/B 14. Touch the CONFIRM button to store the program. Starting a personal recipe 1. Touch the MY RECIPES button on the "main menu". 2. Select the recipe that was saved previously. 3. Touch the START button to start cooking. Deleting a recipe 1. Touch the MY RECIPES button o...
Page 32 - STEAM HEAT; End of steam heat
34 - USE 91477A296/B 5. Touch the COOKING DURATION button or the relevant value. 6. Scroll through the values and select the required duration. 7. Touch the TEMPERATURE button or the relevant value. 8. Scroll through the values and select the required cooking temperature (from 25°C to 40°C). 9. Touc...
Page 33 - STONE
USE - 35 91477A296/B e deactivated by touching any point of the display or by opening the door. 11. Touch the HOME button to quit the function. 12. Proceed with draining the reservoir as described above. KEEP WARM 1. Select KEEP WARM . 2. Touch the TEMPERATURE button or the relevant value. 3. Scroll...
Page 35 - In the event of a blackout; Blackout during a programmed function; Settings
USE - 37 91477A296/B e of the oven cavity. 7. Wait for the end of the drain flow. When finished, the reservoir indicator light (in the information area on the right) and the display indicate the end of the residual water draining process. 8. Touch the CONFIRM button . 9. Drain the water from the dee...
Page 36 - Touch the CONFIRM; Time display
38 - USE 91477A296/B CONNECTION SETTINGS button. Clock settings • In the "settings menu " touch the CLOCK SETTINGS button. Digital clock 1. Select Digital clock. 2. Select On. Touch the CONFIRM button to activate the Digital clock mode. Time display 1. Select Show the time. 2. Select On. 3. ...
Page 38 - Touch the
40 - USE 91477A296/B 2. Scroll through the available languages to select the required language. 3. Touch the CONFIRM button to confirm the language. Controls lock 1. Select Controls lock. 2. Select Yes. 3. Touch the CONFIRM button to activate the Controls lock mode. To temporarily disable the lock d...
Page 39 - Showrooms; Restore settings; CLEANING AND MAINTENANCE; Cleaning the appliance; Cleaning the surfaces
CLEANING AND MAINTENANCE - 41 91477A296/B e Showrooms • Touch the SHOWROOMS button on the “settings menu ” (at the centre of the lower area ). Show Room (for showrooms only) 1. Select Show Room. 2. Select On. 3. Touch the CONFIRM button to activate the Show Room mode . Demo Mode (for showrooms only)...
Page 40 - Cleaning the door; Door disassembly
42 - CLEANING AND MAINTENANCE 91477A296/B Cleaning the door Door disassembly For easier cleaning it is recommended to remove the door and place it on a tea towel.To remove the door proceed as follows:1. Open the door completely and insert two pins into the holes on the hinges indicated in the figure...
Page 41 - Cleaning the oven cavity; Drying
CLEANING AND MAINTENANCE - 43 91477A296/B e 6. Insert the front grommets into their seats. The feet of the grommets must be facing the outer glass 7. Clean the external glass pane and the panes removed previously. 8. Use absorbent kitchen roll. In case of stubborn dirt, wash with a damp sponge and n...
Page 44 - Descaling
46 - CLEANING AND MAINTENANCE 91477A296/B Programmed pyrolytic function It is possible to program the Pyrolytic cycle start time like all other cooking functions.1. After confirming the desired pyrolytic function duration, touch next to the expected end time of the function. 2. Scroll with your fing...
Page 47 - Extraordinary maintenance
CLEANING AND MAINTENANCE - 49 91477A296/B e End of hydraulic circuit cleaning 10. At the end of the cleaning process, the display indicates the request to drain water. 11. Clean and dry any residual water inside the oven cavity. Reservoir draining 12. Place the deep pan on the third shelf from the b...
Page 48 - INSTALLATION; Electrical connection; General information
50 - INSTALLATION 91477A296/B 1. Completely remove all accessories from inside the oven. 2. Remove the rack/tray support frames.3. Use a tool (e.g. a spoon) to remove the bulb cover. 4. Slide out and remove the light bulb. 5. Replace the light bulb with one of the same type (40 W). 6. Refit the cove...
Page 49 - Positioning
INSTALLATION - 51 91477A296/B e with a contact separation distance sufficient to provide complete disconnection in category III overvoltage conditions, pursuant to installation regulations. For the Australian/New Zealand market: The circuit breaker incorporated in the fixed connection must comply wi...
Page 51 - Make sure that the cabinet top/rear
INSTALLATION - 53 91477A296/B e Mounting into a column (mm) * Make sure that the cabinet top/rear section has an opening approx. 35-40 mm deep.
Page 52 - Make sure that the piece of furniture
54 - INSTALLATION 91477A296/B Mounting under worktops (mm) A min. 603 mm B 560 - 568 mm C 583 - 585 mm D 9 - 11 mm E min. 5 mm F 121 - 1105 mm G min. 560 mm H min. 594 mm co Cutout for power cord (min. 6 cm 2 ) jb Electrical connection box If the appliance is to be built-in under a worktop, a wooden...