Page 2 - Instructions; General safety instructions
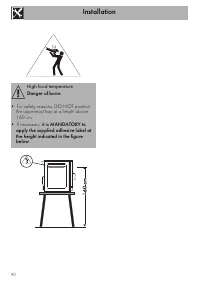
Instructions 48 1 Instructions 1.1 General safety instructions Risk of personal injury • During use the appliance and its accessible parts become very hot. • Never touch the heating elements during use. • Keep children under the age of eight at a safe distance unless they are constantly supervised. ...
Page 3 - ENEN; Risk of damaging the appliance
Instructions 49 ENEN • Have qualified personnel carry out installation and assistance interventions according to the standards in force. • Do not try to repair the appliance yourself or without the intervention of a qualified technician. • If the power supply cable is damaged, it must be replaced by...
Page 4 - For this appliance
Instructions 50 • Do not obstruct ventilation openings and heat dispersal slots. • Never leave the appliance unattended during cooking operations where fats or oils could be released. • Never leave objects on the cooking surface. • Do not use the appliance to heat rooms for any reason. • Remove any ...
Page 5 - Identification plate
Instructions 51 ENEN 1.2 Identification plate • The identification plate bears the technical data, serial number and brand name of the appliance. Do not remove the identification plate for any reason . 1.3 Manufacturer liability The manufacturer declines all liability for damage to persons or proper...
Page 6 - How to read the user manual; Plastic packaging
Instructions 52 • Deliver the appliance to the appropriate recycling centre for electrical and electronic equipment waste, or return it to the retailer when purchasing an equivalent product, on a one for one basis. Our appliances are packaged in non-polluting and recyclable materials. • Deliver the ...
Page 7 - Description; General Description
Description 53 ENEN 2 Description 2.1 General Description 1 Control panel 2 Oven lights 3 Seal 4 Door 5 Fans 6 Tray support frames 7 Water intake line 8 Washing water drain (on some models only) Frame shelf
Page 8 - Controls description; Backlit capacitive buttons
Description 54 2.2 Control panel 1 Backlit capacitive buttons 2 LCD display and icons 2.3 Controls description Backlit capacitive buttons On / Stand-by Back / previous screen Step cooking mode Temp set Manual cooking Time settings / Core probe cooking Humidification Cooking with a recipe Fan speed a...
Page 9 - LCD display and icons; Δt; Available accessories
Description 55 ENEN LCD display and icons Alphanumeric display Temperature and units of measure display Time display / Core probe temperature Step cooking icon and display Cooking in progress Stop cooking Core probe Core probe with Δt Cooking duration Delayed start Open Exhaust Close Exhaust 2.4 Sid...
Page 10 - Shelves
Description 56 2.6 Other parts Shelves The appliance features shelves to position trays and racks at different heights. The insertion heights are indicated from the bottom upwards (see “General Description”). Internal ventilation The internal fans (together with the heating elements) are switched on...
Page 11 - Safety thermostat
Description 57 ENEN Safety thermostat The appliance is equipped with a safety device that triggers in case of serious malfunction.Only for the installer/technical support:1. Unscrew the protective cover for the thermostat with the dedicated tool. 2. To reset the safety thermostat, press the button o...
Page 12 - Use; First time switching on
Use 58 3 Use 3.1 First use 1. Remove any protective film from the outside or inside of the appliance, including accessories. 2. Remove any labels (apart from the technical data plate) from the accessories and from the oven cavity. 3. Remove and wash all the appliance accessories (if fitted) (see “Cl...
Page 14 - Parameters and default values
Use 60 Set time This option allows you to change the current date and time. The procedure is the same as for setting the date and time when the appliance is switched on for the first time (see “First time switching on”). Display time This option allows you to select whether to display the time on th...
Page 15 - Cooling
Use 61 ENEN 3.6 Baking modes The appliance has three baking modes: 1 Manual cooking ( button). 2 Step cooking ( button). 3 Cooking with a recipe ( button). 3.7 Manual cooking From the home screen, press : • The names of the available functions will appear on the display. • Use the button to return t...
Page 20 - At the end of step cooking; Cooking with a recipe
Use 66 • Use the button to go back to the previously set steps. • Use the button to change a step that has already been configured following the procedure described. If the last step has not been set, at least for the required parameters, it will be ignored.When at least 2 steps have been set, in th...
Page 23 - Deleting and renaming a recipe
Use 69 ENEN If you wish to change a step cooking recipe: 1. Use the / buttons to select the required step cooking recipe. 2. Enable changes using the button and enter the password. 3. Change ( / ) or confirm ( ) the shelf number associated with the recipe. • Step 1 appears on the display together wi...
Page 24 - Saved
Use 70 6. Enter the new name for the recipe. 7. Press to confirm, at the same time “ Saved ” appears on the display. Immediately afterwards you are taken to the ordinary or user recipes selection screen. User recipes 1. From the home screen, press . 2. “ Recipes ” appears on the alphanumeric display...
Page 25 - Hot temperature probe
Use 71 ENEN 3.10 Cooking with the core probe (on some models only) The core probe is a thermometer that measures the temperature directly at the centre of the food and stops the cooking cycle when it detects that the temperature is the same as the one set by the user.• Remove the protective rubber c...
Page 26 - If you select the
Use 72 How to insert the probe correctly 1. Place the food on a tray.2. Insert the tip of the probe into the food before placing it in the oven. For best results, make sure that the temperature probe is placed transversely in the thickest part of the food and for least 3/4 of its length. Make sure t...
Page 27 - Special functions
Use 73 ENEN If you select the “ Δt probe ” option: 1. The icon appears. 2. Use the / buttons, to set the target temperature for the core probe (from 30°C to 99°C). This is indicated on the time display. 3. “ Probe temperature ” appears on the alphanumeric display. 4. Press to confirm. 5. “ Set Δt ” ...
Page 29 - Delayed start
Use 75 ENEN Delayed start To set the delayed start function (both for manual cooking and step cooking):1. Select the “ Delayed start ” function. 2. The / buttons are used to select the time for the delayed start function. 3. Press to confirm. Once delayed start has been set, the function, preheating...
Page 30 - Advice for defrosting
Use 76 Advice for defrosting • Place frozen foods without their packaging in a lidless container on the first shelf of the oven. • Avoid overlapping the food.• To defrost meat, use the rack placed on the second level and a tray on the first level. In this way, the liquid from the defrosting food dra...
Page 31 - Cleaning and maintenance; Cleaning the appliance; Ordinary daily cleaning; Cleaning the door; Removing the door
Cleaning and maintenance 77 ENEN 4 Cleaning and maintenance 4.1 Cleaning the appliance Recommendations for cleaning the appliance To keep the surfaces in good condition, they should be cleaned regularly after use. Let them cool first. Ordinary daily cleaning Always use only specific products that do...
Page 32 - Clean both the interior and exterior of the; Cleaning the oven cavity
Cleaning and maintenance 78 3. Open the internal glass pane. 4. Clean both the interior and exterior of the glass panes. Use absorbent kitchen roll. In case of stubborn dirt, wash with a damp sponge and neutral detergent. 5. After cleaning, close the internal glass pane again. 6. Reposition the uppe...
Page 33 - Removing the tray support frames
Cleaning and maintenance 79 ENEN Manual washing system (on some models only) The appliance is equipped with a manual washing system to make it easier to clean the oven cavity.Water can be dispensed directly into the oven cavity using the retractable spray head.1. Extract the spray head. 2. The amoun...
Page 34 - Extraordinary maintenance; Removing the door seal
Cleaning and maintenance 80 3. When you have finished cleaning, reposition the tray support frames inside the oven and fasten them with the fastening ring nuts . 4.4 Extraordinary maintenance Removing the door seal To remove the seal:• Pull the seal outwards to remove it. To refit the seal:• Positio...
Page 35 - Risk of malfunction
Cleaning and maintenance 81 ENEN 4. Slide out and remove the light bulb. 5. Fit the new light bulb. 6. Refit the cover. Ensure the moulded part of the glass ( A ) is facing the door. 7. Press the cover completely down so that it attaches perfectly to the bulb support. Replacing the internal light bu...
Page 36 - ) on the inside edge of
Cleaning and maintenance 82 4. Slide out and remove the light bulb. 5. Fit the new light bulb. 6. Place the glass ( 2 ) on the inside edge of the light bulb cover ( 3 ) and place the seal ( 1 ) on it. Then insert 2 of the screws that were previously removed ( 4 ) in 2 diagonally opposite holes. 7. P...
Page 37 - Regular Maintenance
Cleaning and maintenance 83 ENEN 4.5 If the appliance is not working properly This product meets current safety regulations for electrical appliances. To prevent safety hazards for users, all technical inspections or repairs must be carried out by qualified personnel. Regular Maintenance • The appli...
Page 38 - Installation; Electrical connection; Fixed connection
Installation 84 5 Installation 5.1 Electrical connection General information Check the grid characteristics against the data indicated on the plate. The identification plate bearing the technical data, serial number and brand name is visibly positioned on the appliance. Do not remove this plate for ...
Page 39 - Cable replacement
Installation 85 ENEN (Example of 32A plug and socket) Cable replacement 1. At the back of the appliance, unscrew the 4 screws to remove the metal cover of the terminal board. 2. Use a flat-head screwdriver to unhook and lift the cover to access the terminal board. 3. Replace the cable. 4. Make sure ...
Page 40 - Improper use
Installation 86 5.2 Water connection The openings for the water and drain connections are located on the rear panel of the appliance. Depending on the model, these are used for the internal humidification and manual washing systems. 1 Internal humidification connection. 2 Washing water inlet (on som...
Page 41 - Direct discharge into a drainage system
Installation 87 ENEN • It must be fitted with a U syphon (not provided, detail A in the following figures). • Free from kinks and obstructions.• If multiple appliances are installed, make sure that the drainage pipes are of a suitable size to allow the water to drain properly. • If it is not possibl...
Page 42 - Heavy appliance
Installation 88 5.3 Positioning Levelling Level the appliance on the ground using the adjustable feet. The foot has a range of 10 mm. Steam outlet pipe Depending on the model, there is an exhaust flue on the back of the appliance to release the steam produced during cooking. Multiple installations P...
Page 43 - Stacked installation
Installation 89 ENEN Stacked installation Improper installation Risk of damage to the appliance • It is not possible to stack the appliances one on top of another without having first installed the appropriate stacking kit (available on request). This kit must be fitted to both appliances. The appli...
Page 44 - High food temperature
Installation 90 ù High food temperature Danger of burns • For safety reasons, DO NOT position the uppermost tray at a height above 160 cm. • If necessary, it is MANDATORY to apply the supplied adhesive label at the height indicated in the figure below.