Page 2 - Instructions; General safety instructions
Instructions 4 1 Instructions 1.1 General safety instructions Risk of personal injury • During use the appliance and its accessible parts become very hot. Children must not come near the appliance. • Never touch the heating elements during use. • Keep children under eight years of age at a safe dist...
Page 3 - • Never leave objects on the cooking; For this appliance; Manufacturer liability; Power voltage
Instructions 5 EN • Never leave objects on the cooking surface. • Do not use the appliance to heat rooms for any reason. • Do not remove the seal on the face of the oven. For this appliance • Ensure that the appliance is switched off before replacing the bulb. • Do not rest any weight or sit on the ...
Page 4 - Identification plate; Danger of suffocation
Instructions 6 • Deliver the appliance to the appropriate recycling centre for electrical and electronic equipment waste, or return it to the retailer when purchasing an equivalent product, on a one for one basis. Our appliances are packed in non-polluting and recyclable materials.• Deliver the pack...
Page 5 - Description; General Description
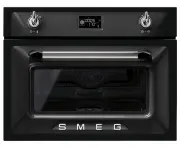
Description 7 EN 2 Description 2.1 General Description 1 Control panel 2 Oven light 3 Seal 4 Door 5 Fan 6 Evaporation tray 7 Water supply tube 8 Rack support frames Frame shelf
Page 6 - Temperature knob
Description 8 2.2 Control panel 1 Temperature knob This knob can be used to select:• The cooking temperature• The duration of a function• Programmed cooking procedures• The current time• The turning on or off of the light inside the appliance. 2 Display Displays the current time, the selected cookin...
Page 7 - Shelves; Available accessories; Perforated tray
Description 9 EN 2.3 Other parts Shelves The appliance features shelves to position trays and racks at different heights. The insertion heights are indicated from the bottom upwards (see 2.1 General Description). Cooling fan The fan cools the oven and comes into operation during cooking.The fan caus...
Page 8 - Rack; Other cooking containers; • You may also use your own containers
Description 10 Rack Useful for supporting containers with food during cooking. Evaporation tray cover Evenly distributes steam inside the oven. Sponge Useful for removing condensation from inside the oven. 2.5 Other cooking containers • You may also use your own containers for cooking, as long as th...
Page 9 - Use; Danger of burns
Use 11 EN 3 Use 3.1 Instructions High temperature inside the oven during use Danger of burns • Keep the oven door closed during cooking. • Protect your hands by wearing oven gloves when moving food inside the oven. • Open the appliance door carefully during or after cooking. • Take care because stea...
Page 10 - Using the accessories; Racks
Use 12 3.2 First use 1. Remove any protective film from the outside or inside of the appliance, including accessories. 2. Remove any labels (apart from the technical data plate) from the accessories and from the oven cavity. 3. Remove and wash all the appliance accessories (see 4 Cleaning and mainte...
Page 11 - Trays
Use 13 EN Trays The tray must be inserted in the groove in the rack. In particular, the perforated tray must be inserted in the groove in the rack above it. This allows liquids to be collected separately from the food which is being cooked. 3.4 Using the oven Display Eco-logic indicator light Showro...
Page 12 - Setting the time
Use 14 Setting the time On the first use, or after a power failure, will be flashing on the appliance's display. To be able to start any cooking function, the current time must be set.1. Turn the temperature knob to set the displayed time (keep the knob turned to produce a faster increase or decreas...
Page 13 - Traditional cooking
Use 15 EN Traditional cooking Each time the temperature knob is pressed during a function, the parameters will be cycled through in the following order. Temperature Minute minder Timed cooking duration Programmed cooking time (if timed cooking is set). Combination cooking Each time the temperature k...
Page 15 - Filling the tank
Use 17 EN 10. Press the function knob. A request to fill the tank with water is shown on the display. Filling the tank 11. Fill a container (e.g. a jug) with sufficient water for the cooking duration. 12. Open the oven door. 13. Rest the container on the open door. 14. Extract the tube from its seat...
Page 16 - Preheating stage
Use 18 16. When the appliance has finished taking in water, shake the tube to remove any residual water. 17. Return the tube to its original position, remove the container of water and close the door. 18. Press the function knob to start steaming. Preheating stage Steaming is always preceded by a pr...
Page 17 - Modifying programmed cooking
Use 19 EN 20. Turn the temperature knob right or left to alter the pre-set cooking time. Modifying programmed cooking 21. When the timed cooking and programmed cooking indicator lights are lit steadily and the appliance is waiting for cooking to start, press the temperature knob. The timed cooking i...
Page 18 - End of steaming
Use 20 End of steaming When steaming finishes, a buzzer will sound and the following screens will alternate on the display. 26. Press the function knob to stop the buzzer. 27. Stand to the side of the appliance and open the door ajar for a few seconds to allow excess steam to escape. 28. Fully open ...
Page 19 - Advice for steam cooking
Use 21 EN If the remaining quantity of water is over 500 ml, the water will be discharged into the evaporation tray in two different steps to facilitate drying. The display will show “STEP 1” when the first stage has finished, and draining will stop. You must press the function knob again to complet...
Page 20 - Peeling peppers and tomatoes:
Use 22 • Fish: due to the delicate nature of fish, steaming gives excellent results. For oily fish such as salmon or trout, cook at 100°C for around 5 minutes. For white fish such as cod or haddock, cook at 80°C for around 5 minutes. If you are cooking different foods, all fish must be cooked in the...
Page 21 - Combination cooking functions
Use 23 EN Combination cooking functions Combination functions list 1. Press the function knob to activate the appliance. 2. Turn the function knob to the right or left to set a combination function. 3. Turn the temperature knob to set the combination cooking duration . 4. Press the temperature knob ...
Page 24 - Convection
Use 26 Convection As the heat comes from above and below at the same time, this system is particularly suitable for certain types of food. Traditional cooking, also known as static cooking, is suitable for cooking just one dish at a time. Ideal for pies, bread and casseroles. It is also suitable for...
Page 25 - Minute minder
Use 27 EN Minute minder 1. Press the temperature knob once (twice if cooking is already in progress). The display shows and the indicator light flashes. 2. Turn the temperature knob to set the duration (from 1 minute to 4 hours). After a few seconds, the indicator light stops flashing and the countd...
Page 27 - Programmed cooking
Use 29 EN Programmed cooking 1. After selecting a cooking function and temperature, press the temperature knob three times. The display shows and the indicator light flashes. 2. Turn the knob right or left to set the cooking duration from 00:01 to 12:59. Keep the knob turned for a fast increase or d...
Page 29 - General advice
Use 31 EN 3.5 Cooking advice General advice • It is not possible to shorten cooking times by increasing the temperature (the food could be overcooked on the outside and undercooked on the inside). • Cooking times vary according to the thickness and quality of the food and to consumer taste. • The fi...
Page 30 - Special functions; Defrost by time
Use 32 3.6 Special functions Defrost by time 1. Place the food to be defrosted inside the oven. 2. Press and turn the function knob to select the defrost by time function marked by the indicator lights and . 3. Press the function knob to confirm your choice of function. 4. Turn the temperature knob ...
Page 31 - Heating
Use 33 EN 4. Turn the temperature knob to set the proving duration (from 00:00 to 13:00). 5. Press the function knob to start the proving function. 6. At the end, the word STOP will be displayed. Heating 1. Place the food to be heated inside the oven. 1. Press and turn the function knob to select th...
Page 32 - Defrost by weight
Use 34 1. Press the function knob to select the Sabbath mode. 2. Press the temperature knob. 3. Turn the temperature knob to modify the heating duration. 4. Press the function knob to confirm the parameters and start the Sabbath mode. 5. When finished, press and hold the function knob down for at le...
Page 33 - Automatic programs
Use 35 EN 6. Press the function knob to confirm the parameters and start defrosting. 7. At the end, the word STOP will be displayed. Preset parameters: *Defrosting times may vary on the basis of the shape and size of the food to be defrosted. Automatic programs 1. Place the food inside the oven.2. P...
Page 34 - Automatic programs table
Use 36 Automatic programs table MEAT (01 - 04) FISH (05 - 08) VEGETABLES (09 - 12) Subcategory Function Steam % Weight (g) Shelf Temp. (°C) Time (minutes) 01 Roast pork + 50 1000 2 180 95 02 Roast veal + 40 1000 2 170 70 03 Whole roast chicken + 50 1000 2 200 40 04 Whole roast duck + 30 2000 2 150 1...
Page 35 - ON
Use 37 EN DESSERTS/PASTRIES (13 - 16) PASTA (17 - 20) 3.7 Secondary menu The appliance also has a drop-down secondary menu allowing the user to:• Activate or deactivate the Child lock.• Activate or deactivate Showroom mode (which disables all the heating elements so that only the control panel works...
Page 36 - Child lock mode
Use 38 Child lock mode This mode allows the appliance to lock the controls automatically after one minute of normal operation without any intervention from the user. During normal operation it is indicated by the indicator light coming on. To release the lock temporarily during cooking, hold the tem...
Page 37 - Keep Warm mode
Use 39 EN Keep Warm mode This mode allows the appliance to keep cooked food warm (at low temperatures) for around an hour after cooking finishes with a cooking cycle for which a duration has been set (if this is not manually interrupted). Eco-light mode For greater energy savings, the light is autom...
Page 38 - Cleaning and maintenance; Cleaning the surfaces; Improper use
Cleaning and maintenance 40 4 Cleaning and maintenance 4.1 Instructions 4.2 Cleaning the surfaces To keep the surfaces in good condition, they should be cleaned regularly after use. Let them cool first. 4.3 Ordinary daily cleaning Always use only specific products that do not contain abrasives or ch...
Page 39 - Grasp the door on both sides with both; Cleaning the door glazing
Cleaning and maintenance 41 EN 2. Grasp the door on both sides with both hands, lift it forming an angle of around 30° and remove it. 3. To reassemble the door, put the hinges in the relevant slots in the oven, making sure that grooved sections A are resting completely in the slots. Lower the door a...
Page 41 - Cleaning the inside of the oven; Descaling
Cleaning and maintenance 43 EN 4.8 Cleaning the inside of the oven For the best oven upkeep, clean it regularly after having allowed it to cool.Take out all removable parts.Clean the oven racks with warm water and non-abrasive detergent. Carefully rinse and dry damp parts. Descaling The following in...
Page 42 - Press the function knob to start the
Cleaning and maintenance 44 3. Press the function knob to start the descaling function. 4. At the end of the descaling process, remove the vinegar from the base of the oven with the supplied sponge. 5. Use a dish sponge on softened encrustations in order to remove the largest possible quantity of sc...
Page 43 - Removing the rack/tray support frames; Cleaning the tank; CLEAN
Cleaning and maintenance 45 EN Removing the rack/tray support frames Removing the guide frames enables the sides to be cleaned more easily.To remove the guide frames:1. Unscrew the frame fastening pins. 2. Pull the frame towards the inside of the oven to free it from the fastening pins. 3. When clea...
Page 44 - Extract the tube from its seat and immerse
Cleaning and maintenance 46 4. Open the oven door.5. Rest the container on the open door. 6. Extract the tube from its seat and immerse its end in the container until it reaches all the way to the bottom. 7. Press the function knob to start drawing the solution into the appliance's tank. 8. When the...
Page 45 - Remove the cover from the evaporation
Cleaning and maintenance 47 EN When the cleaning process is complete, a buzzer will sound and the display will show the solution draining screen. 11. Remove the cover from the evaporation tray and dry it with the sponge supplied. 12. We recommend inserting the supplied sponge into the evaporation tr...
Page 46 - Preliminary operations
Cleaning and maintenance 48 4.10 Vapour Clean Preliminary operations Before starting the Vapour Clean function:• Completely remove all accessories from inside the oven. • Pour approx. 40 cc of water onto the floor of the oven cavity. Make sure it does not overflow out of the cavity. • Spray a water ...
Page 47 - Vapour Clean setting
Cleaning and maintenance 49 EN Vapour Clean setting 1. Press the function knob to activate the appliance. 2. Turn the function knob to the right or left to select the Vapour Clean function . 3. The duration and temperature of the cleaning cycle will appear on the display. 4. Press the temperature kn...
Page 48 - Extraordinary maintenance; Replacing the internal light bulb
Cleaning and maintenance 50 4.11 Extraordinary maintenance Replacing the internal light bulb 1. Completely remove all accessories from inside the oven. 2. Remove the rack/tray support frames. 3. Remove the bulb cover using a tool (e.g. a screwdriver). 4. Slide out and remove the light bulb. 5. Repla...
Page 50 - Installation; Electrical connection; General information; Cable replacement
Installation 52 5 Installation 5.1 Electrical connection General information Check the grid characteristics against the data indicated on the plate.The identification plate bearing the technical data, serial number and brand name is visibly positioned on the appliance.Do not remove this plate for an...
Page 51 - Position of the power cable
Installation 53 EN 5.3 Positioning Position of the power cable (rear view) Front panel seal Glue the supplied front panel seal to the lower part of the front panel to avoid water or other liquids from leaking in. Heavy appliance Crushing hazard • Position the appliance into the cabinet cutout with t...
Page 52 - Fastening bushings
Installation 54 Fastening bushings Remove the bushing covers inserted on the oven front. Mount the appliance into the recess.Secure the appliance to the piece of furniture using screws. Cover the bushings with the covers removed previously. Appliance overall dimensions (mm) (front view) (top view)