Page 2 - Table of Contents; INSTRUCTIONS FOR THE USER; : these provide recommendations for; INSTRUCTIONS FOR THE INSTALLER; : these are intended for the; qualified engineer; who is to install, commission and test the appliance
Table of Contents INSTRUCTIONS FOR THE USER : these provide recommendations for use, a description of the controls and the correct procedures for cleaningand maintaining the appliance INSTRUCTIONS FOR THE INSTALLER : these are intended for the qualified engineer who is to install, commission and tes...
Page 3 - Precautions for Use; PRECAUTIONS FOR USE
Precautions for Use 1. PRECAUTIONS FOR USE THIS MANUAL IS AN INTEGRAL PART OF THE APPLIANCE. TAKE GOOD CAREOF IT AND KEEP IT TO HAND THROUGHOUT THE OVEN'S LIFE CYCLE. WE URGE YOU TO READ THIS MANUAL AND ALL THE INFORMATION ITCONTAINS CAREFULLY BEFORE USING THE APPLIANCE. INSTALLATIONMUST BE CARRIED ...
Page 4 - Disposal instructions; ENVIRONMENT POLICY; Your old appliance must also be disposed of properly.; Important; : deliver the appliance to your local organisation authorised to
Disposal instructions 2. DISPOSAL INSTRUCTIONS - OUR ENVIRONMENT POLICY Our products are only packaged using non-pollutant, environment-friendly,recyclable materials. We urge you to cooperate by disposing of thepackaging properly. Contact your local dealer or the competent localorganisations for the...
Page 5 - Safety precautions; SAFETY PRECAUTIONS
Safety precautions 3. SAFETY PRECAUTIONS REFER TO THE INSTALLATION INSTRUCTIONS FOR THE SAFETY REGULATIONS FOR ELECTRIC OR GAS APPLIANCES AND VENTILATION FUNCTIONS. IN YOUR INTEREST AND TO ENSURE YOUR SAFETY, BY LAW ALL ELECTRIC APPLIANCES MUST ONLY BE INSTALLED AND SERVICED BY QUALIFIED STAFF, IN A...
Page 6 - Instructions for the User; GET TO KNOW YOUR OVEN
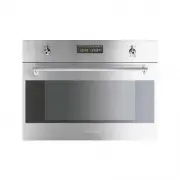
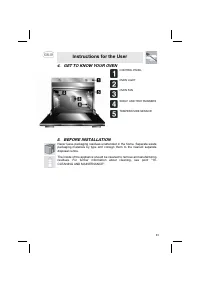
Instructions for the User 4. GET TO KNOW YOUR OVEN 5. BEFORE INSTALLATION CONTROL PANEL OVEN LIGHT OVEN FAN SHELF AND TRAY RUNNERS TEMPERATURE SENSOR Never leave packaging residues unattended in the home. Separate waste packaging materials by type and consign them to the nearest separate disposal ce...
Page 7 - DESCRIPTION OF FRONT PANEL CONTROLS; This display shows the current time or the cooking duration.
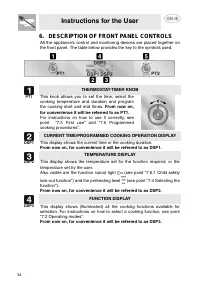
Instructions for the User 6. DESCRIPTION OF FRONT PANEL CONTROLS All the appliance's control and monitoring devices are placed together onthe front panel. The table below provides the key to the symbols used. THERMOSTAT-TIMER KNOB PT1 This knob allows you to set the time, select thecooking temperatu...
Page 8 - FUNCTION-SWITCH ON KNOB; This knob allows access to the oven's three operating; From now on, for convenience it will be referred to; The table below provides a short description of the
Instructions for the User FUNCTION-SWITCH ON KNOB PT2 This knob allows access to the oven's three operating modes, and is also used to select a cooking function (see point “7.2 Operating modes”). From now on, for convenience it will be referred to as PT2. The table below provides a short description...
Page 9 - Precautions and General Advice; All cooking operations must be carried out with the door closed; Operating modes; activated as soon as the current time has been
Instructions for the User 7. USING THE OVEN 7.1 Precautions and General Advice All cooking operations must be carried out with the door closed When the oven and grill are used for the first time, they should be heatedto the maximum temperature for long enough to burn off any oily residuesleft by the...
Page 10 - First use
Instructions for the User 7.3 First use At first use, or after a power failure, the oven's left hand-display, DSP1, will show a flashing symbol. To start any cooking operation, the current time must be set. 7.3.1 Setting the current time To set the current time, turn PT1 to the right and left to inc...
Page 11 - Programmed cooking procedures; The minute minder also works with no function set.; Modifying the data set
Instructions for the User 7.5 Programmed cooking procedures 7.5.1 Cooking with minute minder From ON status (see point “7.2 Operating modes”), press PT1 once. Thedisplay will show the figures (constantly on) and the symbol (flashing). Turn PT1 to set the minutes of cooking (from 00:01 to 23:59). Afe...
Page 13 - cooking has started, showing the set temperature.; Secondary menu; Child safety lock-out function
Instructions for the User Modifying the data set Once automatic cooking has started, its duration can be changed.When the and symbols are steady and cooking is in progress, or the oven is in standby status waiting for cooking to start, press PT1 once.The symbol starts flashing and PT1 can be turned ...
Page 14 - Show Room Function; and may continue for a short time even
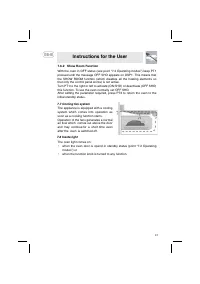
Instructions for the User 7.6.2 Show Room Function With the oven in OFF status (see point “7.2 Operating modes”) keep PT1pressed until the message OFF SHO appears on DSP1. This means thatthe SHOW ROOM function (which disables all the heating elements sothat only the control panel works) is not activ...
Page 15 - ACCESSORIES AVAILABLE; runners
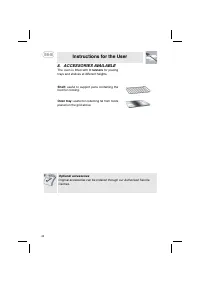
Instructions for the User 8. ACCESSORIES AVAILABLE The oven is fitted with 3 runners for placing trays and shelves at different heights. Shelf: useful to support pans containing the food for cooking. Oven tray: useful for collecting fat from foods placed on the grid above. Optional accessories Origi...
Page 16 - RECOMMENDED COOKING TABLES
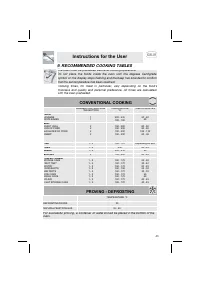
Instructions for the User 9. RECOMMENDED COOKING TABLES The oven must be preheated before all cooking operations.Do not place the foods inside the oven until the degrees Centigradesymbol on the display stops flashing and the beep has sounded to confirmthat the set temperature has been reached.Cookin...
Page 17 - GRILLING
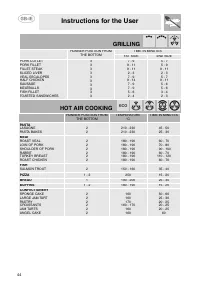
Instructions for the User GRILLING RUNNER POSITION FROM THE BOTTOM TIME IN MINUTES 1ST SIDE 2ND SIDE PORK CUTLETPORK FILLETFILLET STEAKSLICED LIVERVEAL ESCALOPESHALF CHICKENSAUSAGEMEATBALLSFISH FILLETTOASTED SANDWICHES 33 3 3 3 33333 7 - 9 9 - 119 - 11 2 - 37 - 9 9 - 14 7 - 97 - 95 - 62 - 4 5 - 75 -...
Page 18 - CLEANING AND MAINTENANCE; Never use a jet of steam for cleaning the inside of the oven.; Cleaning stainless steel; only; Food stains or spills
Instructions for the User 10. CLEANING AND MAINTENANCE Before carrying out any operations, disconnect the appliance from theelectricity supply. Never use a jet of steam for cleaning the inside of the oven. 10.1 Cleaning stainless steel To keep stainless steel in good condition, it must be cleaned re...
Page 19 - Cleaning the oven; • Clean the oven shelves with hot water and non-abrasive detergents,
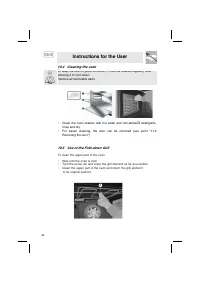
Instructions for the User 10.4 Cleaning the oven To keep the oven in good condition, it must be cleaned regularly, afterallowing it to cool down.Remove all removable parts. • Clean the oven shelves with hot water and non-abrasive detergents, rinse and dry. • For easier cleaning, the door can be remo...
Page 20 - Cleaning the door glazing; The glass in the door should always be kept thoroughly clean. Use
Instructions for the User 10.6 Cleaning the door glazing The glass in the door should always be kept thoroughly clean. Use absorbent kitchen roll; remove stubborn dirt with a damp sponge and ordinary detergent. Do not use abrasive or corrosive cleaners for cleaning the door glazing.(e.g. powder prod...
Page 21 - Instructions for the Installer; EXTRAORDINARY MAINTENANCE; Changing the light bulb; Caution; To change the bulb, first ensure that the oven
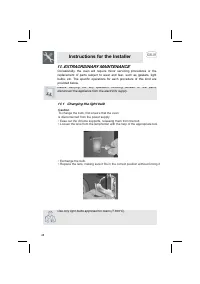
Instructions for the Installer 11. EXTRAORDINARY MAINTENANCE Occasionally, the oven will require minor servicing procedures or the replacement of parts subject to wear and tear, such as gaskets, light bulbs, etc. The specific operations for each procedure of this kind are provided below. Before carr...
Page 22 - Removing the door; Warning
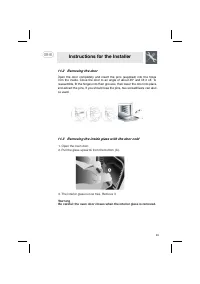
Instructions for the Installer 11.2 Removing the door Open the door completely and insert the pins (supplied) into the holesfrom the inside. Close the door to an angle of about 45° and lift it off. Toreassemble, fit the hinges into their grooves, then lower the door into placeand extract the pins. I...
Page 23 - This operation might have to be; Removing the gasket; Clean the interior glass and the inside of the oven door.
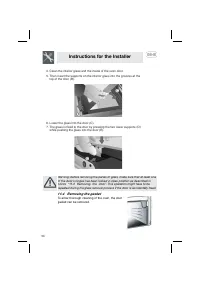
Instructions for the Installer Warning: before removing the panes of glass, make sure that at least oneof the door's hinges has been locked in open position as described inpoints “11.2 Removing the door”. This operation might have to be repeated during the glass removal process if the door is accide...
Page 24 - INSTALLING THE APPLIANCE; Electrical connection; visible position on the oven door surround.; use a
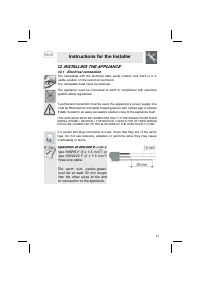
Instructions for the Installer 12. INSTALLING THE APPLIANCE 12.1 Electrical connection The nameplate with the technical data, serial number and mark is in a visible position on the oven door surround. The nameplate must never be removed. The appliance must be connected to earth in compliance with el...
Page 25 - Positioning the oven; and; figure
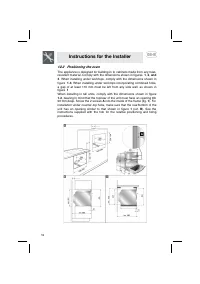
Instructions for the Installer 12.2 Positioning the oven The appliance is designed for building-in to cabinets made from any heat-resistant material. Comply with the dimensions shown in figures 1 , 2 , and 3 . When installing under worktops, comply with the dimensions shown in figure 1 - 3 . When in...