Page 2 - Introduction; PRECAUTIONS FOR SAFETY AND USE
Introduction 1. PRECAUTIONS FOR SAFETY AND USE THIS MANUAL IS AN INTEGRAL PART OF THE APPLIANCE. TAKE GOOD CARE OF IT AND KEEP IT TO HAND THROUGHOUT THE COOKER'S LIFE CYCLE. USERS ARE ADVISED TO READ THIS MANUAL AND ALL THE INSTRUCTIONS IT CONTAINS BEFORE USING THE COOKER. INSTALLATION MUST BE CARRI...
Page 4 - Instructions for the Installer; INSTALLING THE APPLIANCE; Electrical connection
Instructions for the Installer 38 2. INSTALLING THE APPLIANCE This appliance has fire protection (type Y) and can be installed against walls higher than the work surface. In compliance with Electromagnetic Compatibility regulations, the electromagnetic induction hob is classified in Group 2 and Clas...
Page 5 - least 20 mm longer than the other wires at; Levelling
Instructions for the Installer 39 Operation at 380-415V3N~: use a H05RR- F five-wire cable (cable of 5 x 2.5 mm 2 ). Operation at 380-415V2N~: use a H05RR- F four-wire cable (cable of 4 x 4 mm 2 ). Operation at 220-240 V~: use a H05RR-F / H05RNF three-wire cable (cable of 3 x 6 mm 2 ) . The earth wi...
Page 6 - Instructions for the User; DESCRIPTION OF CONTROLS; The front panel; At first use after a power blackout, press the middle knob for 1 - 2; KEY TO SYMBOLS; THERMOSTAT KNOB
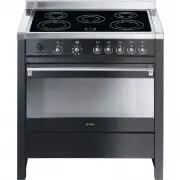
Instructions for the User 40 3. DESCRIPTION OF CONTROLS 3.1 The front panel All the cooker's control and monitoring devices are placed together on the front panel. At first use after a power blackout, press the middle knob for 1 - 2 seconds to enable oven cooking operations. KEY TO SYMBOLS OVEN THER...
Page 7 - FUNCTION SELECTOR KNOB; Turn the knob to select one of the following functions:; HOB CONTROL KNOB
Instructions for the User 41 FUNCTION SELECTOR KNOB Turn the knob to select one of the following functions: NO FUNCTION SET BOTTOM HEATING ELEMENT + FAN TOP AND BOTTOM HEATING ELEMENTS BOTTOM HEATING ELEMENT + FAN HEATING ELEMENT TOP AND BOTTOM HEATING ELEMENTS + FAN FUNCTION FAN HEATING ELEMENT + F...
Page 8 - Heating accelerator
Instructions for the User 42 Heating accelerator Each cooking zone is equipped with a heating accelerator. This system allows the zone to be operated at peak power for a time proportional to the heating power selected. To start the heating accelerator, turn the knob to the left, select setting “A” a...
Page 9 - Electronic Analogue Clock (on some models only); LIST OF FUNCTIONS; Setting the time; for setting the current time. Press the value modification keys
Instructions for the User 43 3.2 Electronic Analogue Clock (on some models only) LIST OF FUNCTIONS MINUTE-MINDER BUTTON END OF COOKING BUTTON CLOCK TIME ADJUSTMENT AND RESET VALUE DECREASE BUTTON VALUE INCREASE BUTTON 3.2.1 Setting the time When the oven is used for the first time, or after an inter...
Page 11 - Programming
Instructions for the User 45 3.2.3 Programming Cooking duration: the 2nd button can be pressed to set the cooking duration. Before it can be set, the thermostat must be turned to the cooking temperature required and the function selector knob to any setting. To set the cooking duration, proceed as f...
Page 12 - and
Instructions for the User 46 Starting cooking: as well as setting a cooking duration, the cooking start time can also be set (with a maximum delay of 12 hours from the current time). To set the cooking start/end time, proceed as follows: - Set the cooking duration as described in the previous point....
Page 13 - HOB; Cooking zones; inductor; Operating Powers
Instructions for the User 47 4. HOB Metal items such as cutlery or lids must never be placed on the surface of the hob since they may become hot. 4.1 Cooking zones The appliance is equipped with 5 cooking zones having different diameters and powers. Their positions are clearly marked by rings, while...
Page 14 - by the manufacturing process, which might contaminate foods with; Types of pans; steel, aluminium or copper without magnetic bottom
Instructions for the User 48 When the hob is used for the first time, it should be heated to its maximum temperature for long enough to burn off any oily residues left by the manufacturing process, which might contaminate foods with unpleasant smells. 4.1.2 Types of pans This type of appliance can o...
Page 15 - Pan present device
Instructions for the User 49 Use only vessels specially designed for induction cooking, with thick, completely flat bottom; if these are not available, the pans used must not have crowned (concave or convex) bottom. YES NO NO 4.1.3 Pan present device Each cooking zone is equipped with a "pan pre...
Page 16 - Electronic circuit board thermal protection
Instructions for the User 50 4.1.6 Electronic circuit board thermal protection The appliance is equipped with a device which constantly measures the temperature of the electronic circuit board. If the temperature should exceed preset values, the device will trigger specific functions to reduce the t...
Page 17 - substances which might melt (plastic or aluminium foil); Holding Function
Instructions for the User 51 Take care not to spill sugar or sweet mixtures onto the hob during cooking, or to place materials or substances which might melt (plastic or aluminium foil) on it; if this should occur, to avoid damage to the surface, turn the heating off immediately and clean with the s...
Page 18 - USING THE OVEN; Precautions and General Advice; At first use after a power blackout, press the middle knob; Oven light; The temperatures inside it may be very high.
Instructions for the User 52 5. USING THE OVEN 5.1 Precautions and General Advice When the oven is used for the first time, it should be heated to the maximum temperature (250°C) for long enough to burn off any oily residues left by the manufacturing process, which might contaminate foods with unple...
Page 19 - ACCESSORIES AVAILABLE
Instructions for the User 53 6. ACCESSORIES AVAILABLE The oven is fitted with 4 runners for placing trays and shelves at different heights. Oven shelf: for cooking food on plates, small cakes or roasts or foods requiring light grilling. Tray grid: for placing on top of a tray for cooking foods which...
Page 20 - COOKING ADVICE; The oven should always be preheated in fan mode to 30/40°C above the; Conventional cooking; FUNCTION SELECTOR; Use deep containers to prevent splashes from
Instructions for the User 54 7. COOKING ADVICE The oven should always be preheated in fan mode to 30/40°C above the cooking temperature. This considerably shortens cooking times and reduces electricity consumption, as well as giving better results. The oven door must be closed during cooking operati...
Page 21 - Hot air cooking
Instructions for the User 55 7.2 Hot air cooking FUNCTION SELECTOR THERMOSTAT SET AT 50 - 250°C This system is suitable for cooking on several shelves, even with foods of different kinds (fish, meat, etc.) without cross-contamination of flavours or smells. The air circulation inside the oven ensures...
Page 22 - Grilling
Instructions for the User 56 7.3 Grilling FUNCTION SELECTOR THERMOSTAT AT MAXIMUM SETTING Used for quick browning of foods. The tray should be placed on the top runner. For short processes and small amounts, place the shelf on the third runner from the bottom. For longer cooking times and grilling, ...
Page 23 - Hot air grilling
Instructions for the User 57 7.4 Hot air grilling FUNCTION SELECTOR THERMOSTAT FROM 50° C TO 250°C Allows uniform heat distribution with better penetration to the core of foods. Foods are lightly browned on the outside but still soft on the inside. During cooking the oven door must be closed, and th...
Page 24 - Defrosting
Instructions for the User 58 7.5 Defrosting FUNCTION SELECTOR THERMOSTAT SET ON 0 The air movement provided by the fan alone thaws foods more quickly. The air circulating inside the oven is at room temperature. Defrosting at room temperature has the advantage that the food's flavour and appearance a...
Page 25 - Rotisserie cooking; The oven door must be closed while cooking is in progress.
Instructions for the User 59 7.6 Rotisserie cooking FUNCTION SELECTOR THERMOSTAT AT MAXIMUM SETTING Prepare the rotisserie rod with the food, tightening the screws A of the prongs. Fit the supports B into the holes in the tray F. Position the rotisserie rod so that the pulley E is still in the reces...
Page 26 - Recommended cooking tables; CONVENTIONAL COOKING; GRILLING
Instructions for the User 60 7.7 Recommended cooking tables Cooking times, for meat in particular, vary depending on the food's thickness and quality and personal preference. CONVENTIONAL COOKING RUNNER HEIGHT FROM BOTTOM TEMPERATURE (°C) TIME IN MINUTES (*) PASTA LASAGNE PASTA BAKES 2 - 3 2 - 3 210...
Page 28 - CLEANING AND MAINTENANCE; Cleaning the ceramic hob; the electricity supply.; Cleaning stainless steel; Routine daily cleaning
Instructions for the User 62 8. CLEANING AND MAINTENANCE 8.1 Cleaning the ceramic hob Before carrying out any operations, disconnect the appliance from the electricity supply. The ceramic hob must be cleaned regularly, preferably after each use, when the residual heat warning lights have gone out. A...
Page 29 - from the hole at the back.; Self-cleaning liners
Instructions for the User 63 8.3 Cleaning the oven (without self-cleaning liners) To keep the oven in good condition, it must be cleaned regularly, after allowing it to cool down. Remove all removable parts. Remove the side runners by lifting them at the front and extracting them from the hole at th...
Page 30 - Removing the self-cleaning liners; Replace the liners in their original positions.; Door glazing
Instructions for the User 64 8.3.4 Removing the self-cleaning liners Remove all accessories from the inside of the oven and proceed as follows: 1. Remove the side runners (fig.1); 2. Extract the side liners "F" and "G" (fig. 2); 3. Extract the back liner "A" after undoing the...
Page 31 - EXTRAORDINARY MAINTENANCE; Changing the light bulb
Instructions for the User 65 9. EXTRAORDINARY MAINTENANCE Occasionally, the oven will require minor servicing procedures or the replacement of parts subject to wear and tear, such as gaskets, light bulbs, etc. The specific operations for each procedure of this kind are provided below. Before carryin...
Page 32 - Removing the door
Instructions for the User 66 9.2 Removing the door Open the door completely and insert the pins (supplied) into the holes fromthe inside. Close the door to an angle of about 45° and lift it off. Toreassemble, fit the hinges into their grooves, then lower the door into placeand extract the screwdrive...