Page 2 - General instructions; INSTRUCTIONS FOR USE
General instructions 54 1. INSTRUCTIONS FOR USE This manual is an integral part of the appliance. It must be kept in its entirety and in anaccessible place for the whole working life of the appliance. We recommend reading thismanual and all information it contains carefully before using the applianc...
Page 4 - SAFETY PRECAUTIONS
General instructions 56 2. SAFETY PRECAUTIONS Consult the installation instructions for safety standards on electrical or gas appliancesand for ventilation functions. In your interests and for your safety the law requires that theinstallation and servicing of all electrical and gas appliances be car...
Page 6 - Instructions for disposal; ENVIRONMENTAL CARE; Our environmental care; Your old appliance also needs to be disposed of correctly.; Important; : hand over your appliance to the local agency authorised for the
Instructions for disposal 58 3. ENVIRONMENTAL CARE 3.1 Our environmental care Pursuant to Directives 2002/95/EC, 2002/96/EC and 2003/108/EC relating tothe reduction of the use of hazardous substances in electrical and electronicappliances, as well as to the disposal of refuse, the crossed out bin sy...
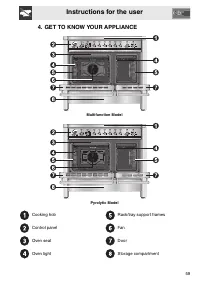
Page 7 - Instructions for the user; GET TO KNOW YOUR APPLIANCE
Instructions for the user 59 4. GET TO KNOW YOUR APPLIANCE Multifunction Model Pyrolytic Model Cooking hob Rack/tray support frames Control panel Fan Oven seal Door Oven light Storage compartment
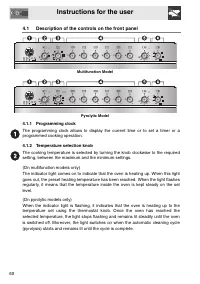
Page 8 - Description of the controls on the front panel; Programming clock
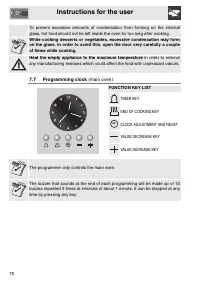
Instructions for the user 60 4.1 Description of the controls on the front panel Multifunction Model Pyrolytic Model 4.1.1 Programming clock The programming clock allows to display the current time or to set a timer or aprogrammed cooking operation. 4.1.2 Temperature selection knob The cooking temper...
Page 9 - The door locking device indicator light (
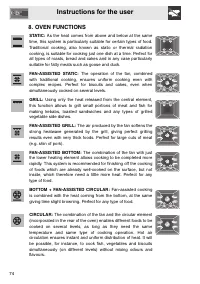
Instructions for the user 61 4.1.3 Function selection knob The oven's various functions are suitable for different cooking modes. Afterselecting the required function, set the cooking temperature using the thermostatknob. For more information on cooking functions, see: “8. OVEN FUNCTIONS”. The door ...
Page 10 - AVAILABLE ACCESSORIES
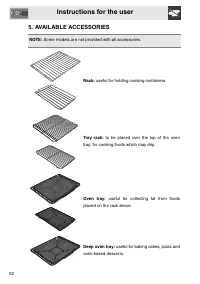
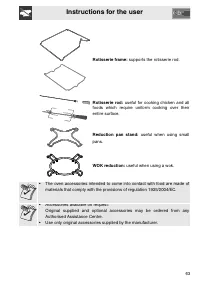
Instructions for the user 62 5. AVAILABLE ACCESSORIES NOTE: Some models are not provided with all accessories. Rack: useful for holding cooking containers. Tray rack: to be placed over the top of the oven tray; for cooking foods which may drip. Oven tray: useful for collecting fat from foods placed ...
Page 12 - Using the rack
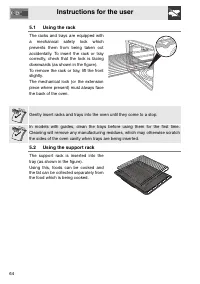
Instructions for the user 64 5.1 Using the rack The racks and trays are equipped witha mechanical safety lock whichprevents them from being taken outaccidentally. To insert the rack or traycorrectly, check that the lock is facingdownwards (as shown in the figure).To remove the rack or tray, lift the...
Page 13 - Using the rotisserie rod
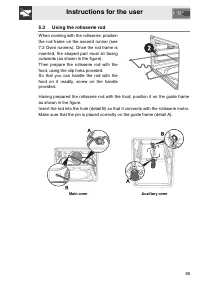
Instructions for the user 65 5.3 Using the rotisserie rod When cooking with the rotisserie, positionthe rod frame on the second runner (see7.2 Oven runners). Once the rod frame isinserted, the shaped part must sit facingoutwards (as shown in the figure).Then prepare the rotisserie rod with thefood, ...
Page 14 - USING THE COOKING HOB; Using the reduction pan stands
Instructions for the user 66 6. USING THE COOKING HOB 5.4 Using the reduction pan stands The reduction pan stands should be placed on top of the hob pan stands asshown in the figures below. Make sure they are stable.The WOK pan stand should only be used when cooking with a wok. 6.1 General warnings ...
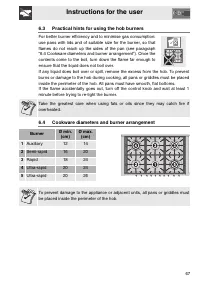
Page 15 - Practical hints for using the hob burners; Burner; Auxiliary
Instructions for the user 67 6.3 Practical hints for using the hob burners For better burner efficiency and to minimise gas consumption:use pans with lids and of suitable size for the burner, so thatflames do not reach up the sides of the pan (see paragraph“6.4 Cookware diameters and burner arrangem...
Page 16 - Before using the appliance; pans and the cooking compartment.; Heat the empty appliance to the maximum temperature; in order to remove; Oven runners; Cooling system
Instructions for the user 68 7. USING THE OVEN 7.1 Before using the appliance • Remove any labels (apart from the technical data plate) from trays, dripping pans and the cooking compartment. • Remove any protective film from the outside or inside of the appliance, including from accessories such as ...
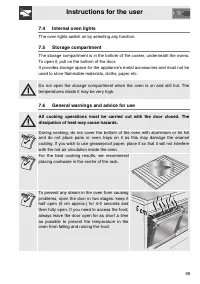
Page 17 - Internal oven lights; The oven lights switch on by selecting any function.; Storage compartment
Instructions for the user 69 7.4 Internal oven lights The oven lights switch on by selecting any function. 7.5 Storage compartment The storage compartment is in the bottom of the cooker, underneath the ovens.To open it, pull on the bottom of the door.It provides storage space for the appliance’s met...
Page 18 - FUNCTION KEY LIST
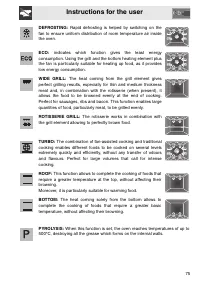
Instructions for the user 70 To prevent excessive amounts of condensation from forming on the internalglass, hot food should not be left inside the oven for too long after cooking. While cooking desserts or vegetables, excessive condensation may formon the glass. In order to avoid this, open the doo...
Page 19 - Analogue clock operation
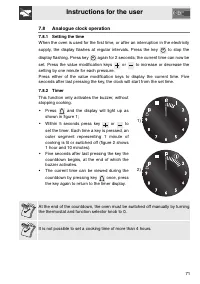
Instructions for the user 71 7.8 Analogue clock operation 7.8.1 Setting the time When the oven is used for the first time, or after an interruption in the electricity supply, the display flashes at regular intervals. Press the key to stop the display flashing. Press key again for 2 seconds; the curr...
Page 20 - Programming
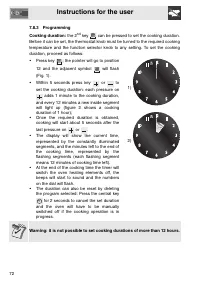
Instructions for the user 72 7.8.3 Programming Cooking duration: the 2 nd key can be pressed to set the cooking duration. Before it can be set, the thermostat knob must be turned to the required cookingtemperature and the function selector knob to any setting. To set the cookingduration, proceed as ...
Page 21 - Display brightness reduction
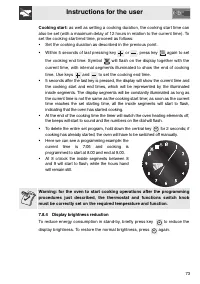
Instructions for the user 73 Cooking start: as well as setting a cooking duration, the cooking start time can also be set (with a maximum delay of 12 hours in relation to the current time). Toset the cooking start/end time, proceed as follows: • Set the cooking duration as described in the previous ...
Page 24 - Cooking advice and instructions; General advice; to achieve uniform cooking at all heights.; Advice for cooking meat; quality of the food and to consumer taste.; Advice for cooking desserts and biscuits; consistency of the dough.
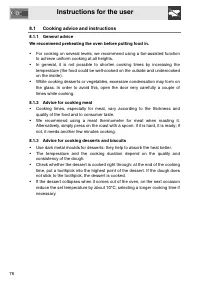
Instructions for the user 76 8.1 Cooking advice and instructions 8.1.1 General advice We recommend preheating the oven before putting food in. • For cooking on several levels, we recommend using a fan-assisted function to achieve uniform cooking at all heights. • In general, it is not possible to sh...
Page 25 - Advice for cooking with the Grill and the Fan-assisted grill; recommend that you preheat the oven before grilling.; To save energy
Instructions for the user 77 8.1.4 Advice for cooking with the Grill and the Fan-assisted grill • Using the Grill function (where present), meat can be grilled even when it is put into the cold oven; preheating is recommended if you wish to change theeffect of the cooking. • With the Fan-assisted gr...
Page 26 - TYPES OF FOOD; FIRST COURSES
Instructions for the user 78 8.3 Cooking table (main oven) TYPES OF FOOD WEIGHT FUNCTION FIRST COURSES LASAGNE 3-4 kg Static OVEN-BAKED PASTA 2 kg Static MEAT ROAST VEAL 1.2 kg Fan-assisted static LOIN OF PORK 1.2 kg Fan-assisted static SHOULDER OF PORK 1.2 kg Turbo ROAST RABBIT 1.2 kg Circular TURK...
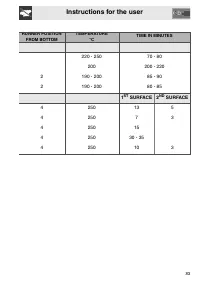
Page 27 - RUNNER POSITION; SURFACE 2; SURFACE
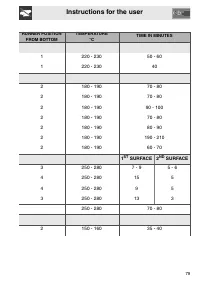
Instructions for the user 79 RUNNER POSITION FROM BOTTOM TEMPERATURE °C TIME IN MINUTES 1 220 - 230 50 - 60 1 220 - 230 40 2 180 - 190 70 - 80 2 180 - 190 70 - 80 2 180 - 190 90 - 100 2 180 - 190 70 - 80 2 180 - 190 80 - 90 2 180 - 190 190 - 210 2 180 - 190 60 - 70 1 ST SURFACE 2 ND SURFACE 3 250 - ...
Page 28 - PIZZA
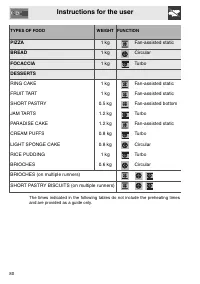
Instructions for the user 80 TYPES OF FOOD WEIGHT FUNCTION PIZZA 1 kg Fan-assisted static BREAD 1 kg Circular FOCACCIA 1 kg Turbo DESSERTS RING CAKE 1 kg Fan-assisted static FRUIT TART 1 kg Fan-assisted static SHORT PASTRY 0.5 kg Fan-assisted bottom JAM TARTS 1.2 kg Turbo PARADISE CAKE 1.2 kg Fan-as...
Page 30 - MEAT
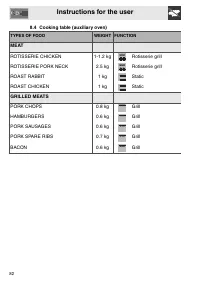
Instructions for the user 82 8.4 Cooking table (auxiliary oven) TYPES OF FOOD WEIGHT FUNCTION MEAT ROTISSERIE CHICKEN 1-1.2 kg Rotisserie grill ROTISSERIE PORK NECK 2.5 kg Rotisserie grill ROAST RABBIT 1 kg Static ROAST CHICKEN 1 kg Static GRILLED MEATS PORK CHOPS 0.8 kg Grill HAMBURGERS 0.6 kg Gril...
Page 32 - CLEANING AND MAINTENANCE; Cleaning the surfaces; pour the product onto a damp cloth and wipe the surface, rinse; Food stains or residues
Instructions for the user 84 9. CLEANING AND MAINTENANCE Do not use steam jets to clean the appliance. The steam could reach theelectronics, damaging them and causing short-circuits. WARNING: For your safety, you are advised to wear protective gloveswhile performing any cleaning or extraordinary mai...
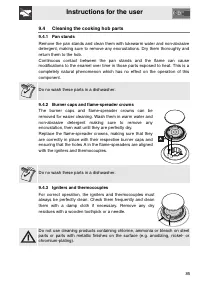
Page 33 - Cleaning the cooking hob parts; Do no wash these parts in a dishwasher.
Instructions for the user 85 9.4 Cleaning the cooking hob parts 9.4.1 Pan stands Remove the pan stands and clean them with lukewarm water and non-abrasivedetergent, making sure to remove any encrustations. Dry them thoroughly andreturn them to the hob.Continuous contact between the pan stands and th...
Page 34 - Cleaning the oven; • For easier cleaning, the door can be removed (see “10.3 Removing the; Removing guide frames; slide it out of the seats
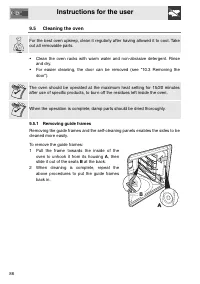
Instructions for the user 86 9.5 Cleaning the oven For the best oven upkeep, clean it regularly after having allowed it to cool. Takeout all removable parts. • Clean the oven racks with warm water and non-abrasive detergent. Rinse and dry. • For easier cleaning, the door can be removed (see “10.3 Re...
Page 35 - Cleaning the door glazing
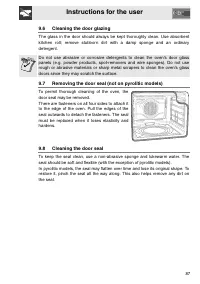
Instructions for the user 87 9.6 Cleaning the door glazing The glass in the door should always be kept thoroughly clean. Use absorbentkitchen roll; remove stubborn dirt with a damp sponge and an ordinarydetergent. Do not use abrasive or corrosive detergents to clean the oven's door glasspanels (e.g....
Page 36 - Pyrolysis: automatic oven cleaning; Before starting the automatic cleaning cycle; , it should be cleaned in
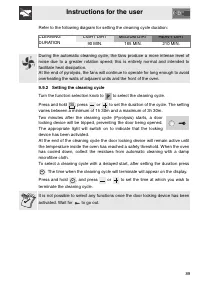
Instructions for the user 88 9.9 Pyrolysis: automatic oven cleaning Pyrolysis may be carried out at any time of the day or night (if you wish to benefitfrom the lower cost of electricity overnight). During the first automatic cleaning cycle, unpleasant odours may occur due tothe normal evaporation o...
Page 38 - TRAORDINARY MAINTENANCE; Replacing the light bulb
Instructions for the user 90 10. EX TRAORDINARY MAINTENANCE The oven requires periodic minor maintenance or replacement of parts subjectto wear, such as gaskets, light bulbs, etc. Specific instructions for each operationof this kind are given below. Before any intervention that requires access to li...
Page 39 - Removing the door; are resting completely in
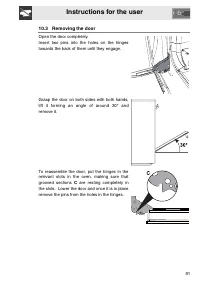
Instructions for the user 91 10.3 Removing the door Open the door completely.Insert two pins into the holes on the hingestowards the back of them until they engage. Grasp the door on both sides with both hands,lift it forming an angle of around 30° andremove it. To reassemble the door, put the hinge...
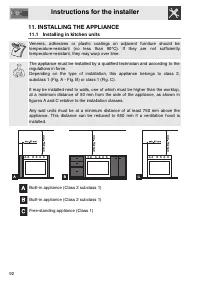
Page 40 - Instructions for the installer; INSTALLING THE APPLIANCE; Installing in kitchen units
Instructions for the installer 92 11. INSTALLING THE APPLIANCE 11.1 Installing in kitchen units Veneers, adhesives or plastic coatings on adjacent furniture should betemperature-resistant (no less than 90°C). If they are not sufficientlytemperature-resistant, they may warp over time. The appliance m...
Page 41 - Room ventilation and combustion extraction
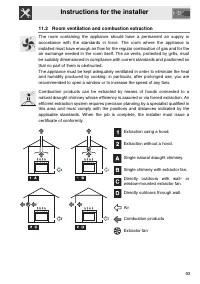
Instructions for the installer 93 11.2 Room ventilation and combustion extraction The room containing the appliance should have a permanent air supply inaccordance with the standards in force. The room where the appliance isinstalled must have enough air flow for the regular combustion of gas and fo...
Page 43 - do not try to
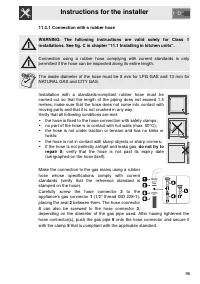
Instructions for the installer 95 11.3.1 Connection with a rubber hose WARNING: The following instructions are valid solely for Class 1installations. See fig. C in chapter “11.1 Installing in kitchen units”. Connection using a rubber hose complying with current standards is onlypermitted if the hose...
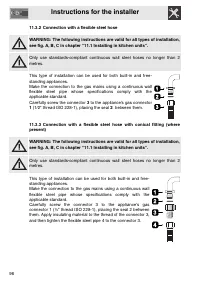
Page 44 - Connection with a flexible steel hose; to the appliance’s gas connector
Instructions for the installer 96 11.3.2 Connection with a flexible steel hose WARNING: The following instructions are valid for all types of installation,see fig. A, B, C in chapter “11.1 Installing in kitchen units”. Only use standards-compliant continuous wall steel hoses no longer than 2metres. ...
Page 45 - Electrical connection; NEVER UNPLUG BY PULLING ON THE CABLE.; accessible position close to the appliance.; The manufacturer declines all responsibility; for damage to persons or things
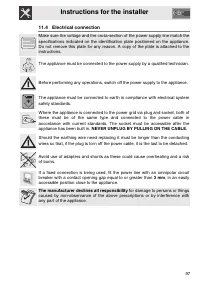
Instructions for the installer 97 11.4 Electrical connection Make sure the voltage and the cross-section of the power supply line match thespecifications indicated on the identification plate positioned on the appliance.Do not remove this plate for any reason. A copy of the plate is attached to thei...
Page 46 - POSSIBLE; • Position the skirt above the top, taking
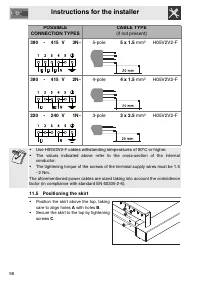
Instructions for the installer 98 POSSIBLE CONNECTION TYPES CABLE TYPE (if not present) 380 - 415 V 3N~ 5-pole 5 x 1.5 mm² H05V2V2-F 380 - 415 V 2N~ 4-pole 4 x 1.5 mm² H05V2V2-F 220 - 240 V 1N~ 3-pole 3 x 2.5 mm² H05V2V2-F • Use H05V2V2-F cables withstanding temperatures of 90°C or higher.• The valu...
Page 47 - Positioning and levelling the appliance; from the
Instructions for the installer 99 11.6 Positioning and levelling the appliance After making the electrical and/or gas connections, properly levelthe appliance on the floor to ensure better stability. Screw orunscrew the bottom part of the foot until the appliance is stable andlevel on the floor. 11....
Page 48 - ADAPTATION TO DIFFERENT TYPES OF GAS; Appliance set for gas:; Replacing the hob nozzles; Unscrew the nozzles using a 7 mm socket wrench.
Instructions for the installer 100 12. ADAPTATION TO DIFFERENT TYPES OF GAS BEFORE PERFORMING ANY OPERATIONS, SWITCH OFF THE POWERSUPPLY TO THE APPLIANCE. Appliance set for gas: NATURAL GAS G20 (2H) 20 mbar pressure (see label on product) In case of operation with types of gas other than that set in...
Page 49 - Burner and nozzle characteristics table
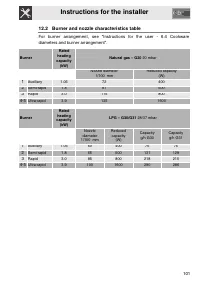
Instructions for the installer 101 12.2 Burner and nozzle characteristics table For burner arrangement, see “Instructions for the user - 6.4 Cookwarediameters and burner arrangement”. Burner Rated heating capacity (kW) Natural gas – G20 20 mbar Nozzle diameter 1/100 mm Reduced capacity (W) 1 Auxilia...
Page 50 - Final operations; Adjusting the minimum setting for natural and city gas
Instructions for the installer 102 12.3 Final operations After replacing the nozzles, reposition the flame-spreader crowns, the burnercaps and the pan stands. Following adjustment to a gas other than the one originally set in the factory,replace the gas setting label fixed to the appliance with the ...
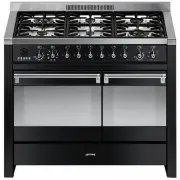


 Smeg A1C-6
User Manual
Smeg A1C-6
User Manual
 Smeg A1C-7
User Manual
Smeg A1C-7
User Manual
 Smeg A2-8
User Manual
Smeg A2-8
User Manual
 Smeg A5-8
User Manual
Smeg A5-8
User Manual
 Smeg B901GMXI9
User Manual
Smeg B901GMXI9
User Manual
 Smeg C95GMCA9-1
User Manual
Smeg C95GMCA9-1
User Manual
 Smeg CPF30UGGWH
User Manual
Smeg CPF30UGGWH
User Manual
 Smeg CPF36UGGWH
User Manual
Smeg CPF36UGGWH
User Manual
 Smeg CPF36UGMAN
User Manual
Smeg CPF36UGMAN
User Manual
 Smeg CPF48UGMBL
User Manual
Smeg CPF48UGMBL
User Manual
 Smeg CS19-7
User Manual
Smeg CS19-7
User Manual
 Smeg CS19A-7
User Manual
Smeg CS19A-7
User Manual
 Smeg CS19B-6
User Manual
Smeg CS19B-6
User Manual
 Smeg CS19P-6
User Manual
Smeg CS19P-6
User Manual
 Smeg CS19P-9
User Manual
Smeg CS19P-9
User Manual
 Smeg CS19RW-6
User Manual
Smeg CS19RW-6
User Manual
 Smeg CS19RW-7
User Manual
Smeg CS19RW-7
User Manual
 Smeg CX60ISVT9
User Manual
Smeg CX60ISVT9
User Manual
 Smeg FS61XNG8-1
User Manual
Smeg FS61XNG8-1
User Manual