Page 3 - Руководство пользователя робота-пылесоса Roborock E4; Roborock E4 Robot Vacuum Cleaner User Manual
01 30 Руководство пользователя робота-пылесоса Roborock E4 Внимательное прочитайте это руководство пользователя перед использованием устройства и сохраните его в надежном месте. Roborock E4 Robot Vacuum Cleaner User Manual Read this user manual carefully before using this product and store it proper...
Page 4 - Troubleshooting
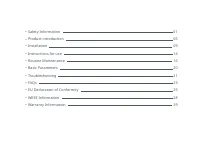
010509141620 23252829 21 Safety InformationProduct introductionInstallationInstructions for useRoutine MaintenanceBasic Parameters FAQsEU Declaration of ConformityWEEE InformationWarranty Information Troubleshooting •••••••••••
Page 5 - Restrictions; Safety Information
• This product is designed for indoor floor cleaning only, do not use it outdoors (such as on an open-ended terrace), on any surface other than the ground (such as a sofa), or in any commercial or industrial environment. • Do not use this product on elevated surfaces without barriers such as the flo...
Page 8 - Roborock robot vacuum cleaner troubleshooting; conjunction with any other antenna or transmitter.
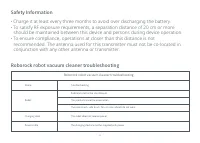
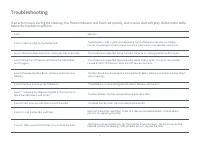
Roborock robot vacuum cleaner troubleshooting Name Robot Charging dock The robot does not receive power The main brush, side brush, fan, or main wheels do not work The product cannot be powered on Problem listed in the User Manual Power cable The charging dock cannot be supplied with power Troublesh...
Page 9 - Robot; Product introduction; Power Indicator
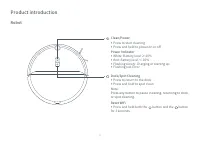
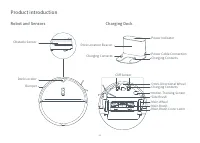
Robot Product introduction Clean/Power • Press to start cleaning • Press and hold to power on or off Power Indicator • White: Battery level ≥ 20% • Red: Battery level < 20% • Flashing slowly: Charging or starting up • Flashing red: Error Dock/Spot Cleaning • Press to return to the dock • Press and ho...
Page 10 - Parts List; Charging Dock
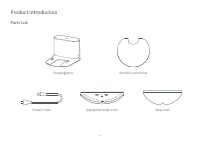
Parts List Product introduction 06 Charging Dock Moisture-proof mat Power Cable Adjustable water tank Mop cloth
Page 11 - Speaker
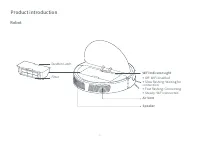
Robot Filter Dustbin Latch Speaker Air Vent WiFi Indicator Light • Off: WiFi disabled • Slow flashing: Waiting for connection • Fast flashing: Connecting • Steady: WiFi connected Product introduction 07
Page 12 - Robot and Sensors
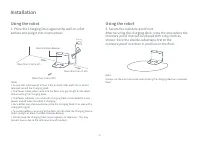
Robot and Sensors Product introduction Charging Dock Side Brush Omni-Directional Wheel Bumper Charging Contacts Motion Tracking Sensor Main Brush Main Wheel Main Brush Cover Latch Cliff Sensor Obstacle Sensor Dock Locator Power Indicator Charging Contacts Power Cable Connection Charging Contacts Dock...
Page 13 - Installation; Using the robot
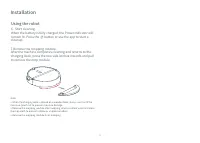
More than 0.5m (1.6ft) More than 0.5m (1.6ft) More than 1.5m (4.9ft) Installation Using the robot 1. Place the Charging Dock against the wall on a flat surface and plug it into mains power. Dock Location Beacon Notes: • Ensure that a distance of at least 0.5m on both sides and 1.5m in front is retain...
Page 14 - Power Indicator color indicates
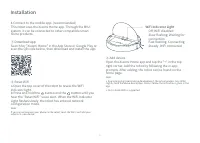
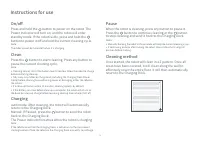
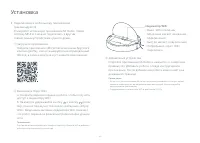
3.Power on and charge. Press and hold the button to power on. When the Power Indicator is on, place the robot on the Charging Dock to charge. This robot is equipped with a high-performance lithium-ion rechargeable battery pack. To maintain battery performance, keep the battery charged. Note:The robo...
Page 15 - Download app
Installation ② Reset WiFi a.Open the top cover of the robot to reveal the WiFi indicator light. b.Press and hold the button and the button until you hear the "Reset WiFi" voice alert. When the WiFi Indicator Light flashes slowly, the robot has entered network configuration mode. Note:If you ca...
Page 17 - When the battery is fully charged, the Power Indicator will; After the machine completes cleaning and returns to the
Using the robot 6. Start cleaning. When the battery is fully charged, the Power Indicator will remain lit. Press the button or use the app to start a cleanup. Note: • When the charging dock is placed on a wooden floor, always use it with the moisture-proof mat to prevent moisture damage. • Remove the...
Page 18 - Instructions for use; Cleaning method; Charging
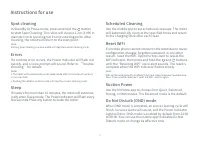
Instructions for use Cleaning method Once started, the robot will clean in a Z pattern. Once all areas have been covered, it will clean along the wall to effectively cover the entire floor. It will then automatically return to the Charging Dock. On/off Press and hold the button to power on the robot. T...
Page 20 - Routine Maintenance; Dustbin and Filter
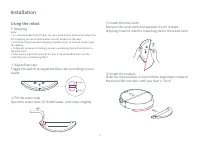
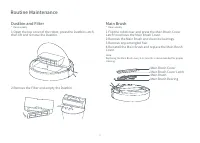
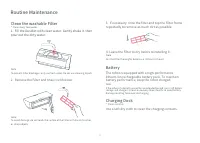
Routine Maintenance Main Brush Cover Latch Main Brush CoverMain Brush Main Brush Bearing Dustbin and Filter * Clean weekly 1.Open the top cover of the robot, press the Dustbin Latch, then lift and remove the Dustbin. 2.Remove the Filter and empty the Dustbin. Main Brush * Clean weekly 1.Flip the rob...
Page 21 - Battery; Fill the Dustbin with clean water. Gently shake it, then
Routine Maintenance Note:To avoid damage, do not touch the surface of the Filter with hands, brushes, or sharp objects. Battery The robot is equipped with a high-performance lithium-ion rechargeable battery pack. To maintain battery performance, keep the robot charged. Note:If the robot is to be lef...
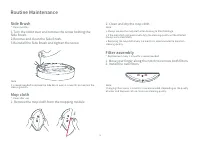
Page 22 - Side Brush; Turn the robot over and remove the screw holding the; Mop cloth; Remove the mop cloth from the mopping module.; Filter assembly; Move your finger along the notch to remove both filters.
Routine Maintenance Side Brush * Clean monthly 1.Turn the robot over and remove the screw holding the Side Brush. 2.Remove and clean the Side Brush. 3.Reinstall the Side Brush and tighten the screw. Note:It is recommended to replace the Side Brush every 3-6 months to maintain the cleaning quality. M...
Page 25 - below for resolution options.
Troubleshooting If an error occurs during the cleanup, the Power Indicator will flash red quickly, and a voice alert will play. Refer to the table below for resolution options. Error Error 8: Clear away any obstacles around the robot. Solution The robot may be stuck. Clear any obstacles around it. Er...
Page 26 - WIFI Specification
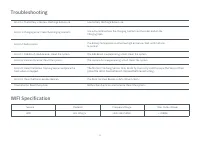
Troubleshooting Error 18: Vacuum fan error. Reset the system. The vacuum fan is experiencing a fault. Reset the system. Error 12: The battery is too low. Recharge before use. Low battery. Recharge before use. Error 13: Charging error. Clean the charging contacts. Use a dry cloth to clean the Chargin...
Page 27 - FAQs
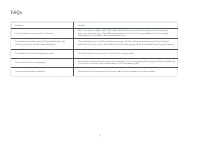
FAQs Problem Unable to power on Unable to connect to WiFi Solution The battery level is low. Put the robot on the Charging Dock to charge it before use. The battery temperature is too low or too high. Only use the robot within the range of 4-40°C (39-104°F). Unable to charge If the Charging Dock is ...
Page 29 - EU Declaration of Conformity
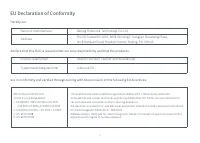
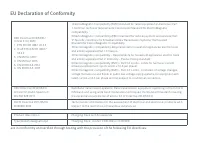
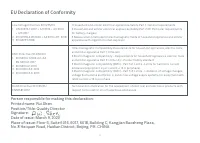
Hereby we: Name of manufacturer Address Beijing Roborock Technology Co.,Ltd.Floor6, Suite6016, 6017, 6018, BuildingC, Kangjian Baosheng Plaza, No.8 Heiquan Road, Haidian District, Beijing, P.R.CHINA declare that this DoC is issued under our sole responsibility and that the products: Product descriptio...
Page 31 - Person responsible for making this declaration:
Low Voltage Directive 2014/35/EU1. EN 60335-1:2012 + A11:2014 + AC:2014 + A13:20172. EN 60335-2-29:2004 + A2:2010+A11: 20183. EN 62233:2008 1.Household and similar electrical appliances-Safety-Part 1: General requirements2.Household and similar electrical appliances-Safety-Part 2-29: Particular requ...
Page 32 - WEEE Information
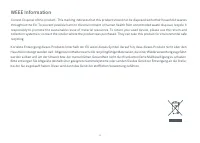
WEEE Information Correct Disposal of this product . This marking indicates that this product should not be disposed with other household wastes throughout the EU. To prevent possible harm to the environment or human health from uncontrolled waste disposal, recycle it responsibly to promote the susta...
Page 33 - Warranty Information
Warranty Information The warranty period depends on the laws of the country in which the product is sold, and the warranty is the responsibility of theseller.The warranty only covers defects in material or workmanship.The repairs under warranty may only be carried out by an authorized service centre...
Page 35 - Информация о технике безопасности; Ограничения
• Данное устройство предназначено только для уборки в помещениях. Не используйте его на улице (например, на неогороженной террасе), на иных поверхностях, кроме пола (например, на диване), и в помещениях коммерческого или производственного назначения. • Не используйте устройство на приподнятых неогор...
Page 39 - Таблица неисправностей
Элемент Основное устройство Зарядный блок Основное устройство не заряжается. Проблема с основной щеткой, боковой щеткой, вентилятором или основным колесом. Не вк лючается. Функции не работают. Шнур питания Нет питания в зарядном блоке. Неисправность Таблица неисправностей Таблица неисправностей 35
Page 40 - Робот; Знакомство с устройством
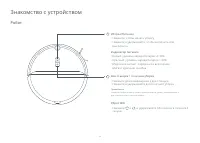
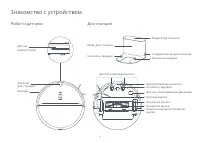
Сброс WiFi • Нажмите и , и удерживайте обе кнопки в течение 3 секунд. Робот Знакомство с устройством Уборка/Питание • Нажмите, чтобы начать уборку • Нажмите и удерживайте, чтобы вк лючить или вык лючить Индикатор питания • Белый: уровень заряда батареи ≥ 20% • Красный: уровень заряда батареи < 20...
Page 41 - Список деталей
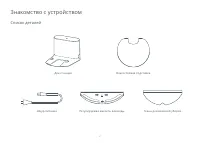
Список деталей Шнур питания Док-станция Влагостойкая подставка Регулируемая емкость для воды Ткань для влажной уборки Знакомство с устройством 37
Page 43 - Робот и датчики
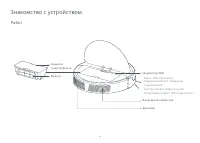
Робот и датчики Док-станция Боковая щетка Всенаправленное колесо Бампер Контакты зарядки Датчик отслеживания движения Основная щетка Основное колесо Защелка крышки основной щетки Датчик перепада высоты Датчик препятствий Локатор док-станции Индикатор питания Контакты зарядки Соединение шнура питания...
Page 44 - Установка; Использование робота
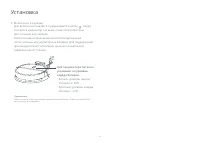
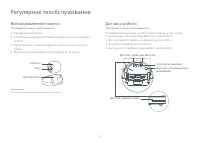
Более 0,5 м Более 0,5 м Более 1,5 м Установка Использование робота 1. Разместите док-станцию на ровной поверхности у стены и вк лючите ее в розетку электропитания. Маяк док-станции Примечания. • Убедитесь, чтобы оставалось как минимум 0,5 метра свободного места с каж дой стороны и 1,5 метра свободно...
Page 49 - Пауза; Правила эксплуатации; Способ уборки; Зарядка
Пауза Когда робот выполняет уборку, нажмите любую кнопку для приостановки. Нажмите кнопку для продолжения уборки или кнопку для остановки уборки и возвращения робота к док-станции. Правила эксплуатации Способ уборки После запуска робот начнет уборку по зигзагообразной траектории. После того, как все...
Page 51 - Регулярное техобслуживание; Пылесборник и фильтр; Снимите фильтр и опустошите пылесборник.; Основная щетка
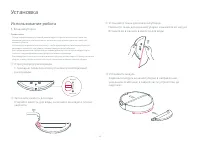
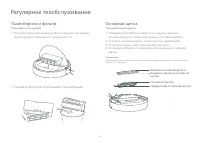
Регулярное техобслуживание Защелка крышки основной щетки Крышка основной щетки Основная щеткаПодшипник основной щетки Пылесборник и фильтр *Очищайте раз в неделю 1. Откройте верхнюю крышку робота, нажмите на защелку пылесборника, поднимите и извлеките его. 2. Снимите фильтр и опустошите пылесборник....
Page 52 - Батарея; Очистка моющегося сетчатого фильтра
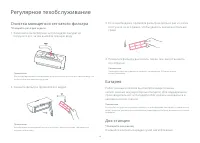
Примечание. Во избежание повреж дений не прикасайтесь к фильтру руками, щетками или острыми объектами. Батарея Робот оснащен блоком высокопроизводительных литий-ионных акк умуляторных батарей. Д ля под держания производительнос ти батарей робот должен находитьс я в заряженном сос тоянии. Примечание....
Page 53 - Боковая щетка; Ткань для влажной уборки; Фильтр в сборе
Боковая щетка * Очищайте раз в месяц 1. Переверните робота и откру тите винт, фиксирующий боковую щетку. 2. Снимите и очистите боковую щетку. 3. Установите боковую щетку на место и затяните винт. Примечание. Для улучшения качества уборки рекоменд уется менять боковую щетк у раз в 3–6 месяцев Ткань д...
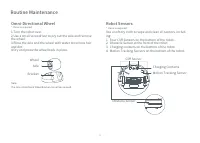
Page 54 - Всенаправленное колесо; Датчики робота
Колесо Ось Кронштейн Всенаправленное колесо * Очищайте по мере необходимости 1. Переверните робота. 2. С помощью маленькой отвертки отделите ось и снимите колесо. 3. Промойте ось и колесо водой и очистите их от волос и грязи. 4. Высушите и установите колесо обратно на место. Датчики робота *Очищайте...
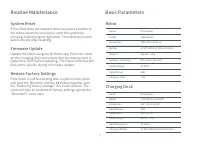
Page 55 - Основные параметры; Сброс системы
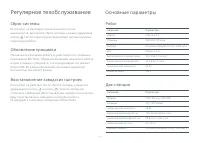
Основные параметры Робот 350×350×90,5 мм Литиевая батарея 14,4 В / 5200 мА ч Литиевая батарея 14,4 В / 5200 мА ч 58 Вт Параметры Прибл. 3,0 кг WiFi Smart Connect 14,4 В пост. тока Название Размеры roborock E4 модель Батарея Номинальная мощность Вес Беспроводное подк лючение Номинальное напряжение Вр...
Page 56 - Устранение неисправностей; оповещение. Варианты разрешение приведены в таблице ниже.
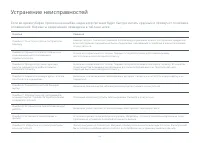
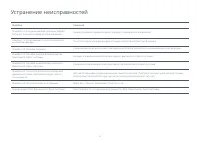
Устранение неисправностей Если во время уборки произошла ошибка, индикатор питания будет быстро мигать красным и прозвучит голосовое оповещение. Варианты разрешение приведены в таблице ниже. Ошибка Решение Ошибка 8: Устраните все препятствия вокруг робота. Возможно, робот застрял. Устраните какие-ли...
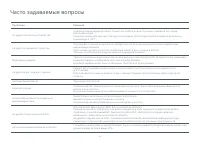
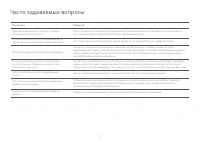
Page 58 - Часто задаваемые вопросы
Часто задаваемые вопросы Проблема Решение Не удается вк лючить устройство Низкий уровень заряда батареи. Поместите робота на док-станцию и зарядите его перед использованием. Слишком низкая или высокая температ ура батареи. Используйте робота только в диапазоне температ ур 4–40°C. Не удается зарядить...
Page 61 - Гарантийная информация
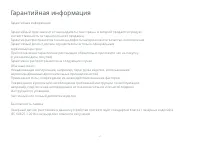
Гарантийная информация Лазерный датчик расстояния в данном устройстве соответствует стандартам К ласса I лазерных изделий в IEC 60825-1:2014 и не выделяет опасного излучения Безопасность лазера Гарантийная информация Гарантийный срок зависит от законодательства страны, в которой продается продукт, и...
Page 62 - Правила и условия монтажа, хранения, перевозки; Прибор не требует какого-либо монтажа или постоянной фиксации.
Правила и условия монтажа, хранения, перевозки (транспортировки), реализации и утилизации Прибор не требует какого-либо монтажа или постоянной фиксации. Хранение и перевозка прибора должны осуществляться в сухих местах. Реализация прибора должна производиться согласно действующему законодательству Р...
Page 64 - Robot Vacuum Cleaner
Робот-пылесос Производитель: Beijing Roborock Technology Co., Ltd.Модель прод укта: roborock E4А дрес производителя: Floor 6, Suite 6016, 6017, 6018, Building C, Kangjian Baosheng Plaza, No. 8 Heiquan Road, Haidian District, Beijing, Китайская Народная Республика Дополнительную информацию о прод укт...