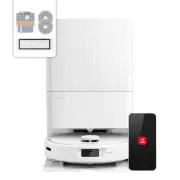
Page 2 - Roborock Q Revo; Robotic Vacuum Cleaner User Manual
Roborock Q Revo Read this user manual with diagrams carefully before using this product and store it properly for future reference. Robotic Vacuum Cleaner User Manual
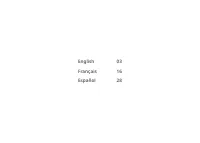
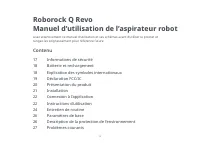
Page 4 - Contents; English
03 04 Safety Information 05 Battery and Charging 05 International Symbols Explanation 06 FCC/IC Statement 07 Product Overview 08 Installation08 Connecting to the App 09 Instructions for Use 11 Routine Maintenance 12 Basic Parameters 13 Environmental Protection Description 14 Common Issues Contents E...
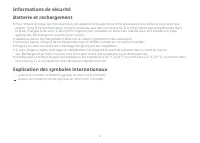
Page 6 - International Symbols Explanation
05 Safety InformationBattery and Charging • To reduce the risk of electric shock, this appliance has a polarized plug (one blade is wider than the other). This plug will fit in a polarized outlet only one way. If the plug does not fit fully in the outlet, reverse the plug. If it still does not fit, ...
Page 8 - Product Overview
07 Product Overview A • Press to return to dock/start emptying • Press and hold to start spot cleaning/ wash mop —Dock • Press and hold to turn the robot on or off • Press to start cleaning —Power/Clean • White: Battery level ≥ 20% • Red: Battery level < 20% • Pulsing: Charging or starting up • F...
Page 9 - Connecting to the App
08 B4 Power on and Charge the Robot Press and hold the button to power on the robot. Wait until the power light is steady, and then place the robot on the dock to charge. The robot is equipped with a built-in high-performance lithium- ion rechargeable battery pack. To maintain battery performance, k...
Page 10 - Instructions for Use
09 1. Open the top cover and find the WiFi indicator. ❷ Reset WiFi Option 2: Search for “Mi Home” in the App Store or Google Play or scan the QR code to download and install the app. Instructions for Use C Press and hold the button to turn on the robot. The power indicator will turn on and the robot...
Page 12 - Routine Maintenance
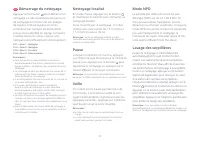
11 Routine Maintenance D * Clean every 2 weeks and replace every 6-12 months D1-1—Main Brush Cover D1-2—Latches D1-3—Main Brush D1-4—Main Brush Caps D1-5—Main Brush BearingD1-6— Turn over the robot and press the latches to remove the main brush cover. D1-7— Pull out the main brush and remove the mai...
Page 13 - Basic Parameters
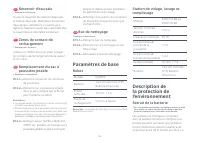
12 D9 Moving Dock Lift up and move the dock. Do not move the dock by lifting dock base, water tank handles or dust container cover directly to prevent the dock from falling off. Notes: • The dust bag handle seals the bag on removal to prevent leakage. • Always install a dust bag before closing the d...
Page 14 - Removing the battery; Environmental
13 Removing the battery The chemical substances contained in the built-in lithium-ion battery of this product can cause environmental pollution. Before disposing of this product, remove the battery. The battery should then be properly recycled either through local authorities or by providing the bat...
Page 15 - Common Issues
14 Common Issues Unable to power on. • The battery level is low. Put the robot on the charging dock and charge it before use. • The battery temperature is too low or too high. Only use the robot within the range of 4-40°C (39-104°F). Unable to charge. • Check the power indicator light turns on and b...
Page 17 - Contenu; Français
16 17 Informations de sécurité 18 Batterie et rechargement 18 Explication des symboles internationaux 19 Déclaration FCC/IC 20 Présentation du produit 21 Installation22 Connexion à l’application 22 Instructions d’utilisation 24 Entretien de routine 26 Paramètres de base 26 Description de la protecti...
Page 19 - Explication des symboles internationaux
18 Informations de sécuritéBatterie et rechargement • Pour réduire le risque de choc électrique, cet appareil est équipé d’une fiche polarisée (une broche est plus large que l’autre). Cette fiche n’entrera dans une prise polarisée que dans un seul sens. Si la fiche n’entre pas complètement dans la p...
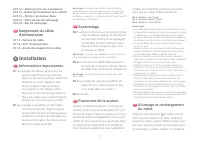
Page 22 - Installation
21 A10-14—Fente pour le sac à poussière A10-15—Balise de localisation de la station A10-16—Flotteur de niveau d’eau A10-17—Filtre du bac de nettoyage A10-18—Bac de nettoyage A11 Rangement du câble d’alimentation A11-1—Sorties du câble A11-2—Port d’alimentation A11-3—Fente de rangement du câble B1-2—...
Page 23 - Ajout d’un appareil; Connexion à l’application; Téléchargement de l’application
22 Instructions d’utilisation C Appuyez sur le bouton et maintenez-le enfoncé pour allumer le robot. Le voyant d’alimentation s’allumera et le robot entrera en mode Veille. Appuyez sur le bouton et maintenez-le enfoncé pour éteindre le robot et mettre fin au cycle de nettoyage. Marche/Arrêt Le robot...
Page 25 - Entretien de routine
24 D1-1—Cache de la brosse principale D1-2—Loquets D1-3—Brosse principale D1-4—Capuchons de la brosse principale D1-5—Roulement de la brosse principaleD1-6— Retournez le robot et appuyez sur les loquets pour retirer le cache de la brosse principale. D1-7— Tirez sur la brosse principale pour la sorti...
Page 28 - Problèmes courants
27 Remarques : • Avant de retirer la batterie, assurez-vous qu’elle est entièrement épuisée et que le robot est déconnecté de sa station. • Retirez l’ensemble du bloc-batterie. Veillez à ne pas endommager le boîtier du bloc-batterie pour éviter tout court-circuit ou toute fuite de substances dangere...
Page 29 - Contenido; Español
28 29 Información de seguridad 30 Batería y carga 30 Explicación de símbolos internacionales 31 Declaración de FCC/IC 32 Descripción general del producto 33 Instalación34 Conexión con la aplicación 34 Instrucciones para el uso 36 Mantenimiento rutinario 38 Parámetros básicos 38 Descripción de protec...
Page 31 - Explicación de símbolos internacionales
30 Información de seguridadBatería y carga • Para reducir el riesgo de descarga eléctrica, este dispositivo tiene un enchufe polarizado (un borne es más ancho que el otro). Este enchufe entrará en un tomacorriente polarizado solo de un lado. Si el enchufe no cabe totalmente en el tomacorriente, debe...
Page 32 - Declaración de FCC/IC
31 Declaración de FCC/IC Información de cumplimiento Nombre del producto Aspiradora robot con base de cargaModelo de la aspiradora robot: QX0PEA Base de Vaciado, Lavado y Llenado: EWFD11LRR, EWFD12LRR Modelo del producto Declaración de cumplimiento Correspondencia de parte responsable en EE. UU. Rob...
Page 34 - Instalación
33 Cuando utilice el robot por primera vez, sígalo todo el recorrido de limpieza y verifique que no haya problemas potenciales. El robot podrá limpiar por sí solo en los futuros usos. Nota: Instalación B B1-1— Ordene los cables, objetos duros o filosos (como uñas y vidrio) y artículos sueltos del pi...
Page 35 - Conexión con la aplicación; Descargar la aplicación; Instrucciones para; Llenar el tanque de agua
34 Conexión con la aplicación Este robot admite tanto la aplicación Roborock como la aplicación Mi Home. Elija la que mejor se adapte a sus necesidades. Opción 1: busque "Roborock" en App Store o en Google Play o bien escanee el código QR para descargar e instalar la aplicación. ❶ Descargar ...
Page 39 - Parámetros básicos; Robot; Descripción de; Problemas comunes
38 D12-3— Limpie alrededor del filtro con un paño seco. Instale una nueva bolsa de polvo desechable en su lugar a lo largo de la ranura y despliegue la bolsa de polvo para maximizar el desempeño de vaciado. Modelo EWFD11LRR o EWFD12LRR Voltaje de entrada nominal 120 V~ Frecuencia nominal 60 Hz Entra...