Philips HR7778-03 - User Manual
Philips HR7778-03 Food Processor – User Manual, read for free online in PDF format. We hope this helps you resolve any issues you may have. If you have further questions, please contact us through the contact form.

English
1 Before first use
Before you use the appliance and accessories for the first time, thoroughly
clean the parts that come into contact with food.
To explore more helpful tips and basic recipes online, you can:
1
Go to www.philips.com.
2
Click the search button
on the homepage.
3
Type the product number “HR7776, HR7777 or HR7778” in the search
box.
4
Find or download the information you need from the searching result.
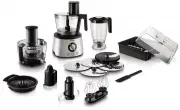
2 Overview (Fig. 1)
a
Food processor pusher
b
Food processor bowl lid
c
Blade unit
d
Drive shaft
e
Food processor bowl
f
Motor unit
g
Kneading accessory
h
Double balloon beater
i
Reversible shredding disc
j
Adjustable slicing disc
k
Julienne disc (HR7778 only)
l
Granulating disc (HR7778 only)
m
French fry disc (HR7778 only)
n
Citrus press cone
o
Citrus press sieve
p
Mini juicer pusher
q
Mini juicer lid
r
Mini juicer filter
s
Mini juicer base
t
Mini chopper jar
u
Seal ring
v
Detachable blade unit for mini
chopper or blender
w
Maxi juicer pusher
x
Maxi juicer lid
y
Maxi juicer filter
z
Maxi juicer bowl
{
Base unit of maxi juicer bowl
|
Measuring cup
}
Blender lid
~
Blender jar
Seal ring
€
Detachable blade unit for
blender
or mini chopper
Tray cover
‚
Storage tray
ƒ
Spatula
„
Cleaning brush
3 Food processor
General Assembly
Before you use or assemble any of the accessories, make sure that you
assemble according to Fig. 2 to 10.
1
Turn the bowl clockwise until you hear a click to fix it onto the motor
unit.
2
Assemble the accessory or the accessory equipped with the shaft to the
bowl.
3
Put the ingredients in the bowl.
•
For the citrus press, press the citrus fruits on the cone, and go to
Step 5.
4
Put the lid on the bowl, and turn the lid clockwise until you hear a click
to fix it. Then put the pusher into the feeding tube.
•
For the discs and mini juicer, put the ingredients into the feeding
tube with the pusher.
5
Connect the power plug to the power supply.
6
Check the advised ingredient quantity and setting in Table 1. Turn the
knob to the desired speed setting.
7
After use, turn the knob to
OFF
, and then unplug the appliance.
Blade unit
Before you start, make sure that you assemble according to Fig. 2.
You can use the blade unit to chop, mix, blend, or puree ingredients. You can
also use it to mix and blend cake batters.
To remove food that sticks to the blade or to the inside of the bowl, use a
spatula to remove the excess after you switch off the appliance.
Note
•
Always put the blade unit in the bowl before you star t to add the ingredients.
•
Do not use the blade unit to chop hard ingredients, like coffee beans, turmeric, nutmeg, and
ice cubes, as this may cause the blade to get blunt.
•
Do not let the appliance run too long when you chop (hard) cheese or chocolate. Otherwise
these ingredients become too hot, star t to melt, and turn lumpy.
Kneading accessory
Before you start, make sure that you assemble according to Fig. 3.
Turn the knob to the ON position and then press the kneading preset button
to start. Press the button again to stop when the dough is formed.
Tip
•
If using High Gluten Flour, for best results, use 60g water for ever y 100g of flour, and knead at
speed 9-12 for 1.5 mins (max time).
•
The kneading preset button is equipped with an auto-stop timer to protect your
appliance from over usage.
•
The kneading preset button also has an auto cool down period after each processing
cycle. During this period, the button will blink and the function cannot be activated.
Double balloon beater
Warning
•
Do not use the double balloon beater to blend cake batters with butter or margarine. Use
the blade unit for this job. .
Before you start, make sure that you assemble according to Fig. 4.
Turn the knob to the ON position and then press the whipping/whisking
preset button
to start. Press the button again to stop when the cream or
egg whites are completely processed.
You can use the double balloon beater to whisk egg whites and to whip
cream.
Tip
•
The whipping/whisking button is equipped with an auto-stop timer to protect your
appliance from over usage.
Discs
Before you start, make sure that you pick your desired disc from following
and assemble according to Fig. 5:
Name
Purpose
Reversible shredding disc
For shredding ingredients into
thin or thick flat pieces with
the
reversible sides
Adjustable slicing disc
For slicing ingredients to the
slicing thickness you set
Julienne disc (HR7778 only) For cutting ingredients into thin
strips
Granulating disc (HR7778
only)
For granulating ingredients to
small/fine pieces
French fry disc (HR7778
only)
For
cutting ingredients into thick
strips.
Caution
•
Be careful when you handle the slicing blade of disc. It has a ver y sharp cutting edge.
•
Never use the disc to process hard ingredients, like ice cubes.
•
Do not exer t too much pressure on the pusher when you press ingredients into the feed
tube.
Note
•
Put the ingredients into the feeding tube with the pusher. Fill the feeding tube evenly for the
best results. When you have to process a large amount of ingredients, process small batches
and empty the bowl between batches.
Citrus press
Before you start, make sure that you assemble according to Fig. 6.
Note
•
Put the sieve for citrus press on the shaft in the bowl. Make sure that the projection on the
sieve is locked in the slot of the bowl handle. When the sieve is fixed correctly, you hear a
click.
•
Press the citrus fruit onto the cone. Stop pressing to remove the pulp from the sieve if
necessar y. When you finish pressing or want to remove the pulp, turn the knob to OFF and
remove the bowl from the appliance with the accessories on it.
Mini Juicer (HR7777 only)
Before you start, make sure that you assemble according to Fig. 7.
Caution
•
Do not exer t too much pressure on the pusher when you press ingredients into the feed
tube.
•
Do not fill the bowl beyond the maximum indication.
Note
•
Before processing ingredients, remove all seeds and pips from plums, apricots, peaches, and
cherries, remove all tough skins from pineapples, melons etc.
Mini chopper (Optional)
Before you start, make sure that you assemble according to Fig. 8.
You can use the mini chopper to chop coffee beans, peppercorns, nuts, herbs,
dried fruits etc.
Dried fruits such as figs can be chopped and use as toppings for yoghurt or
spread for your bread or biscuit.
For best results when processing dried black Mission figs, use max of 60 g at
speed P for 7 seconds.
Note
•
You can order a mini chopper jar and a blade unit (under ser vice code number 9965 100
56737 & 9965 100 56882) from your Philips dealer or a Philips ser vice center as extra
accessories.
•
Follow the recommendation on Table 1. Do not exceed the maximum level indicated on the
mini chopper.
Maxi Juicer (HR7778 only)
Before you start, make sure that you assemble according to Fig. 9.
You can use the maxi juicer to juice up to 1.5 kg of fruits and vegetables such
as carrots, apples, watermelon, pear, grapes, and pineapple.
Caution
•
Never inser t your hand or another object (e.g. a fork, knife, spoon, or spatula) into the feeding
tube. Only use the pusher supplied with the appliance for this purpose.
•
Wait until the sieve has completely stopped rotating before you remove the lid.
Note
•
Always check the sieve before use. Do not use the juicer if you notice any damage like cracks,
crazes, or a loose grating disc.
•
Before processing ingredients, remove all seeds and pips from plums, apricots, peaches and
cherries, remove all tough skins from pineapples, melons etc.
•
When you clamp the lid on the juicer bowl correctly, you hear a click.
Blender
Before you start, make sure that you assemble according to Fig. 10.
To crush ice, turn the knob to the ON position and then press the ice preset
button
. Press the button again to stop.
Note
•
Never open the lid to put your hand or any object in the jar while the blender is running.
•
Always assemble the sealing ring onto the blade unit before you attach the blade unit to the
blender jar.
•
To add liquid ingredients during processing, pour them into the blender jar through the
feeding hole.
•
Precut ingredients into small pieces before you process them.
•
If you want to prepare a large quantity, process small batches of ingredients instead of a large
quantity at once.
•
To avoid spillage: When you process a liquid tends to foam (for example, milk), do not put
more than 1 liter of liquid in the blender jar.
•
Put the ingredients in the blender jar within the maximum level indication.
4 Cleaning
Warning
•
Before you clean the appliance, unplug it.
Caution
•
Make sure that the cutting edges of the blades and discs do not come into contact with hard
objects. This may cause the blade to get blunt.
•
The cutting edges are sharp. Be careful when you clean the blade unit of the food processor,
the blade unit of the blender and the discs.
1
Clean the motor unit with a moist cloth.
2
Clean the other parts in hot water (< 60ºC) with some washing-up
liquid or in a dishwasher.
5 Storage
1
Push the power cord into the integrated cord storage (Fig. 12).
2
Store the product in a dry place.
3
(For HR7776 and HR7777) Put the small accessories in the food
processor bowl (Fig. 13).
4
(For HR7778) Put the kneading accessory, blade unit, double balloon
beater, spatula, and discs into the accessory storage tray (Fig. 14).
6 Guarantee and service
If you have a problem, need service, or need information, see
www.philips.com/support or contact the Philips Consumer Care Center in
your country. The phone number is in the worldwide guarantee leaflet. If
there is no Consumer Care Center in your country, go to your local Philips
dealer.
1/8
4240 002 00841
"Loading the manual" means you need to wait until the file loads and becomes available for online reading. Some manuals are very large, and the time they take to appear depends on your internet speed.