Page 2 - SPECIFICATIONS; Applicable portable power pack; SAFETY WARNINGS; Important safety instructions; Read All Instructions
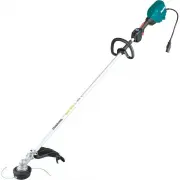
2 ENGLISH ENGLISH (Original instructions) SPECIFICATIONS Model: CRU03 Handle type Loop handle No load speed (at each rotation speed level) 3: 0 - 6,000 /min 2: 0 - 4,600 /min 1: 0 - 4,000 /min Overall length (without cutting tool) 1,783 mm (70-1/4″) Nylon cord diameter 2.0 - 2.3 mm (0.08″ - 0.09″) A...
Page 5 - SAVE THESE INSTRUCTIONS.; Symbols
5 ENGLISH 17. Cutting elements continue to rotate after the motor is switched off. 18. Do not operate power tools in explosive atmo- spheres, such as in the presence of flammable liquids, gases or dust. Power tools create sparks which may ignite the dust or fumes. 19. Take a rest to prevent loss of ...
Page 6 - Important safety instructions for; Tips for maintaining maximum
6 ENGLISH Important safety instructions for battery cartridge 1. Before using battery cartridge, read all instruc- tions and cautionary markings on (1) battery char- ger, (2) battery, and (3) product using battery. 2. Do not disassemble battery cartridge. 3. If operating time has become excessively ...
Page 7 - PARTS DESCRIPTION
7 ENGLISH PARTS DESCRIPTION 1 2 3 4 5 6 7 8 9 10 1 Speed indicator 2 ADT indicator (ADT = Automatic Torque Drive Technology) 3 Caution lamp 4 Main power button 5 Reverse button 6 Plug 7 Lock-off lever 8 Switch trigger 9 Handle 10 Protector - - - -
Page 8 - FUNCTIONAL; Tool / battery protection system; Overload protection
8 ENGLISH FUNCTIONAL DESCRIPTION WARNING: Always be sure that the tool is switched off and the portable power pack is disconnected from the tool before adjusting or checking function on the tool. Failure to switch off and disconnect the portable power pack may result in serious personal injury from ...
Page 9 - Speed adjusting; Automatic Torque Drive Technology; Reverse button for debris removal
9 ENGLISH 1 2 ► 1. Lock-off lever 2. Switch trigger Speed adjusting You can select the tool speed by tapping the main power button. Each time you tap the main power button, the level of speed will change. 2 1 ► 1. Speed indicator 2. Main power button Speed indicator Mode Rotation speed High 0 - 6,00...
Page 10 - ASSEMBLY
10 ENGLISH NOTE: During the reverse rotation, the tool operates only for a short period of time and then automatically stops. NOTE: Once the tool is stopped, the rotation returns to regular direction when you start the tool again. NOTE: If you tap the reverse button while the cutting tool is still r...
Page 11 - Installing the protector; Installing the cutting tool; OPERATION; Adjusting the working position
11 ENGLISH Installing the protector WARNING: Never use the tool without the guard illus- trated in place. Failure to do so can cause serious personal injury. CAUTION: Take care not to injure yourself on the cutter for cutting the nylon cord. Attach the protector to the clamp using bolts. 1 2 3 ► 1. ...
Page 12 - Starting the operation
12 ENGLISH 3. Insert the plug of the tool into the socket of the portable power pack.When inserting, align the triangle marking on both the plug and the socket. 1 2 3 ► 1. Plug 2. Socket 3. Triangle marking 4. Adjust the cord length using the holder as necessary. 1 ► 1. Holder The cord length is pro...
Page 13 - Correct handling of the tool
13 ENGLISH 3. Wear the shoulder harness of the portable power pack and lock the buckle on the waist belt. 4. Insert the plug of the tool into the socket of the portable power pack.When inserting, align the triangle marking on both the plug and the socket. 1 2 3 ► 1. Plug 2. Socket 3. Triangle markin...
Page 14 - Emergency detachment; MAINTENANCE; Cleaning the tool
14 ENGLISH NOTICE: The bump feed will not operate prop- erly if the nylon cutting head is not rotating. NOTE: If the nylon cord does not feed out while tapping the head, rewind/replace the nylon cord by following the procedures in the section for the maintenance. Emergency detachment CAUTION: In cas...
Page 17 - TROUBLESHOOTING; OPTIONAL ACCESSORIES; MAKITA LIMITED WARRANTY
17 ENGLISH TROUBLESHOOTING Before asking for repairs, conduct your own inspection first. If you find a problem that is not explained in the manual, do not attempt to dismantle the tool. Instead, ask Makita Authorized Service Centers, always using Makita replace - ment parts for repairs. State of abn...
Page 18 - ESPECIFICACIONES; Unidad portátil de alimentación eléctrica aplicable; ADVERTENCIAS DE; Instrucciones importantes de seguridad; Lea todas las instrucciones
18 ESPAÑOL ESPAÑOL (Instrucciones originales) ESPECIFICACIONES Modelo: CRU03 Tipo de mango Mango redondo Velocidad sin carga (en cada nivel de la velocidad de rotación) 3: 0 - 6 000 r/min 2: 0 - 4 600 r/min 1: 0 - 4 000 r/min Longitud total (sin la herramienta de corte) 1 783 mm (70-1/4″) Diámetro d...
Page 22 - GUARDE ESTAS; Símbolos; Instrucciones importantes de
22 ESPAÑOL 3. Revise si hay sujetadores que estén sueltos o piezas dañadas, tal como grietas en el cabezal de corte de nailon. 4. Siga las instrucciones para la lubricación y el cambio de los accesorios si aplica para el caso. 5. Cuando no se utilice, almacene el equipo en un lugar seco en interiore...
Page 24 - DESCRIPCIÓN DE LAS PIEZAS
24 ESPAÑOL DESCRIPCIÓN DE LAS PIEZAS 1 2 3 4 5 6 7 8 9 10 1 Indicador de velocidad 2 Indicador de ADT (ADT = Automatic Torque Drive Technology (Tecnología de acciona - miento automático de torsión)) 3 Luz indicadora de precaución 4 Botón de encendido principal 5 Botón de inversión 6 Enchufe 7 Palanc...
Page 25 - Sistema de protección para la; Interruptor de alimentación principal
25 ESPAÑOL DESCRIPCIÓN DEL FUNCIONAMIENTO ADVERTENCIA: Asegúrese siempre de que la herramienta esté apagada y la unidad portátil de alimentación eléctrica esté desconectada de la herramienta antes de realizar cualquier ajuste o revisión del funcionamiento de la herramienta. El no seguir esta indicac...
Page 26 - Ajuste de velocidad; Tecnología de accionamiento
26 ESPAÑOL PRECAUCIÓN: Antes de conectar la unidad portátil de alimentación eléctrica a la herramienta, compruebe siempre que el gatillo interruptor se accione debidamente y que regrese a la posi- ción de apagado una vez que se suelte. Usar una herramienta con un interruptor que no funciona adecuada...
Page 27 - MONTAJE; Instalación del mango
27 ESPAÑOL Botón de inversión para la eliminación de residuos ADVERTENCIA: Apague la herramienta y desconecte la unidad portátil de alimentación eléctrica de la herramienta antes de quitar la maleza o residuos que se hayan enredado y que no se puedan quitar con la función de rotación inversa. El no ...
Page 29 - OPERACIÓN; Ajuste de la posición de trabajo
29 ESPAÑOL Cabezal de corte de nailon AVISO: Asegúrese de utilizar un cabezal de corte de nailon original de Makita. 4 5 3 1 2 ► 1. Cabezal de corte de nailon 2. Eje 3. Llave hexa- gonal 4. Aflojar 5. Apretar 1. Inserte la llave hexagonal a través del orificio en la caja de engranajes para bloquear ...
Page 30 - Arranque de la operación
30 ESPAÑOL 4. Ajuste la longitud del cable mediante el sujetador, como sea necesario. 1 ► 1. Sujetador La longitud del cable está debidamente ajustada cuando:— Puede oscilar la herramienta sin obstáculo del cable; — Puede oscilar la herramienta sin que el cable quede colgando flojo; y — Puede descon...
Page 31 - Manipulación correcta de la
31 ESPAÑOL 4. Inserte el enchufe de la herramienta en el enchufe hembra de la unidad portátil de alimentación eléctrica. Cuando lo inserte, alinee la marca triangular tanto en el enchufe como en el enchufe hembra. 1 2 3 ► 1. Enchufe 2. Enchufe hembra 3. Marca triangular 5. Pulse el botón de encendid...
Page 32 - Desacople de emergencia; MANTENIMIENTO; Limpieza de la herramienta
32 ESPAÑOL Cuando utilice un cabezal de corte de nailon (de tipo golpe y alimentación) El cabezal de corte de nailon es una cabeza de desbrozadora dual con un mecanismo de golpe y alimentación. Para alimentar el cordón de nailon, golpee ligeramente el cabezal contra el suelo mientras esté girando. 1...
Page 35 - RESOLUCIÓN DE PROBLEMAS; ACCESORIOS OPCIONALES; GARANTÍA LIMITADA DE MAKITA; Ésta Garantía no aplica para México
35 ESPAÑOL RESOLUCIÓN DE PROBLEMAS Antes de solicitar alguna reparación, primero realice una inspección por su cuenta. Si detecta algún problema que no esté explicado en el manual, no intente desensamblar la herramienta. En vez de esto, solicite la reparación a un centro de servicio autorizado de Ma...
Page 36 - Makita Corporation
Makita Corporation 3-11-8, Sumiyoshi-cho, Anjo, Aichi 446-8502 Japan www.makita.com 885764-942 CRU03-1 EN, ESMX 20191107