Page 2 - Product description
Contents Introduction............................................................... 2Safety........................................................................ 4Assembly................................................................ 13Operation.....................................................
Page 3 - Symbols on the product
10.Battery charger 1 11.Battery release buttons12.Battery 2 13.Warning indicator14.Battery indicator button15.Battery status16.Power button17.Speed mode button18.Speed mode display19.Branch hook20.Combination wrench21.Operator's manual22.Transport guard23.Chain lubrication adjustment screw24.Chain o...
Page 4 - Symbols on the battery charger; Safety; Safety definitions
This product is not electrically insulated. If the product touches or comes close to high-voltage power lines it could lead to death or seri- ous injury. Electricity can jump from one point to another by arcing. The higher the voltage, the greater the distance electricity can jump. Elec- tricity can...
Page 5 - General power tool safety warnings
instructions in the manual are not obeyed. Note: Used to give more information that is necessary in a given situation. General power tool safety warnings WARNING: Read all safety warnings and all instructions. Failure to follow the warnings and instructions may result in electric shock, fire and/or ...
Page 7 - SAVE THESE; General safety instructions
may cause entanglement of your clothing or body with the saw chain. • Always hold the pole pruner with both hands. Holding the pole pruner with one hand increases the risk of personal injury and should never be done. • Wear eye protection. Further protective equipment for hearing, head, hands, legs ...
Page 8 - Safety instructions for operation
• Remove the battery to prevent the product from being started by accident. • This product is a dangerous tool if you are not careful or if you use the product incorrectly. This product can cause serious injury or death to the operator or others. • Do not use the product if it is changed from its in...
Page 13 - Safety instructions for maintenance; Assembly; Introduction
environment which has a good airflow, dry and free from dust. • Do not put objects into the cooling slots of the battery charger. • Do not connect the battery charger terminals to metal objects as this can short circuit the battery charger. • Use approved mains sockets that are not damaged. Make sur...
Page 16 - Operation
4. Pull the attachment straight out of the coupling. C To adjust the harness Always use the harness when you operate the product. The harness gives maximum control during operation of the product. The harness decreases the risk of tiredness in your arms and back.1. Put on the harness.2. Attach the p...
Page 17 - To start the product
8. Make sure the handle and safety features are in order. Never use a machine that has any parts missing or has been modified in relation to the specification. To connect the battery charger WARNING: Only use the battery charger in ambient temperatures between 41°F (5°C) and 104°F (40°C). 1. Connect...
Page 19 - To check the chain lubrication
• Whenever possible position yourself so that you can make the cut at right angles to the branch. 90° • Do not work with the shaft held straight out in front of you (like a fishing rod) as this increases the apparent weight of the cutting attachment. • Cut large branches in sections so that you have...
Page 20 - Maintenance
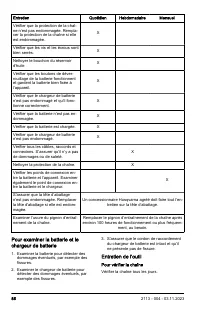
Maintenance Introduction WARNING: Read and understand the safety chapter before you do maintenance work on the product. WARNING: Remove the battery before you do maintenance on the product. Maintenance schedule WARNING: Remove the battery before you do maintenance. The following is a list of the mai...
Page 22 - To sharpen the saw chain
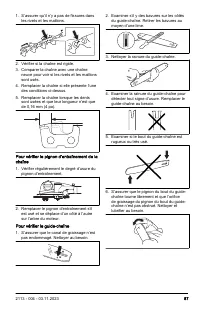
To do a check of the guide bar 1. Make sure that the oil channel is not blocked. Clean if it is necessary. 2. Examine if there are burrs on the edges of the guide bar. Remove the burrs using a file. 3. Clean the groove in the guide bar. 4. Examine the groove in the guide bar for wear. Replace the gu...
Page 26 - To clean the product, the battery and
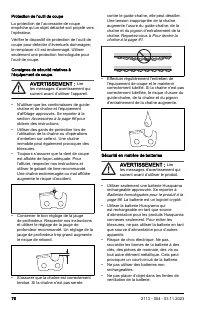
To lubricate cutting equipment WARNING: Poor lubrication of cutting equipment may cause the chain to snap, which could lead to serious, even fatal injuries. WARNING: Do not use waste oil! Waste oil is dangerous for persons, the product and for the environment. Chain oil WARNING: Poor lubrication of ...
Page 27 - Troubleshooting; Keypad
Two piece-shaft Apply grease to the end of the drive shaft after each 30 hours of operation. There is a risk that the drive shaft ends (splined coupling) on models with two-piece shafts will seize if they are not lubricated regularly. Troubleshooting Keypad Power button LED flashes Possible faults P...
Page 28 - Transportation, storage and disposal; Transportation and storage
Battery Condition Possible faults Possible procedure The battery warning LED flashes. Temperature deviation, the battery is too cold or too hot to use. Let the battery cool down or move it in- doors to warm it up. When the battery has the correct temperature, it can be used again. Use the battery in...
Page 29 - Technical data
• Put the battery and the battery charger in a space that is dry and free from moisture and frost. • Do not keep the battery in an area where static electricity can occur. Do not keep the battery in a metal box. • Put the battery in storage where the temperature is between 41 °F (5 °C) and 77 °F (25...
Page 30 - Accessories; Approved batteries for the product
Accessories Approved batteries for the product Battery BLi22 BLi30 40-B140 Type Lithium-ion Lithium-ion Lithium-ion Battery capacity, Ah 4.2 7.5 4.0 Nominal voltage, V 36 36 36 Weight, lb/kg 2.9/1.3 4.2/1.9 2.6/1.2 Approved battery chargers Battery charger QC250 40-C80 Input voltage, V 100-240 100-2...
Page 31 - Attachments
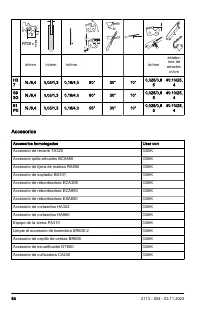
H3 7 ⅜ /6.4 0.05/1.3 0.16/4.0 80° 30° 10° 0.025/0.6 5 40:10/25. 4 S9 3G ⅜ /6.4 0.05/1.3 0.16/4.0 60° 30° 10° 0.025/0.6 5 40:10/25. 4 91 PX ⅜ /6.4 0.05/1.3 0.16/4.0 55° 30° 10° 0.025/0.6 5 40:10/25. 4 Attachments Approved attachments Use with Trimmer attachment TA320 330iK Brush cutter attachment BCA...
Page 32 - Descripción del producto
Contenido Introducción............................................................ 32Seguridad................................................................35Montaje................................................................... 45Funcionamiento....................................................
Page 33 - Símbolos en el producto
10.Cargador de la batería 3 11.Botones de liberación de la batería12.Batería 4 13.Indicador de advertencia14.Botón del indicador de batería15.Estado de la batería16.Botón de encendido17.Botón de modo de velocidad18.Pantalla de modo de velocidad19.Brazo para corte de ramas20.Llave combinada21.Manual ...
Page 35 - Seguridad; Definiciones de seguridad
Seguridad Definiciones de seguridad Las advertencias, precauciones y notas se utilizan para señalar las piezas particularmente importantes del manual. ADVERTENCIA: Se utilizan para señalar el riesgo de lesiones graves o mortales para el operador o para aquellos que se encuentren cerca si no se sigue...
Page 38 - GUARDE ESTAS; Instrucciones generales de
podadora de barra y salir despedido hacia su dirección o hacerle perder el equilibrio. • Siga las instrucciones para la lubricación, el tensado de la cadena y la sustitución de la espada y la cadena. Una cadena mal tensada o lubricada es posible que se rompa o aumente la probabilidad de reculada. • ...
Page 45 - Montaje
• Este aparato puede ser utilizado por niños de 8 años o mayores, y por personas con capacidades físicas, sensoriales o cognitivas reducidas, o que carezcan de la experiencia y los conocimientos necesarios, solo si se los supervisa o reciben instrucciones sobre el uso del aparato de manera segura y ...
Page 48 - Para llenar con aceite para cadena; Funcionamiento; Introducción
3. Ajuste la longitud del arnés hasta que el gancho de sujeción esté aproximadamente al nivel de su cadera derecha. ADVERTENCIA: Si se produce una emergencia, suelte el producto y déjelo caer en el suelo. Para llenar con aceite para cadena 1. Presione el centro de la tapa del aceite y gírela hacia l...
Page 49 - Para poner en marcha el producto
1. Conecte el cargador de baterías a una toma de corriente. El LED de carga parpadea en rojo 1 vez y en verde 1 vez. AVISO: Solo conecte el cargador de baterías a una toma de corriente con la tensión y la frecuencia que se especifican en la placa de características. 2. Conecte la batería al cargador...
Page 52 - Mantenimiento
Mantenimiento Introducción ADVERTENCIA: Asegúrese de leer y comprender el capítulo de seguridad antes de realizar trabajos de mantenimiento en el producto. ADVERTENCIA: Extraiga la batería antes de realizar mantenimiento en el producto. Programa de mantenimiento ADVERTENCIA: Retire la batería antes ...
Page 54 - Para afilar la cadena de sierra
5. Reemplace la cadena de sierra cuando la longitud de los dientes de corte se haya gastado a solo 0,16 in (4 mm). Para examinar el piñón de arrastre de la cadena 1. Compruebe regularmente el nivel de desgaste del piñón de arrastre de la cadena. 2. Reemplace el piñón de arrastre de la cadena si está...
Page 60 - Solución de problemas; Teclado
Solución de problemas Teclado El LED del botón de en- cendido parpadea Posibles fallas Posible medida Encendido ininterrumpido Batería baja. Cargue la batería. 2 parpadeos Subvoltaje. 1. Apague el producto.2. Encienda el producto nuevamen- te. 3. Si el problema persiste, comuní- quese con un taller ...
Page 61 - Transporte, almacenamiento y eliminación de residuos; Transporte y almacenamiento
Batería Estado Posibles fallas Procedimiento posible El LED de advertencia de la batería parpadea. Desviación de tempera- tura, la batería está de- masiado fría o demasia- do caliente para su uso. Deje que la batería se enfríe o muévala al interior para calentarla. Cuando la batería tenga la tempera...
Page 62 - Datos técnicos
• Utilice cinta sobre los contactos abiertos cuando coloque la batería en un paquete. Coloque firmemente la batería en el paquete para evitar el movimiento. • Retire la batería para almacenarla o transportarla. • Coloque la batería y el cargador de la batería en un lugar seco, donde no haya humedad ...
Page 63 - Accesorios
Accesorios Baterías homologadas para el producto Batería BLi22 BLi30 40-B140 Tipo Iones de litio Iones de litio Iones de litio Capacidad de la bate- ría, Ah 4,2 7,5 4,0 Voltaje nominal, V 36 36 36 Peso, lb/kg 2,9/1,3 4,2/1,9 2,6/1,2 Cargadores de batería aprobados Cargador de la batería QC250 40-C80...
Page 65 - Description de l’outil
Table des matières Introduction............................................................. 65Sécurité................................................................... 68Montage.................................................................. 78Fonctionnement........................................
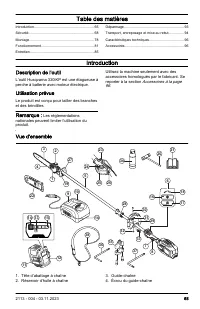
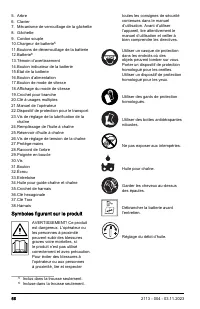
Page 66 - Symboles figurant sur le produit
5. Arbre6. Clavier7. Mécanisme de verrouillage de la gâchette8. Gâchette9. Cordon souple10.Chargeur de batterie 5 11.Boutons de déverrouillage de la batterie12.Batterie 6 13.Témoin d’avertissement14.Bouton indicateur de la batterie15.État de la batterie16.Bouton d’alimentation17.Bouton de mode de vi...
Page 67 - Symboles sur le chargeur de batterie
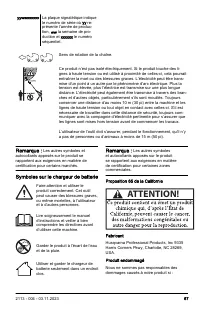
yywwxxxxxx La plaque signalétique indique le numéro de série où yy re- présente l’année de produc- tion, ww la semaine de pro- duction et xxxxxx le numéro séquentiel. Sens de rotation de la chaîne. Ce produit n’est pas isolé électriquement. Si le produit touche des li- gnes à haute tension ou est ut...
Page 68 - Sécurité; Définitions relatives à la sécurité
• Le produit n’est pas réparé de façon adéquate. • Le produit est réparé avec des pièces qui ne sont pas fournies ou homologuées par le fabricant. • Le produit comprend un accessoire qui n’est pas fourni ou homologué par le fabricant. • Le produit n’est pas réparé par un centre de service après-vent...
Page 71 - CONSERVER CES; Consignes générales de sécurité
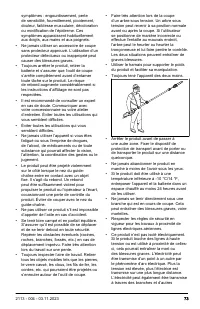
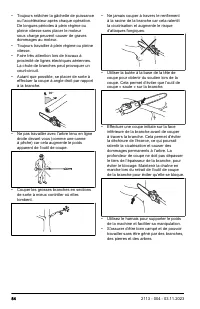
de perte d’équilibre ou de contrôle de le l’élagueuse. • Lors de la coupe d’une branche en tension, prendre garde à l’effet de rebond. Lorsque la tension présente dans les fibres du bois est relâchée, la branche peut frapper l’opérateur ou lui faire perdre le contrôle de l’élagueuse. • Toujours fair...
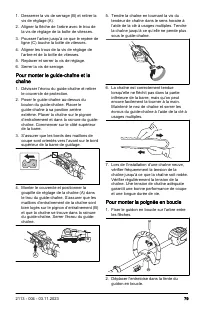
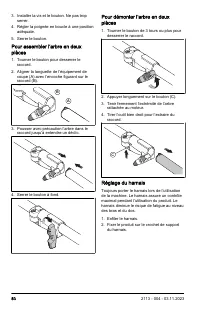
Page 78 - Montage
• Cette machine peut être utilisée par des enfants âgés de 8 ans et plus, des personnes à capacités physique, mentale ou sensorielle réduites, ou des personnes avec un manque d’expérience et de connaissances s’ils sont supervisés ou s’ils ont reçu des instructions concernant l’utilisation de l’appar...
Page 81 - Fonctionnement
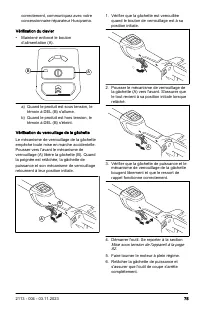
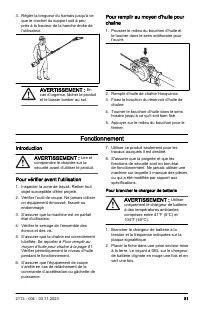
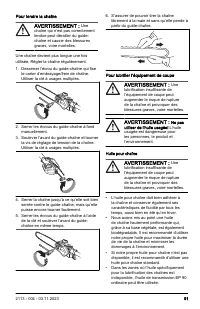
3. Régler la longueur du harnais jusqu’à ce que le crochet du support soit à peu près à la hauteur de la hanche droite de l’utilisateur. AVERTISSEMENT : En cas d’urgence, lâcher le produit et le laisser tomber au sol. Pour remplir au moyen d’huile pour chaîne 1. Pousser le milieu du bouchon d’huile ...
Page 82 - Mise sous tension de l'appareil
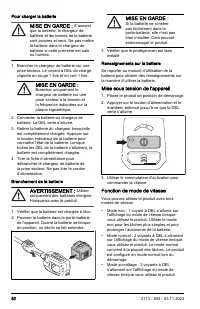
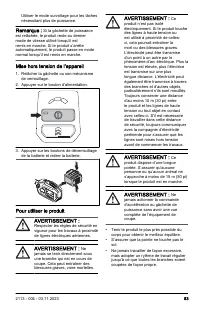
Pour charger la batterie MISE EN GARDE : S’assurer que la batterie, le chargeur de batterie et les bornes de la batterie sont propres et secs. Ne pas mettre la batterie dans le chargeur de batterie si cette première est sale ou humide. 1. Brancher le chargeur de batterie sur une prise secteur. Le vo...
Page 85 - Entretien
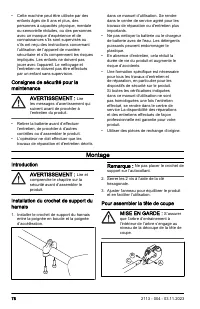
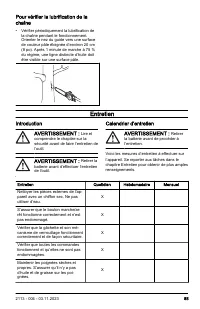
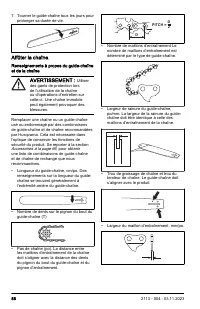
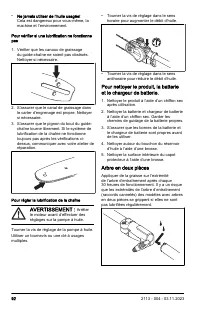
Pour vérifier la lubrification de la chaîne • Vérifier périodiquement la lubrification de la chaîne pendant le fonctionnement. Orienter le nez du guide vers une surface de couleur pâle éloignée d’environ 20 cm (8 po). Après 1 minute de marche à 75 % du régime, une ligne distincte d’huile doit être v...
Page 93 - Dépannage; Clavier
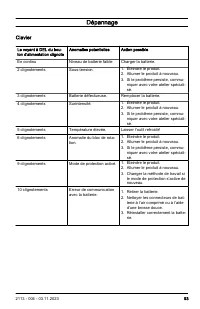
Dépannage Clavier Le voyant à DEL du bou- ton d’alimentation clignote Anomalies potentielles Action possible En continu Niveau de batterie faible Charger la batterie. 2 clignotements Sous-tension. 1. Éteindre le produit.2. Allumer le produit à nouveau.3. Si le problème persiste, commu- niquer avec v...
Page 94 - Transport, entreposage et mise au rebut; Transport et entreposage
Batterie État Anomalies potentielles Procédure possible La DEL d’avertissement de la batterie clignote. Écart de température, la batterie est trop froi- de ou trop chaude pour être utilisée. Laisser la batterie se refroidir ou la placer à l’intérieur afin de lui permettre de se ré- chauffer. Lorsque...
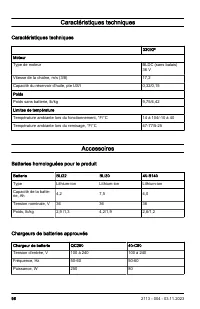
Page 96 - Caractéristiques techniques; Accessoires; Batteries homologuées pour le produit; Chargeurs de batteries approuvés
Caractéristiques techniques Caractéristiques techniques 330iKP MoteurType de moteur BLDC (sans balais) 36 V Vitesse de la chaîne, m/s (3/8) 17,2 Capacité du réservoir d’huile, pte US/l 0,32/0,15 PoidsPoids sans batterie, lb/kg 9,75/4,42 Limites de températureTempérature ambiante lors du fonctionneme...