Page 2 - Intended use
Contents Introduction............................................................... 2Safety........................................................................ 3Assembly................................................................ 11Operation.....................................................
Page 3 - Symbols on the product; Manufacturer; Safety; Safety definitions
Symbols on the product WARNING! This prod- uct can be dangerous! Careless or incorrect use can result in seri- ous or fatal injury to the operator or others. It is extremely important that you read and un- derstand the contents of the operator's man- ual. Read the operator’s manual carefully and mak...
Page 4 - Read all instructions
IMPORTANT SAFETY INSTRUCTIONS Read all instructions WARNING: Make sure to read the approved accessory manual together with this power unit's manual. WARNING: When using electric gardening products, basic safety precautions should always be followed to reduce the risk of fire, electric shock, and per...
Page 6 - Other general safety information
• The rated rotational speed of the cutter must be at least equal to the maximum rotational speed marked on the machine. Cutters running faster than their rated rotational speed can break and fly apart. • Wear eye, ear, head and hand protection. Adequate protective equipment will reduce personal inj...
Page 10 - Safety instructions for assembly
To do a check of the keypad• Push and hold the power button (A). B A a) The product is on when the LED (B) is on. b) The product is off when the LED (B) is off. To do a check of the power trigger lockoutThe power trigger lockout prevents accidental start. When you push the power trigger lockout (A) ...
Page 11 - Safety instructions for maintenance; SAVE THESE; Assembly; To assemble the loop handle
attached to the product. The harness makes operation more efficient. Safety instructions for maintenance WARNING: Read the warning instructions that follow before you do maintenance on the product. • Remove the battery before you do maintenance, other checks or assemble the product. • The operator m...
Page 12 - To disassemble the two-piece shaft; Operation; Introduction
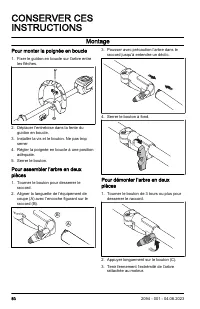
4. Tighten the knob fully. To disassemble the two-piece shaft 1. Turn the knob 3 turns or more to loosen the coupling. 2. Push and hold the button (C).3. Hold tight to the end of the shaft that the motor is attached to. 4. Pull the attachment straight out of the coupling. C Operation Introduction WA...
Page 13 - Automatic shutdown function
• Hold the product on the right side of your body. • Keep the cutting attachment below waist level. • Keep body parts away from the hot surfaces. • Keep body parts away from the cutting attachment. Before you operate the product • Examine the work area to make sure that you know the type of terrain,...
Page 14 - Maintenance
3. Push the release buttons on the battery and pull the battery out. Maintenance Introduction WARNING: Before you do any maintenance work you must read and understand the safety chapter. Maintenance schedule WARNING: Remove the battery before you do maintenance. The following is a list of the mainte...
Page 15 - Troubleshooting; Keypad
To clean the product, the battery and the battery charger 1. Clean the product with a dry cloth after use. 2. Clean the battery and battery charger with a dry cloth. Keep the battery guide tracks clean. 3. Make sure that the terminals on the battery and the battery charger are clean before the batte...
Page 16 - Transportation, storage and disposal; Transportation and storage
Battery Condition Possible faults Possible procedure The battery warning LED flashes. Temperature deviation, the battery is too cold or too hot to use. Let the battery cool down or move it in- doors to warm it up. When the battery has the correct temperature, it can be used again. Use the battery in...
Page 17 - Technical data; Approved batteries for the product
• Use the battery charger only when the surrounding temperature is between 41°F/5°C and 104°F/40°C. • Charge the battery 30% to 50% before you put it in storage for long periods. • Put the battery charger in storage in a space that is closed and dry. • Keep the battery away from the battery charger ...
Page 18 - Approved battery chargers; Accessories; Attachments
Approved battery chargers Battery charger QC250 40-C80 Input voltage, V 100-240 100-240 Frequency, Hz 50-60 50-60 Power, W 250 80 Accessories Attachments Approved attachments Use with Trimmer attachment TA320 330iK Trimmer attachment TA850 330iK Brush cutter attachment BCA850 330iK Reciprocator atta...
Page 19 - Uso previsto
Contenido Introducción............................................................ 19Seguridad................................................................20Montaje................................................................... 30Funcionamiento....................................................
Page 20 - Símbolos en el producto; Fabricante; Seguridad; Definiciones de seguridad
Símbolos en el producto ADVERTENCIA: Este producto puede ser pe- ligroso. El uso incorrec- to o descuidado pue- de provocarle daños mortales al operador u otras personas. Es muy importante que lea y comprenda el contenido del manual de usuario. Lea cuidadosamente el manual de usuario y asegúrese de ...
Page 21 - Lea todas las instrucciones
INSTRUCCIONES DE SEGURIDAD IMPORTANTES Lea todas las instrucciones ADVERTENCIA: Asegúrese de leer el manual de accesorios homologados junto con este manual de la unidad de alimentación. ADVERTENCIA: Cuando utilice productos eléctricos para jardines, siga siempre las precauciones de seguridad básicas...
Page 30 - Montaje; Para conectar el mango cerrado
GUARDE ESTAS INSTRUCCIONES Montaje Para conectar el mango cerrado 1. Fije el mango cerrado sobre el eje entre las flechas. 2. Mueva el separador en la ranura del mango cerrado. 3. Instale el tornillo y la perilla. No apriete en exceso. 4. Ajuste el mango cerrado a una posición adecuada. 5. Apriete l...
Page 31 - Funcionamiento; Introducción
4. Tire del accesorio para sacarlo del acoplamiento. C Funcionamiento Introducción ADVERTENCIA: Asegúrese de leer y comprender el capítulo de seguridad antes de utilizar el producto. Para conectar la batería al producto ADVERTENCIA: Utilice solo baterías originales Husqvarna en el producto. 1. Asegú...
Page 32 - Función de modo de velocidad; Función de apagado automático
2. Mantenga presionado el botón de encendido hasta que la luz LED verde se encienda. 3. Utilice el gatillo de alimentación para controlar la velocidad. Función de modo de velocidad Puede utilizar el producto en 3 modos de velocidad.• Modo ECO: En la pantalla de modo de velocidad, se enciende 1 LED c...
Page 33 - Mantenimiento
Mantenimiento Introducción ADVERTENCIA: Antes de realizar el mantenimiento, debe leer y entender el capítulo de seguridad. Programa de mantenimiento ADVERTENCIA: Retire la batería antes de realizar mantenimiento. La siguiente es una lista de pasos de mantenimiento que se deben realizar en el product...
Page 34 - Solución de problemas; Teclado
Para limpiar el producto, la batería y el cargador de batería 1. Limpie el producto con un paño seco después del uso. 2. Limpie la batería y el cargador de la batería con un paño seco. Mantenga limpios los rieles de guía de la batería. 3. Asegúrese de que las terminales en la batería y en el cargado...
Page 36 - Transporte, almacenamiento y eliminación de residuos; Transporte y almacenamiento; Datos técnicos
Transporte, almacenamiento y eliminación de residuos Transporte y almacenamiento • Cumpla los requisitos de la Legislación de productos peligrosos aprobada sobre baterías de iones de litio. • Siga los requisitos especiales sobre el embalaje y las etiquetas para transportes comerciales, incluidos los...
Page 37 - Accesorios
330iK Temperatura ambiente para el funcionamiento, °F/°C 14–104/-10–40 Temperatura ambiente para almacenamiento, °F/°C 41-77/5-25 Baterías homologadas para el producto Batería BLi22 BLi30 40-B140 Tipo Iones de litio Iones de litio Iones de litio Capacidad de la bate- ría, Ah 4,2 7,5 4,0 Voltaje nomi...
Page 39 - Utilisation prévue
Table des matières Introduction............................................................. 39Sécurité................................................................... 40Montage.................................................................. 50Fonctionnement........................................
Page 40 - Symboles figurant sur le produit; Fabricant; Sécurité; Définitions relatives à la sécurité
Symboles figurant sur le produit AVERTISSEMENT! Cet appareil peut être dan- gereux! S’il est utilisé de manière insouciante ou non appropriée, ce- la pourrait causer des blessures graves voire mortelles pour l’utilisa- teur ou pour d’autres personnes. Il est extrê- mement important de lire et de com...
Page 41 - Lire toutes les instructions
Remarque : Utilisé pour donner des renseignements plus détaillés qui sont nécessaires dans une situation donnée. IMPORTANTES CONSIGNES DE SÉCURITÉ Lire toutes les instructions AVERTISSEMENT : S’assurer de lire le manuel de l’accessoire homologué et le manuel de l’unité électrique. AVERTISSEMENT : Lo...
Page 50 - Montage; Pour monter la poignée en boucle
CONSERVER CES INSTRUCTIONS Montage Pour monter la poignée en boucle 1. Fixer le guidon en boucle sur l'arbre entre les flèches. 2. Déplacer l'entretoise dans la fente du guidon en boucle. 3. Installer la vis et le bouton. Ne pas trop serrer. 4. Régler la poignée en boucle à une position adéquate. 5....
Page 51 - Fonctionnement
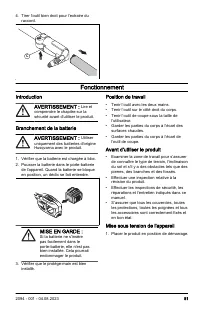
4. Tirer l’outil bien droit pour l’extraire du raccord. C Fonctionnement Introduction AVERTISSEMENT : Lire et comprendre le chapitre sur la sécurité avant d’utiliser le produit. Branchement de la batterie AVERTISSEMENT : Utiliser uniquement des batteries d'origine Husqvarna avec le produit. 1. Vérif...
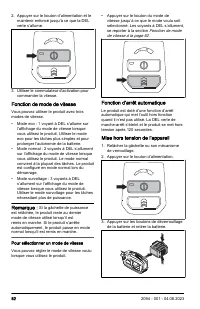
Page 52 - Fonction de mode de vitesse; Fonction d’arrêt automatique
2. Appuyer sur le bouton d’alimentation et le maintenir enfoncé jusqu’à ce que la DEL verte s’allume. 3. Utiliser le commutateur d'activation pour commander la vitesse. Fonction de mode de vitesse Vous pouvez utiliser le produit avec trois modes de vitesse.• Mode eco : 1 voyant à DEL s’allume sur l’...
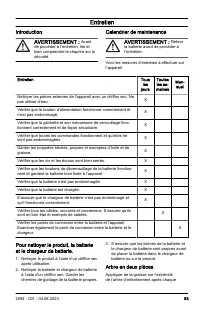
Page 53 - Entretien
Entretien Introduction AVERTISSEMENT : Avant de procéder à l’entretien, lire et bien comprendre le chapitre sur la sécurité. Calendrier de maintenance AVERTISSEMENT : Retirer la batterie avant de procéder à l’entretien. Voici les mesures d’entretien à effectuer sur l’appareil. Entretien Tous les jou...
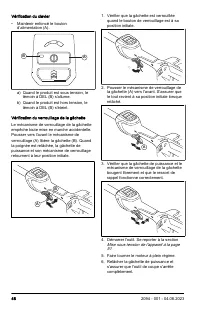
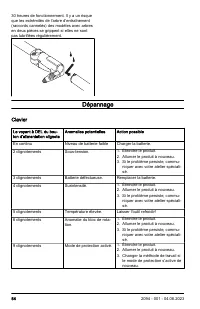
Page 54 - Dépannage; Clavier
30 heures de fonctionnement. Il y a un risque que les extrémités de l’arbre d’entraînement (raccords cannelés) des modèles avec arbres en deux pièces se grippent si elles ne sont pas lubrifiées régulièrement. Dépannage Clavier Le voyant à DEL du bou- ton d’alimentation clignote Anomalies potentielle...
Page 56 - Transport, entreposage et mise au rebut; Transport et entreposage; Caractéristiques techniques
Transport, entreposage et mise au rebut Transport et entreposage • Respecter les exigences de la loi sur les produits dangereux avec la batterie au lithium. • Respecter l’exigence spéciale relative à l’emballage et aux étiquettes pour le transport commercial, y compris par des tiers et des transitai...
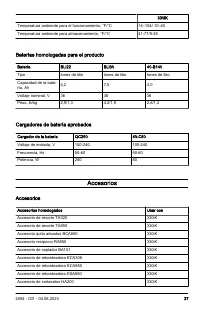
Page 57 - Accessoires
330iK Température ambiante lors du fonctionnement, °F/°C 14 à 104/-10 à 40 Température ambiante lors du remisage, °F/°C 41 – 77 / 5 – 25 Batteries homologuées pour le produit Batterie BLi22 BLi30 40-B140 Type Lithium-ion Lithium-ion Lithium-ion Capacité de la batte- rie, Ah 4,2 7,5 4,0 Tension nomin...