Page 3 - Table of Contents
Table of Contents INTRODUCTION ............................................... 2 manual accuracy ........................................... 2Contact info.................................................... 2Basic Controls ................................................ 3g1183 machine data sheet .....
Page 4 - INTRODUCTION; Contact Info; Manual Accuracy
-2- Model G1183/G1276 (Mfg. Since 3/10) INTRODUCTION We stand behind our machines. If you have any questions or need help, use the information below to contact us. Before contacting, please get the serial number and manufacture date of your machine. This will help us help you faster. Grizzly Technic...
Page 5 - Basic Controls
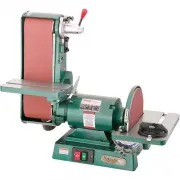
Model G1183/G1276 (Mfg. Since 3/10) -3- Basic Controls having a good understanding of the basic con-trols of the sander is important to properly set up the machine and successfully complete the test run. refer to figure 5 and the following descrip- tions to gain this understanding. A. Upper Roller A...
Page 10 - For Your Own Safety, Read Instruction; NOTICE; Safety Instructions for Machinery
-8- Model G1183/G1276 (Mfg. Since 3/10) ELECTRICAL EQUIPMENT INJURY RISKS. You can be shocked, burned, or killed by touching live electrical components or improperly grounded machinery. To reduce this risk, only allow qualified service personnel to do electrical installation or repair work, and alwa...
Page 12 - Additional Safety for Combination Sanders
-10- Model G1183/G1276 (Mfg. Since 3/10) Additional Safety for Combination Sanders WORKpIECE INSpECTION. nails, staples, knots, or other imperfections in the workpiece can be dislodged and thrown from the sander at a high rate of speed into the operator or bystanders, or cause damage to sandpaper or...
Page 13 - SECTION 2: pOWER SUppLY
Model G1183/G1276 (Mfg. Since 3/10) -11- SECTION 2: pOWER SUppLY Availability Before installing the machine, consider the avail-ability and proximity of the required power supply circuit. If an existing circuit does not meet the requirements for this machine, a new circuit must be installed. To mini...
Page 15 - Voltage Conversion
Model G1183/G1276 (Mfg. Since 3/10) -13- Extension Cords We do not recommend using an extension cord with this machine. If you must use an extension cord, only use it if absolutely necessary and only on a temporary basis. Extension cords cause voltage drop, which may damage electrical components and...
Page 16 - Needed for Setup
-14- Model G1183/G1276 (Mfg. Since 3/10) Wear safety glasses dur- ing the entire setup pro- cess! This machine presents serious injury hazards to untrained users. Read through this entire manu- al to become familiar with the controls and opera- tions before starting the machine! SECTION 3: SETUp the...
Page 17 - Inventory
Model G1183/G1276 (Mfg. Since 3/10) -15- Inventory The following is a list of items shipped with your machine. Before beginning setup, lay these items out and inventory them. If any non-proprietary parts are missing (e.g. a nut or a washer), we will gladly replace them; or for the sake of expediency...
Page 18 - Cleanup
-16- Model G1183/G1276 (Mfg. Since 3/10) The unpainted surfaces of your machine are coated with a heavy-duty rust preventative that prevents corrosion during shipment and storage. This rust preventative works extremely well, but it will take a little time to clean. Be patient and do a thorough job c...
Page 19 - Site Considerations
Model G1183/G1276 (Mfg. Since 3/10) -17- Site Considerations figure 9. minimum working clearances. 32" 32" Dust Hose Dust Hose Weight Load Refer to the Machine Data Sheet for the weight of your machine. Make sure that the surface upon which the machine is placed will bear the weight of the m...
Page 24 - Dust Collection
-22- Model G1183/G1276 (Mfg. Since 3/10) Dust Collection Recommended CfM at: 3" dust port ................................ 220 CFm2 1 ⁄ 2 " dust hose ........................... 150 CFm Do not confuse this CFM recommendation with the rating of the dust collector. To determine the CFM at the ...
Page 25 - Test Run; power Connection
Model G1183/G1276 (Mfg. Since 3/10) -23- Test Run once the assembly is complete, test run your machine to make sure it runs properly. if, during the test run, you cannot easily locate the source of an unusual noise or vibration, stop using the machine immediately, then review the Troubleshooting on ...
Page 26 - SECTION 4: OpERATIONS; Operation Overview
-24- Model G1183/G1276 (Mfg. Since 3/10) SECTION 4: OpERATIONS Operation Overview The purpose of this overview is to provide the nov-ice machine operator with a basic understanding of how the machine is used during operation, so the machine controls/components discussed later in this manual are easi...
Page 27 - Table Tilt
Model G1183/G1276 (Mfg. Since 3/10) -25- Table Tilt angle sanding is performed with the table tilted away from 0° (perpendicular to the sanding sur-face). Compound angles are sanded using a com-bination of table tilt and miter gauge angle. Table Tilt Rangessanding Belt table ...........................
Page 30 - Belt Sanding
-28- Model G1183/G1276 (Mfg. Since 3/10) Belt Sanding the sanding belt removes material faster than the sanding disc, and can be secured at any angle from horizontal to completely vertical with the use of the pivot cap screw shown in figure 36. figure 36. positioning the sanding belt assembly. pivot...
Page 32 - SECTION 5: ACCESSORIES
-30- Model G1183/G1276 (Mfg. Since 3/10) SECTION 5: ACCESSORIES Some aftermarket accessories can be installed on this machine that could cause it to function improperly, increasing the risk of serious personal injury. To minimize this risk, only install accessories recommended for this machine by Gr...
Page 34 - SECTION 6: MAINTENANCE; Schedule
-32- Model G1183/G1276 (Mfg. Since 3/10) SECTION 6: MAINTENANCE For optimum performance from your machine, follow this maintenance schedule and refer to any specific instructions given in this section. Before & During Operation:• loose mounting bolts. • damaged, excessively worn, or clogged sand...
Page 35 - Troubleshooting
Model G1183/G1276 (Mfg. Since 3/10) -33- review the troubleshooting and procedures in this section to fix or adjust your machine if a problem devel-ops. if you need replacement parts or you are unsure of your repair skills, then feel free to call our technical support at (570) 546-9663. SECTION 7: S...
Page 37 - platen Adjustment
Model G1183/G1276 (Mfg. Since 3/10) -35- — if the platen is not even with or is higher than the upper roller crown, loosen the platen cap screw shown in figure 49, adjust the platen even with the middle of the top roller, then re-tighten the cap screw to secure the platen in place. 5. replace the sa...
Page 39 - Wiring Safety Instructions
Model G1183/G1276 (Mfg. Since 3/10) -37- these pages are current at the time of printing. however, in the spirit of improvement, we may make chang-es to the electrical systems of future machines. study this section carefully. if there are differences between your machine and what is shown in this se...
Page 42 - Main Breakdown
-40- Model G1183/G1276 (Mfg. Since 3/10) 1 2 3 4 5 6 7V2-1 7V2-2 8 9 10 11 12 13 14 15 16 17 18 19 20 21 22 23 24 25 26 27 28 29 30 31 32 33 34 35 36V2 37 38 39 40 41 41-1 42 43 44 46 47 48 49 50 51 52 53 54 55 56 57 58 59 60 61 62 63 64 65 66 67 68 69 70 71 72 74 76 80 81 82 83 84 85 86 87 88 89 90...
Page 43 - Main parts List
Model G1183/G1276 (Mfg. Since 3/10) -41- REF PART # DESCRIPTION REF PART # DESCRIPTION 1 P1183001 BASE ALUMINUM 42 PW04 FLAT WASHER 7/16 2 P1183002 BASE PLATE PLASTIC 43 P1183043 STAR KNOB 3 PB06M HEX BOLT M8-1.25 X 12 44 P1183044 POINTER 4 PFS03 FLANGE SCREW 10-24 X 3/8 45 PS18 PHLP HD SCR 10-24 X ...
Page 45 - WARRANTY CARD
C U T A LO N G D O T T E D LI N E Name _____________________________________________________________________________ Street _____________________________________________________________________________City _______________________ State _________________________ Zip _____________________Phone # _____...
Page 47 - WARRANTY AND RETURNS
WARRANTY AND RETURNS Grizzly Industrial, Inc. warrants every product it sells for a period of 1 year to the original purchaser from the date of purchase. This warranty does not apply to defects due directly or indirectly to misuse, abuse, negligence, accidents, repairs or alterations or lack of main...