Page 2 - WARNING; • Crystalline silica from bricks, cement, and
WARNING Some dust created by power sanding, sawing, grind-ing, drilling, and other construction activities contains chemicals known to the State of California to cause cancer, birth defects or other reproductive harm. Some examples of these chemicals are: • Lead from lead-based paints. • Crystalline...
Page 3 - Table of Contents
Table of Contents INTRODUCTION ............................................................................................................................... 3 Foreword .....................................................................................................................................
Page 5 - Foreword; INTRODUCTION; Contact Info
G0449/G0450 37" Drum Sander -3- If you have any comments regarding this manual, please write to us at the address below: Grizzly Industrial, Inc. C / O Technical Documentation Manager P.O. Box 2069 Bellingham, WA 98227-2069 We stand behind our machines. If you have any service questions or parts...
Page 8 - Identification
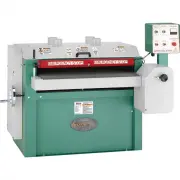
-6- G0449/G0450 37" Drum Sander M Figure 1. Front view, Model G0449. A. Table Height Shaft B. Table Height Handwheel C. Depth Scale D. Lifting Hook E. Table Height Lock Knob F. Top Cover G. Top Cover Handle Identification H. Dust Port I. Emergency Stop Bar J. Control Panel K. Variable Speed Cont...
Page 9 - Control Panel
G0449/G0450 37" Drum Sander -7- Control Panel A. SANDING DRUMS START Button —Starts the sanding drums. B. CONVEYOR START Button —Starts the conveyor belt. C. AMP DRAW Meter —Displays the combined amperage draw of both motors. D. EMERGENCY STOP Button —Stops all machine functions. A D F E C B E. ...
Page 10 - NOTICE; Safety Instructions for Machinery
-8- G0449/G0450 37" Drum Sander 4. ALWAYS USE HEARING PROTECTION WHEN OPERATING MACHINERY. Machinery noise can cause permanent hearing damage. 5. WEAR PROPER APPAREL. DO NOT wear loose clothing, gloves, neckties, rings, or jewelry which may get caught in moving parts. Wear protective hair coveri...
Page 12 - Additional Safety for Drum Sanders
-10- G0449/G0450 37" Drum Sander Additional Safety for Drum Sanders 6. DUST COLLECTION SYSTEM . Never operate the sander without an adequate dust collection system in place and run-ning. 7. BE ATTENTIVE . Never leave the machine running unattended. 8. REPLACING SANDING PAPER . Replace sanding pa...
Page 13 - SECTION 2: CIRCUIT REQUIREMENTS
G0449/G0450 37" Drum Sander -11- Serious personal injury could occur if you connect the machine to the power source before you have completed the set up pro- cess. DO NOT connect the machine to the power source until instructed to do so. G0449 Amperage Draw The 10 HP motor on the Model G0449 wil...
Page 14 - Power Connection; Phase Converter
-12- G0449/G0450 37" Drum Sander A fire may occur if your particular electrical configuration does not comply with local and state codes. The best way to ensure compli- ance is to check with your local municipality or a qualified electrician. Serious personal injury could occur if you connect yo...
Page 16 - Unpacking
-14- G0449/G0450 37" Drum Sander The Model G0449/G0450 was carefully packed when it left our warehouse. If you discover the machine is damaged after you have signed for delivery, please immediately call Customer Service at (570) 546-9663 for advice. Save the containers and all packing materials ...
Page 17 - Inventory; Site Considerations
G0449/G0450 37" Drum Sander -15- Inventory After all the parts have been removed from the box, you should have the following items: Inventory: (Figure 4) Qty A. Drum Sander .............................................. 1 B. Control Panel .............................................. 1 C. Top C...
Page 19 - Placing Sander; Mounting to Floor
G0449/G0450 37" Drum Sander -17- Placing Sander Figure 9. Lifting the sander. The Model G0449 /G0450 has a shipping weight of 1190 /1275 lbs. Serious personal injury may occur if safe moving meth- ods are not followed. To be safe, get assistance and use power equip- ment when moving the crate an...
Page 21 - Power Cord
G0449/G0450 37" Drum Sander -19- Figure 13. G0449 control panel wiring. 2. Feed the power cord through the strain relief on the bottom of the control panel, tighten the strain relief, connect the cord to the ter-minals shown in Figure 13 or 14, and close the control panel. Note For Model G0450 O...
Page 23 - Operation Safety; SECTION 4: OPERATIONS; Depth of Cut
G0449/G0450 37" Drum Sander -21- Damage to your eyes, lungs, and ears could result from using this machine without proper protective gear. Always wear safety glasses, a respirator, and hearing protection when operating this machine. Loose hair and cloth- ing could get caught in machinery and cau...
Page 24 - Variable Speed; Sanding
-22- G0449/G0450 37" Drum Sander Variable Speed The variable speed knob allows you to increase the feed rate from 6–18 FPM. The correct speed to use depends on the type of stock you are using (hardwood vs. softwood) and the stage of finish you are at with that workpiece. As a general rule, a slo...
Page 25 - Choosing Sandpaper; Sanding Tips
G0449/G0450 37" Drum Sander -23- Choosing Sandpaper There are many types of sanding belts to choose from. We recommend Aluminum Oxide for gen-eral workshop environments. Below is a chart that groups abrasives into different classes, and shows which grits fall into each class. The general rule of...
Page 26 - Paper Replacement
-24- G0449/G0450 37" Drum Sander Paper Replacement Tension Wheel Tension Spring The Model G0449/G0450 is designed for 6" wide sandpaper rolls. Turn to SECTION 5: ACCESSORIES on Page 25 for grit selection and model numbers. Tools Needed: Qty Phillips Screwdriver #2 ..............................
Page 27 - SECTION 5: ACCESSORIES
G0449/G0450 37" Drum Sander -25- SECTION 5: ACCESSORIES PRO-STICK ® Sanding Pad Extend the life of your sandpaper! Just feed this crepe-rubber cleaning pad through your drum sander to remove dust build-up from the sandpa-per without damage. Size Model 15" X 20" X 1 1 ⁄ 8 " .............
Page 28 - SECTION 6: MAINTENANCE; Schedule
-26- G0449/G0450 37" Drum Sander Always disconnect power to the machine before performing maintenance. Failure to do this may result in serious person- al injury. Moving parts such as chains should be lubricated periodically with a light machine oil. Motor bear-ings need no lubrication. Use only...
Page 30 - About Service; Troubleshooting
-28- G0449/G0450 37" Drum Sander This section is provided for your convenience—it is not a substitute for the Grizzly Service Department. If any adjustments arise that are not described in this manual, you need replacement parts, or you are unsure of how to perform the procedures in this section...
Page 32 - Gauge Blocks
-30- G0449/G0450 37" Drum Sander Tools Needed: Qty Hex Wrench 5mm .............................................. 1Wrench 19mm ................................................... 2Straightedge (at least 24") ................................. 1Ruler ...............................................
Page 34 - Conveyor Tensioning
-32- G0449/G0450 37" Drum Sander Tools Needed: Qty Wrench 19mm ................................................... 1 Tensioning The conveyor may slightly stretch with continued use and will eventually need to be tensioned. This is most obvious if the conveyor starts slipping on the rollers. When...
Page 35 - Drum Adjustments
G0449/G0450 37" Drum Sander -33- ���� ��������� ��� ������������ Tools Needed: Qty Hex Wrench 5mm .............................................. 1Hex Wrench 4mm .............................................. 1Wrench 19mm ................................................... 1Wrench 10mm .............
Page 38 - Pressure Roller
-36- G0449/G0450 37" Drum Sander Figure 40. Gauge blocks in position for adjusting the pressure roller height. Note: An additional trick for eliminating snipe is to reduce pressure on the rear rollers, but not the front rollers. Conditions will vary with wood types, so use trial-and-error to fin...
Page 39 - Dust Scoop Position; Scale Pointer
G0449/G0450 37" Drum Sander -37- Tools Needed: Qty Hex Wrench 4mm .............................................. 1 Setting: Distance From Roller ..................... 0.160" (4mm) The dust scoop helps control the effectiveness of the dust collection system, thus reducing the amount of dust t...
Page 40 - Table Lift Screws
-38- G0449/G0450 37" Drum Sander 5. Loosen the chain with the adjustable idler roller sprocket shown in Figure 43 . Figure 42. Marking sprocket tooth and chain. Tools Needed: Qty Hex Wrench 8mm .............................................. 1Wrench/Socket 14mm ......................................
Page 41 - Conveyor Belt
G0449/G0450 37" Drum Sander -39- Tools Needed: Qty Hex Wrench 8mm .............................................. 1Hex Wrench 5mm .............................................. 1Hex Wrench 4mm .............................................. 1Hex Wrench 3mm ............................................
Page 44 - G0449 Electrical Components
-42- G0449/G0450 37" Drum Sander G0449 Electrical Components Main Motor Relay Main Motor Contactor Feed Motor Contactor Feed Motor Relay Terminal Block Current Transformer Figure 52. G0449 back side of front panel. Figure 53. Model G0449 Electrical panel. Ground Conveyor START Drum START E-STOP ...
Page 50 - Frame Parts Breakdown
-48- G0449/G0450 37" Drum Sander �� �� �� �� �� �� �� �� �� �� �� �� �� �� �� �� �� �� �� �� �� �� �� ��� �� �� �� �� �� �� �� �� �� �� �� �� �� �� �� �� �� �� �� �� �� �� �� � �� �� �� �� �� �� �� �� �� �� ��� ��� ��� ��� ��� ��� ��� ��� ��� ��� ��� ��� ��� ��� ��� �� ��� ��� �� ��� ��� ��� ���...
Page 51 - Frame Parts List
G0449/G0450 37" Drum Sander -49- REF PART # DESCRIPTION REF PART # DESCRIPTION 1 P0449001 MAIN FRAME 46 PW06 FLAT WASHER 1/4 2 P0449002 LIFT RING 47 P0449047 DUST SCOOP 3 P0449003 SCALE 48 P0449048 RUBBER PLATE 5 P0449005 MOTOR BASE 49 P0449049 PLATE 6 PB75M HEX BOLT M12-1.75 X 35 50 P0449050 RI...
Page 52 - Conveyor Parts Breakdown
-50- G0449/G0450 37" Drum Sander ��� ��� �� ��� ��� ��� ��� ��� ��� ��� ��� ��� ��� �� ��� �� �� �� �� �� ��� ��� ��� �� �� �� �� �� �� ��� �� �� �� �� �� ��� ��� ��� �� �� ��� �� �� ��� ��� ��� ��� ��� ��� ��� ��� ��� ��� ��� ��� ��� ��� ��� �� �� ��� ��� ��� ��� ��� ��� ��� ��� ��� ��� ��� ���...
Page 53 - Conveyor Parts List
G0449/G0450 37" Drum Sander -51- REF PART # DESCRIPTION REF PART # DESCRIPTION 100 PSS01M SET SCREW M6-1 X 10 140 PW07 FLAT WASHER 5/16 101 P0449101 ROLLER COVER 141 PW07 FLAT WASHER 5/16 102 P0449102 ROLLER COVER 142 PN03M HEX NUT M8-1.25 103 PSBS09M BUTTON HD CAP SCR M6-1 X 12 143 P0449143 SHA...
Page 54 - Roller and Drum Parts Breakdown
-52- G0449/G0450 37" Drum Sander ��� ���� ��� ��� ��� ��� ��� ��� ��� ��� ��� ��� ��� ��� ��� ��� ��� ��� ��� ��� ���� ���� ��� ��� ��� ��� ��� ���� ��� ��� ��� ��� ��� ��� ��� ��� ��� ��� ��� ��� ��� ��� Roller and Drum Parts Breakdown
Page 55 - Roller and Drum Parts List
G0449/G0450 37" Drum Sander -53- REF PART # DESCRIPTION REF PART # DESCRIPTION 200 P0449200 ROLLER BUSHING SUPPORT 234 PLABEL-11 LABEL SAFETY GLASSES 201 PR19M EXT RETAINING RING 28MM 235 PLABEL-13 LABEL DISCONNECT POWER 202 P0449202 HOLD DOWN ROLLER SPRING 236 P0449236 MACHINE ID LABEL (G0449) ...
Page 56 - WARRANTY AND RETURNS
-54- G0449/G0450 37" Drum Sander Grizzly Industrial, Inc. warrants every product it sells for a period of 1 year to the original purchaser from the date of purchase. This warranty does not apply to defects due directly or indirectly to misuse, abuse, negligence, accidents, repairs or alterations...
Page 57 - WARRANTY CARD
C U T A LO N G D O T T E D LI N E Name _____________________________________________________________________________ Street _____________________________________________________________________________City _______________________ State _________________________ Zip _____________________Phone # _____...
Page 60 - Call Today For A; FREE; Full Color Catalog
Buy Direct and Save with Grizzly ® – Trusted, Proven and a Great Value! -OR- • SECURE ORDERING • ORDERS SHIPPED WITHIN 24 HOURS • E-MAIL RESPONSE WITHIN ONE HOUR Visit Our Website Today And Discover Why Grizzly ® Is The Industry Leader! Call Today For A FREE Full Color Catalog


 Grizzly Industrial G0529
Manual
Grizzly Industrial G0529
Manual
 Grizzly Industrial G0538
Manual
Grizzly Industrial G0538
Manual
 Grizzly Industrial G0582
Manual
Grizzly Industrial G0582
Manual
 Grizzly Industrial G0723
Manual
Grizzly Industrial G0723
Manual
 Grizzly Industrial G1015
Manual
Grizzly Industrial G1015
Manual
 Grizzly Industrial G1276
Manual
Grizzly Industrial G1276
Manual
 Grizzly Industrial G9717
Manual
Grizzly Industrial G9717
Manual
 Grizzly Industrial G9984
Manual
Grizzly Industrial G9984
Manual
 Grizzly Industrial H6070
User Manual
Grizzly Industrial H6070
User Manual
 Grizzly Industrial H7762
Manual
Grizzly Industrial H7762
Manual