Page 4 - General
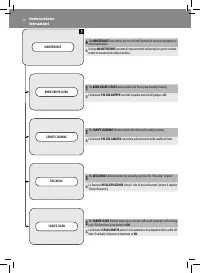
4 Safety instructionsNorme di sicurezza EN - IMPORTANT SAFET Y INFORMATION This machine is equipped with safety features. Nevertheless, read and follow the safety in-structions carefully and only use the machine as described in these instructions, to avoid acci-dental injury or damage due to imprope...
Page 5 - Caution
5 Safety instructionsNorme di sicurezza Italiano English Italiano English Caution General - This machine is intended for normal house- hold use only. It is not intended for use in environments such as staff kitchens of shops, offi ces, farms or other work environ-ments. - Always put the machine on a...
Page 7 - Recycling; - This symbol means that this product shall; Warranty and support
7 Safety instructionsNorme di sicurezza Italiano English Italiano English Recycling - This symbol means that this product shall not be disposed of with normal household waste (2012/19/EU). - Follow your country’s rules for the separate collection of electrical and electronic prod-ucts. Correct dispo...
Page 8 - Avvertenza; Indicazioni generali
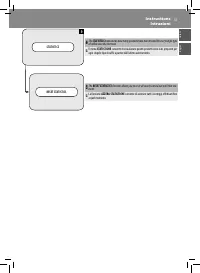
8 Safety instructionsNorme di sicurezza IT - INFORMAZIONI DI SICUREZZA IMPORTANTI Questa macchina è dotata di funzionalità di sicurezza. Tuttavia, leggete e seguite con at-tenzione le istruzioni di sicurezza e utilizzate la macchina solo come descritto in questo manu-ale per evitare lesioni accident...
Page 9 - Attenzione
9 Safety instructionsNorme di sicurezza Italiano English Italiano English da. All’inizio dell’erogazione possono verifi -carsi brevi spruzzi di acqua calda. Prima di rimuovere l’erogatore di acqua calda atten-dete che il ciclo di erogazione termini. Attenzione Indicazioni generali - Questa macchina ...
Page 11 - Riciclaggio
11 Safety instructionsNorme di sicurezza Italiano English Italiano English - Dopo aver preparato la schiuma di latte, pu- lite velocemente il pannarello automatico erogando una piccola quantità di acqua cal-da. Seguite le istruzioni di pulizia riportate nel manuale per l’utente. - Prestate attenzion...
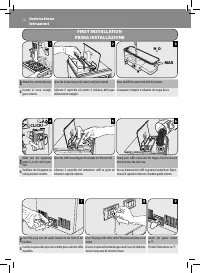
Page 12 - MAX; Rinse and fi ll the water tank with fresh water.; FIRST INSTALLATION
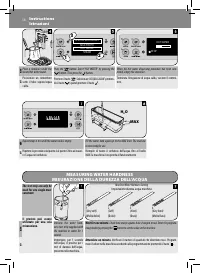
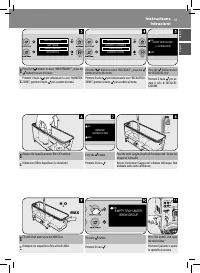
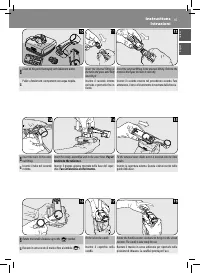
12 InstructionsIstruzioni H 2 O MAX EN Attach the external drip tray. Open the lid and remove the water tank by the handle. Rinse and fi ll the water tank with fresh water. IT Inserire la vasca raccogli-gocce esterna. Sollevare il coperchio ed estrarre il serbatoio dell'acqua utilizzando la maniglia...
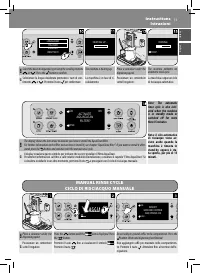
Page 13 - e proseguire con il ciclo di risciacquo manuale.; MANUAL RINSE CYCLE
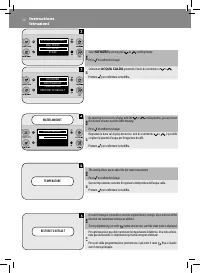
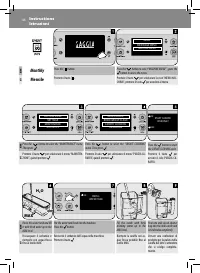
13 Instructions Istruzioni Italiano English Italiano English HEATING UP… RINSING STOP ACTIVATE AQUACLEAN FILTER? ESC OK 0/8 EN Select the desired language by pressing the scrolling buttons or . Press the button to confi rm. The machine is heating up. Place a container under the dispensing spout. The...
Page 14 - MEASURING WATER HARDNESS; Wait for one minute.; Attendere un minuto.; Verifi care il numero di quadrati che diventano rossi. Program-
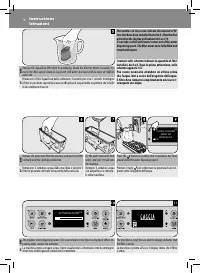
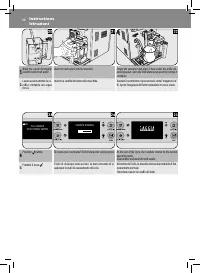
14 InstructionsIstruzioni EN Place a container under the steam/hot water wand. Press the button. Select “HOT WATER” by pressing the button. Then press the button. When the hot water dispensing procedure has been com-pleted, empty the container. IT Posizionare un contenitore sotto il tubo vapore/acqu...
Page 15 - AQUACLEAN FILTER; Installing the; Installazione
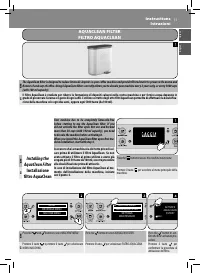
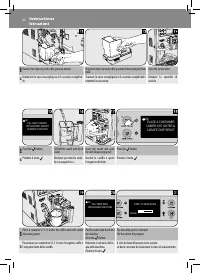
15 Instructions Istruzioni Italiano English Italiano English EN The AquaClean fi lter is designed to reduce limescale deposits in your coff ee machine and provide fi ltered water to preserve the aroma and fl avour of each cup of coff ee. Using 8 AquaClean fi lters correctly allows you to descale you...
Page 16 - Press the
16 InstructionsIstruzioni EN Remove the AquaClean fi lter from its packaging. Shake the fi lter for about 5 seconds. Im-merse the fi lter upside down in a jug with cold water and wait until no more air bubbles come out. IT Rimuovere il fi ltro AquaClean dalla confezione. Scuoterlo per circa 5 second...
Page 17 - Replacing the; The performance of this fi lter is de-; Sostituzione; Le prestazioni del fi ltro; care la macchina
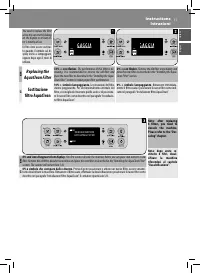
17 Instructions Istruzioni Italiano English Italiano English EN Replacing the AquaClean Filter 10% + icon fl ashes. The performance of this fi lter is de- creasing. It is recommended to remove the old fi lter and place the new fi lter as described in the “Installing the Aqua-Clean Filter” section to...
Page 18 - press; due volte consecutive; HOW TO PROGRAM MY FAVORITE ESPRESSO; DOUBLE COFFEE; DOPPIO CAFFÉ
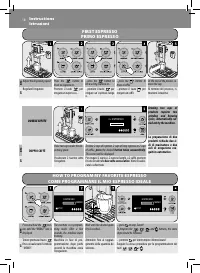
18 InstructionsIstruzioni FIRST ESPRESSO PRIMO ESPRESSO EN Adjust the dispensing spout. Press the button to brew an espresso or.. ...press the button to brew a long espresso or... ...press the button to brew a coff ee. At the end of the process, re-move the cup. IT Regolare l’erogatore. Premere il t...
Page 19 - BREWING BEVERAGES USING PRE-GROUND COFFEE
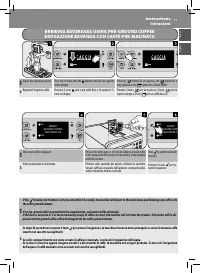
19 Instructions Istruzioni Italiano English Italiano English BREWING BEVERAGES USING PRE-GROUND COFFEE EROGAZIONE BEVANDA CON CAFFÈ PRE-MACINATO EN This screen will be displayed. Press on the lid to open it. Lift the lid. Add pre-ground coff ee to the compartment by using the measuring scoop supplie...
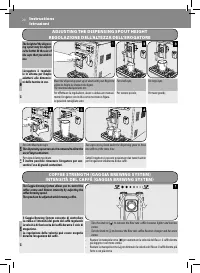
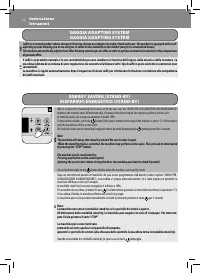
Page 20 - INTENSITÀ DEL CAFFÈ (GAGGIA BREWING SYSTEM); Turn the knob to; ADJUSTING THE DISPENSING SPOUT HEIGHT; For Latte Macchiato cups.
20 InstructionsIstruzioni COFFEE STRENGTH (GAGGIA BREWING SYSTEM) INTENSITÀ DEL CAFFÈ (GAGGIA BREWING SYSTEM) EN - Turn the knob to ( ) to increase the fl ow rate: coff ee becomes lighter and has less crema. - Turn the knob to ( ) to decrease the fl ow rate: coff ee becomes stronger and has more cre...
Page 21 - ADJUSTING THE CERAMIC COFFEE GRINDER; MILD; LEGGERO
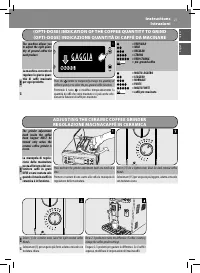
21 Instructions Istruzioni Italiano English Italiano English V 09 ADJUSTING THE CERAMIC COFFEE GRINDER REGOLAZIONE MACINACAFFÈ IN CERAMICA (OPTI-DOSE) INDICATION OF THE COFFEE QUANTITY TO GRIND (OPTI-DOSE) INDICAZIONE QUANTITÀ DI CAFFÈ DA MACINARE EN Press and turn the grinder adjustment knob one no...
Page 23 - MILK CARAFE; Riposizionare il coperchio.; RIMOZIONE DELLA
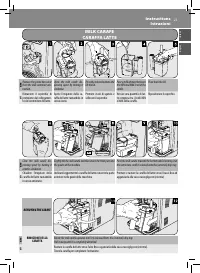
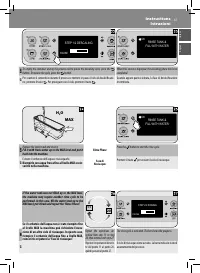
23 Instructions Istruzioni Italiano English Italiano English MILK CARAFE CARAFFA LATTE EN Remove the protection cover from the milk container con-nection. Open the milk carafe dis-pensing spout by turning it clockwise. Press the release buttons and lift the lid. Pour a milk amount between the MIN an...
Page 24 - FIRST CAPPUCCINO - LATTE MACCHIATO
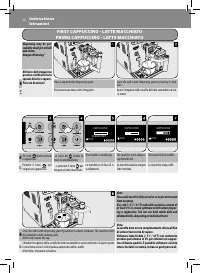
24 InstructionsIstruzioni CAPPUCCINO STOP CAPPUCCINO STOP EN Press the button to brew a cappuccino.... ..or press the button to brew a Latte Macchiato. The machine is heating up. The machine starts dispens-ing frothed milk. The machine brews coff ee. IT Premere il tasto per erogare un cappuccino... ...
Page 25 - CICLO DI AUTOPULIZIA “CLEAN” (DOPO OGNI UTILIZZO); button on the control panel. You can perform; sul pannello; HOW TO PROGRAM MY FAVORITE CAPPUCCINO
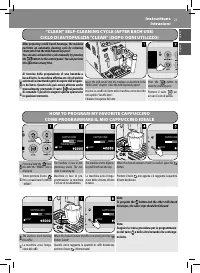
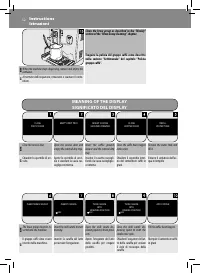
25 Instructions Istruzioni Italiano English Italiano English “CLEAN” SELF-CLEANING CYCLE (AFTER EACH USE) CICLO DI AUTOPULIZIA “CLEAN” (DOPO OGNI UTILIZZO) EN Insert the milk carafe into the machine as described in the “Milk Carafe” chapter. Close the milk dispensing spout. Press the button to start...
Page 27 - MENU FOR CUSTOMIZATION AND MAINTENANCE; BEVERAGE MENU; or
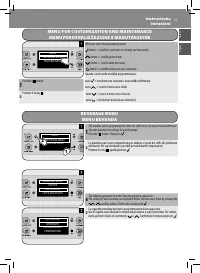
27 Instructions Istruzioni Italiano English Italiano English MENU FOR CUSTOMIZATION AND MAINTENANCE MENU PERSONALIZZAZIONE E MANUTENZIONE EN Press the button. IT Premere il tasto . When you enter the programming mode: button = (confi rms a selection or a change you have made) button = (scrolls up th...
Page 28 - DELICATO; This setting enables the prebrewing function.; COFFEE AMOUNT
28 InstructionsIstruzioni EN By adjusting the bar on the display with the or scrolling button, you can choose the amount of water used for coff ee brewing. Press to confi rm the change. IT Regolando la barra sul display attraverso i tasti di scorrimento o , è possibile scegliere la quantità d’acqua ...
Page 29 - RESTORE TO DEFAULT; MILK AMOUNT; Hot Water; Acqua Calda; BEVANDE SPECIAL
29 Instructions Istruzioni Italiano English Italiano English EN By adjusting the bar on the display with the or scrolling button, you can choose the amount of milk to be used for the selected beverage. Press to confi rm the change. The milk managing options are displayed only for the milk-based beve...
Page 30 - ACQUA CALDA
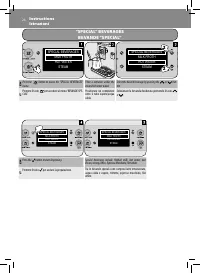
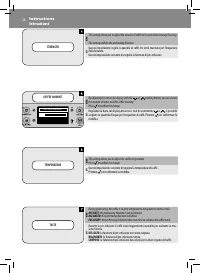
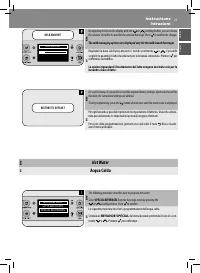
30 InstructionsIstruzioni SPECIAL BEVERAGES MILK FROTH HOT WATER STEAM HOT WATER WATER AMOUNT TEMPERATURE RESTORE TO DEFAULT EN Select HOT WATER by pressing the or scrolling button. Press to confi rm the change. IT Selezionare ACQUA CALDA premendo il tasto di scorrimento o o . Premere per confermare...
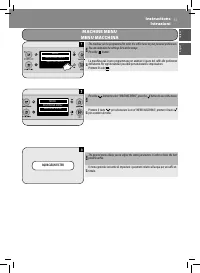
Page 31 - MACHINE MENU
31 Instructions Istruzioni Italiano English Italiano English EN The general menu allows you to adjust the water parameters in order to brew the best possible coff ee. IT Il menu generale consente di impostare i parametri relativi all’acqua per un caff è ot-timale. AQUACLEAN FILTER MACHINE MENU MENU ...
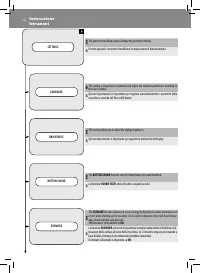
Page 32 - SUONO TASTI; The; ECOMODE; consente di risparmiare energia mantenendo al livello uno l’at-; ON
32 InstructionsIstruzioni EN The general menu allows you to change the operation settings. IT Il menu generale consente di modifi care le impostazioni di funzionamento. EN This setting is important to automatically adjust the machine parameters according to the user’s country. IT Questa impostazione...
Page 33 - WATER HARDNESS; DUREZZA ACQUA; RIPRISTINA DEFAULT
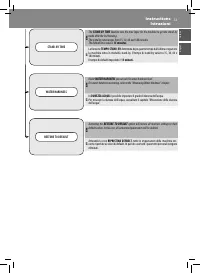
33 Instructions Istruzioni Italiano English Italiano English EN The STAND-BY TIME function sets the time lapse for the machine to go into stand-by mode after the last brewing. The stand-by time ranges from 15, 30, 60 and 180 minutes.The default time value is 15 minutes . IT La funzione TEMPO STAND-B...
Page 35 - STATISTICHE; ogni singolo tipo di caff è a partire dall’ultimo azzeramento.; AZZERA STATISTICHE; consente di azzerare tutti i conteggi eff ettuati fi no; RESET STATISTICS
35 Instructions Istruzioni Italiano English Italiano English EN The STATISTICS menu shows how many products have been brewed for every single type of coff ee since the last reset. IT Il menu STATISTICHE consente di visualizzare quanti prodotti sono stati preparati per ogni singolo tipo di caff è a p...
Page 36 - Use a soft, dampened cloth to clean the machine.; Attenersi alle seguenti istruzioni.; Daily Cleaning
36 InstructionsIstruzioni CLEANING AND MAINTENANCE PULIZIA E MANUTENZIONE EN Note: - Use a soft, dampened cloth to clean the machine. - Do not wash any removable part in the dishwasher. - Do not use alcohol, solvents and/or abrasive objects to clean the machine. - Do not immerse the machine in water...
Page 37 - Weekly Cleaning
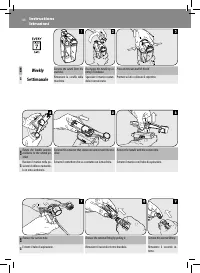
37 Instructions Istruzioni Italiano English Italiano English EN Weekly Cleaning Turn off the machine and unplug it. Remove the (external) drip tray. Remove the grill and wash it thoroughly. Remove the support under the grill. Wash the support and the drip tray. IT Pulizia Settimanale Spegnere la mac...
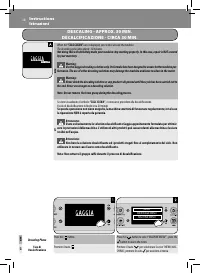
Page 38 - Descaling Phase; the end. Never use vinegar as a descaling solution.; “CALC CLEAN”
38 InstructionsIstruzioni DESCALING - APPROX. 30 MIN. DECALCIFICAZIONE - CIRCA 30 MIN. MENU BEVERAGE MENU MACHINE MENU EN Descaling Phase Press the button. Press the button to select “MACHINE MENU” ; press the button to access the menu. IT Fase di Decalcifi cazione Premere il tasto . Premere il tast...
Page 41 - . Per proseguire con il ciclo, premere il tasto; Remove the water tank and rinse it.
41 Instructions Istruzioni Italiano English Italiano English EN To empty the container during the process and to pause the descaling cycle, press the button. To resume the cycle, press the button. When this screen is displayed, the descaling phase has been completed. IT Per svuotare il contenitore d...
Page 42 - INTERRUPTION OF THE DESCALING CYCLE
42 InstructionsIstruzioni EN At the end of the second step, the machine is ready for use. Disassemble and wash the milk carafe. Empty and rinse the drip tray. IT Al termine della seconda fase, la macchina è pronta per l'uso. Smontare e lavare la caraff a del latte. Vuotare e risciacquare la vasca ra...
Page 43 - MILK CARAFE CLEANING; Daily; Press on the sides and lift the lid.; Quotidiana; Premere ai lati e sollevare il coperchio.
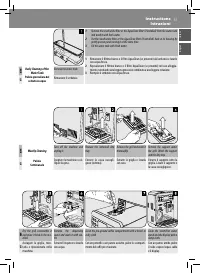
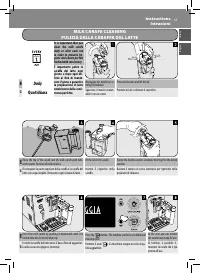
43 Instructions Istruzioni Italiano English Italiano English MILK CARAFE CLEANING PULIZIA DELLA CARAFFA DEL LATTE EN Daily Disengage the handle by ro-tating it clockwise. Press on the sides and lift the lid. IT Quotidiana Sganciare il manico ruotan-dolo in senso orario. Premere ai lati e sollevare i...
Page 44 - Weekly; Settimanale
44 InstructionsIstruzioni EN Weekly Remove the carafe from the machine. Disengage the handle by ro-tating it clockwise. Press on the sides and lift the lid. IT Settimanale Rimuovere la caraff a dalla macchina. Sganciare il manico ruotan-dolo in senso orario. Premere ai lati e sollevare il coperchio....
Page 45 - Insert the newly-assembled unit in the cover base.; Fare attenzione al riferimento.; Clean all the parts thoroughly with lukewarm water.
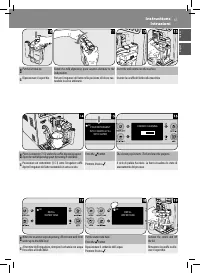
45 Instructions Istruzioni Italiano English Italiano English EN Insert the tube in the exter-nal fi tting. Insert the newly-assembled unit in the cover base. Pay at- tention to the reference. Fit the external cover. Make sure it is inserted into the base guides. IT Inserire il tubo nel raccordo este...
Page 46 - Monthly; Mensile
46 InstructionsIstruzioni EN Monthly Press the button. Press the button to select “MACHINE MENU” ; press the button to access the menu. IT Mensile Premere il tasto . Premere il tasto per selezionare la voce “MENU MAC- CHINA”; premere il tasto per accedere al menu. MENU BEVERAGE MENU MACHINE MENU STA...
Page 47 - Insert the milk carafe into the machine.
47 Instructions Istruzioni Italiano English Italiano English POUR DETERGENT INTO CARAFE & FILL WITH WATER OK CARAFE CLEANING EN Put the lid back on. Rotate the milk dispensing spout counter-clockwise to the lock position. Insert the milk carafe into the machine. IT Riposizionare il coperchio. Po...
Page 49 - BREW GROUP CLEANING
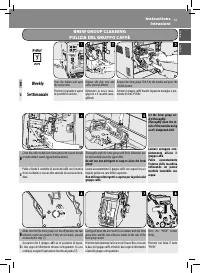
49 Instructions Istruzioni Italiano English Italiano English BREW GROUP CLEANING PULIZIA DEL GRUPPO CAFFÈ EN Weekly Press the button and open the service door. Remove the drip tray and coff ee grounds drawer. Remove the brew group. Pull it by the handle and press the «PUSH» button. IT Settimanale Pr...
Page 50 - Apply the lubricant evenly on both side guides.; Also lubricate the shaft.
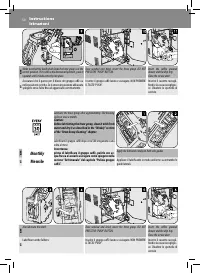
50 InstructionsIstruzioni EN Make sure that the hook which locks the brew group is in the correct position. If it is still in the downward position, push it upwards until it locks correctly into place. Once washed and dried, insert the brew group. DO NOT PRESS THE “PUSH” BUTTON. Insert the coff ee g...
Page 51 - Select the; MANUTENZIONE; Selezionare; PULIZIA GRUPPO; Press the button to start the cleaning cycle.; Non bere la soluzione erogata durante il processo.
51 Instructions Istruzioni Italiano English Italiano English EN Select the MAINTENANCE option from the machine menu. Select BREW GROUP CLEAN . Press the button. IT Selezionare la voce MANUTENZIONE nel menu macchina. Selezionare PULIZIA GRUPPO . Premere il tasto . Besides weekly cleaning, we recommen...
Page 52 - Close the service door.
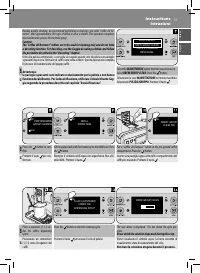
52 InstructionsIstruzioni EN When the machine stops dispensing, remove and empty the container. IT Al termine dell’erogazione, rimuovere e svuotare il conte-nitore. Clean the brew group as described in the “Weekly” section of the “Brew Group Cleaning” chapter. Eseguire la pulizia del gruppo caff è c...
Page 53 - MAINTENANCE PRODUCTS; AQUACLEAN water fi lter
53 Instructions Istruzioni Italiano English Italiano English EMPTY COFFEE GROUNDS DRAWER 0% EN Remove and empty the coff ee grounds drawer with the ma-chine turned on. The machine needs to be descaled. Go to the Maintenance menu to select and start the cycle. Replace the AQUACLEAN wa-ter fi lter wit...
Page 54 - TROUBLESHOOTING
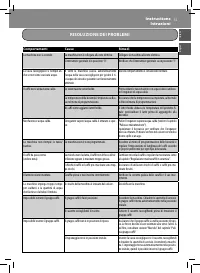
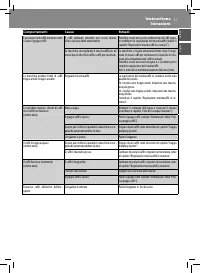
54 InstructionsIstruzioni Machine actions Causes Solutions The machine does not turn on. The machine is not connected to the electric net-work. Connect the machine to the electric network. The power button is set to "0". Check that the power button is set to "I". The drip tray gets f...
Page 55 - Comportamenti; RISOLUZIONE DEI PROBLEMI
55 Instructions Istruzioni Italiano English Italiano English Comportamenti Cause Rimedi La macchina non si accende. La macchina non è collegata alla rete elettrica. Collegare la macchina alla rete elettrica. L'interruttore generale è in posizione “0”. Verifi care che l’interruttore generale sia in p...
Page 58 - TECHNICAL SPECIFICATIONS
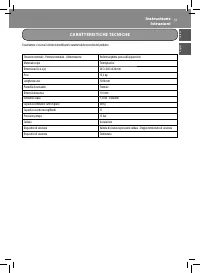
58 InstructionsIstruzioni TECHNICAL SPECIFICATIONS The manufacturer reserves the right to make changes to the technical specifi cations of the product. Nominal Voltage - Power Rating - Power Supply See data plate on the appliance Housing material Thermoplastic material Size (w x h x d) 245 x 360 x 4...
Page 59 - CARATTERISTICHE TECNICHE
59 Instructions Istruzioni Italiano English Italiano English CARATTERISTICHE TECNICHE Il costruttore si riserva il diritto di modifi care le caratteristiche tecniche del prodotto. Tensione nominale - Potenza nominale - Alimentazione Vedere targhetta posta sull’apparecchio Materiale corpo Termoplasti...
Page 60 - che ritenute necessarie.; GAGGIA; Sede Legale/Registered Offi; COD
GAGGIA S.p.A. reser ves the right to make any necessar y modi fi cation. GAGGIA S.p.a. si riser va il diritto di appor tare tutte le modi fi che ritenute necessarie. GAGGIA S.p.A. Sede Legale/Registered Offi ce Piazza A. Diaz, 120123 MILANO Sede Amministrativa/Administrative Offi ce Via Torretta, 24...