Page 3 - POLSKI
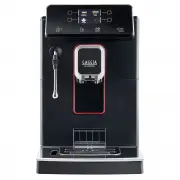
Congratulations on your purchase of Gaggia Magenta! This easy-to-use machine guarantees excellent results every day. Thanks to the intuitive interface, you can choose among 5 beverages and customise them according to your preferences. Before being packed, each of our high-quality machines undergoes ...
Page 4 - First installation / Eerste installatie / Pierwsza instalacja
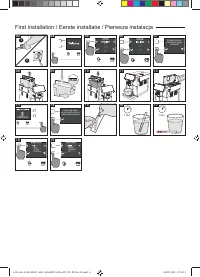
First installation / Eerste installatie / Pierwsza instalacja 1 2 Confermi di voler cambiare la lingua in Italiano? In the next steps we will set the correct water hardness level 1 sec. 1 min. 03 08 14 15 17 16 18 19 09 10 11 13 04 05 06 07 12 4219-465-02411 MAN. GAG. MAGENTA Plus EN-NL-PL Rev 01.in...
Page 5 - English; Contents; INTENZA+ water filter; Technical specifications
5 English Contents Machine overview (Fig.2) ...................................................................................................................................................................................................................................................................
Page 6 - Steam wand version
6 English Machine overview (Fig.2) 1 Control panel 13 Brew group 2 Adjustable coffee dispensing spout 14 Service door 3 Water tank lid 15 Coffee residues drawer 4 Coffee bean container lid 16 Coffee pucks container 5 Pre-ground coffee compartment 17 Drip tray 6 Power cord socket 18 Drip tray grid 7 ...
Page 7 - Control panel and display; Multifunction buttons
7 English Control panel and display Multifunction buttons The multifunction buttons on the sides of the display are used to select the function or the beverage to which they refer at that time. Control panel overview (Fig. 1) 1/2 MULTIFUNCTION buttons Select the function shown on the display. 3 ON/O...
Page 8 - First installation; Manual rinse cycle
8 English First installation Before using the machine, it is essential to follow a few simple steps, clearly described in the explanatory drawings you found in the quick guide at the beginning of this instruction manual. Note: for even tastier coffee, we recommend that you initially prepare 5 cups o...
Page 9 - Measuring water hardness
9 English Measuring water hardness You will need to set the water hardness when you install your machine. Take the water hardness measuring strip contained in the packaging and follow the steps shown on the display during the installation phase. To change the water hardness later, press the CLEAN/SE...
Page 10 - Installing the INTENZA+ water filter; Replacing the INTENZA+ water filter
10 English Installing the INTENZA+ water filter Immerse the INTENZA+ water filter in cold water, in a vertical position and with the opening facing upwards. Press both sides of the filter gently to let air bubbles out. Place the INTENZA+ filter in the water tank, ensuring it is correctly positioned....
Page 11 - Types of beverage
11 English Types of beverage Original recipe Description Espresso The espresso is known around the globe as true Italian coffee. Served in a small cup, its unmistakeable features are a full and intense aroma and a top layer of compact, natural “crema”. It is the result of the pressurized hot water e...
Page 12 - Espresso tray; Coffee Brewing; Brewing coffee using coffee beans
12 English Espresso tray This machine was designed to guarantee flawless results, from a traditional espresso to a number of different beverages. If you want to enjoy an Italian espresso with a delicious layer of its natural “crema” on top and as tradition dictates, we suggest your using of the "...
Page 13 - Brewing coffee using pre-ground coffee
13 English 3 Press the " " button until " " is selected. Note : The “pre-ground coffee” function excludes the possibility of brewing two cups of coffee at the same time, as well as the aroma setting. In fact, these are only possible with coffee beans . 4 Press the START/STOP START/S...
Page 14 - How to Froth Milk; Model with the classic pannarello; Model whith the steam wand
14 English How to Froth Milk Tip : use cold milk (at a temperature of around 5 °C) with a protein content of at least 3% to ensure optimum results for the froth. You can use either whole milk or semi-skimmed milk. You can also use skimmed milk, soy milk or lactose-free milk. Model with the classic p...
Page 15 - Dispensing hot water
15 English 4 Press the HOME HOME button to open the beverage menu. Select " STEAM " and press the START/STOP START/STOP button to start frothing 5 To froth the milk correctly, the steam nozzle must always be in contact with the milk and not with the froth. Therefore, as the layer of froth...
Page 16 - Customising beverages and saving; Beverage Customisation
16 English Customising beverages and saving settings (MEMO) This machine allows you to change the settings of a beverage according to your preferences and save them (MEMO), by overwriting the previous settings. Beverage Customisation 1 Press the HOME HOME button. 2 Select your beverage. 3 All the se...
Page 17 - Coffee grind settings
17 English 9 Once the beverage has been customised according to your preferences, you can proceed with dispensing it by pressing START/STOP START/STOP button. 10 If you have changed any of the parameters listed above, you will be asked at the end of dispensing if you would like to save the recipe wi...
Page 18 - Cleaning and maintenance; Cleaning table
18 English Cleaning and maintenance Regular cleaning and maintenance keep the machine in perfect condition and ensure perfect coffee flavour, a constant coffee flow and an excellent milk froth. Please refer to the following table to know when and how to clean the removable parts of the machine. Plea...
Page 19 - Cleaning the classic pannarello
19 English Part description When to clean How to clean Espresso tray Depending on usage Remove the espresso tray and clean it with running water. You can also dishwash it in the upper tray. Cleaning the steam system Cleaning the classic pannarello 1 Remove the classic pannarello and the rubber handl...
Page 20 - Cleaning the brew group; Removing the brew group
20 English Cleaning the brew group Warning : do not wash the brew group in the dishwasher and do not use dishwashing detergents, since they may cause the malfunctioning of the brew group and alter the coffee flavour. Removing the brew group 1 Turn off the machine and disconnect the power cord. 2 Rem...
Page 21 - Reinserting the brew group
21 English Reinserting the brew group 1 Before placing the brew group back into the machine, make sure that the two yellow reference marks on the side match. If this is not the case, perform the following step: Make sure that the lever is in contact with the base of the brew group. 2 Make sure that ...
Page 22 - Lubricating the brew group; Cleaning the brew group with cleaning tablets for the
22 English Lubricating the brew group In order to ensure the perfect performance of the machine, it is necessary to lubricate the brew group. Refer to the following table for the frequency of lubrication. Frequency of use Number of beverages prepared daily Lubrication frequency Low 1-5 Every 4 month...
Page 23 - Descaling; Descaling procedure
23 English 4 Apply a thin layer of lubricant to the guides, on both sides (see figure). 5 Reinsert the brew group - see the “Reinserting the brew group” chapter. Note : you can use the lubricant tube multiple times. Descaling Descaling procedure Descaling needs to be carried out when the machine req...
Page 24 - What to do if the descaling process is interrupted
24 English 6 Place a large recipient (1.5l) under the steam tube and the coffee dispensing spout. 7 Follow the instructions shown on the display to launch the descaling procedure. This procedure lasts approximately 25 minutes and consists of a descaling cycle and a rinse cycle, carried out with disp...
Page 25 - Other settings; Language
25 English Other settings By pressing the CLEAN/SET clean/setting button and selecting “ SETTINGS ” on the display, you can reset or modify some of the machine parameters including: - Language. - Water filter. - Stand-by Time. - Units. - Water hardness. - Beverage counter. - Button sound - Factory s...
Page 26 - Units; Beverage counter; Water hardness; Button sound
26 English Units By selecting “UNITS”: you can set the unit of measurement in "ml" or "oz". SETTING WATER HARDNESS BEVERAGE COUNTER BUTTON SOUND UNITS Beverage counter It is possible to display the number of cups of each beverage that have been dispensed since the first operation of ...
Page 27 - Error code key
27 English Error code key The list below reports the error codes that the display can show, their meanings and how to solve the problem. If the indicated solutions are ineffective because the display continues to show the error code icon and the machine does not return to normal operation, or if oth...
Page 28 - Troubleshooting
28 English Troubleshooting This chapter outlines the most common problems you may encounter while using the machine. If you are unable to solve the problem using the information provided below, visit the FAQ sections on www.gaggia.com or www.gaggia.it or contact the either the Customer Service Centr...
Page 32 - Nederlands; Inhoudsopgave; Waterfilter INTENZA+; Koffieafgifte; Aanpassing van de maalfijnheid; Betekenis van de foutcodes
32 Nederlands Inhoudsopgave Overzicht van de machine (afb. 2) .................................................................................................................................................................................................................................................
Page 33 - Versie stoompijpje
33 Nederlands Overzicht van de machine (afb. 2) 1 Controlepaneel 13 Zetgroep 2 Afstelbare koffietuit 14 Servicedeur 3 Deksel van het waterreservoir 15 Koffieopvanglade 4 Deksel van het koffiebonenreservoir 16 Koffieresidureservoir 5 Compartiment voorgemalen koffie 17 Lekbakje 6 Aansluiting voor voed...
Page 34 - Controlepaneel en display; Multifunctietoetsen
34 Nederlands Controlepaneel en display Multifunctietoetsen De multifunctionele toetsen aan de zijkanten van het display dienen om de functie of de drank te selecteren waarnaar ze op dat moment verwijzen. Overzicht van het controlepaneel (afb. 1) 1/2 MULTIFUNCTIETOETSEN Om de op het display aangegev...
Page 35 - Eerste installatie; Handmatige spoelcyclus
35 Nederlands Eerste installatie Voordat u de machine gebruikt, is het van essentieel belang dat u een paar eenvoudige stappen volgt, duidelijk beschreven in de beknopte handleiding aan het begin van deze handleiding met verklarende tekeningen. Opmerking: om een nog heerlijkere koffie te verkrijgen,...
Page 36 - Meting van de waterhardheid
36 Nederlands Meting van de waterhardheid Tijdens de eerste installatie, moet de waterhardheid ingesteld worden. Neem het meetstrookje van de waterhardheid uit de verpakking en volg de stappen die op het display weergegeven worden tijdens de installatiefase. Om de waterhardheid later te veranderen, ...
Page 37 - Vervanging van het waterfilter INTENZA+
37 Nederlands Installatie van het waterfilter INTENZA+ Dompel het waterfilter INTENZA+ in verticale positie (met de opening naar boven) in koud water en druk zachtjes op de zijkanten om de luchtbelletjes eruit te laten komen. Plaats het filter INTENZA+ in het waterreservoir en verzeker u ervan dat h...
Page 38 - Type drank
38 Nederlands Type drank Oorspronkelijk recept Beschrijving Espresso De espresso is in heel de wereld gekend als de echte "Italiaanse koffie". Hij wordt geserveerd in een klein kopje, met als onmiskenbare kenmerken een vol en intens aroma en een toplaag van compacte, natuurlijke room. Wat u ...
Page 40 - Afgifte van de koffie met voorgemalen koffie
40 Nederlands 3 Druk op de toets " ", tot selectie van " ". Opmerking : de functie "voorgemalen koffie" sluit de mogelijkheid uit om twee kopjes koffie tegelijk te zetten en het aroma in te stellen, wat alleen mogelijk is met koffiebonen. 4 Druk op de toets START/STOP START...
Page 41 - Hoe melk opschuimen; Model met de Klassieke Pannarello
41 Nederlands Hoe melk opschuimen Raad : gebruik koude melk (aan een temperatuur van ongeveer 5 °C) met een gehalte aan proteïnen van minstens 3% om een optimaal resultaat te garanderen voor het schuim. U kan zowel volle als halfvolle melk gebruiken. U kan bovendien afgeroomde melk, sojamelk en lact...
Page 42 - Model met stoompijpje
42 Nederlands 4 Druk op de toets HOME HOME om naar het drankenmenu te gaan. Selecteer de toets "STOOM" en druk op de toets START/STOP START/STOP om het opschuimen van de melk te laten beginnen. 5 Voor het juiste melkschuim moet de spuitmond voor stoom altijd in contact zijn met de melk en...
Page 43 - Afgifte van heet water; Aanpassing van de dranken en opslag; Aanpassing van de dranken
43 Nederlands Afgifte van heet water Let op : bij het begin van de bereiding kan, afhankelijk van het model, de Klassieke Pannarello of het stoompijpje stoom en heet water spuiten. 1 Plaats een houder onder de Klassieke Pannarello of het stoompijpje (al naargelang het model). 2 Druk op de toets HOME...
Page 46 - Reiniging en onderhoud; Reinigingstabel
46 Nederlands Reiniging en onderhoud Regelmatige reiniging en onderhoud houden de machine in optimale staat en garanderen een constante, uitstekende koffie, constante toevoer en uitstekend melkschuim. Raadpleeg de onderstaande tabel om te weten wanneer en hoe u alle verwijderbare delen van de machin...
Page 47 - Reiniging van de Klassieke Pannarello
47 Nederlands Beschrijving deel Wanneer reinigen Hoe reinigen Espresso tray In functie van het type gebruik Verwijder de espresso tray, reinig deze met stromend water. U kan deze ook in de bovenste mand van de vaatwasser reinigen. Reiniging van de Klassieke Pannarello 1 Verwijder de Klassieke Pannar...
Page 48 - Reiniging van de zetgroep; Verwijdering van de zetgroep; Reiniging van de zetgroep onder stromend water
48 Nederlands Reiniging van de zetgroep Let op : reinig de zetgroep niet in de vaatwasmachine en gebruik geen afwasmiddelen voor afwas- of reinigingsmiddelen, omdat dit de zetgroep kan beschadigen en de smaak van de koffie kan beïnvloeden. Verwijdering van de zetgroep 1 Schakel de machine uit en kop...
Page 49 - Herplaatsing van de zetgroep
49 Nederlands Herplaatsing van de zetgroep 1 Voordat u de zetgroep opnieuw in de machine plaatst, moet u ervoor zorgen dat de twee gele referentietekens aan de zijkant overeenkomen. Indien dit niet zo is, doet u als volgt: Zorg ervoor dat de hendel in aanraking komt met de basis van de zetgroep. 2 V...
Page 50 - Invetten van de zetgroep; Reiniging van de zetgroep met tabletten om de
50 Nederlands Invetten van de zetgroep Om optimale machineprestaties te garanderen, moet de zetgroep gesmeerd worden. Raadpleeg de volgende tabel voor de frequentie voor invetten. Frequentie van gebruik Dagelijks aantal bereide dranken Frequentie voor invetten Laag 1-5 Om de 4 maanden Normaal 6-10 O...
Page 51 - Ontkalking; Frequentie van de ontkalking
51 Nederlands 4 Breng een dunne laag smeervet aan op de geleiders, aan beide kanten (zie afbeelding). 5 Plaats de zetgroep opnieuw (zie het hoofdstuk "Herplaatsing van de zetgroep"). Opmerking : u kunt de tube smeervet meerdere keren hergebruiken. Ontkalking Frequentie van de ontkalking Wann...
Page 52 - Wat te doen in geval van onderbreking van de
52 Nederlands 6 Plaats een grote houder (1,5l) onder het stoompijpje en de koffietuit. 7 Volg de aanwijzingen die weergegeven worden op het display om de ontkalkingsprocedure te starten. Deze procedure duurt ongeveer 25 minuten en bestaat uit een ontkalkingscyclus en een spoelcyclus, uitgevoerd met ...
Page 53 - Verschillende instellingen; Taal
53 Nederlands Verschillende instellingen Door op de toets CLEAN/SET clean/setting te drukken en " INSTELLINGEN " te selecteren op het display, kunnen sommige machineparameters hersteld of gewijzigd worden, zoals: - Taal. - Waterfilter. - Stand-by tijd. - Meeteenheid. - Waterhardheid. - Drank...
Page 54 - Meeteenheid; Drankenteller; Waterhardheid; Toetsgeluid
54 Nederlands Meeteenheid Door "MEETEENHEID" te selecteren: kan men de meeteenheid instellen in "ml" of "once". SETTING WATER HARDNESS BEVERAGE COUNTER BUTTON SOUND UNITS Drankenteller Voor elke drank kan het aantal kopjes weergegeven worden dat afgegeven werd sinds de eerste...
Page 56 - Oplossing van problemen
56 Nederlands Oplossing van problemen Dit hoofdstuk vat de meest voorkomende problemen samen die u kunt aantreffen bij de machine. Als u het probleem niet kunt oplossen met de onderstaande informatie, ga dan naar www.gaggia.com of www.gaggia.it voor een lijst met veelgestelde vragen of neem contact ...
Page 59 - Accessoires GAGGIA; Technische gegevens
59 Nederlands Accessoires GAGGIA De koffie en de accessoires zijn beschikbaar in de erkende centra (Italië), of bij de dealers van uw land. Ontkalkingsoplossing Waterfilter INTENZA+ Koffieolieverwijderingstabletten Technische gegevens Nominale spanning - Nominaal vermogen - Voeding Zie plaatje aan d...
Page 60 - Polski; Spis treści
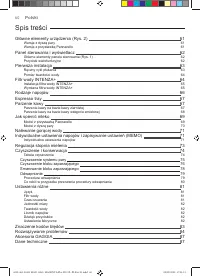
60 Polski Spis treści Główne elementy urządzenia (Rys. 2) .....................................................................................................................................................................................................................................................
Page 61 - Wersja z dyszą pary
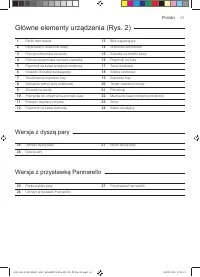
61 Polski Główne elementy urządzenia (Rys. 2) 1 Panel sterowania 13 Blok zaparzający 2 Regulowany dozownik kawy 14 Drzwiczki serwisowe 3 Pokrywa zbiornika na wodę 15 Kasetka na resztki kawy 4 Pokrywa pojemnika na kawę ziarnistą 16 Pojemnik na fusy 5 Pojemnik na kawę wstępnie zmieloną 17 Taca ociekow...
Page 62 - Panel sterowania i wyświetlacz; Przyciski wielofunkcyjne
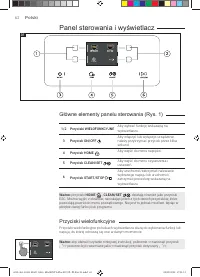
62 Polski Panel sterowania i wyświetlacz Przyciski wielofunkcyjne Przyciski wielofunkcyjne po bokach wyświetlacza służą do wybierania funkcji lub napoju, do której odnoszą się one w danym momencie. Główne elementy panelu sterowania (Rys. 1) 1/2 Przyciski WIELOFUNKCYJNE Aby wybrać funkcję wskazaną na...
Page 63 - Pierwsza instalacja; Ręczny cykl płukania
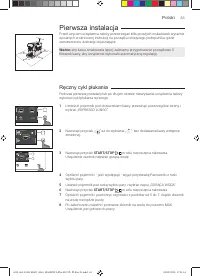
63 Polski Pierwsza instalacja Przed użyciem urządzenia należy przestrzegać kilku prostych wskazówek wyraźnie opisanych w skróconej instrukcji na początku niniejszego podręcznika, gdzie zamieszczono ilustracje objaśniające. Ważne: aby kawa smakowała lepiej, zalecamy przygotowanie początkowo 5 filiżan...
Page 64 - Pomiar twardości wody
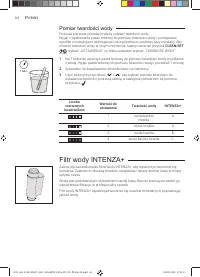
64 Polski Pomiar twardości wody Podczas pierwszej instalacji należy ustawić twardość wody. Wyjąć z opakowania pasek testowy do pomiaru twardości wody i postępować zgodnie z instrukcjami widniejącymi na wyświetlaczu podczas fazy instalacji. Aby zmienić twardość wody w innym momencie, należy nacisnąć ...
Page 65 - Instalacja filtra wody INTENZA+; Wymiana filtra wody INTENZA+
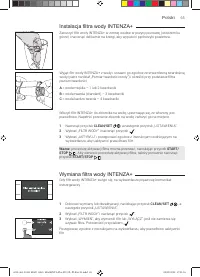
65 Polski Instalacja filtra wody INTENZA+ Zanurzyć filtr wody INTENZA+ w zimnej wodzie w pozycji pionowej (otworem ku górze) i nacisnąć delikatnie na brzegi, aby wypuścić pęcherzyki powietrza. Włożyć filtr INTENZA+ do zbiornika na wodę, upewniając się, że włożony jest prawidłowo. Napełnić ponownie z...
Page 66 - Rodzaje napojów
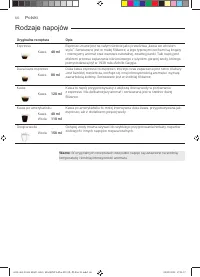
66 Polski Rodzaje napojów Oryginalna receptura Opis Espresso Espresso znane jest na całym świecie jako prawdziwa „kawa we włoskim stylu”. Serwowane jest w małej filiżance, a jego typowymi cechami są bogaty i intensywny aromat oraz warstwa naturalnej, zwartej pianki. Taki napój jest efektem procesu z...
Page 67 - Parzenie kawy na bazie kawy ziarnistej
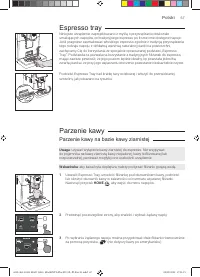
67 Polski Espresso tray Niniejsze urządzenie zaprojektowano z myślą o przyrządzaniu doskonale smakujących napojów, od tradycyjnego espresso po liczne inne dostępne napoje. Jeśli pragniesz zasmakować włoskiego espresso zgodnie z tradycją przyrządzania tego rodzaju napoju, z delikatną warstwą naturaln...
Page 68 - Parzenie kawy na bazie kawy wstępnie zmielonej
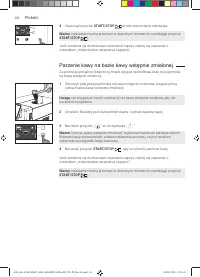
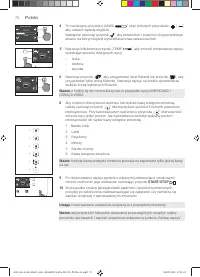
68 Polski 3 Naciskać przycisk „ ” aż do wybrania „ ”. Ważne : funkcja „kawy wstępnie zmielonej” wyklucza możliwość parzenia dwóch filiżanek kawy równocześnie, a także ustawienia aromatu, co jest możliwe wyłącznie w przypadku kawy ziarnistej. 4 Nacisnąć przycisk START/STOP START/STOP , aby uruchomi...
Page 69 - Jak spienić mleko; Model z przystawką Pannarello
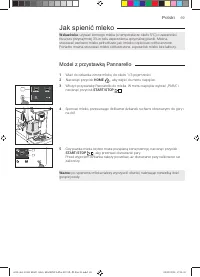
69 Polski Jak spienić mleko Wskazówka : używać zimnego mleka (o temperaturze około 5°C) o zawartości tłuszczu przynajmniej 3% w celu zapewnienia optymalnej pianki. Można stosować zarówno mleko pełnotłuste, jak i mleko częściowo odtłuszczone. Ponadto można stosować mleko odtłuszczone, sojowe lub mlek...
Page 70 - Model z dyszą pary
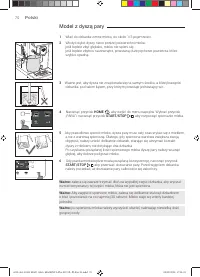
70 Polski 4 Nacisnąć przycisk HOME HOME , aby wejść do menu napojów. Wybrać przycisk „PARA” i nacisnąć przycisk START/STOP START/STOP , aby rozpocząć spienianie mleka. 5 Aby prawidłowo spienić mleko, dysza pary musi cały czas stykać się z mlekiem, a nie z warstwą spienioną. Dlatego, gdy spieniona...
Page 71 - Nalewanie gorącej wody; Indywidualne ustawienia napojów i; Indywidualne ustawienia napojów
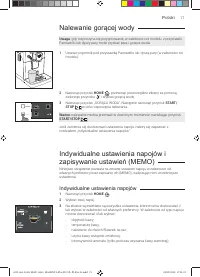
71 Polski Nalewanie gorącej wody Uwaga : gdy rozpoczyna się przygotowanie, w zależności od modelu, z przystawki Pannarello lub dyszy pary może pryskać para i gorąca woda. 1 Ustawić pojemnik pod przystawką Pannarello lub dyszą pary (w zależności od modelu). 2 Nacisnąć przycisk HOME HOME , przewinąć p...
Page 73 - Regulacja stopnia mielenia
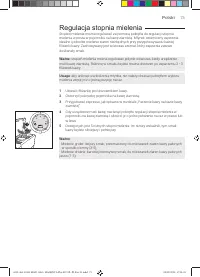
73 Polski Regulacja stopnia mielenia Stopień mielenia można regulować za pomocą pokrętła do regulacji stopnia mielenia w posta w pojemniku na kawę ziarnistą. Młynek ceramiczny zapewnia idealne i jednolite mielenie ziaren niezbędnych przy przygotowywaniu każdej filiżanki kawy. Zachowywany jest wówcza...
Page 74 - Czyszczenie i konserwacja; Tabela czyszczenia
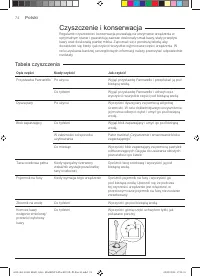
74 Polski Czyszczenie i konserwacja Regularne czyszczenie i konserwacja pozwalają na utrzymanie urządzenia w optymalnym stanie i gwarantują zawsze doskonały smak kawy, stały przepływ kawy oraz doskonałą piankę mleka. Zapoznać się z poniższą tabelą, aby dowiedzieć się, kiedy i jak czyścić wszystkie w...
Page 75 - Czyszczenie przystawki Pannarello
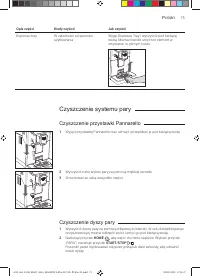
75 Polski Opis części Kiedy czyścić Jak czyścić Espresso tray W zależności od sposobu użytkowania Wyjąć Espresso Tray i wyczyścić pod bieżącą wodą. Można również umyć ten element w zmywarce, w górnym koszu. Czyszczenie przystawki Pannarello 1 Wyjąć przystawkę Pannarello oraz uchwyt i przepłukać je p...
Page 76 - Czyszczenie bloku zaparzającego; Wyjmowanie bloku zaparzającego
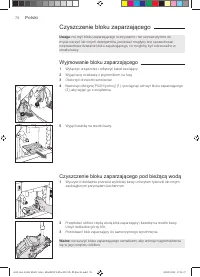
76 Polski Czyszczenie bloku zaparzającego Uwaga : nie myć bloku zaparzającego w zmywarce i nie używać płynów do mycia naczyń lub innych detergentów, ponieważ mogłyby one spowodować nieprawidłowe działanie bloku zaparzającego, co mogłoby być odczuwalne w smaku kawy. Wyjmowanie bloku zaparzającego 1 W...
Page 77 - Wkładanie bloku zaparzającego na miejsce
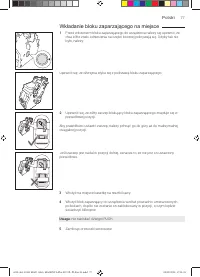
77 Polski Wkładanie bloku zaparzającego na miejsce 1 Przed włożeniem bloku zaparzającego do urządzenia należy się upewnić, że dwa żółte znaki odniesienia na części bocznej pokrywają się. Gdyby tak nie było, należy: Upewnić się, że dźwignia styka się z podstawą bloku zaparzającego. 2 Upewnić się, że ...
Page 78 - Smarowanie bloku zaparzającego; Czyszczenie bloku zaparzającego za pomocą
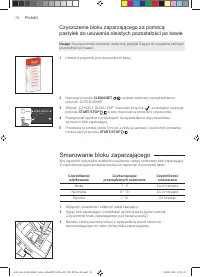
78 Polski Smarowanie bloku zaparzającego Aby zapewnić optymalne działanie urządzenia, należy smarować blok zaparzający. Z częstotliwością smarowania można się zapoznać w poniższej tabeli. Częstotliwość użytkowania Liczba napojów przyrządzanych codziennie Częstotliwość smarowania Niska 1 - 5 Co 4 mie...
Page 79 - Odwapnianie; Procedura odwapniania
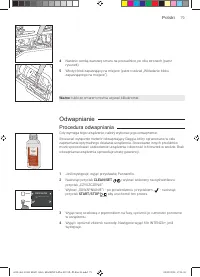
79 Polski 4 Nanieść cienką warstwę smaru na prowadnice, po obu stronach (patrz rysunek). 5 Włożyć blok zaparzający na miejsce (patrz rozdział „Wkładanie bloku zaparzającego na miejsce”). Ważne : tubki ze smarem można używać kilkukrotnie. Odwapnianie Procedura odwapniania Gdy wymaga tego urządzenie, ...
Page 80 - Co robić w przypadku przerwania procedury
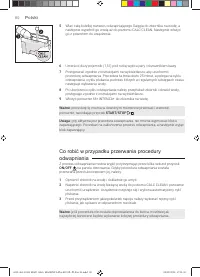
80 Polski 6 Umieścić duży pojemnik (1,5 l) pod rurką wylotu pary i dozownikiem kawy. 7 Postępować zgodnie z instrukcjami na wyświetlaczu, aby uruchomić procedurę odwapniania. Procedura ta trwa około 25 minut, a polega na cyklu odwapniania i cyklu płukania, podczas których w regularnych odstępach cza...
Page 81 - Ustawienia różne; Język; Czas czuwania; Filtr wody
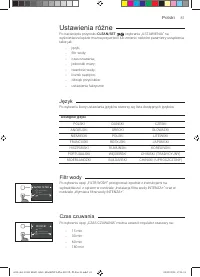
81 Polski Ustawienia różne Po naciśnięciu przycisku CLEAN/SET clean/setting i wybraniu „ USTAWIENIA” na wyświetlaczu będzie można przywrócić lub zmienić niektóre parametry urządzenia, takie jak: - język; - filtr wody; - czas czuwania; - jednostki miary; - twardość wody; - licznik napojów; - dźwięk p...
Page 82 - Jednostki miary; Licznik napojów; Ustawienia fabryczne; Dźwięk przycisków
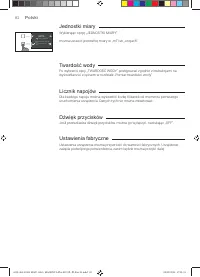
82 Polski Jednostki miary Wybierając opcję „JEDNOSTKI MIARY”: można ustawić jednostkę miary w „ml” lub „uncjach”. SETTING WATER HARDNESS BEVERAGE COUNTER BUTTON SOUND UNITS Licznik napojów Dla każdego napoju można wyświetlić liczbę filiżanek od momentu pierwszego uruchomienia urządzenia. Danych tych...
Page 83 - Znaczenie kodów błędów
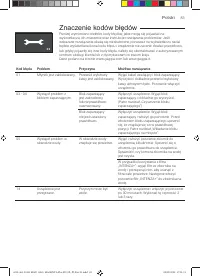
83 Polski Znaczenie kodów błędów Poniżej wymieniono niektóre kody błędów, jakie mogą się pojawiać na wyświetlaczu, ich znaczenie oraz instrukcje rozwiązania problemów. Jeśli wskazane rozwiązania okażą się nieskuteczne, ponieważ na wyświetlaczu nadal będzie wyświetlana ikona kodu błędu i urządzenie n...
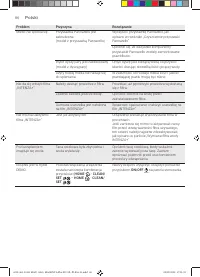
Page 84 - Rozwiązywanie problemów
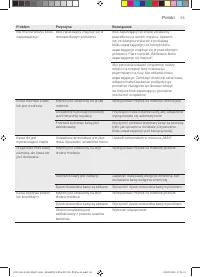
84 Polski Rozwiązywanie problemów W niniejszym rozdziale podsumowano najczęstsze problemy, jakie mogą występować w tym urządzeniu. Jeśli problemu nie uda się rozwiązać, korzystając z podanych poniżej informacji, należy wejść na stronę www.gaggia.com lub www. gaggia.it, aby zapoznać się z często zada...
Page 87 - Akcesoria GAGGIA
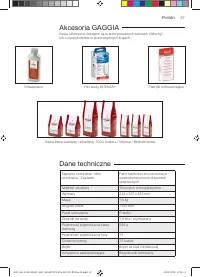
87 Polski Akcesoria GAGGIA Kawa i akcesoria dostępne są w autoryzowanych salonach (Włochy) lub u dystrybutorów w poszczególnych krajach. Odwapniacz Filtr wody INTENZA+ Pastylki odtłuszczające Dane techniczne Napięcie nominalne - Moc nominalna - Zasilanie Patrz tabliczka umieszczona po wewnętrznej st...
Page 88 - GAGGIA
GAGGIA S.p.A. reser ves the right to make any necessar y modification. GAGGIA S.p.a. behoudt zich het recht voor om alle wijzigingen die zij noodzakelijk acht aan te brengen. GAGGIA S.p.a. zastrzega sobie prawo do wprowadzania dowolnych zmian. C O D . - Rev .01 - 03/09/20 GAGGIA S.p.A. Sede Amminist...