Page 3 - POLSKI
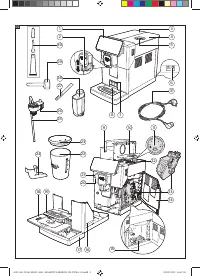
Congratulations on your purchase of Gaggia Magenta Milk! This easy-to-use machine guarantees excellent results every day. Thanks to the intuitive interface, you can choose among 9 beverages and customise them according to your preferences. Before being packed, each of our high-quality machines under...
Page 5 - English; Contents
5 English Contents Machine overview (Fig.2) ...................................................................................................................................................................................................................................................................
Page 7 - Control panel and display; Multifunction buttons
7 English Control panel and display Multifunction buttons The multifunction buttons on the sides of the display are used to select the function or the beverage to which they refer at that time. Control panel overview (Fig. 1) 1/2 MULTIFUNCTION buttons Select the function shown on the display. 3 ON/O...
Page 8 - First installation; Manual rinse cycle
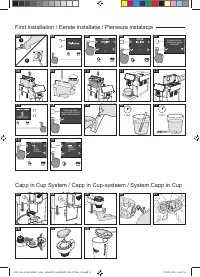
8 English First installation Before using the machine, it is essential to follow a few simple steps, clearly described in the explanatory drawings you found in the quick guide at the beginning of this instruction manual. Note: for even tastier coffee, we recommend that you initially prepare 5 cups o...
Page 9 - Measuring water hardness; INTENZA+ water filter
9 English Measuring water hardness You will need to set the water hardness when you install your machine. Take the water hardness measuring strip contained in the packaging and follow the steps shown on the display during the installation phase. To change the water hardness later, press the CLEAN/SE...
Page 10 - Installing the INTENZA+ water filter; Replacing the INTENZA+ water filter
10 English Installing the INTENZA+ water filter Immerse the INTENZA+ water filter in cold water, in a vertical position and with the opening facing upwards. Press both sides of the filter gently to let air bubbles out. Place the INTENZA+ filter in the water tank, ensuring it is correctly positioned....
Page 11 - Types of beverage
11 English Types of beverage Original recipe Description Ristretto A ristretto, served in a small cup, is an espresso whose brewing time is shorter than a regular espresso. This results in a coffee that is shorter and less in rich in caffeine. Coffee 30 ml Espresso The espresso is known around the g...
Page 12 - Espresso tray; Coffee Brewing; Brewing coffee using coffee beans
12 English Espresso tray This machine was designed to guarantee flawless results, from a traditional espresso to a number of different beverages. If you want to enjoy an Italian espresso with a delicious layer of its natural “crema” on top and as tradition dictates, we suggest your using of the "...
Page 13 - Brewing coffee using pre-ground coffee
13 English 3 Press the " " button until " " is selected. Note : The “pre-ground coffee” function excludes the possibility of brewing two cups of coffee at the same time, as well as the aroma setting. In fact, these are only possible with coffee beans . 4 Press the START/STOP START/S...
Page 14 - Preparation of coffee-based beverages; How to assemble the Capp in Cup system; Brewing coffee-based and frothed milk beverages
14 English Preparation of coffee-based beverages and frothed milk How to assemble the Capp in Cup system Note : Before preparing any milk-based beverage, make sure that the Capp in Cup system is fitted properly on the machine. 1 Fit the spout on the main body of the Capp in Cup system. 2 Insert the ...
Page 15 - Dispensing hot water
15 English 4 Press the HOME HOME button and choose the desired beverage from the menu. - Press the button corresponding to the desired beverage. - Press the START/STOP START/STOP button to start dispensing the selected bever- age. 5 The machine dispenses a default amount of coffee and frothed milk...
Page 16 - Customising beverages and saving; Beverage Customisation
16 English 3 Press the "HOT WATER" button Finally, press the START/STOP START/STOP button to commence dispensing. Note : you can interrupt dispensing at any time by pressing the START/STOP START/STOP button. If you wish to customise the settings of a specific beverage, please refer to the “B...
Page 17 - Coffee grind settings
17 English 8 To change the intensity of the aroma or select the pre-ground, press the “ “ button. You can choose among 5 different degrees of intensity. Every time you press the “ ” button, the aroma strength changes by one degree. The display shows the selected intensity or the selection of the pre...
Page 18 - Cleaning and maintenance; Cleaning table
18 English 4 While the machine is grinding coffee, press the grind settings adjustment knob in the bean container and turn it one notch at a time, to the left or right. 5 You can select from 5 different grinding settings. The smaller the notch, the stronger and richer the coffee. Note : - Coarse gri...
Page 20 - Capp in Cup system Cleaning Programmes; Cleaning of the Capp in Cup system under running
20 English Cleaning the Capp in Cup system Capp in Cup system Cleaning Programmes The machine allows two cleaning programmes for the Capp in Cup system: quick and deep clean. Both programmes can be selected with the CLEAN/SET clean/setting button. Press the “CLEANING” button upon selection. Quick cl...
Page 21 - Cleaning the brew group; Removing the brew group
21 English Cleaning the brew group Warning : do not wash the brew group in the dishwasher and do not use dishwashing detergents, since they may cause the malfunctioning of the brew group and alter the coffee flavour. Removing the brew group 1 Turn off the machine and disconnect the power cord. 2 Rem...
Page 22 - Reinserting the brew group
22 English Reinserting the brew group 1 Before placing the brew group back into the machine, make sure that the two yellow reference marks on the side match. If this is not the case, perform the following step: Make sure that the lever is in contact with the base of the brew group. 2 Make sure that ...
Page 23 - Lubricating the brew group; Cleaning the brew group with cleaning tablets for the
23 English Lubricating the brew group In order to ensure the perfect performance of the machine, it is necessary to lubricate the brew group. Refer to the following table for the frequency of lubrication. Frequency of use Number of beverages prepared daily Lubrication frequency Low 1-5 Every 4 month...
Page 24 - Descaling; Descaling procedure
24 English 4 Apply a thin layer of lubricant to the guides, on both sides (see figure). 5 Reinsert the brew group - see the “Reinserting the brew group” chapter. Note : you can use the lubricant tube multiple times. Descaling Descaling procedure Descaling needs to be carried out when the machine req...
Page 25 - What to do if the descaling process is interrupted
25 English 6 Place a large recipient (1.5l) under the steam tube and the coffee dispensing spout. 7 Follow the instructions shown on the display to launch the descaling procedure. This procedure lasts approximately 25 minutes and consists of a descaling cycle and a rinse cycle, carried out with disp...
Page 26 - Other settings; Language
26 English Other settings By pressing the CLEAN/SET clean/setting button and selecting “SETTINGS” on the display, you can reset or modify some of the machine parameters including: - Language. - Water filter. - Stand-by Time. - Units. - Water hardness. - Beverage counter. - Button sound - Factory set...
Page 27 - Units; Beverage counter; Water hardness; Button sound
27 English Units By selecting “UNITS”: you can set the unit of measurement in "ml" or "oz". SETTING WATER HARDNESS BEVERAGE COUNTER BUTTON SOUND UNITS Beverage counter It is possible to display the number of cups of each beverage that have been dispensed since the first operation of ...
Page 28 - Error code key
28 English Error code key The list below reports the error codes that the display can show, their meanings and how to solve the problem. If the indicated solutions are ineffective because the display continues to show the error code icon and the machine does not return to normal operation, or if oth...
Page 29 - Troubleshooting
29 English Troubleshooting This chapter outlines the most common problems you may encounter while using the machine. If you are unable to solve the problem using the information provided below, visit the FAQ sections on www.gaggia.com or www.gaggia.it or contact the either the Customer Service Centr...
Page 32 - GAGGIA accessories
32 English GAGGIA accessories Coffee and accessories are available through authorised centres (Italy), or distributors in your country. Technical specifications Nominal voltage - Power rating - Power supply See data plate on the inside of the service door Housing material Thermoplastic type Dimensio...
Page 33 - Nederlands; Inhoudsopgave
33 Nederlands Inhoudsopgave Overzicht van de machine (afb. 2) .................................................................................................................................................................................................................................................
Page 35 - Controlepaneel en display; Multifunctietoetsen
35 Nederlands Controlepaneel en display Multifunctietoetsen De multifunctionele toetsen aan de zijkanten van het display dienen om de functie of de drank te selecteren waarnaar ze op dat moment verwijzen. Overzicht van het controlepaneel (afb. 1) 1/2 MULTIFUNCTIETOETSEN Om de op het display aangegev...
Page 36 - Eerste installatie; Handmatige spoelcyclus
36 Nederlands Eerste installatie Voordat u de machine gebruikt, is het van essentieel belang dat u een paar eenvoudige stappen volgt, duidelijk beschreven in de beknopte handleiding aan het begin van deze handleiding met verklarende tekeningen. Opmerking: om een nog heerlijkere koffie te verkrijgen,...
Page 37 - Meting van de waterhardheid
37 Nederlands Meting van de waterhardheid Tijdens de eerste installatie, moet de waterhardheid ingesteld worden. Neem het meetstrookje van de waterhardheid uit de verpakking en volg de stappen die op het display weergegeven worden tijdens de installatiefase. Om de waterhardheid later te veranderen, ...
Page 38 - Installatie van het waterfilter INTENZA+; Vervanging van het waterfilter INTENZA+
38 Nederlands Installatie van het waterfilter INTENZA+ Dompel het waterfilter INTENZA+ in verticale positie (met de opening naar boven) in koud water en druk zachtjes op de zijkanten om de luchtbelletjes eruit te laten komen. Plaats het filter INTENZA+ in het waterreservoir en verzeker u ervan dat h...
Page 39 - Type drank
39 Nederlands Type drank Oorspronkelijk recept Beschrijving Ristretto De ristretto, geserveerd in een klein kopje, is een espresso met een kortere afgiftetijd in vergelijking met de klassieke espresso, wat resulteert in een kortere en minder cafeïnehoudende koffie. Koffie 30 ml Espresso De espresso ...
Page 40 - Koffieafgifte; Afgifte van koffie met koffiebonen
40 Nederlands Espresso tray Deze machine is ontworpen om onberispelijke resultaten in het kopje te garanderen, van de traditionele espresso tot tal van andere beschikbare dranken. Als u een Italiaanse espresso wilt proeven zoals de traditie vereist, met een heerlijke laag natuurlijke room op het opp...
Page 41 - Afgifte van de koffie met voorgemalen koffie
41 Nederlands 3 Druk op de toets " ", tot selectie van " ". Opmerking : de functie "voorgemalen koffie" sluit de mogelijkheid uit om twee kopjes koffie tegelijk te zetten en het aroma in te stellen, wat alleen mogelijk is met koffiebonen. 4 Druk op de toets START/STOP START...
Page 42 - Bereiding van dranken op basis van; Hoe het Capp in Cup-systeem assembleren; Afgifte van de dranken op basis van koffie en
42 Nederlands Bereiding van dranken op basis van koffie en opgeschuimde melk Hoe het Capp in Cup-systeem assembleren Opmerking : Voordat u een drank op basis van melk bereidt, moet u ervoor zorgen dat het Capp in Cup-systeem correct op de machine gemonteerd is. 1 Assembleer het pijpje op het central...
Page 44 - Afgifte van heet water; Aanpassing van de dranken en opslag; Aanpassing van de dranken
44 Nederlands Afgifte van heet water Let op : wanneer de voorbereiding begint, kan het stoompijpje stoom en heet water afspuiten. 1 Verwijder het Capp in Cup-systeem en plaats een houder onder het stoompijpje. 2 Druk op de toets HOME HOME , doorloop de verschillende schermen met de groene toets "...
Page 46 - Aanpassing van de maalfijnheid
46 Nederlands Aanpassing van de maalfijnheid U kunt de maalfijnheid aanpassen met de instelknop voor de maalfijnheid die zich in de koffiebonencontainer bevindt. De keramische koffiemolen garandeert een perfecte en homogene maling voor de bereiding van elk kopje koffie. Zo wordt het aroma bewaard, o...
Page 47 - Reiniging en onderhoud; Reinigingstabel
47 Nederlands Reiniging en onderhoud Regelmatige reiniging en onderhoud houden de machine in optimale staat en garanderen een constante, uitstekende koffie, constante toevoer en uitstekend melkschuim. Raadpleeg de onderstaande tabel om te weten wanneer en hoe u alle verwijderbare delen van de machin...
Page 48 - Reinigingsprogramma‘s van het Capp in Cup-systeem
48 Nederlands Beschrijving deel Wanneer reinigen Hoe reinigen Koffieresidureservoir Wanneer de machine dit vereist Leeg het koffieresidureservoir en reinig het onder stromend water. Verzeker u ervan dat de machine ingeschakeld is tijdens deze werkzaamheid, anders wordt het koffieresidureservoir niet...
Page 49 - Reiniging van het Capp in Cup-systeem onder; Reiniging van de zetgroep; Verwijdering van de zetgroep
49 Nederlands Reiniging van het Capp in Cup-systeem onder stromend water Let op : het stoompijpje kan heet zijn na gebruik. 1 Verwijder het Capp in Cup-systeem van het stoompijpje (afb. 23). 2 Verwijder de rubberen handgreep van het stoompijpje (afb. 24). 3 Verwijder het pijpje van het Capp in Cup-s...
Page 50 - Reiniging van de zetgroep onder stromend water; Herplaatsing van de zetgroep
50 Nederlands Reiniging van de zetgroep onder stromend water 1 Reinig de koffieleiding grondig met de steel van een lepeltje of met een ander afgerond keukengereedschap. 2 Spoel de zetgroep en de koffieopvanglade grondig met lauw water. Reinig het bovenste filter zorgvuldig. 3 Laat de zetgroep aan d...
Page 51 - Reiniging van de zetgroep met tabletten om de
51 Nederlands Indien de haak nog onderaan is, betekent dit dat hij niet correct gepositioneerd is. 3 Verwijder de koffieopvanglade. 4 Plaats de zetgroep opnieuw in de machine langs de geleiders aan de zijkanten totdat deze met een klik op zijn plaats blokkeert. Let op : druk niet op de hendel PUSH. ...
Page 52 - Invetten van de zetgroep
52 Nederlands Invetten van de zetgroep Om optimale machineprestaties te garanderen, moet de zetgroep gesmeerd worden. Raadpleeg de volgende tabel voor de frequentie voor invetten. Frequentie van gebruik Dagelijks aantal bereide dranken Frequentie voor invetten Laag 1-5 Om de 4 maanden Normaal 6-10 O...
Page 53 - Ontkalking; Frequentie van de ontkalking
53 Nederlands Ontkalking Frequentie van de ontkalking Wanneer de machine dit vereist, moet de ontkalking uitgevoerd worden.Gebruik alleen de ontkalkingsoplossing van Gaggia die ontworpen is om optimale prestaties van de machine te garanderen. Het gebruik van andere producten zou schade aan de machin...
Page 54 - Wat te doen in geval van onderbreking van de; Verschillende instellingen; Taal
54 Nederlands Wat te doen in geval van onderbreking van de ontkalkingsprocedure U kan de ontkalkingsprocedure verlaten door de ON/OFF ON/OFF toets op het controlepaneel, enkele sekonden ingedrukt te houden. Als de ontkalkingsprocedure onderbroken wordt voordat deze is voltooid, voert u het volgende ...
Page 55 - Waterfilter; Drankenteller; Waterhardheid; Toetsgeluid
55 Nederlands Stand-by tijd Na "STAND-BY-TIJD" geselecteerd te hebben, kan de timer ingesteld worden op: - 15 min. - 30 min. - 60 min. - 180 min. SETTING WATER HARDNESS BEVERAGE COUNTER STAND-BY UNITS SETTING WATER FILTER TIMER STAND-BY WATER HARDNESS UNITS Waterfilter Nadat "WATERFILTER...
Page 56 - Betekenis van de foutcodes
56 Nederlands Betekenis van de foutcodes Hieronder staan een aantal foutcodes die het display kan weergeven, hun betekenis en hoe het probleem op te lossen. Als de aangegeven oplossingen niet werken en het display het pictogram van de foutcode blijft weergeven en de machine niet correct werkt, of al...
Page 57 - Oplossing van problemen
57 Nederlands Oplossing van problemen Dit hoofdstuk vat de meest voorkomende problemen samen die u kunt aantreffen bij de machine. Als u het probleem niet kunt oplossen met de onderstaande informatie, ga dan naar www.gaggia.com of www.gaggia.it voor een lijst met veelgestelde vragen of neem contact ...
Page 60 - Accessoires GAGGIA; Technische gegevens
60 Nederlands Accessoires GAGGIA De koffie en de accessoires zijn beschikbaar in de erkende centra (Italië), of bij de dealers van uw land. Ontkalkingsoplossing Waterfilter INTENZA+ Koffieolieverwijderingstabletten Milk circuit cleaner (Philips) Technische gegevens Nominale spanning - Nominaal vermo...
Page 61 - Polski; Spis treści; Pierwsza instalacja; Dane techniczne
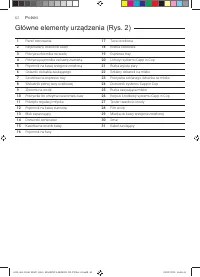
61 Polski Spis treści Główne elementy urządzenia (Rys. 2) .....................................................................................................................................................................................................................................................
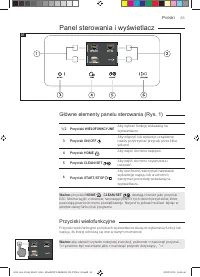
Page 63 - Panel sterowania i wyświetlacz; Przyciski wielofunkcyjne
63 Polski Panel sterowania i wyświetlacz Przyciski wielofunkcyjne Przyciski wielofunkcyjne po bokach wyświetlacza służą do wybierania funkcji lub napoju, do której odnoszą się one w danym momencie. Główne elementy panelu sterowania (Rys. 1) 1/2 Przyciski WIELOFUNKCYJNE Aby wybrać funkcję wskazaną na...
Page 64 - Ręczny cykl płukania
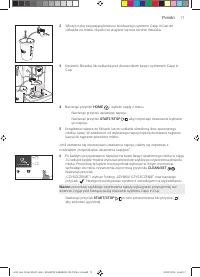
64 Polski Pierwsza instalacja Przed użyciem urządzenia należy przestrzegać kilku prostych wskazówek wyraźnie opisanych w skróconej instrukcji na początku niniejszego podręcznika, gdzie zamieszczono ilustracje objaśniające. Ważne: aby kawa smakowała lepiej, zalecamy przygotowanie początkowo 5 filiżan...
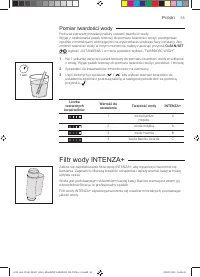
Page 65 - Pomiar twardości wody
65 Polski Pomiar twardości wody Podczas pierwszej instalacji należy ustawić twardość wody. Wyjąć z opakowania pasek testowy do pomiaru twardości wody i postępować zgodnie z instrukcjami widniejącymi na wyświetlaczu podczas fazy instalacji. Aby zmienić twardość wody w innym momencie, należy nacisnąć ...
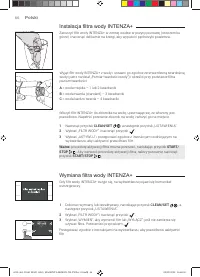
Page 66 - Instalacja filtra wody INTENZA+; Wymiana filtra wody INTENZA+
66 Polski Instalacja filtra wody INTENZA+ Zanurzyć filtr wody INTENZA+ w zimnej wodzie w pozycji pionowej (otworem ku górze) i nacisnąć delikatnie na brzegi, aby wypuścić pęcherzyki powietrza. Włożyć filtr INTENZA+ do zbiornika na wodę, upewniając się, że włożony jest prawidłowo. Napełnić ponownie z...
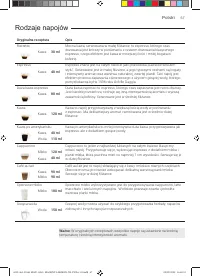
Page 67 - Rodzaje napojów
67 Polski Rodzaje napojów Oryginalna receptura Opis Ristretto Mocna kawa, serwowana w małej filiżance: to espresso, którego czas dozowania jest krótszy w porównaniu z czasem dozowania klasycznego espresso, czego efektem jest kawa w mniejszej ilości i mniej bogata w kofeinę. Kawa 30 ml Espresso Espre...
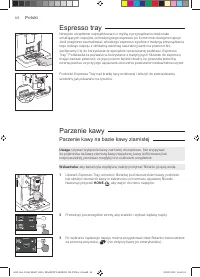
Page 68 - Parzenie kawy na bazie kawy ziarnistej
68 Polski Espresso tray Niniejsze urządzenie zaprojektowano z myślą o przyrządzaniu doskonale smakujących napojów, od tradycyjnego espresso po liczne inne dostępne napoje. Jeśli pragniesz zasmakować włoskiego espresso zgodnie z tradycją przyrządzania tego rodzaju napoju, z delikatną warstwą naturaln...
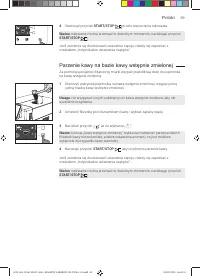
Page 69 - Parzenie kawy na bazie kawy wstępnie zmielonej
69 Polski 3 Naciskać przycisk „ ” aż do wybrania „ ”. Ważne : funkcja „kawy wstępnie zmielonej” wyklucza możliwość parzenia dwóch filiżanek kawy równocześnie, a także ustawienia aromatu, co jest możliwe wyłącznie w przypadku kawy ziarnistej. 4 Nacisnąć przycisk START/STOP START/STOP , aby uruchomi...
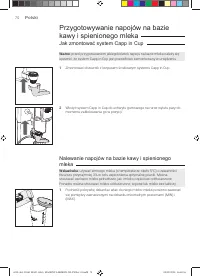
Page 70 - Przygotowywanie napojów na bazie; Jak zmontować system Capp in Cup; Nalewanie napojów na bazie kawy i spienionego
70 Polski Przygotowywanie napojów na bazie kawy i spienionego mleka Jak zmontować system Capp in Cup Ważne : przed przygotowaniem jakiegokolwiek napoju na bazie mleka należy się upewnić, że system Capp in Cup jest prawidłowo zamontowany w urządzeniu. 1 Zmontować dozownik z korpusem środkowym systemu...
Page 72 - Nalewanie gorącej wody; Indywidualne ustawienia napojów i; Indywidualne ustawienia napojów
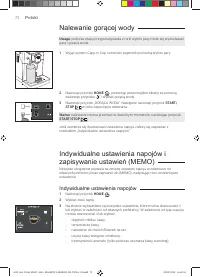
72 Polski Nalewanie gorącej wody Uwaga : podczas etapu przygotowywania z rurki wylotu pary może się wydostawać para i gorąca woda. 1 Wyjąć system Capp in Cup i umieścić pojemnik pod rurką wylotu pary. 2 Nacisnąć przycisk HOME HOME , przewinąć poszczególne ekrany za pomocą zielonego przycisku „ ” i w...
Page 74 - Regulacja stopnia mielenia
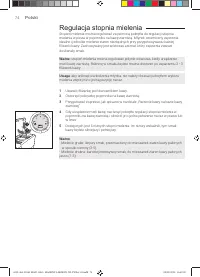
74 Polski Regulacja stopnia mielenia Stopień mielenia można regulować za pomocą pokrętła do regulacji stopnia mielenia w posta w pojemniku na kawę ziarnistą. Młynek ceramiczny zapewnia idealne i jednolite mielenie ziaren niezbędnych przy przygotowywaniu każdej filiżanki kawy. Zachowywany jest wówcza...
Page 75 - Czyszczenie i konserwacja
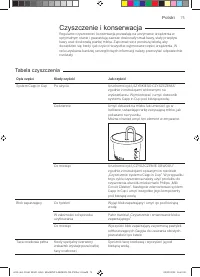
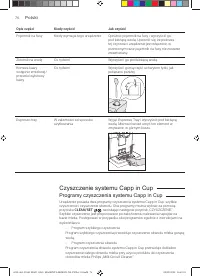
75 Polski Czyszczenie i konserwacja Regularne czyszczenie i konserwacja pozwalają na utrzymanie urządzenia w optymalnym stanie i gwarantują zawsze doskonały smak kawy, stały przepływ kawy oraz doskonałą piankę mleka. Zapoznać się z poniższą tabelą, aby dowiedzieć się, kiedy i jak czyścić wszystkie w...
Page 76 - Programy czyszczenia systemu Capp in Cup
76 Polski Opis części Kiedy czyścić Jak czyścić Pojemnik na fusy Kiedy wymaga tego urządzenie Opróżnić pojemnik na fusy i wyczyścić go pod bieżącą wodą. Upewnić się, że podczas tej czynności urządzenie jest włączone, w przeciwnym razie pojemnik na fusy nie zostanie zresetowany. Zbiornik na wodę Co t...
Page 77 - Czyszczenie systemu Capp in Cup pod bieżącą wodą; Czyszczenie bloku zaparzającego; Wyjmowanie bloku zaparzającego
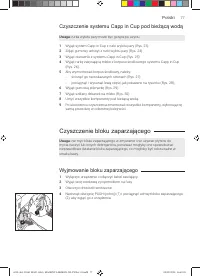
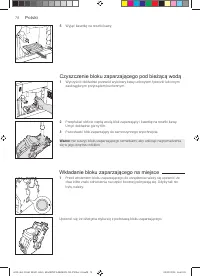
77 Polski Czyszczenie systemu Capp in Cup pod bieżącą wodą Uwaga : rurka wylotu pary może być gorąca po użyciu. 1 Wyjąć system Capp in Cup z rurki wylotu pary (Rys. 23). 2 Zdjąć gumowy uchwyt z rurki wylotu pary (Rys. 24). 3 Wyjąć dozownik z systemu Capp in Cup (Rys. 25). 4 Wyjąć rurkę zasysającą ml...
Page 78 - Czyszczenie bloku zaparzającego pod bieżącą wodą; Wkładanie bloku zaparzającego na miejsce
78 Polski Czyszczenie bloku zaparzającego pod bieżącą wodą 1 Wyczyścić dokładnie przewód wylotowy kawy uchwytem łyżeczki lub innym zaokrąglonym przyrządem kuchennym. 2 Przepłukać obficie ciepłą wodą blok zaparzający i kasetkę na resztki kawy. Umyć dokładnie górny filtr. 3 Pozostawić blok zaparzający...
Page 79 - Czyszczenie bloku zaparzającego za pomocą
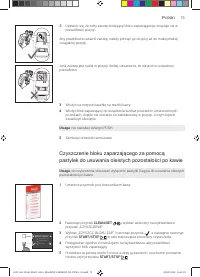
79 Polski Jeśli zaczep jest nadal w pozycji dolnej, oznacza to, że nie jest on ustawiony prawidłowo. 3 Włożyć na miejsce kasetkę na resztki kawy. 4 Włożyć blok zaparzający do urządzenia wzdłuż prowadnic umieszczonych po bokach, dopóki nie zostanie on zablokowany w pozycji, o czym będzie świadczyć kl...
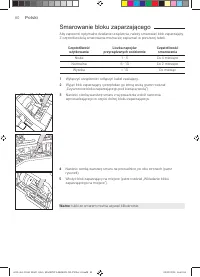
Page 80 - Smarowanie bloku zaparzającego
80 Polski Smarowanie bloku zaparzającego Aby zapewnić optymalne działanie urządzenia, należy smarować blok zaparzający. Z częstotliwością smarowania można się zapoznać w poniższej tabeli. Częstotliwość użytkowania Liczba napojów przyrządzanych codziennie Częstotliwość smarowania Niska 1 - 5 Co 4 mie...
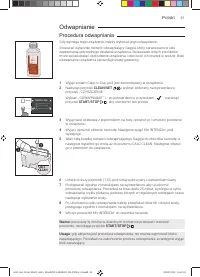
Page 81 - Odwapnianie
81 Polski Odwapnianie Procedura odwapniania Gdy wymaga tego urządzenie, należy wykonać jego odwapnienie.Stosować wyłącznie roztwór odwapniający Gaggia, który opracowano w celu zapewniania optymalnego działania urządzenia. Stosowanie innych produktów może spowodować uszkodzenie urządzenia i obecność ...
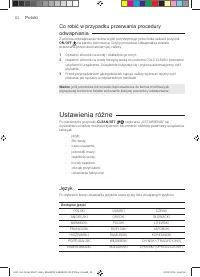
Page 82 - Co robić w przypadku przerwania procedury; Ustawienia różne; Język
82 Polski Co robić w przypadku przerwania procedury odwapniania Z procesu odwapniania można wyjść przytrzymując przez kilka sekund przycisk ON/OFF ON/OFF na panelu sterowania. Gdyby procedura odwapniania została przerwana przed ukończeniem jej, należy: 1 Opróżnić zbiornik na wodę i dokładnie go umyć...
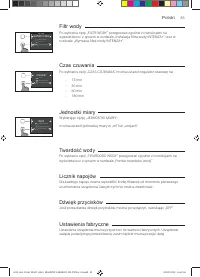
Page 83 - Czas czuwania; Filtr wody; Jednostki miary; Licznik napojów; Ustawienia fabryczne; Dźwięk przycisków
83 Polski Czas czuwania Po wybraniu opcji „CZAS CZUWANIA” można ustawić regulator czasowy na: - 15 min - 30 min - 60 min - 180 min SETTING WATER HARDNESS BEVERAGE COUNTER STAND-BY UNITS SETTING WATER FILTER TIMER STAND-BY WATER HARDNESS UNITS Filtr wody Po wybraniu opcji „FILTR WODY” postępować zgod...
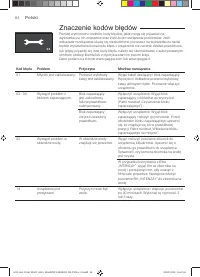
Page 84 - Znaczenie kodów błędów
84 Polski Znaczenie kodów błędów Poniżej wymieniono niektóre kody błędów, jakie mogą się pojawiać na wyświetlaczu, ich znaczenie oraz instrukcje rozwiązania problemów. Jeśli wskazane rozwiązania okażą się nieskuteczne, ponieważ na wyświetlaczu nadal będzie wyświetlana ikona kodu błędu i urządzenie n...
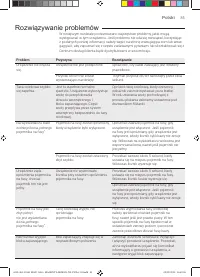
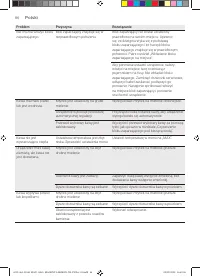
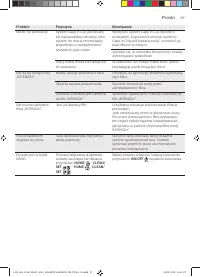
Page 85 - Rozwiązywanie problemów
85 Polski Rozwiązywanie problemów W niniejszym rozdziale podsumowano najczęstsze problemy, jakie mogą występować w tym urządzeniu. Jeśli problemu nie uda się rozwiązać, korzystając z podanych poniżej informacji, należy wejść na stronę www.gaggia.com lub www. gaggia.it, aby zapoznać się z często zada...
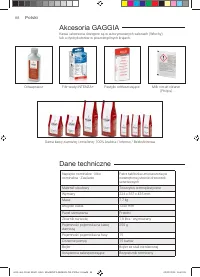
Page 88 - Akcesoria GAGGIA
88 Polski Akcesoria GAGGIA Kawa i akcesoria dostępne są w autoryzowanych salonach (Włochy) lub u dystrybutorów w poszczególnych krajach. Odwapniacz Filtr wody INTENZA+ Pastylki odtłuszczające Milk circuit cleaner (Philips) Dane techniczne Napięcie nominalne - Moc nominalna - Zasilanie Patrz tabliczk...
Page 92 - GAGGIA
GAGGIA S.p.A. reser ves the right to make any necessar y modification. GAGGIA S.p.a. behoudt zich het recht voor om alle wijzigingen die zij noodzakelijk acht aan te brengen. GAGGIA S.p.a. zastrzega sobie prawo do wprowadzania dowolnych zmian. C O D . - Rev .02 - 03/09/20 GAGGIA S.p.A. Sede Amminist...