Page 2 - Welcome to the Danby family.; You must keep the original proof
1 Welcome to the Danby family. We are proud of our quality products and we believe in dependable service. We suggest that you read this owner’s manual before plugging in your new appliance as it contains important operation information, safety information, troubleshooting, and maintenance tips to en...
Page 3 - Important Safety Information; READ AND FOLLOW ALL SAFETY INSTRUCTIONS; SAVE THESE INSTRUCTIONS!; CAUTION: RISK OF FIRE
Important Safety Information READ AND FOLLOW ALL SAFETY INSTRUCTIONS SAVE THESE INSTRUCTIONS! CAUTION: RISK OF FIRE Flammable refrigerant used. When maintaining or disposing of the air conditioner, the refrigerant must not be allowed to vent into the open air. WARNING Shows that the appliance uses a...
Page 4 - WARNING; objects as this could cause tipping.
SAVE THESE INSTRUCTIONS! Important Safety Information READ AND FOLLOW ALL SAFETY INSTRUCTIONS SAFETY PRECAUTIONS WARNING • Installation must be performed according to the installation instructions. Improper installation can cause water leakage, electrical shock or fi re. • Use only the included acces...
Page 5 - CAUTION; similarly qualifi ed persons in order to avoid a hazard.
Important Safety Information READ AND FOLLOW ALL SAFETY INSTRUCTIONS SAVE THESE INSTRUCTIONS! CAUTION • This appliance is not intended for use by persons (including children) whose physical, sensory or mental capabilities may be different or reduced, or who lack experience or knowledge, unless such ...
Page 6 - Note about fl uorinated gasses; to the room area as specifi ed for operation.
Important Safety Information READ AND FOLLOW ALL SAFETY INSTRUCTIONS SAVE THESE INSTRUCTIONS! Note about fl uorinated gasses • Fluorinated greenhouse gases are contained in hermetically sealed equipment. For specifi c information on the type, the amount and the C02 equivalent in tonnes of the fl uorina...
Page 7 - See transport regulations.
Important Safety Information READ AND FOLLOW ALL SAFETY INSTRUCTIONS SAVE THESE INSTRUCTIONS! Transport of equipment containing fl ammable refrigerants See transport regulations. Marking of equipment using signs See local regulations. Disposal of equipment using fl ammable refrigerants See national re...
Page 8 - Checks to the refrigeration equipment:; Where electrical components are being changed, they shall
SAVE THESE INSTRUCTIONS! Important Safety Information READ AND FOLLOW ALL SAFETY INSTRUCTIONS 6. No ignition sources: No person carrying out work in relation to a refrigeration system which involves exposing any pipe work that contains or has contained fl ammable refrigerant shall use any sources of ...
Page 9 - Repairs to sealed components
SAVE THESE INSTRUCTIONS! Important Safety Information READ AND FOLLOW ALL SAFETY INSTRUCTIONS Repairs to sealed components 1. During repairs to sealed components, all electrical supplies shall be disconnected from the equipment being worked upon prior to any removal of sealed covers, etc. If it is a...
Page 10 - Leak detection methods; • Remove
SAVE THESE INSTRUCTIONS! Important Safety Information READ AND FOLLOW ALL SAFETY INSTRUCTIONS Leak detection methods The following leak detection methods are deemed acceptable for systems containing fl ammable refrigerants: • Electronic leak detectors shall be used to detect fl ammable refrigerants bu...
Page 11 - Charging procedures
SAVE THESE INSTRUCTIONS! Important Safety Information READ AND FOLLOW ALL SAFETY INSTRUCTIONS Charging procedures In addition to conventional charging procedures, the following requirements shall be followed: • Ensure that contamination of different refrigerants does not occur when using charging eq...
Page 12 - Labeling
SAVE THESE INSTRUCTIONS! Important Safety Information READ AND FOLLOW ALL SAFETY INSTRUCTIONS Labeling Equipment shall be labeled stating that it has been decommissioned and emptied of refrigerant. The label shall be dated and signed. Ensure that there are labels on the equipment stating the equipme...
Page 13 - INSTALLATION INSTRUCTIONS; LOCATION
12 INSTALLATION INSTRUCTIONS LOCATION This air conditioner is designed to fi t inside a standard double-hung window with opening widths of 23.6 - 38.8” (60 - 98.5 cm). The lower sash must open suffi ciently to allow a clear vertical opening of 13.8” (35 cm). This air conditioner is not designed for ve...
Page 14 - TOP RAIL INSTALLATION
INSTALLATION INSTRUCTIONS TOP RAIL INSTALLATION The top rail must be assembled before installing the air conditioner into the window. 1. Remove all packaging from the air conditioner and place it on a stable fl at surface. 2. Align the holes in the top rail with the holes in the top of the air condit...
Page 15 - Wooden Window Sill; Hold the side panels in one hand and gently pull; INSTALL THE AIR CONDITIONER
INSTALLATION INSTRUCTIONS 14 Wooden Window Sill Vinyl-Clad Window Sill Close the window behind the top rail to secure the air conditioner. SIDE PANEL INSTALLATION The side panels must be assembled before installing the air conditioner into the window. The side panels are labeled “left” and “right”. ...
Page 16 - Extend the side panels to fi ll the window frame.; INSTALL THE FRAME LOCK; Install the frame locks on each side panel.; INSTALL THE LOCKING SCREWS
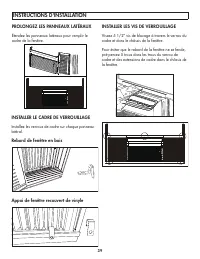
INSTALLATION INSTRUCTIONS 15 Wooden Window Sill Vinyl-Clad Window Sill EXTEND THE SIDE PANELS Extend the side panels to fi ll the window frame. INSTALL THE FRAME LOCK Install the frame locks on each side panel. INSTALL THE LOCKING SCREWS Drive 5 1/2” locking screws through the frame lock and into the...
Page 17 - SECURE THE LOWER SASH
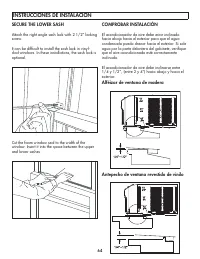
16 INSTALLATION INSTRUCTIONS SECURE THE LOWER SASH Attach the right angle sash lock with 2 1/2” locking screw. It can be diffi cult to install the sash lock in vinyl-clad windows. In these installations, the sash lock is optional. Cut the foam window seal to the width of the window. Insert it into th...
Page 18 - NORMAL SOUNDS; Ensure the air conditioner is turned off and
INSTALLATION INSTRUCTIONS 17 NORMAL SOUNDS Vibration: the air conditioner may vibrate or make noise due to poor wall or window construction or incorrect installation. Trickling sounds: droplets of water hitting the condenser during normal operation may cause a trickling sound. High pitched chatter: ...
Page 19 - OPERATING INSTRUCTIONS; POWER BUTTON: Press to turn the air conditioner on or off.
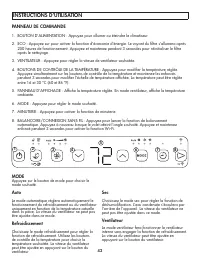
18 OPERATING INSTRUCTIONS CONTROL PANEL 1. POWER BUTTON: Press to turn the air conditioner on or off. 2. ECO: Press to activate the energy saver feature. The fi lter light will illuminate after 250 hours of operation. Press and hold for 3 seconds to reset the fi lter after cleaning. 3. FAN: Press to s...
Page 20 - REMOTE CONTROL
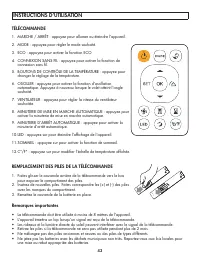
OPERATING INSTRUCTIONS 19 REMOTE CONTROL 1. ON/OFF: Press to turn the appliance on or off. 2. MODE: Press to set the desired mode. 3. ECO: Press to activate the ECO feature. 4. WIRELESS CONNECT: Press to activate the wireless connection feature. 5. TEMPERATURE CONTROL BUTTONS: Press to change the te...
Page 21 - REMOTE CONTROL REGULATIONS
OPERATING INSTRUCTIONS 20 REMOTE CONTROL REGULATIONS This equipment has been tested and found to comply with the limits for a Class B digital device, pursuant to Part 15 of the FCC Rules. These limits are designed to provide reasonable protection against harmful interference in a residential install...
Page 22 - WIRELESS CONNECTION
21 OPERATING INSTRUCTIONS WIRELESS CONNECTION This appliance can be controlled with a wireless application on your wireless device. Visit https://www.danby.com/support/#apps to download the application and learn about its operation. TIMER Press the timer button while the air conditioner is running t...
Page 25 - LIMITED IN-HOME APPLIANCE WARRANTY; LIMITED “IN HOME” WARRANTY
LIMITED IN-HOME APPLIANCE WARRANTY This quality product is warranted to be free from manufacturer’s defects in material and workmanship, provided that the unit is used under the normal operating conditions intended by the manufacturer.This warranty is available only to the person to whom the unit wa...
Page 26 - Bienvenue dans la famille Danby.; Vous devez
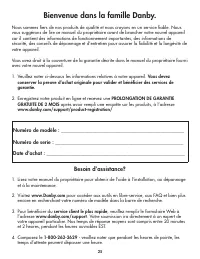
25 Bienvenue dans la famille Danby. Nous sommes fi ers de nos produits de qualité et nous croyons en un service fi able. Nous vous suggérons de lire ce manuel du propriétaire avant de brancher votre nouvel appareil car il contient des informations de fonctionnement importantes, des informations de séc...
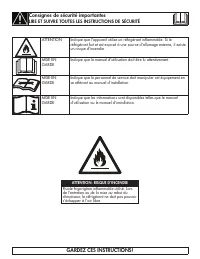
Page 27 - ATTENTION: RISQUE D’INCENDIE; GARDEZ CES INSTRUCTIONS!; LIRE ET SUIVRE TOUTES LES INSTRUCTIONS DE SÉCURITÉ
ATTENTION: RISQUE D’INCENDIE Fluide frigorigène infl ammable utilisé. Lors de l’entretien ou de la mise au rebut du climatiseur, le réfrigérant ne doit pas pouvoir s’échapper à l’air libre. ATTENTION Indique que l’appareil utilise un réfrigérant infl ammable. Si le réfrigérant fuit et est exposé à une...
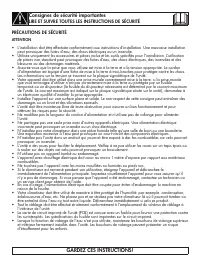
Page 28 - PRÉCAUTIONS DE SÉCURITÉ; ATTENTION; Consignes de sécurité importantes
GARDEZ CES INSTRUCTIONS! PRÉCAUTIONS DE SÉCURITÉ ATTENTION • L’installation doit être effectuée conformément aux instructions d’installation. Une mauvaise installation peut provoquer des fuites d’eau, des chocs électriques ou un incendie. • Utilisez uniquement les accessoires et pièces inclus et les...
Page 29 - MISE EN GARDE; est tombé ou est endommagé.
Consignes de sécurité importantes LIRE ET SUIVRE TOUTES LES INSTRUCTIONS DE SÉCURITÉ MISE EN GARDE • Cet appareil n’est pas destiné à être utilisé par des personnes (y compris des enfants) dont les capacités physiques, sensorielles ou mentales peuvent être différentes ou réduites, ou qui manquent d’...
Page 30 - Remarque sur les gaz fl uorés; recommandés par le fabricant.
Consignes de sécurité importantes LIRE ET SUIVRE TOUTES LES INSTRUCTIONS DE SÉCURITÉ Remarque sur les gaz fl uorés • Les gaz à effet de serre fl uorés sont contenus dans des équipements hermétiquement fermés. Pour des informations spécifi ques sur le type, la quantité et l’équivalent C02 en tonnes de g...
Page 31 - Marquage des équipements à l’aide de panneaux
Important Safety Information READ AND FOLLOW ALL SAFETY INSTRUCTIONS SAVE THESE INSTRUCTIONS! Transport d’équipements contenant des fl uides frigorigènes infl ammables Voir les règlements de transport. Marquage des équipements à l’aide de panneaux Voir les réglementations locales. Élimination de l’équ...
Page 32 - Contrôles à l’équipement de réfrigération:
GARDEZ CES INSTRUCTIONS! Consignes de sécurité importantes LIRE ET SUIVRE TOUTES LES INSTRUCTIONS DE SÉCURITÉ 6. Aucune source d’infl ammation: Aucune personne effectuant des travaux en rapport avec un système de réfrigération impliquant l’exposition de tuyauteries contenant ou ayant contenu un réfri...
Page 34 - et qu’il existe une ventilation.
Méthodes de détection de fuite Les méthodes de détection des fuites suivantes sont jugées acceptables pour les systèmes contenant des réfrigérants infl ammables: • Des détecteurs de fuites électroniques doivent être utilisés pour détecter les réfrigérants infl ammables, mais la sensibilité peut ne pas...
Page 35 - bouteilles de réfrigérant.
Procédures de charge Outre les procédures de chargement classiques, les exigences suivantes doivent être respectées: • Assurez-vous que les différents réfrigérants ne soient pas contaminés lors de l’utilisation d’un équipement de charge. Les tuyaux ou les conduites doivent être aussi courts que poss...
Page 37 - INSTRUCTIONS D'INSTALLATION; EMPLACEMENT
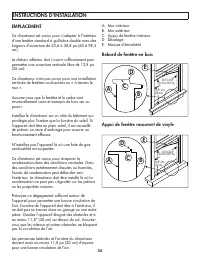
36 INSTRUCTIONS D'INSTALLATION EMPLACEMENT Ce climatiseur est conçu pour s’adapter à l’intérieur d’une fenêtre standard à guillotine double avec des largeurs d’ouverture de 23,6 à 38,8 po (60 à 98,5 cm). Le châssis inférieur doit s’ouvrir suffi samment pour permettre une ouverture verticale libre de ...
Page 38 - INSTALLATION DU RAIL SUPÉRIEUR
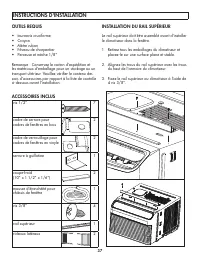
INSTRUCTIONS D'INSTALLATION INSTALLATION DU RAIL SUPÉRIEUR Le rail supérieur doit être assemblé avant d’installer le climatiseur dans la fenêtre. 1. Retirez tous les emballages du climatiseur et placez-le sur une surface plane et stable. 2. Alignez les trous du rail supérieur avec les trous du haut ...
Page 39 - INSTRUCTIONS D’UTILISATION; Rebord de fenêtre en bois; Tenez les panneaux latéraux d’une main et tirez; INSTALLER LE CLIMATISEUR
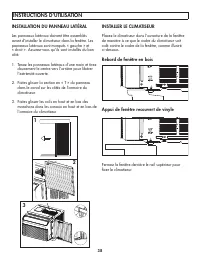
38 INSTRUCTIONS D’UTILISATION Rebord de fenêtre en bois Appui de fenêtre recouvert de vinyle Fermez la fenêtre derrière le rail supérieur pour fi xer le climatiseur. INSTALLATION DU PANNEAU LATÉRAL Les panneaux latéraux doivent être assemblés avant d’installer le climatiseur dans la fenêtre. Les pann...
Page 42 - Assurez-vous que le climatiseur est éteint et
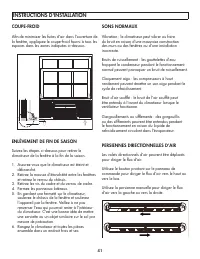
41 SONS NORMAUX Vibration : le climatiseur peut vibrer ou faire du bruit en raison d’une mauvaise construction des murs ou des fenêtres ou d’une installation incorrecte. Bruits de ruissellement : les gouttelettes d’eau frappant le condenseur pendant le fonctionnement normal peuvent provoquer un brui...
Page 45 - RÈGLEMENTS DE LA TÉLÉCOMMANDE; un fonctionnement indésirable.
RÈGLEMENTS DE LA TÉLÉCOMMANDE Cet équipement a été testé et déclaré conforme aux limites d’un appareil numérique de classe B, conformément à la partie 15 des règles FCC. Ces limites sont conçues pour fournir une protection raisonnable contre les interférences nuisibles dans une installation résident...
Page 46 - CONNEXION SANS FIL
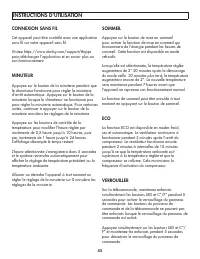
45 INSTRUCTIONS D’UTILISATION CONNEXION SANS FIL Cet appareil peut être contrôlé avec une application sans fi l sur votre appareil sans fi l. Visitez https://www.danby.com/support/#apps pour télécharger l’application et en savoir plus sur son fonctionnement. MINUTEUR Appuyez sur le bouton de la minute...
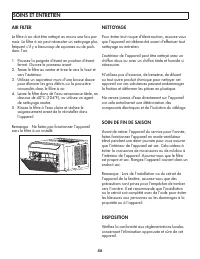
Page 47 - AIR FILTER; Poussez la poignée d’évent en position d’évent; NETTOYAGE; SOINS ET ENTRETIEN
46 AIR FILTER Le fi ltre à air doit être nettoyé au moins une fois par mois. Le fi ltre à air peut nécessiter un nettoyage plus fréquent s’il y a beaucoup de squames ou de poils dans l’air. 1. Poussez la poignée d’évent en position d’évent fermé. Ouvrez le panneau avant. 2. Tenez le fi ltre au centre e...
Page 49 - GARANTIE LIMITÉE « À DOMICILE »
LIMITED IN-HOME APPLIANCE WARRANTY This quality product is warranted to be free from manufacturer’s defects in material and workmanship, provided that the unit is used under the normal operating conditions intended by the manufacturer.This warranty is available only to the person to whom the unit wa...
Page 50 - Bienvenido a la familia Danby.; Debe conser var el comprobante
49 Bienvenido a la familia Danby. Estamos orgullosos de nuestros productos de calidad y creemos en un servicio confi able. Le sugerimos que lea este manual del propietario antes de enchufar su nuevo electrodoméstico, ya que contiene información importante de funcionamiento, información de seguridad, ...
Page 51 - Importantes Instrucciones de Seguridad; LEA Y SIGA TODAS LAS INSTRUCCIONES DE SEGURIDAD; PRECAUCIÓN: RIESGO DE INCENDIO; ¡GUARDE ESTAS INSTRUCCIONES!
ADVERTENCIA Muestra que el aparato utiliza un refrigerante infl amable. Si el refrigerante tiene fugas y se expone a una fuente de ignición externa, existe riesgo de incendio. PRECAUCIÓN Muestra que el manual de funcionamiento debe leerse con atención. PRECAUCIÓN Muestra que el personal de servicio d...
Page 52 - PRECAUCIONES DE SEGURIDAD; ADVERTENCIA
PRECAUCIONES DE SEGURIDAD ADVERTENCIA • La instalación debe realizarse de acuerdo con las instrucciones de instalación. Una instalación incorrecta puede provocar fugas de agua, descargas eléctricas o incendios. • Utilice solo los accesorios y piezas incluidos y las herramientas especifi cadas para la...
Page 53 - PRECAUCIÓN; dispositivo de control de velocidad de estado sólido.
PRECAUCIÓN • Este electrodoméstico no está diseñado para que lo utilicen personas (incluidos niños) cuyas capacidades físicas, sensoriales o mentales puedan ser diferentes o reducidas, o que carezcan de experiencia o conocimientos, a menos que dichas personas reciban supervisión o capacitación para ...
Page 57 - Reparaciones de componentes sellados; daños en las juntas, montaje incorrecto de los prensaestopas, etc.; Reparación de componentes intrínsecamente seguros
Importantes Instrucciones de Seguridad LEA Y SIGA TODAS LAS INSTRUCCIONES DE SEGURIDAD Reparaciones de componentes sellados 1. Durante las reparaciones de componentes sellados, todos los suministros eléctricos deben desconectarse del equipo en el que se está trabajando antes de retirar las cubiertas...
Page 58 - Métodos de detección de fugas; haya ventilación disponible.
Importantes Instrucciones de Seguridad LEA Y SIGA TODAS LAS INSTRUCCIONES DE SEGURIDAD Métodos de detección de fugas Los siguientes métodos de detección de fugas se consideran aceptables para sistemas que contienen refrigerantes infl amables: • Se deben usar detectores electrónicos de fugas para dete...
Page 59 - Procedimientos de carga
Importantes Instrucciones de Seguridad LEA Y SIGA TODAS LAS INSTRUCCIONES DE SEGURIDAD Procedimientos de carga Además de los procedimientos de carga convencionales, se deben seguir los siguientes requisitos: • Asegúrese de que no se contamine con refrigerantes diferentes cuando utilice equipos de ca...
Page 61 - INSTRUCCIONES DE INSTALACIÓN; UBICACIÓN
60 INSTRUCCIONES DE INSTALACIÓN UBICACIÓN Este acondicionador de aire está diseñado para caber dentro de una ventana estándar de guillotina doble con anchos de apertura de 23,6 - 38,8” (60 - 98,5 cm). La hoja inferior debe abrirse lo sufi ciente para permitir una abertura vertical clara de 13,8” (35 ...
Page 62 - INSTALACIÓN DEL RIEL SUPERIOR
INSTRUCCIONES DE INSTALACIÓN INSTALACIÓN DEL RIEL SUPERIOR El riel superior debe ensamblarse antes de instalar el acondicionador de aire en la ventana. 1. Retire todo el embalaje del acondicionador de aire y colóquelo sobre una superfi cie plana y estable. 2. Alinee los orifi cios del riel superior co...
Page 63 - Alféizar de ventana de madera; Sostenga los paneles laterales con una mano; INSTALE EL AIRE ACONDICIONADO
62 INSTRUCCIONES DE INSTALACIÓN Alféizar de ventana de madera Antepecho de ventana revestido de vinilo Cierre la ventana detrás del riel superior para asegurar el acondicionador de aire. INSTALACIÓN DEL PANEL LATERAL Los paneles laterales deben ensamblarse antes de instalar el acondicionador de aire...
Page 64 - Instale los seguros del marco en cada panel lateral.; INSTALE LOS TORNILLOS DE BLOQUEO
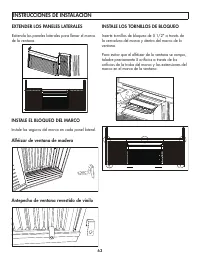
63 INSTRUCCIONES DE INSTALACIÓN Alféizar de ventana de madera Antepecho de ventana revestido de vinilo EXTENDER LOS PANELES LATERALES Extienda los paneles laterales para llenar el marco de la ventana. INSTALE EL BLOQUEO DEL MARCO Instale los seguros del marco en cada panel lateral. INSTALE LOS TORNI...
Page 67 - INSTRUCCIONES DE OPERACIÓN
66 3s 3s 1 2 3 4 6 7 8 5 PANEL DE CONTROL 1. BOTÓN DE ENCENDIDO: Presiónelo para encender o apagar el aire acondicionado. 2. ECO: Presione para activar la función de ahorro de energía. La luz del fi ltro se iluminará después de 250 horas de funcionamiento. Mantenga presionado durante 3 segundos para ...
Page 69 - REGLAMENTOS DE CONTROL REMOTO; causar un funcionamiento no deseado.
REGLAMENTOS DE CONTROL REMOTO Este equipo ha sido probado y cumple con los límites para un dispositivo digital de Clase B, de acuerdo con la Parte 15 de las Reglas de la FCC. Estos límites están diseñados para proporcionar una protección razonable contra interferencias perjudiciales en una instalaci...
Page 70 - CONEXIÓN INALÁMBRICA
69 INSTRUCCIONES DE OPERACIÓN CONEXIÓN INALÁMBRICA Este aparato se puede controlar con una aplicación inalámbrica en su dispositivo inalámbrico. Visite https://www.danby.com/support/#apps para descargar la aplicación y conocer su funcionamiento. TEMPORIZADOR Presione el botón del temporizador mientr...
Page 71 - CUIDADO Y MANTENIMIENTO; FILTRO DE AIRE
70 CUIDADO Y MANTENIMIENTO FILTRO DE AIRE El fi ltro de aire debe limpiarse al menos una vez al mes. El fi ltro de aire puede requerir una limpieza más frecuente si hay mucha caspa o pelaje en el aire. 1. Empuje la manija de ventilación a la posición de ventilación cerrada. Abra el panel frontal. 2. S...
Page 73 - GARANTÍA LIMITADA “A DOMICILIO”
LIMITED IN-HOME APPLIANCE WARRANTY This quality product is warranted to be free from manufacturer’s defects in material and workmanship, provided that the unit is used under the normal operating conditions intended by the manufacturer.This warranty is available only to the person to whom the unit wa...