Page 4 - TABLE OF CONTENTS; TABLE DES MATIÈRES / ÍNDICE DE CONTENIDO; INTRODUCTION; INTRODUCTION / INTRODUCCIÓN
2 — English Introduction ...................................................................................................................................................................... 2 Introduction / Introducción Important Safety Instructions ...............................................
Page 5 - READ ALL INSTRUCTIONS; IMPORTANT SAFETY INSTRUCTIONS
3 — English WARNING! When using electric gardening appliances, basic safety precautions should always be followed to reduce the risk of fire, electric shock and personal injury. READ ALL INSTRUCTIONS For safe operation, read and understand all instructions before using this product. Follow all saf...
Page 7 - SYMBOLS
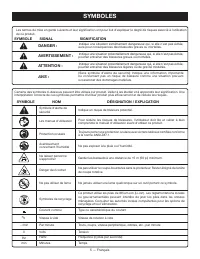
5 — English SYMBOLS The following signal words and meanings are intended to explain the levels of risk associated with this product. SYMBOL SIGNAL MEANING DANGER: Indicates an imminently hazardous situation, which, if not avoided, will result in death or serious injury. WARNING: Indicates a potentia...
Page 9 - ASSEMBLY; ATTACHING GRASS DEFLECTOR
7 — English ASSEMBLY WARNING: Be certain the shafts are locked into place before oper-ating string trimmer; check it periodically for tightness during use to avoid possible disconnection of shafts, which could result in serious personal injury. WARNING: This string trimmer is designed to use only th...
Page 10 - OPERATION; INSTALLING/REMOVING BATTERY PACK; STARTING/STOPPING THE STRING TRIMMER
8 — English OPERATION WARNING: Do not allow familiarity with products to make you careless. Remember that a careless fraction of a second is sufficient to inflict serious injury. WARNING: Always wear eye protection with side shields marked to comply with ANSI Z87.1. Failure to do so could result in ...
Page 11 - ADVANCING THE LINE MANUALLY
9 — English OPERATION ADVANCING THE LINE MANUALLY See Figure 12. Remove the battery pack. Push the black button located on the string head while pulling on line to manually advance the line. LINE CUT-OFF BLADE See Figures 13. This trimmer is equipped with a line cut-off blade on the grass deflec...
Page 12 - MAINTENANCE; GENERAL MAINTENANCE; STORING THE TRIMMER
10 — English MAINTENANCE WARNING: To avoid serious personal injury, always remove the bat-tery pack from the tool when cleaning or performing any maintenance. WARNING: Always wear eye protection with side shields marked to comply with ANSI Z87.1. Failure to do so could result in objects being thrown...
Page 13 - TROUBLESHOOTING; CALL US FIRST; PROBLEM
11 — English TROUBLESHOOTING CALL US FIRST For any questions about operating or maintaining your product, call the Ryobi Help Line! Your product has been fully tested prior to shipment to ensure your complete satisfaction. PROBLEM POSSIBLE CAUSE SOLUTION Line will not advance when using the auto-fee...
Page 14 - LIMITED WARRANTY STATEMENT; WARRANTY
12 — English LIMITED WARRANTY STATEMENT Techtronic Industries North America, Inc., warrants to the original retail purchaser that this RYOBI ® brand outdoor product is free from defect in material and workmanship and agrees to repair or replace, at Techtronic Industries North America, Inc.’s, discre...
Page 15 - NOTES
Page 16 - LIRE TOUTES LES INSTRUCTIONS; INSTRUCTIONS IMPORTANTES CONCERNANT LA SÉCURITÉ
3 — Français AVERTISSEMENT ! Lors de l’utilisation d’outils de jardinage, toujours suivre les consignes de sécurité de base pour éviter les risques d’incendie, d’électrocution et de blessures. LIRE TOUTES LES INSTRUCTIONS Pour travailler en toute sécurité, lire et veiller à bien comprendre toutes ...
Page 18 - SYMBOLES
5 — Français SYMBOLES Certains des symboles ci-dessous peuvent être utilisés sur produit. Veiller à les étudier et à apprendre leur signification. Une interprétation correcte de ces symboles permettra d’utiliser produit plus efficacement et de réduire les risques. SYMBOLE NOM DÉSIGNATION / EXPLICATI...
Page 20 - ASSEMBLAGE; FIXATION DU DÉFLECTEUR D’HERBE; OUTILS NÉCESSAIRES; POIGNÉE AVANT
7 — Français ASSEMBLAGE Poussez les deux sections ensemble jusqu’à ce que l’arbre du taille-bordures soit appuyé. ATTENTION : Soyez prudent lorsque vous glissez les deux arbres ensemble pour éviter de vous pincer les mains ou les doigts. À l’aide d’une clé hexagonale, tournez les deux vis jusq...
Page 21 - UTILISATION; MISE EN MARCHE ET ARRÊT DU TAILLE-; UTILISATION DU TAILLE-BORDURES
8 — Français UTILISATION AVERTISSEMENT : Ne pas laisser la familiarité avec l’produit faire oublier la prudence. Ne pas oublier qu’une fraction de seconde d’inattention peut entraîner des blessures graves. AVERTISSEMENT : Toujours porter une protection oculaire avec écrans latéraux certifiée conform...
Page 22 - AVANCE MANUELLE DE LIGNE
9 — Français UTILISATION AVANCE MANUELLE DE LIGNE Voir la figure 12. Retirer le bloc piles. Appuyer sur le bouton noir situé sur la tête de coupe tout en tirant sur la ligne pour le faire avancer manuellement. LAME DE SECTIONNEMENT DE LIGNE Voir la figure 13. Cette tondeuse est équipée d’une lam...
Page 23 - ENTRETIEN; ENTRETIEN GÉNÉRAL; REMISAGE DU TAILLE-HAIES À LIGNE
10 — Français ENTRETIEN AVERTISSEMENT : Pour empêcher un démarrage accidentel pouvant entraîner des blessures graves, toujours retirer le piles de l’produit avant tout nettoyage ou entretien. AVERTISSEMENT : Toujours porter une protection oculaire avec écrans latéraux certifiée conforme à la norme A...
Page 24 - DÉPANNAGE; PROBLÈME; NOUS APPELER D’ABORD; BESOIN D’AID
11 — Français DÉPANNAGE PROBLÈME CAUSE POSSIBLE SOLUTION Le ligne n’avancera pas si une tête à avance automatique est utilisée Ligne soudée sur elle-même. Pas assez de ligne sur la bobine. Ligne trop courte. Ligne emmêlée sur la bobine. Lubrifier avec un produit au silicone. Installer une nouvelle l...
Page 25 - GARANTIE; ÉNONCÉ DE LA GARANTIE LIMITÉE
12 — Français GARANTIE ÉNONCÉ DE LA GARANTIE LIMITÉE Techtronic Industries North America, Inc., garantit à l’acheteur original que ce produit RYOBI ® est exempt de tous vices de matériaux ou de fabrication et s’engage à réparer ou remplacer gratuitement, à son choix, tout produit s’avérant défectueu...
Page 27 - LEA TODAS LAS INSTRUCCIONES; INSTRUCCIONES DE SEGURIDAD IMPORTANTES
3 — Español ¡ADVERTENCIA! Al utilizar herramientas eléctricas para el cuidado del jardín, con el fin de reducir el riesgo de incendio, descargas eléctricas y lesiones corporales, siempre deben seguirse ciertas medidas básicas de precaución. LEA TODAS LAS INSTRUCCIONES Para la operación segura, lea...
Page 29 - SÍMBOLOS
5 — Español SÍMBOLOS Es posible que se empleen en este producto algunos de los siguientes símbolos. Le suplicamos estudiarlos y aprender su significado. Una correcta interpretación de estos símbolos le permitirá utilizar mejor y de manera más segura el producto. SÍMBOLO NOMBRE DENOMINACIÓN/EXPLICACI...
Page 30 - CARACTERÍSTICAS; DIÁMETRO DE CORTE AJUSTABLE; ARMADO
6 — Español CARACTERÍSTICAS ESPECIFICACIONES Motor ..........................................................................................................................................................................40 V c.c.Ancho de corte ..........................................................
Page 31 - MONTAJE DEL DEFLECTOR DE PASTO; HERRAMIENTAS NECESARIAS
7 — Español ARMADO Presione las dos secciones para unirlas, hasta que el eje de la recortadora haga tope. PRECAUCIÓN: Tenga cuidado al deslizar un eje dentro del otro, porque podría pellizcarse las manos o los dedos. Con una llave hexagonal, ajuste los dos tornillos hasta que queden firmes. AD...
Page 32 - FUNCIONAMIENTO; ENCENDIDO Y APAGADO DE LA RECORTADORA
8 — Español FUNCIONAMIENTO ADVERTENCIA: No permita que su familarización con las herramientas lo vuelva descuidado. Tenga presente que un descuido de un instante es suficiente para causar una lesión grave. ADVERTENCIA: Siempre póngase protección ocular con protección lateral con la marca de cumplimi...
Page 33 - AVANCE MANUAL DEL HILO
9 — Español FUNCIONAMIENTO AVANCE MANUAL DEL HILO Vea la figura 12. Retire el paquete de baterías. Oprima el botón negro ubicado en el cabezal del hilo mientras tira del hilo para avanzar manualmente el hilo. CUCHILLA DE CORTE DEL HILO Vea la figura 13. Esta recortadora está equipada con una cuc...
Page 34 - MANTENIMIENTO; MANTENIMIENTO GENERAL; ALMACENAMIENTO DE LA RECORTADORA
10 — Español MANTENIMIENTO ADVERTENCIA: Para evitar lesiones serias, siempre retire el paquete de baterías de la herramienta cuando la limpie o durante cualquier mantenimiento. ADVERTENCIA: Siempre póngase protección ocular con protección lateral con la marca de cumplimiento de la norma ANSI Z87.1. ...
Page 35 - CORRECCIÓN DE PROBLEMAS; PROBLEMA; LLÁMENOS PRIMERO
11 — Español CORRECCIÓN DE PROBLEMAS PROBLEMA CAUSA POSIBLE SOLUCIÓN El hilo no avanza cuando se usa el cabezal con alimentación automática El hilo se pegó a sí mismo. No hay suficiente hilo en el carrete El hilo se desgastó hasta quedar muy corto. El hilo está enredado en el carrete. Lubrique con r...
Page 36 - GARANTÍA; DECLARACIÓN DE LA GARANTÍA LIMITADA
12 — Español GARANTÍA DECLARACIÓN DE LA GARANTÍA LIMITADA Techtronic Industries North America, Inc. garantiza al comprador original al menudeo que este producto de la marca RYOBI ® carece de defectos en los materiales y en la mano de obra, y acuerda reparar o remplazar, a la sola discreción de Techt...
Page 37 - NOTAS
Page 38 - CALIFORNIA PROPOSITION 65; OPERATOR’S MANUAL; MANUEL D’UTILISATION / MANUAL DEL OPERADOR; 0 VOLT STRING TRIMMER; TECHTRONIC INDUSTRIES POWER EQUIPMENT
9910008461-8-16 (REV:01) CALIFORNIA PROPOSITION 65 WARNING: This product and substances that may become airborne from its use may con-tain chemicals, including lead, known to the State of California to cause cancer, birth defects, or other reproductive harm. Wash hands after handling. RYOBI is a reg...