Husqvarna TS 354XD - Manuals
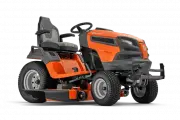
User Manual Husqvarna TS 354XD


Summary
Contents Introduction............................................................... 2Safety........................................................................ 5Assembly................................................................ 10Operation.....................................................
The hot surfaces symbol show a risk, which, if not obeyed, can cause death, serious injury and/or damage. The fire symbol shows a risk, which, if not obeyed, can cause death, serious injury and/or damage. Cruise control. Freewheel (automatic models only). Label on the product DANGER – Keep hands and...
• Disengage blades when not mowing. Shut off engine and wait for all parts to come to complete stop before cleaning the machine, removing the grass catcher, or unclogging the discharge chute. • Operate machine only in daylight or good artificial light. • Do not operate the machine while under the in...
Husqvarna Manuals
-
 Husqvarna 115iHD55
User Manual
Husqvarna 115iHD55
User Manual
-
 Husqvarna 115iL
User Manual
Husqvarna 115iL
User Manual
-
 Husqvarna 115iPT4
User Manual
Husqvarna 115iPT4
User Manual
-
 Husqvarna 120
User Manual
Husqvarna 120
User Manual
-
 Husqvarna 120iTK4-P
User Manual
Husqvarna 120iTK4-P
User Manual
-
 Husqvarna 120 Mark II
User Manual
Husqvarna 120 Mark II
User Manual
-
 Husqvarna 122C
User Manual
Husqvarna 122C
User Manual
-
 Husqvarna 122HD45
User Manual
Husqvarna 122HD45
User Manual
-
 Husqvarna 122L
Quick Guide
Husqvarna 122L
Quick Guide
-
Husqvarna 122L
User Manual
-
 Husqvarna 122LK
User Manual
Husqvarna 122LK
User Manual
-
 Husqvarna 122LKE
Quick Guide
Husqvarna 122LKE
Quick Guide
-
 Husqvarna 122LKH
Quick Guide
Husqvarna 122LKH
Quick Guide
-
Husqvarna 122LKH
User Manual
-
 Husqvarna 122LKP
Quick Guide
Husqvarna 122LKP
Quick Guide
-
Husqvarna 122LKP
User Manual
-
 Husqvarna 122RJ
Quick Guide
Husqvarna 122RJ
Quick Guide
-
Husqvarna 122RJ
User Manual
-
 Husqvarna 125B
User Manual
Husqvarna 125B
User Manual
-
Husqvarna 125B
Manual