Page 2 - OPERATION; SAFETY RULES; SAFE OPERATION PRACTICES FOR POWERED WALK-BEHIND ROTARY; TRAINING
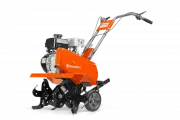
2 OPERATION • Do not allow hands, feet, or other body parts or cloth- ing near the rotating tines or any other moving part. The tines begin to rotate once the engine/motor is started and the activating device is engaged. The tines may momentarily rotate after the activating device is released. • Exe...
Page 3 - MAINTENANCE AND STORAGE; WARNING; The engine exhaust from this product con tains
3 • Never pick up or carry a machine while the engine (motor) is running. • Do not operate the tiller while under the influence of alcohol or drugs. • Powered walk-behind tiller work is strenuous. You must be in good physical condition and mentally alert. If you have any condition that might be aggr...
Page 4 - PRODUCT SPECIFICATIONS; TABLE OF CONTENTS; CUSTOMER RESPONSIBILITIES
4 PRODUCT SPECIFICATIONS Gasoline Capacity: 1.47 Quarts (1,4 Liters) Unleaded Regular Oil (API:SG-SL): SAE 30 (Above 32°F / 0°C) (Capacity: 16 oz./0,47 L) SAE 5W30 (Below 32°F / 0°C)Spark Plug : Torch F6RTC (Gap: .030" / 0,76 mm) TABLE OF CONTENTS SAFETY RULES ......................................
Page 5 - ASSEMBLY; TOOLS REQUIRED FOR ASSEMBLY; CONTENTS OF HARDWARE PACK
5 ASSEMBLY OPERATOR’S POSITION (See Fig. 1) When right or left hand is mentioned in this manual, it means when you are in the operating position (standing behind tiller handles). TOOLS REQUIRED FOR ASSEMBLY A socket wrench set will make assembly easier. Standard wrench sizes are listed.(1) Utility k...
Page 6 - INSTALL DEPTH STAKE ASSEMBLY
6 ASSEMBLY INSTALL DEPTH STAKE ASSEMBLY (See Fig. 3) • Loosen nut “A”. • Insert stake support between engine bracket halves with stake spring down. • Bolt stake support to engine brackets with bolts, lock washers and nuts. Tighten se curely. Tighten nut “A”. • Depth stake must move freely. If it doe...
Page 7 - KNOW YOUR TILLER; READ THIS MANUAL AND SAFETY RULES BEFORE OPERATING YOUR TILLER.; MEETS ANSI SAFETY REQUIREMENTS
7 OPERATION KNOW YOUR TILLER READ THIS MANUAL AND SAFETY RULES BEFORE OPERATING YOUR TILLER. Compare the illustrations with your tiller to familiarize yourself with the location of various controls and adjustments. Save this manual for future reference. These symbols may appear on your Tiller or in ...
Page 8 - TILLING; HOW TO USE YOUR TILLER
8 OPERATION TILLING The speed and depth of tilling is regulated by the position of the depth stake and wheel height.The depth stake should always be below the wheels for digging. It serves as a brake to slow the tiller’s forward motion to enable the tines to penetrate the ground. Also, the more the ...
Page 9 - ADD GASOLINE
9 OPERATION OPERATION ADD GASOLINE • Fill to within 1/2" of top of fuel tank to prevent spills and to allow for fuel expansion. Do not overfill. Use fresh, clean, regular un lead ed gasoline with a minimum of 87 octane. Do not mix oil with gasoline. Purchase fuel in quan ti ties that can be used...
Page 10 - BREAKING IN YOUR TILLER; CULTIVATING
10 OPERATION OPERATION BREAKING IN YOUR TILLER Break-in your belt(s), pulleys and tine control before you actually begin tilling.• Start engine, tip tines off ground by pressing handles down and engage tine control to start tine rotation. Allow tines to rotate for five minutes. • Check tine operatio...
Page 11 - MAINTENANCE; LUBRICATION CHART; GENERAL RECOMMENDATIONS; BEFORE EACH USE; SERVICE DATES
11 MAINTENANCE SAE 30 OR 10W-30 MOTOR OIL REFER TO MAINTENANCE “ENGINE” SECTION LUBRICATION CHART GENERAL RECOMMENDATIONS The warranty on this tiller does not cover items that have been subjected to operator abuse or negligence. To receive full value from the warranty, the operator must main tai...
Page 12 - ENGINE; LUBRICATION
12 MAINTENANCE Fig. 11 Disconnect spark plug wire before performing any maintenance to prevent accidental start ing of engine.Prevent fires! Keep the engine free of grass, leaves, spilled oil, or fuel. Re move fuel from tank before tipping unit for maintenance. Clean muffler area of all grass, dirt,...
Page 13 - MUFFLER; CLEANING; COOLING SYSTEM
13 MAINTENANCE MUFFLER Do not operate tiller without muffler. Do not tamper with exhaust system. Damaged mufflers or spark arresters could create a fire hazard. Inspect pe ri odi cally and re place if nec es sary. If your engine is equipped with a spark arrester screen assembly, re move every 50 hou...
Page 14 - SERVICE AND ADJUSTMENTS; TILLER; TINE ARRANGEMENT
14 CAUTION: Disconnect spark plug wire from spark plug and place wire where it cannot come into contact with plug. SERVICE AND ADJUSTMENTS TILLER TO ADJUST HANDLE HEIGHT (See Fig. 15) Factory assembly has provided lowest handle height. Se lect handle height best suited for your tilling conditions. H...
Page 16 - TO AD JUST CARBURETOR
16 SERVICE AND ADJUSTMENTS • Wrap V-belt around reverse idler pulley and reassemble idler to idler arm. Tighten securely. Be sure belt is between reverse idler pulley and idler arm pin. • Install belt to outside groove of transmission pulley. Be sure belt is inside all belt guides and rests on outsi...
Page 17 - STORAGE; ENGINE OIL; OTHER; FUEL SYSTEM
17 STORAGE ENGINE OIL Drain oil (with engine warm) and replace with clean oil. (See “ENGINE” in the Maintenance section of this man ual). CYLINDER(S) • Remove spark plug.• Pour 1 ounce (29 ml) of oil through spark plug hole into cylinder. • Pull starter handle slowly several times to distribute oil....
Page 18 - TROUBLESHOOTING POINTS
18 TROUBLESHOOTING POINTS Will not start 1 Out of fuel. 1 Fill fuel tank. 2 Fuel valve “OFF” 2 Turn fuel valve to the “ON” position. 3 Engine not “CHOKED” properly. 3 See “TO START ENGINE” in Operation section. 4 Engine flooded. 4 Wait several minutes before attempting to start. 5 Bad spark plug or ...
Page 19 - SERVICE NOTES