Page 2 - Product description; iRXT
Contents Introduction..................................................................... 2Safety..............................................................................4Assembly...................................................................... 13Operation....................................
Page 3 - Symbols on the product
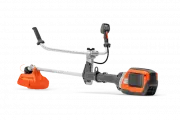
7. Handlebar8. Power trigger9. Power trigger lockout10. Add-on weight (accessory)11. ErgoFeed button (535iRXT)12. Handle13. Warning indicator (LED)14. Speed mode button15. Start/Stop button16. Charger17. Charger cable18. Power on and Warning indicator (LED)19. Combination wrench20. Locking pin21. Ba...
Page 4 - Safety; Safety definitions; Work area safety
Symbols on the product or its packaging indicate that this product cannot be handled as domestic waste. This product must be deposited at an appropriate recycling facility. Direct current. Keep all parts of your body away from the hot surfaces. If the product features Bluetooth ® wireless technology...
Page 7 - Blade thrust causes and related warnings; Other general safety information
Blade thrust causes and related warnings • Blade thrust is a sudden sideways, forward or backward motion of the machine, which may occur when the blade jams or catches on an object such as a sapling or a tree stump. It can be violent enough to cause the machine and/or operator to be propelled in any...
Page 8 - Bluetooth
or the cutting equipment rotates, as this can result in serious injury. • Keep in mind that it is you, the operator that is responsible for not exposing people or their property to accidents or hazards. • Under no circumstances may the design of the product be modified without the permission of the ...
Page 12 - Cutting attachment; Safety instructions for assembly
Cutting attachment WARNING: Remove the battery and make sure that the cutting attachment stops completely before you work on any part of the cutting attachment. WARNING: Use correct cutting attachment. Only use the cutting attachment with the guards we recommend, refer to Accessories on page 30. Mak...
Page 13 - Assembly; To attach the handle
• Do not clean the battery or the battery charger with water. Strong detergent can cause damage to the plastic. • If you do not do maintenance, it decreases the life cycle of the product and increases the risk of accidents. • Special training is necessary for all servicing and repair work, especiall...
Page 14 - Cutting equipment and guards; Assembly of the grass blade guard and the
the cutting attachment. See Accessories on page 30. WARNING: An incorrectly attached cutting attachment can result in injury or death. Cutting equipment and guards WARNING: Stop the product and remove the battery. Use protective gloves. The product have different cutting attachment guards for the cu...
Page 18 - To adjust the Balance XB harness
3. Remove the support flange (F) and the saw blade (D) from the output shaft. F G D B C 4. Remove the drive disc (B) from the output shaft. To adjust the Balance XB harness (535iRXT) 1. Put the harness on.2. Push the 2 parts of the breastplate together as shown in the illustration. 3. Tighten the hi...
Page 19 - Operation; Introduction; To start to use Husqvarna Connect
WARNING: Use the harness quick release function if you must release from the product and the harness in an emergency situation. 1. Put on the harness.2. Adjust the harness for the best work position.3. Adjust the side straps until the weight is equally applied across your shoulders. 4. Adjust the ha...
Page 20 - Correct balance of the product; To adjust the balance with the add-on weight; To apply the load equally on the
• Keep body parts away from the hot surfaces.• Keep body parts away from the cutting attachment. Correct balance of the product For forestry clearing, the product is correctly balanced when it freely hangs horizontally from the suspension point. With correct balance, the risk of hitting stones if yo...
Page 22 - To fell a tree to the left
all directions. There is a risk of injury to the operator and bystanders.The risk increases in areas where it is not easy to see the material that should be cut.Do not cut with the area of the blade that is shown in grey in the illustration. The speed and movement of the blade can cause blade thrust...
Page 23 - Brush cutting with a saw blade
3. Tilt the saw blade and push it with force diagonally up and to the right. At the same time, push the tree with the blade guard. To fell a tree forward To fell forward, push the bottom of the tree rearward.1. Apply full throttle.2. Put the saw blade against the tree as given in the picture. 3. Pul...
Page 24 - Grass trimming with a trimmer head; To trim the grass
2. A grass blade is used for all types of tall or coarse grass. 3. The grass is cut down with a sideways, swinging movement, where the movement from right-to-left is the clearing stoke and the movement from left-to- right is the return stoke. Let the left-hand side of the blade (between 8 and 12 o'c...
Page 25 - To stop the product; Maintenance
To stop the product 1. Release the power trigger and the power trigger lockout. 2. Press the start/stop button until the green LED is out. 3. Press the release buttons on the battery and pull the battery out. Maintenance Introduction WARNING: Before you do any maintenance work you must read and unde...
Page 27 - To lubricate the bevel gear; Troubleshooting; User interface
• Sharpen one tooth of the saw blade to the right and the next tooth to the left, see the illustration. 15˚ Note: Sharpen the edges of the teeth with a flat file if the blade is heavily worn. Continue to sharpen with a round file. • Sharpen all edges equally to keep the blade balanced. • Adjust the ...
Page 28 - Transportation, storage and disposal; Transportation and storage; Technical data
Problem Possible faults Possible action Error LED flashes red Overload. The cutting attachment is jammed. Stop the product. Remove the battery. Clean the cut- ting attachment from unwanted materials. Temperature deviation. Let the product cool down. The power trigger and the acti- vate button are pr...
Page 29 - Approved batteries
535iFR 535iRXT 535iRX Motor type Husqvarna e-torq BLDC Husqvarna e-torq BLDC Husqvarna e-torq BLDC Speed of output shaft. Trimmer head/blade, 1/min 5300/8200 5300/8200 5300/8200 Cutting width, mm/in 450/17.7 450/17.7 450/17.7 Weight Weight without battery, kg/lb 4.5/9.9 4.9/10.8 4.9/10.8 Noise emiss...
Page 30 - Approved battery chargers; Accessories
Battery BLi300 40-B330X Weight, kg (lb) 1.9 (4.2) 2 (4.4) Approved battery chargers Battery charger QC500 40-C750X Input voltage, V 100-240 100-240 Frequency, Hz 50-60 50-60 Power, W 500 750 Accessories Accessories Approved accessories Accessory type Cutting attachment guard, art. no. Centre hole in...
Page 31 - Declaration of Conformity; EU Declaration of conformity
Declaration of Conformity EU Declaration of conformity We, Husqvarna AB, SE-561 82 Huskvarna, Sweden, tel: +46-36-146500, declare on our sole responsibility that the product: Description Battery-operated brushcutter / grass trimmer Brand Husqvarna Type / Model 535iFR, 535iRXT, 535iRX Identification ...