Page 3 - Table of Contents
INTRODUCTION ............................................................................................................................... 2 Manual Accuracy ........................................................................................................................ 2Contact Info .........
Page 4 - INTRODUCTION; Manual Accuracy; Contact Info
-2- Model G0787 (Mfd. Since 09/14) INTRODUCTION We are proud to provide a high-quality owner’s manual with your new machine! We made every effort to be exact with the instruc-tions, specifications, drawings, and photographs in this manual. Sometimes we make mistakes, but our policy of continuous imp...
Page 5 - Components
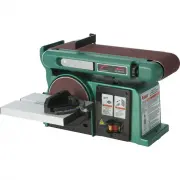
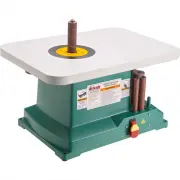
Model G0787 (Mfd. Since 09/14) -3- Controls & Components Refer to Figures 1–2 and the following descrip- tions to become familiar with the basic controls of this machine. To reduce your risk of serious injury, read this entire manual BEFORE using machine. Figure 2. Work table and miter gauge con...
Page 6 - Machine Data Sheet; MACHINE DATA
-4- Model G0787 (Mfd. Since 09/14) Machine Data Sheet The information contained herein is deemed accurate as of 2/25/2016 and represents our most recent product specifications. Due to our ongoing improvement efforts, this information may not accurately describe items previously purchased. PAGE 1 OF ...
Page 8 - For Your Own Safety, Read Instruction; NOTICE; Safety Instructions for Machinery
-6- Model G0787 (Mfd. Since 09/14) ELECTRICAL EQUIPMENT INJURY RISKS. You can be shocked, burned, or killed by touching live electrical components or improperly grounded machinery. To reduce this risk, only allow qualified service personnel to do electrical installation or repair work, and always di...
Page 10 - Additional Safety for Disc/Belt Sanders
-8- Model G0787 (Mfd. Since 09/14) Additional Safety for Disc/Belt Sanders WORKPIECE SUPPORT. Workpiece kickback can occur with violent force if workpiece is not properly supported during operation. Always sand with workpiece firmly against table or another sup-port device. WORKPIECE INSPECTION. Nai...
Page 11 - SECTION 2: POWER SUPPLY
Model G0787 (Mfd. Since 09/14) -9- SECTION 2: POWER SUPPLY Availability Before installing the machine, consider the avail-ability and proximity of the required power supply circuit. If an existing circuit does not meet the requirements for this machine, a new circuit must be installed. To minimize t...
Page 13 - Unpacking; Needed for Setup
Model G0787 (Mfd. Since 09/14) -11- SECTION 3: SETUP This machine was carefully packaged for safe transport. When unpacking, separate all enclosed items from packaging materials and inspect them for shipping damage. If items are damaged, please call us immediately at (570) 546-9663. IMPORTANT: Save ...
Page 14 - Site Considerations; Bench Mounting
-12- Model G0787 (Mfd. Since 09/14) Site Considerations 17½" 2½" Dust Port 14½" Figure 5. Minimum working clearances. Children and visitors may be seriously injured if unsuper- vised around this machine. Lock entrances to the shop or disable start switch or power connection to prevent un...
Page 15 - Assembly
Model G0787 (Mfd. Since 09/14) -13- 5. Insert threaded end of table lock knob through slot in work table and into threaded hole in sander body. 6. Set work table at desired angle and tighten table lock knob. 4. Insert work table index pin into upper hole on sander base (see Figure 9). 1. Attach sand...
Page 16 - Dust Collection
-14- Model G0787 (Mfd. Since 09/14) Figure 12. Dust hose attached to dust port. Dust Collection To connect dust collection hose: 1. Fit 2 1 ⁄ 2 " dust hose over dust port, as shown in Figure 12, and secure in place with hose clamp. Recommended CFM at Dust Port: 250 CFMDo not confuse this CFM rec...
Page 17 - Test Run
Model G0787 (Mfd. Since 09/14) -15- Test Run Once assembly is complete, test run the machine to ensure it is properly connected to power and safety components are functioning correctly. If you find an unusual problem during the test run, immediately stop the machine, disconnect it from power, and fi...
Page 18 - SECTION 4: OPERATIONS; Disabling Switch
-16- Model G0787 (Mfd. Since 09/14) SECTION 4: OPERATIONS Disabling Switch Figure 14. Disabling switch by removing key. The switch can be disabled by removing the key, as shown below. Disabling the switch in this man-ner can prevent unauthorized operation of the machine, which is important if it is ...
Page 19 - Disc Sanding
Model G0787 (Mfd. Since 09/14) -17- Disc Sanding Only sand workpiece on side of sanding disc that is rotating down toward work table. This will keep workpiece from flying out of your hands from rotational force of disc. Set the work table angle relative to the sanding disc. The angle can be set usin...
Page 20 - Belt Sanding
-18- Model G0787 (Mfd. Since 09/14) Belt Sanding 3. Place workpiece on work table and brace it against miter gauge (see Figure 17). Figure 17. Disc sanding. 4. While keeping workpiece snug against miter gauge fence, gently feed it into downward spinning half of sanding disc. 5. Use light pressure, a...
Page 23 - Sandpaper Disc
Model G0787 (Mfd. Since 09/14) -21- The Model G0787 Disc/Belt Sander accepts 6" diameter cloth- or paper-backed pressure sensi-tive adhesive (PSA) sandpaper discs. These are available in a variety of grits through the Grizzly catalog. See Accessories on Page 23 for prices and ordering informatio...
Page 25 - SECTION 5: ACCESSORIES
Model G0787 (Mfd. Since 09/14) -23- Sanding DiscsThese 6" diameter aluminum-oxide sanding discs are pre-applied with top-quality pressure sensitive adhesive and sold in a 3-pk. D1307—Sandpaper Disc 6" A/O 60-Grit D1308—Sandpaper Disc 6" A/O 80-Grit D1309—Sandpaper Disc 6" A/O 100-Gri...
Page 27 - SECTION 6: MAINTENANCE; Schedule
Model G0787 (Mfd. Since 09/14) -25- SECTION 6: MAINTENANCE For optimum performance from your machine, follow this maintenance schedule and refer to any specific instructions given in this section. Daily Check• Loose mounting bolts. • Worn/damaged sanding disc or sanding belt. • Worn or damaged wires...
Page 28 - Troubleshooting
-26- Model G0787 (Mfd. Since 09/14) Review the troubleshooting and procedures in this section if a problem develops with your machine. If you need replacement parts or additional help with a procedure, call our Technical Support. Note: Please gather the serial number and manufacture date of your mac...
Page 30 - Aligning Work Table; Calibrating Miter
-28- Model G0787 (Mfd. Since 09/14) Aligning Work Table 4. Loosen flange nuts shown in Figure 34. Figure 34. Work table alignment nuts. x 3 5. Adjust table so distance "A" equals distance "B" ( Figure 33), with 1 ⁄ 16 " gap between table and sanding disc. 6. Re-tighten flange nut...
Page 31 - Replacing Drive Belt
Model G0787 (Mfd. Since 09/14) -29- 4. Re-tighten lock knob, making sure machin- ist's square remains flat against both miter gauge fence and sanding disc. 5. Pointer shown in Figure 35 should point to "0" on the miter scale. — If the pointer does not point to "0" on the miter scale,...
Page 32 - Wiring Safety Instructions
-30- Model G0787 (Mfd. Since 09/14) SHOCK HAZARD. Working on wiring that is con-nected to a power source is extremely dangerous. Touching electrified parts will result in personal injury including but not limited to severe burns, electrocution, or death. Disconnect the power from the machine before ...
Page 33 - Wiring Diagram
Model G0787 (Mfd. Since 09/14) -31- READ ELECTRICAL SAFETY ON PAGE 30! Neutral Hot Ground 110 VAC 5-15 Plug (As Recommended) PADDLE SWITCH/RELAY (Viewed from Behind) KEDU HY7 Relay WE-10 MOTOR Machine Housing Ground Ground Start Capacitor 100MFD 125VAC The wiring shown here was current at the time o...
Page 34 - Main Breakdown
-32- Model G0787 (Mfd. Since 09/14) 43 29 28 1 3 47 84 81 17 10 9 6 4 7 8 92 12 11 22 91 19 21 20 54 25 24 83 14 27 42 39 49 53 72 26 67 66 68 70 69 71 77 76 68 69 78 74 73 75 12 85 64 44 54 65 90 43 44 63 62 61 86 88 87 59 60 40 41 13 16 37 15 89 30 34 50 48 52 51 32 32 31 33 15 55 32 57 58 41 32 3...
Page 37 - WARRANTY CARD
C U T A LO N G D O T T E D LI N E Name _____________________________________________________________________________ Street _____________________________________________________________________________City _______________________ State _________________________ Zip _____________________Phone # _____...