Shark LA502 - User Manual

Shark LA502 Vacuum – User Manual, read for free online in PDF format. We hope this helps you resolve any issues you may have. If you have further questions, please contact us through the contact form.


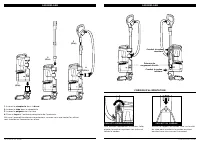
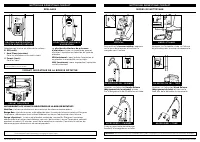
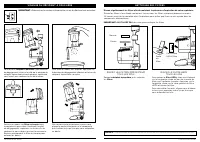
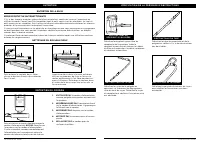


Table of Contents:
- Page 2 – WARNING; IMPORTANT SAFETY INSTRUCTIONS; FOR HOUSEHOLD USE ONLY; SAVE THESE INSTRUCTIONS
- Page 3 – ASSEMBLY
- Page 4 – CLEANING MODES; SETTINGS
- Page 5 – EMPTYING THE DUST CUP; RINSE HEPA FILTER; CLEANING THE FILTERS
- Page 6 – MAINTENANCE; CHECKING FOR BLOCKAGES; CLEANING THE SOFT ROLLER; DO NOT
- Page 7 – AVAILABLE ACCESSORIES
- Page 9 – AVERTISSEMENT; toujours suivre les précautions de base suivantes :; CONSIGNES DE SÉCURITÉ IMPORTANTES; POUR USAGE DOMESTIQUE SEULEMENT; CONSERVEZ CES INSTRUCTIONS
- Page 10 – ASSEMBLAGE; CORDON D’ALIMENTATION
- Page 11 – VOYANT INDICATEUR DE LA BROSSE ROTATIVE; NETTOYAGE DOMESTIQUE COMPLET
- Page 12 – filtre à charpie; RINCEZ LE FILTRE HEPA; VIDANGE DU RÉCIPIENT À POUSSIÈRE; RINCEZ LES FILTRES PRÉ-MOTEUR; récipient à poussière; NETTOYAGE DES FILTRES; N’UTILISEZ PAS
- Page 13 – NETTOYAGE DU ROULEAU DOUX; NE PAS; ENTRETIEN DU CORDON; VÉRIFICATION DE LA PRÉSENCE D’OBSTRUCTIONS; ENTRETIEN
- Page 14 – ACCESSOIRES DISPONIBLES; DÉPANNAGE
- Page 16 – LEA TODAS LAS INSTRUCCIONES ANTES; ADVERTENCIA; utilizar un aparato eléctrico:; INSTRUCCIONES IMPORTANTES DE SEGURIDAD; SOLO PARA USO DOMÉSTICO; CONSERVE ESTAS INSTRUCCIONES
- Page 17 – CABLE DE ALIMENTACIÓN; ENSAMBLADO
- Page 18 – cepillo; II; control deslizante de succión; LIMPIEZA DE TODO EL HOGAR
- Page 19 – LIMPIE EL FILTRO HEPA; el filtro HEPA; LIMPIE LOS FILTROS ANTES DEL; LIMPIEZA DE LOS FILTROS; recipiente para el polvo
- Page 20 – MANTENIMIENTO; LIMPIEZA DEL RODILLO SUAVE; MANTENIMIENTO DEL CABLE; CÓMO VERIFICAR SI HAY OBSTRUCCIONES
- Page 21 – ACCESORIOS DISPONIBLES
LA500 Series • Série • Serie
OWNER’S GUIDE
GUIDE DE L’UTILISATEUR
GUÍA DEL PROPIETARIO
ADV
LIFT-AWAY
®
"Loading the manual" means you need to wait until the file loads and becomes available for online reading. Some manuals are very large, and the time they take to appear depends on your internet speed.
Summary
s h a r k c l e a n . c o m s h a r k c l e a n . c o m READ ALL INSTRUCTIONS BEFORE USING THIS VACUUM 1. Inspect power cord and plug for any damage before use. DO NOT use vacuum cleaner with a damaged cord or plug. Turn off all controls before plugging in or unplugging the vacuum cleaner. Store you...
s h a r k c l e a n . c o m s h a r k c l e a n . c o m ASSEMBLY ASSEMBLY Tool Storage Posts Upper Cord Hook Lower Cord Hook POWER CORD For cord access, rotate upper hook down and remove cord. Use cord holder on the side of wand to hold cord in place while vacuuming. UPPER CORD HOOK CORD HOLDER 1. I...
s h a r k c l e a n . c o m s h a r k c l e a n . c o m Select surface setting: O Power Off I Hard Floor For hard floors and small area rugs. II Carpet For carpets. NOTE: All accessories are compatible with both the wand and the handle. Included accessories will vary by model. NOTE: For deep carpet ...