Page 2 - WARNING; IMPORTANT SAFETY INSTRUCTIONS; FOR HOUSEHOLD USE ONLY; SAVE THESE INSTRUCTIONS
s h a r k c l e a n . c o m s h a r k c l e a n . c o m READ ALL INSTRUCTIONS BEFORE USING THIS VACUUM 1. Inspect power cord and plug for any damage before use. DO NOT use vacuum cleaner with a damaged cord or plug. Turn off all controls before plugging in or unplugging the vacuum cleaner. Store you...
Page 3 - ASSEMBLY; CONTROLS
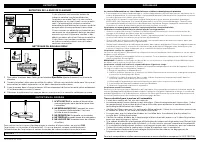
s h a r k c l e a n . c o m s h a r k c l e a n . c o m ASSEMBLY SETTINGS 1 2 3 5 6 4. For compact storage, hang the handheld vacuum from the Storage Hook on the wand. 5. Remove Odor Neutralizer Technology Dial from bag. Flip up the dial handle, align the teal arrows, then insert the dial into the n...
Page 4 - ODOR NEUTRALIZER TECHNOLOGY; Odor Dial Must be Installed for Vacuum to Function Properly
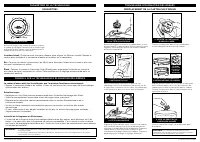
s h a r k c l e a n . c o m s h a r k c l e a n . c o m ODOR NEUTRALIZER TECHNOLOGY ODOR CARTRIDGE REPL ACEMENT TECHNOLOGY SETTINGS ODOR NEUTRALIZER TECHNOLOGY TIPS SETTINGS Flip up the dial handle and rotate the odor dial to adjust odor neutralizer technology intensity or to unlock the dial for car...
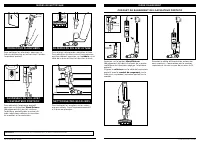
Page 5 - STORAGE MODE; CLEANING MODES; FLOOR MODE; Foot Pedal; ABOVE-FLOOR WITH WAND; Wand Release
s h a r k c l e a n . c o m s h a r k c l e a n . c o m STORAGE MODE HANDHELD STOR AGE HOOK Press the Wand Release button near the top of the wand to detach the handheld vacuum. Align the Catch on the side of the handheld vacuum with the Storage Hook on the wand, then hang the handheld vacuum from t...
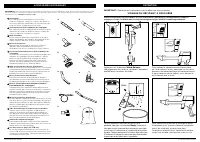
Page 6 - MAINTENANCE; AVAILABLE ACCESSORIES
s h a r k c l e a n . c o m s h a r k c l e a n . c o m MAINTENANCE EMPT YING THE DUST CUP Press the Wand Release button and lift off the handheld vacuum. To remove the dust cup from the handheld vacuum, press the two Dust Cup Release buttons at the same time and pull out the dust cup from the top. ...
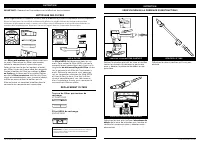
Page 7 - CHECKING FOR BLOCKAGES; Felt Filter; Debris Intake
s h a r k c l e a n . c o m s h a r k c l e a n . c o m CHECKING FOR BLOCKAGES MAINTENANCE Remove the handheld vacuum from the wand and check all dust cup intake openings for debris or blockages. Detach the wand and check it for blockages. CHECK HANDHELD CHECK WAND Regularly rinse and replace the fi...
Page 8 - TROUBLESHOOTING; Power cord caught in brushroll or floor nozzle.; SELF-CLEANING BRUSHROLL MAINTENANCE; CORD MAINTENANCE
s h a r k c l e a n . c o m s h a r k c l e a n . c o m TROUBLESHOOTING For all other issues, please go to support.sharkclean.com/ or call Customer Service 1-800-798-7398. Power cord caught in brushroll or floor nozzle. • To minimize the risk of power cord damage, DO NOT run the vacuum over the powe...
Page 9 - RECORD THIS INFORMATION; REGISTER YOUR PURCHASE; TECHNICAL SPECIFICATIONS
s h a r k c l e a n . c o m s h a r k c l e a n . c o m RECORD THIS INFORMATION Model Number: ������������������������Date Code: ����������������������������Date of Purchase: ���������������������� (Keep receipt)Store of Purchase: ���������������������� TIP: The model number is on the rating label b...
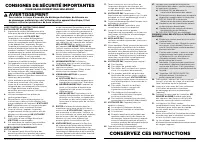
Page 10 - AVERTISSEMENT; toujours suivre les précautions de base suivantes :; CONSIGNES DE SÉCURITÉ IMPORTANTES; POUR USAGE DOMESTIQUE SEULEMENT; CONSERVEZ CES INSTRUCTIONS
s h a r k c l e a n . c o m s h a r k c l e a n . c o m LISEZ TOUTES LES INSTRUCTIONS AVANT D'UTILISER CET ASPIRATEUR 1. Inspectez le cordon d’alimentation et la fiche pour déceler d’éventuels dommages avant l’utilisation. N’UTILISEZ PAS l’aspirateur si le cordon d’alimentation ou la fiche sont endo...
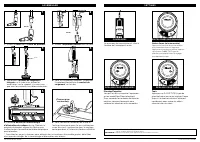
Page 11 - SETTINGS; COMMANDES; ASSEMBLAGE
s h a r k c l e a n . c o m s h a r k c l e a n . c o m SETTINGS 1 2 3 5 6 5. Retirez le bouton de la technologie d’élimination des odeurs du sac. Relevez la poignée du bouton, alignez les flèches puis insérez-le dans l’ouverture de la tête d’aspirateur pour plancher. * Consulter les pages suivantes...
Page 12 - TECHNOLOGIE D’ÉLIMINATION DES ODEURS; CADRAN D’ODEUR; lorsque l’aspirateur est utilisé.; Entretien requis; soigneusement l’aspirateur.; Intensité de la fragrance au fil du temps; un rendement optimal.
s h a r k c l e a n . c o m s h a r k c l e a n . c o m TECHNOLOGIE D’ÉLIMINATION DES ODEURS PARAMÈTRES DE LA TECHNOLOGIE TECHNOLOGIE D’ÉLIMINATION DES ODEURS REMPLACEMENT DE LA CARTOUCHE D’ODEUR PARAMÈTRES DE LA TECHNOLOGIE CONSEILS SUR LA TECHNOLOGIE D’ÉLIMINATION DES ODEURS PARAMÈTRES Relevez la ...
Page 13 - MODE POUR PLANCHERS; MODES DE NETTOYAGE; pédale; AU-DESSUS DU SOL AVEC; MODE RANGEMENT
s h a r k c l e a n . c o m s h a r k c l e a n . c o m MODE POUR PLANCHERS NETTOYAGE DES ESCALIERS AU-DESSUS DU SOL AVEC LE TUBE MODES DE NETTOYAGE Pour nettoyer les planchers, appuyez sur la buse de plancher et inclinez vers l’arrière l’aspirateur portatif. Pour nettoyer les escaliers ou les autre...
Page 14 - ACCESSOIRES DISPONIBLES; ENTRETIEN
s h a r k c l e a n . c o m s h a r k c l e a n . c o m Pour retirer le compartiment à poussière de l’aspirateur à main, appuyez sur les deux boutons de déverrouillage du compartiment à poussière en même temps, puis retirez-le en le tenant par le haut. (Clic) B A D F I H C E G J K L ACCESSOIRES DISP...
Page 15 - REPLACEMENT FILTERS; VÉRIFICATION DE LA PRÉSENCE D’OBSTRUCTIONS
s h a r k c l e a n . c o m s h a r k c l e a n . c o m VÉRIFIEZ L’ASPIRATEUR PORTATIF VÉRIFIEZ LE TUBE PRE- MOTOR FILTE RS REPLACEMENT FILTERS Les filtres pré-moteur doivent être rincés tous les mois. Pour retirer les filtres pré-moteur, retirez le compartiment à poussière, puis faites glisser vers...
Page 16 - Trousse de détail pour la maison et l’automobile; NETTOYAGE DU ROULEAU DOUX; Eject Roller; ENTRETIEN DU CORDON; ENTRETIEN DE LA BUSE DE PLANCHER
s h a r k c l e a n . c o m s h a r k c l e a n . c o m Pour tout autre problème, veuillez communiquer avec le service clientèle en composant le 1 800 798-7398. Le cordon d’alimentation est coincé dans la brosse rotative ou dans la buse de plancher. • Pour minimiser le risque d’endommager le cordon ...
Page 17 - ENREGISTREZ VOTRE ACHAT :; SPÉCIFICATIONS DE LA TECHNOLOGIE D’ÉLIMINATION DES ODEURS; CONSIGNEZ CES RENSEIGNEMENTS
s h a r k c l e a n . c o m s h a r k c l e a n . c o m ENREGISTREZ VOTRE ACHAT : registeryourshark.com Numérisez le code QR avec votre appareil mobile Pour obtenir de plus amples renseignements, scannez ici ou rendez-vous sur qr.sharkclean.com/odortech CARACTÉRISTIQUES TECHNIQUES Tension électrique...
Page 18 - ADVERTENCIA; utilizar un aparato eléctrico:; INSTRUCCIONES IMPORTANTES DE SEGURIDAD; SOLO PARA USO DOMÉSTICO; CONSERVE ESTAS INSTRUCCIONES
s h a r k c l e a n . c o m s h a r k c l e a n . c o m LEA TODAS LAS INSTRUCCIONES ANTES DE USAR ESTA VACÍO1. Revise que el enchufe y el cable de alimentación no estén dañados antes de usar. NO use la aspiradora si tiene el enchufe o el cable dañados. Apague todos los controles antes de enchufar o ...
Page 19 - CONTROLES; ENSAMBLADO
s h a r k c l e a n . c o m s h a r k c l e a n . c o m 1 2 3 5 6 (Chasquido) (Clic) (Clic) CONTROLES BOTÓN POWER (ENCENDIDO) AJUSTE PARA PISO SENCILLO AJUSTE PARA ALFOMBRA 4 (Gira para hacer clic) 5. Quita el dial de la tecnología neutralizadora de olores de la bolsa. Levanta el mango del dial, ali...
Page 20 - TECNOLOGÍA NEUTRALIZADORA DE OLORES; cuando la aspiradora esté en uso.; Se requiere mantenimiento; rendimiento continuo.
s h a r k c l e a n . c o m s h a r k c l e a n . c o m DIAL DE OLORES 1. QUITA EL DIAL DE OLORES DE LA BOQUILLA 2. QUITA EL CARTUCHO DE OLORES ANTIGUO 3. RETIRA EL CARTUCHO NUEVO DE LA BOLSA 5. INSTALA EL DIAL EN LA BOQUILLA 4. INSTALA EL CARTUCHO NUEVO EN EL DIAL 6. ELIMINACIÓN DE CARTUCHOS USADOS...
Page 21 - MODO PISO; MODOS DE LIMPIEZA; pedal; MODO ALMACENAMIENTO
s h a r k c l e a n . c o m s h a r k c l e a n . c o m MODO PISO LIMPIEZA DE ESCALERAS ENCIMA DEL PISO CON VÁSTAGO ENCIMA DEL PISO CON PORTÁTIL MODOS DE LIMPIEZA NOTA: Todos los accesorios son compatibles con el vástago y con la aspiradora portátil. Para limpiar los pisos, pise la boquilla de piso ...
Page 22 - soltar el recipiente para el polvo; ACCESORIOS DISPONIBLES; MANTENIMIENTO
s h a r k c l e a n . c o m s h a r k c l e a n . c o m Para quitar el recipiente para el polvo de la aspiradora portátil, presiona los dos botones para soltar el recipiente para el polvo al mismo tiempo y retira el recipiente para el polvo de la parte superior. (Clic) B A D F I H C E G J K L ACCESO...
Page 23 - FILTROS DE REPUESTO; CÓMO VERIFICAR SI HAY OBSTRUCCIONES
s h a r k c l e a n . c o m s h a r k c l e a n . c o m REVISE LA PORTÁTIL REVISE EL VÁSTAGO PRE- MOTOR FILTE RS FILTROS DE REPUESTO REVISE LA BOQUILLA DE PISO HE PA FILTE R Los filtros delanteros del motor se deben limpiar todos los meses. Para quitar los filtros delanteros del motor, desmonta el r...
Page 24 - MANTENIMIENTO DE LA BOQUILLA DE PISO; MANTENIMIENTO DE CORD; SOLUCIÓN DE PROBLEMAS
s h a r k c l e a n . c o m s h a r k c l e a n . c o m Para todos los demás problemas, llama al Servicio al Cliente al 1-800-798-7398. Si hay cabello enredado en el cepillo giratorio, sigue aspirando en el modo Carpet (Alfombra) sobre una superficie de piso descubierta, una alfombra de fibra corta ...
Page 25 - ESPECIFICACIONES TÉCNICAS; REGISTRE ESTA INFORMACIÓN
s h a r k c l e a n . c o m s h a r k c l e a n . c o m La garantía limitada de cinco (5) años se aplica a las compras realizadas a los vendedores minoristas autorizados de SharkNinja Operating LLC. La cobertura de garantía se aplica solo al propietario y al producto originales y no puede transferir...