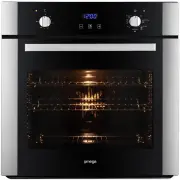
Page 3 - TABLE OF CONTENTS; Accessories....................................................................................4
3 DEAR CUSTOMER, We thank you and congratulate you on your choice. This new carefully designed product, manufactured with the highest quality materials, has been carefully tested to satisfy all your cooking demands. We would therefore request you to read and follow these easy instructions, which wil...
Page 4 - ACCESSORIES
Page 5 - SAFETY INSTRUCTIONS; Important; This oven does not contain any asbestos-based components.
5 SAFETY INSTRUCTIONS Important - When you receive the appliance, unpack it or have it unpacked immediately. Give it an overall inspection. Make note of any concerns or reservations on the delivery slip and make sure to keep a copy of this form. Keep this user guide with your appliance. If the appli...
Page 6 - SAFETY INSTRUCTIONS Cont.; Maintenance and cleaning; PACKAGING; indicate that used appliances must not be mixed with other waste.
6 SAFETY INSTRUCTIONS Cont. Maintenance and cleaning - Do not use a steam cleaner. - For any cleaning operation inside the oven cavity, the oven must be switched off. - Before unclipping the glass, allow the appliance to cool. - Before removing the back, ensure that the appliance is powered down. Af...
Page 7 - INSTALLATION OF YOUR OVEN; Leave a gap of at least 20 cm; WARNING; Min 20cm; Option 2
7 INSTALLATION OF YOUR OVEN To install the oven into the kitchen a cut out should be made in accordance with the dimensions shown in below. The apparatus is to be fastened to the top by means of the two screws provided in the kit through the holes made on the oven uprights. The cabinet in which the ...
Page 8 - ELECTRICAL INSTALLATION; The oven is only for domestic use.; Electricals Specification; INSTRUCTIONS FOR USE
8 ELECTRICAL INSTALLATION WARNING This apparatus must be earthed. The oven is only for domestic use. The feed voltage and the absorbed power are as indicated on the data plate attached to the left-hand side upright, which can be seen when the oven door is open. Connecting must be carried out by qual...
Page 10 - INSTRUCTIONS FOR USE Cont.; MODE
10 INSTRUCTIONS FOR USE Cont. Cooking Functions Each type of oven is provided for various cooking systems. A system can be selected by bringing the pointer of knob to the relating symbol. ( OO655X, OO656X,OO657X,OO686X ) MODE PRESET ( ⁰ ⁰ ⁰ ⁰ C) TMIN ( ⁰ ⁰ ⁰ ⁰ C) TMAX ( ⁰ ⁰ ⁰ ⁰ C) HEATING ELEMENTS N...
Page 11 - Electronic Control; Control Panel Description; The oven control panel is made with one display and two knobs.; Programming time functions; symbol appears when the minute minder is displayed.
11 INSTRUCTIONS FOR USE Cont. Electronic Control Control Panel Description (Models: OO686X, OO687X) The oven control panel is made with one display and two knobs. - Time & Temperature display. - Time & Temperature knob (Push & Shuttle). - Mode (oven functions) knob. The push & shuttl...
Page 12 - If the selected function works using any heating elements, the; Setting an automatic oven function; Alarm Timer
12 INSTRUCTIONS FOR USE Cont. Alarm Timer You can set this timer to sound a buzzer after 0 to 60 minutes of cooking. First turn the knob fully clockwise, then turn it back to the desired alarm time Setting the minute minder (Models: OO656X, OO657X) When the symbol is displayed, turn the knob left/ri...
Page 13 - - Modify the flashing hours value turning the knob left/right.; Oven functions
13 INSTRUCTIONS FOR USE Cont. 4. W hen the word dur is displayed, the control shows 30’ as the standard cooking duration. Turn the knob left/right in order to set the actually desired cooking time in a range between 0 and 240 Minutes. The display will flash dur and its value alternatively for a few ...
Page 14 - Defrost; - The heaters and the other loads are disabled.; - The control emits an acoustic warning signal.; Error code table
14 INSTRUCTIONS FOR USE Cont. Defrost This function is used to defrost frozen food in a short time. It doesn’t heat up the oven, only the convection fan works. The temperature display shows dEF to indicate that this special mode is active. Commands lock for children safety Hold the Time & Temp k...
Page 15 - Place the door in a convenient location.
15 INSTRUCTIONS FOR USE Cont. Oven door removal WARNING Make sure that: • The oven is cool and power to the oven has been turned off before removing the door. Failure to do so could result in electrical shock or burns. • The oven door is heavy and fragile. Use both hands to remove the oven door. The...
Page 16 - damage the bulb when it becomes hot.
16 INSTRUCTIONS FOR USE Cont. Replacement of the oven light WARNING Make sure that: • The oven and lights are cool and power to the oven has been turned off before replacing the light bulb(s). Failure to do so could result in electrical shock or burns. • The lenses must be in place when using the ov...
Page 17 - GUIDANCE TEMPERATURE AN TIME SCHEDULE FOR COOKING; - For cooking on 1 plane make use on 2nd holder from the bottom; IMPORTANT: The cooking times are considered with oven preheated.
17 GUIDANCE TEMPERATURE AN TIME SCHEDULE FOR COOKING Warning for hot-air cooking - Position of pans: - For cooking on 1 plane make use on 2nd holder from the bottom - For cooking on 2 planes make use of 2nd - 4th holders from the bottom - For cooking on 3 planes make use of 2nd - 3th and 4th holders...