Page 2 - Thank you for introducing our family to yours; always serve you well.; We hope you love this product as much as we do!
Thank you for introducing our family to yours At Omega, we understand that cooking, cleaning and washing may not be your favourite things in the world. That's why we created a range of no-nonsense, reliable products that always get the job done for you. With the features you need and nothing you don...
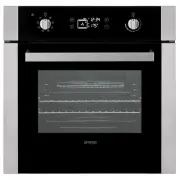
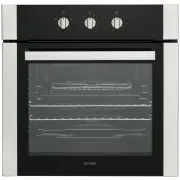
Page 3 - X BUILT-IN ELECTRIC PYROLYTIC OVEN; CONGRATULATIONS; SECTION; Appliance Details..............................; DISPOSAL INFORMATION
2 INSTALLATION, OPERATION AND MAINTENANCE INSTRUCTIONS FOR OMEGA BUILT-IN PYROLYTIC ELECTRIC OVEN OO6 1P X BUILT-IN ELECTRIC PYROLYTIC OVEN CONGRATULATIONS Thank you for choosing one of our many fantastic built in ovens. We are confident that you will now be able to meet your cooking needs. Before y...
Page 4 - IMPORTANT SAFETY INSTRUCTIONS
3 IMPORTANT SAFETY INSTRUCTIONS IMPORTANT: Read the assembly instruction section and safety precautions of this booklet carefully before removing the contents of this carton. 1. This appliance is not intended for use by persons (including children) with reduced physical, sensory or mental capabiliti...
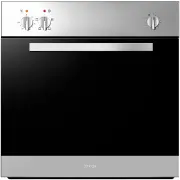
Page 5 - APPLIANCE DETAILS; External Oven size; ELECTRICAL CONNECTIONS; LOCAL AUTHORITY REQUIREMENTS; NOTE; these may overheat and catch fire.; Note; by an unauthorized person.
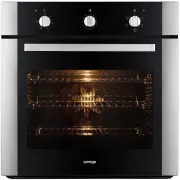
4 APPLIANCE DETAILS ELECTRICAL DETAILS: OVENS: Rated Voltage: Max Rated Inputs: Supply Connection: OO6 2 P X 220 to 240V ac 50 Hz 2600W OVENS - 15 A plug This information can be found on the rating plate (data label) affixed to the inside of the door jamb. SIZES: Relevant Sizes: LENGTH (mm) WIDTH (m...
Page 6 - OVEN LAMP REPLACEMENT
5 OVEN LAMP REPLACEMENT • The appliance must first be disconnected from the power outlet or turned off at your isolation switch. • Unscrew the glass cover attached to the lamp holder; anti-clockwise. • Unscrew the lamp and replace it with another high-temperature lamp with the following characterist...
Page 7 - INSTALLATION; PREPARATION FOR INSTALLATION AND USE
6 INSTALLATION The adjacent furniture must be able to withstand a minimum temperature rise of 50°C above the ambient temperature of the room it is located in during periods of use. The power supply to the appliance must be cut off before any adjustments or maintenance work is done on it. PREPARATION...
Page 8 - INSTALLATION OF BUILT IN OVEN
7 INSTALLATION OF BUILT IN OVEN Insert the oven into cabinet partly by pushing it forward. Open the oven door and insert 2 screws into the holes on the oven frame. While the product frame touches the wooden surface of the cabinet, tighten the screws. If the oven is installed below a built-in hob, th...
Page 9 - OPERATING INSTRUCTIONS; Turbo Heating Element; ENERGY SAVING
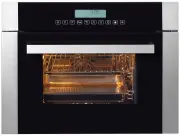
8 OPERATING INSTRUCTIONS FRONT VIEW: INTERNAL VIEWS: 8. Oven Light . 9. Turbo Heating Element . 10. Fan (behind plate) . 11. Air Outlet Shutters . 1. Control Panel. 2. Handle. 3. Oven Door. 4. Bottom Heating Element (under plate). 5. T op Heating Element (above plate) . 6. Wire Grill (2) . 7. Racks/...
Page 10 - CONTROLS
Page 11 - OVEN FUNCTION CONTROL CHART; : Oven shelves are numbered from
10 OVEN FUNCTION CONTROL CHART Note : Oven shelves are numbered from 9 at the top down to 1 at the bottom . During heated oven functions a cooling fan in the top of the oven will operate in order to cool down the oven door and kitchen cabinet as well as reducing condensation in the oven. There will ...
Page 13 - Fan Assist Function:; ). Placing the rack within the oven tray provided will ensure that
12 Fan Assist Function: This is the function where the air coming from the lower and upper heating elements is circulated into the oven by the fan motor and blade. Adjust the function control knob so it indicates the Fan Assist Function symbol and adjust the oven timer to the recommended time for co...
Page 14 - Pyrolytic Cleaning Function:
13 Maxi-Grill with Fan Function: This function will ensure complete, fast and all over grilling by working the fan, the grill and the upper heating element at the same time. Adjust the function control knob so it indicates the Maxi-Grill with Fan function symbol and adjust the oven timer to the reco...
Page 15 - that the time can only be reset after the power has been reset.
USING THE DIGITAL TIMER Time of Day Adjustment: The time must be adjusted before starting to use the oven. Following the connection of the power supply to the oven, the display will begin to flash. Leave the oven function control at “off” and then press either the “+” or “-“ button (set to manual mo...
Page 17 - CLEANING; before commencing any cleaning process.; Cleaning the oven exterior:
16 CLEANING NOTE: Cleaning and maintenance operations must only be carried out when the oven is cool. The appliance should be disconnected from the power outlet or turned off at your isolation switch before commencing any cleaning process. Cleaning the oven exterior: Before starting to clean your ov...
Page 19 - COOKING GUIDES; Oven Shelf Location; When using only 1 shelf, use position/rack; Cooking Pizza; oven for at least 10 minutes.; Roasting Meat, Cooking Chicken and Fish
18 COOKING GUIDES • For optimum cooking keep edges of baking dishes and pans at least 4cm from the sides of the oven. Thisallows free heat circulation and ensures even cooking. • Where possible remove large cuts of meat 1kg or over from the fridge 1 hour prior to cooking. Allow, tostand covered and ...
Page 20 - When making cakes have eggs at room temperature.; Pavlova and Meringues; Eggs should be at room temperature.
19 Grilling Cooking times may vary according to the nature of the foods, their homogeneity and their volume. When cooking a certain food for the first time, it is advisable to choose the lowest temperature and then increase temperature as required. Cakes and Baking Organize the oven shelves while th...