Page 2 - SPECIFICATIONS; Applicable battery cartridge and charger; SAFETY WARNINGS; IMPORTANT SAFETY; Read All Instructions
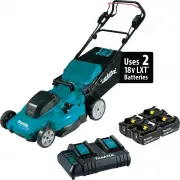
2 ENGLISH ENGLISH (Original instructions) SPECIFICATIONS Model: XML10 XML11 XML13 XML14 Mowing width (blade diameter) 534 mm (21″) 480 mm (18-7/8″) No load speed 3,000 /min 3,100 /min Part number of replacement mower blade 191V96-5 191V97-3 Dimensions (L x W x H) during operation L: 1,780 mm to 1,84...
Page 5 - SAVE THESE INSTRUCTIONS.; Symbols; Important safety instructions for
5 ENGLISH 9. Do not replace the battery in the rain. 10. Do not wet the terminal of battery with liquid such as water, or submerge the battery. Do not leave the battery in the rain, nor charge, use, or store the battery in a damp or wet place. If the terminal gets wet or liquid enters inside of bat-...
Page 6 - ASSEMBLY; Installing the handle
6 ENGLISH 14. During and after use, the battery cartridge may take on heat which can cause burns or low temperature burns. Pay attention to the han- dling of hot battery cartridges. 15. Do not touch the terminal of the tool imme- diately after use as it may get hot enough to cause burns. 16. Do not ...
Page 7 - Removing the mulching plug; Assembling the grass basket
7 ENGLISH 2. Turn the knob 90° while pulling the knob on the lower handle to release the locking pin. Perform the same procedure on the other side. Raise the handle, and then turn the knob on both sides 90°. Make sure that the knobs are securely fixed. 1 Fig.3 ► 1. Knob NOTE: Supporting the handle m...
Page 8 - Installing or removing the grass
8 ENGLISH 3. Make sure that there is no sagging on the corners of the grass basket. Fig.8 4. Open the upper clip, and attach it to the frame. Fig.9 5. Attach all the other clips as shown in the figure. Make sure that all the clips are securely attached to the frame. 1 1 1 Fig.10 ► 1. Clip Installing...
Page 9 - Attaching the mulching plug; FUNCTIONAL; Installing or removing battery
9 ENGLISH Attaching the mulching plug 1. Open the rear cover, and then remove the grass basket. 1 2 Fig.13 ► 1. Rear cover 2. Grass basket 2. Attach the mulching plug by pushing it as far as it will go so that the protrusions on the mulching plug fit into the holes on the machine. 1 2 Fig.14 ► 1. Mu...
Page 10 - Indicating the remaining battery
10 ENGLISH 2. Align the tongue on the battery cartridge with the slot on the machine, and then slide the cartridge until it locks in place with a little click. 1 Fig.16 ► 1. Battery cartridge 3. Insert the lock key in the place shown in the figure as far as it will go. 1 Fig.17 ► 1. Lock key 4. Clos...
Page 11 - Main power switch; Switch action
11 ENGLISH Indicating the remaining battery capacity Only for battery cartridges with the indicator 1 2 Fig.19 ► 1. Indicator lamps 2. Check button Press the check button on the battery cartridge to indi - cate the remaining battery capacity. The indicator lamps light up for a few seconds. Indicator...
Page 12 - Adjusting the mowing height
12 ENGLISH This mower is equipped with the lock key and handle switch. If you notice anything unusual with either of the lock key or switch, stop the operation immediately and have them checked by your nearest Makita Authorized Service Center. For XML11/XML141. Install the battery cartridges. Insert...
Page 13 - Grass level indicator
13 ENGLISH The table below shows the relationship between the number on the mower body and the approximate mow - ing height. Number Mowing height 1 32 mm (1-1/4″) 2 40 mm (1-9/16″) 3 49 mm (1-15/16″) 4 59 mm (2-5/16″) 5 70 mm (2-3/4″) 6 81 mm (3-3/16″) 7 92 mm (3-5/8″) 8 100 mm (3-15/16″) Hold the l...
Page 14 - Using the rear discharge
14 ENGLISH 2. Adjust the handle height, and then turn the knob on both sides 90°. Make sure that the knobs are securely fixed. 1 Fig.29 ► 1. Knob Adjusting the traveling speed For XML11/XML14 1 Fig.30 ► 1. Speed lever The traveling speed can be adjusted with the speed lever. To decrease the speed, p...
Page 15 - OPERATION; Mowing
15 ENGLISH OPERATION Mowing WARNING: Before mowing, clear away sticks and stones from mowing area. Furthermore, clear away any weeds from mowing area in advance. WARNING: Always wear the safety goggles or safety glasses with side shields when operating the mower. CAUTION: If the cut grass or foreign...
Page 16 - Emptying the grass basket; MAINTENANCE; Maintenance
16 ENGLISH NOTE: Mowing long lawn to short length all at once may cause the lawn to die. The cut lawn may also block up inside of the mower body. NOTE: If the unevenness in the length of lawn or poor finish is found after mowing, or decrease of the motor speed is found during mowing, decrease the mo...
Page 17 - Carrying the mower; Storing
17 ENGLISH Carrying the mower CAUTION: Before carrying the mower, make sure that the battery cartridge and lock key are removed. When carrying the mower, hold the rear grip and the lower holding part at the front of the machine with two people as shown in the figure. 1 2 Fig.40 ► 1. Lower holding pa...
Page 18 - Removing or installing the mower
18 ENGLISH For XML10/XML13 1 Fig.43 ► 1. Knob NOTICE: Be careful not to pinch the cords when folding the handle. 4. Loosen the thumb nuts on both sides, and then fold the upper handle as shown in the figure. 2 1 Fig.44 ► 1. Thumb nut 2. Upper handle 5. Place the machine in the upright position. NOTE...
Page 19 - Removing the mower blade; Installing the mower blade
19 ENGLISH Removing the mower blade 1. Put the mower on its side so that the mowing height adjusting lever comes to the lower side. 2. To lock the blade, insert the pin into the hole on the mower body as far as it will go. 3. Turn the bolt counterclockwise with box wrench 17. 2 1 3 Fig.47 ► 1. Mower...
Page 20 - TROUBLESHOOTING; OPTIONAL; MAKITA LIMITED WARRANTY
20 ENGLISH TROUBLESHOOTING Before asking for repairs, conduct your own inspection first. If you find a problem that is not explained in the manual, do not attempt to disassemble the machine. Instead, ask Makita Authorized Service Centers, always using Makita replacement parts for repairs. State of a...
Page 21 - ESPECIFICACIONES; Cartucho de batería y cargador aplicables; ADVERTENCIAS DE; INSTRUCCIONES IMPORTANTES; Lea todas las instrucciones
21 ESPAÑOL ESPAÑOL (Instrucciones originales) ESPECIFICACIONES Modelo: XML10 XML11 XML13 XML14 Amplitud de corte del césped (diámetro de la cuchilla) 534 mm (21″) 480 mm (18-7/8″) Velocidad sin carga 3 000 r/min 3 100 r/min Número de pieza de la cuchilla de repuesto de la cortadora de césped 191V96-...
Page 24 - GUARDE ESTAS; Símbolos
24 ESPAÑOL 7. No utilice un paquete de baterías o una herra- mienta que esté dañado/dañada o haya sido modificado/modificada. Las baterías dañadas o modificadas podrían comportarse de manera impredecible causando un incendio, explosión o riesgo de lesión. 8. No exponga un paquete de baterías o una h...
Page 26 - MONTAJE; Instalación del mango
26 ESPAÑOL MONTAJE ADVERTENCIA: Asegúrese siempre de que la llave de cierre y el cartucho de batería se hayan extraído antes de realizar cualquier trabajo en la cortadora de césped. El no extraer la llave de cierre y el cartucho de batería puede ocasionar lesiones personales graves debido a un encen...
Page 27 - Extracción del tapón para mantillo; Montaje del canasto para césped
27 ESPAÑOL Extracción del tapón para mantillo 1. Abra la cubierta posterior. 1 Fig.4 ► 1. Cubierta posterior 2. Levante el tapón para mantillo ligeramente, y luego quítelo. 1 Fig.5 ► 1. Tapón para mantillo Montaje del canasto para césped 1. Levante el sujetador de presión superior del canasto para c...
Page 29 - Instalación o extracción del
29 ESPAÑOL 2. Coloque el tapón para mantillo al empujarlo hasta el máximo que avance, de modo que las protuberancias del tapón para mantillo encajen dentro de los orificios de la máquina. 1 2 Fig.14 ► 1. Tapón para mantillo 2. Protuberancia DESCRIPCIÓN DEL FUNCIONAMIENTO Instalación o extracción del...
Page 30 - Indicación de capacidad restante de
30 ESPAÑOL Para retirar el cartucho de batería;1. Jale hacia arriba la palanca de bloqueo y abra la cubierta de la batería. 2. Jale el cartucho de batería para extraerlo de la máquina mientras desliza el botón en la parte delantera del cartucho. 3. Saque la llave de cierre. 4. Cierre la cubierta de ...
Page 31 - Interruptor de alimentación principal
31 ESPAÑOL Luces indicadoras Capacidad restante Iluminadas Apagadas Parpadeando 75% a 100% 50% a 75% 25% a 50% 0% a 25% Cargar la batería. La batería pudo haber funcionado mal. NOTA: Dependiendo de las condiciones de uso y la temperatura ambiente, la indicación podrá diferir ligeramente de la capaci...
Page 34 - Ajuste de la velocidad de recorrido; Uso del tapón para mantillo; Funcionamiento electrónico; OPERACIÓN; Corte del césped
34 ESPAÑOL Ajuste de la velocidad de recorrido Para la XML11/XML14 1 Fig.30 ► 1. Palanca de velocidad La velocidad de recorrido se puede ajustar con la palanca de velocidad. Para disminuir la velocidad, tire de la palanca hacia usted y, para aumentar la veloci - dad, gire la palanca hacia adelante. ...
Page 35 - Corte de césped largo
35 ESPAÑOL Sujete el mango firmemente con ambas manos al cortar el césped. La referencia de velocidad del corte es de aproximadamente 7 metros a 14 metros (23 ft. - 46 ft.) cada 10 segundos. Fig.33 NOTA: Cuando se corta césped largo o espeso, si se encuentra una irregularidad en la longitud del césp...
Page 36 - Vaciado del canasto para césped; MANTENIMIENTO; Mantenimiento
36 ESPAÑOL Vaciado del canasto para césped ADVERTENCIA: Para reducir el riesgo de accidentes, revise regularmente el canasto para césped para ver si no hay daños o ha perdido resistencia. Reemplace el canasto para césped en caso necesario. 1. Libere la palanca interruptora y la palanca de accionamie...
Page 37 - Traslado de la cortadora de césped; Almacenamiento
37 ESPAÑOL Traslado de la cortadora de césped PRECAUCIÓN: Antes de transportar la corta- dora de césped, asegúrese de quitar el cartucho de batería y la llave de cierre. Para trasladar la cortadora de césped, sostenga la empuñadura trasera y la parte de sujeción inferior al frente de la máquina con ...
Page 38 - Extracción o instalación de la
38 ESPAÑOL Para la XML10/XML13 1 Fig.43 ► 1. Perilla AVISO: Tenga cuidado de no pellizcar los cables cuando pliegue el mango. 4. Afloje las tuercas de mano de ambos lados, y luego pliegue el mango superior como se muestra en la figura. 2 1 Fig.44 ► 1. Tuerca de mano 2. Mango superior 5. Coloque la m...
Page 39 - Instalación de la cuchilla de la
39 ESPAÑOL Extracción de la cuchilla de la cortadora de césped 1. Coloque de lado la cortadora de césped de tal forma que la palanca de ajuste de la altura de corte del césped quede orientada hacia el lado inferior. 2. Para bloquear la cuchilla, inserte el pasador en el orificio del cuerpo de la cor...
Page 40 - RESOLUCIÓN DE PROBLEMAS; ACCESORIOS; GARANTÍA LIMITADA DE MAKITA; Ésta Garantía no aplica para México
40 ESPAÑOL RESOLUCIÓN DE PROBLEMAS Antes de solicitar alguna reparación, primero realice una inspección por su cuenta. Si detecta algún problema que no esté explicado en el manual, no intente desarmar la máquina. En vez de esto, solicite la reparación a un centro de servicio autorizado de Makita, us...
Page 44 - Makita Corporation
Makita Corporation 3-11-8, Sumiyoshi-cho, Anjo, Aichi 446-8502 Japan www.makita.com 885927A914 XML10-2 EN, ESMX 20221004


 Makita XML06PT1 User Manual
 Makita XML07PT1 User Manual
 Makita XML08PT1 User Manual
 Makita XML09PT1 User Manual
 Makita XML10CM1 User Manual
 Makita XML11CT1 User Manual
 Makita DLM382CM2 User Manual
 Makita DLM382PM2 User Manual
 Makita DLM382Z User Manual
 Makita DLM432Z User Manual
 Makita DLM460Z User Manual
 Makita DLM462Z User Manual
 Makita DLM530Z User Manual
 Makita DLM533Z User Manual
 Makita ELM3300 User Manual
 Makita ELM3320 User Manual
 Makita ELM3700 User Manual
 Makita ELM3720 User Manual
 Makita ELM4100 User Manual
 Makita ELM4120 User Manual