Jet 415560 - User Manual
Jet 415560 Band Saw – User Manual, read for free online in PDF format. We hope this helps you resolve any issues you may have. If you have further questions, please contact us through the contact form.


Table of Contents:
- Page 2 – WARNING – To reduce risk of injury:
- Page 3 – SAVE THESE INSTRUCTIONS; On-off switch padlock
- Page 4 – Table of contents; Section
- Page 5 – About this manual
- Page 6 – Specifications
- Page 8 – Setup and assembly; Shipping contents
- Page 10 – Coolant tank preparation; Electrical connections; GROUNDING INSTRUCTIONS; Extension cords
- Page 11 – Adjustments; Tools required for adjustments
- Page 14 – Counterbalance spring
- Page 15 – Auto shut-off adjustment
- Page 16 – Operation; General operating procedure
- Page 17 – Evaluating cutting efficiency; Lubrication
- Page 18 – Additional servicing
- Page 19 – Troubleshooting HVBS-712V/712DV Band Saw; Mechanical and electrical problems; Operational problems
- Page 20 – Replacement Parts
- Page 28 – DC Motor Driver
- Page 29 – Warranty and service
Operating Instructions and Parts Manual
Horizontal-Vertical Band Saw
Models HVBS-712V, HVBS-712DV
JET
427 New Sanford Road
LaVergne, Tennessee 37086
Part No. M-415560
Ph.: 800-274-6848
Edition 1 03/2019
www.jettools.com
Copyright © 2019 JET
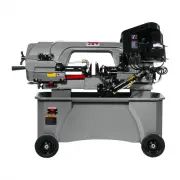
HVBS-712V shown
This .pdf document is bookmarked
"Loading the manual" means you need to wait until the file loads and becomes available for online reading. Some manuals are very large, and the time they take to appear depends on your internet speed.
Summary
1.0 IMPORTANT SAFETY INSTRUCTIONS Read and understand the entire instruction manual before operating machine. This band saw is designed and intended for use by properly trained and experienced personnel only. If you are not familiar with the proper and safe operation of a band saw, do not use until ...
3 27. Make sure workpiece is securely clamped in vise. Never use your hand to hold the workpiece. 28. Never reach around or over a moving saw blade. 29. Do not remove jammed cutoff pieces until blade has stopped. 30. Feed work into a blade or cutter only against the direction of rotation of the blad...
4 3.0 Table of contents Section Page 1.0 IMPORTANT SAFETY INSTRUCTIONS ....................................................................................................... 2 2.0 On-off switch padlock ..................................................................................................