Page 2 - WARNING – To reduce risk of injury:
2 1.0 IMPORTANT SAFETY INSTRUCTIONS Read and understand the entire instruction manual before operating machine. This band saw is designed and intended for use by properly trained and experienced personnel only. If you are not familiar with the proper and safe operation of a band saw, do not use unti...
Page 3 - SAVE THESE INSTRUCTIONS; ON/OFF Switch padlock
3 24. Maintain tools with care. Keep saw blades sharp and clean for the best and safest performance. Follow instructions for lubricating and changing accessories. 25. Turn off the machine before cleaning. Use a brush or compressed air to remove chips or debris — do not use your hands. 26. Do not sta...
Page 4 - About this manual
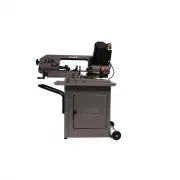
4 2.0 About this manual This manual is provided by JET, covering the safe operation and maintenance procedures for a JET Model HBS-56MVS Band Saw. This manual contains instructions on installation, safety precautions, general operating procedures, maintenance instructions and parts breakdown. Your m...
Page 5 - Table of contents; Section
5 3.0 Table of contents Section Page 1.0 IMPORTANT SAFETY INSTRUCTIONS ....................................................................................................... 2 1.1 ON/OFF Switch padlock ....................................................................................................
Page 6 - Specifications
6 4.0 Specifications Model number HBS-56MVS Stock number 414558 Motor and Electricals Motor type DC brushed motor Horsepower 1/2 HP (0.375 kW) Motor phase single Voltage 115 V only Cycle 60 Hz Listed FLA (full load amps) 3.8 A Motor speed 1200-3600 RPM On/off switches Magnetic push-button Power tran...
Page 7 - Setup and assembly; Carton contents; Tools required for assembly
7 5.0 Setup and assembly Read and understand all instructions before attempting assembly. Band Saw must be disconnected from power during all assembly procedures. Failure to comply may cause serious injury. Compare the contents of your container with the following parts list to make sure all parts a...
Page 8 - Assembly of Stand
8 5.3 Assembly of Stand See Figure 5-3. 1. Assemble left (A) and right (B) side plates with six 5/16x3/4 hex cap screws, twelve flat washers, six hex nuts (HP2/4/8). Tighten hex nuts. 2. Turn assembly (from Step 1) on its back (door opening upward) and mount bottom plate (E) with two 5/16x3/4 hex ca...
Page 9 - Mounting band saw to stand; Handwheel
9 5.4 Mounting band saw to stand Remove any plastic or holding straps from around the band saw. Areas of the machine have been given a protective coating at the factory; this should be removed using a soft cloth moistened with kerosene or a cleaner-degreaser. Do not use gasoline, paint thinner, or l...
Page 10 - Electrical connections; GROUNDING INSTRUCTIONS; Extension cords
10 6.0 Electrical connections The HBS-56MVS Band Saw is rated for 115-volt power. The band saw comes with a plug designed for use on a circuit with a grounded outlet that looks like the one pictured in A , Figure 6-1. Before connecting to power source, be sure switch is in off position. It is recomm...
Page 11 - Adjustments; Tools required for adjustments
11 7.0 Adjustments 7.1 Tools required for adjustments (Not all may be needed depending on adjustment.) Wrenches 10, 12, 14mm Hex wrench 6mm Square Straight edge Small clamp 7.2 Blade-to-table squareness The blade must be perpendicular to table to ensure a straight cut. This setting should be verifie...
Page 12 - Miter cutting; Workpiece clamping; Blade tension
12 7.5 Downfeed stop The weight of the bow guides the blade through the workpiece. The stop screw (G, Figure 7-3) prevents blade from contacting base after the cut. It has been adjusted by the manufacturer. If future adjustment is needed, loosen hex nut and rotate screw then retighten hex nut. 7.6 L...
Page 13 - Blade tracking; Blade guide adjustments; Guide assemblies
13 gained, the operator should develop a better “feel” for how tight to set a particular blade. Tick marks can be made on the tension knob for quickly resetting tension when re-installing a blade. 7.10 Blade tracking Blade tracking adjustment requires running saw with back cover open. Use caution wh...
Page 14 - Blade replacement; Feed pressure adjustment
14 7.12 Blade replacement Use caution and proceed slowly when working with or around a band saw blade. Use work gloves when handling it. 1. Disconnect band saw from power source. 2. Remove back blade cover, and red blade guards. It is essential these red guards be installed after new blade has been ...
Page 15 - Operation; Blade selection; General operating procedure
15 Figure 7-10 8.0 Operation The HBS-56MVS is equipped with a motor driver containing a voltage feedback device to provide consistent torque during operation. The saw is also provided with an overload protection device to prevent overheating of the motor. If saw shuts off because of overload, allow ...
Page 16 - Evaluating cutting efficiency; General maintenance
16 2. Position workpiece in vise and tighten vise. Workpiece should be fitted directly between jaws without adding other objects. When workpiece is profiled section, flat piece or special shape, refer to examples in Figure 8-1 for proper clamping positions. The top row shows acceptable clamping posi...
Page 18 - Troubleshooting HBS-56MVS Band Saw; Operational problems
18 10.0 Troubleshooting HBS-56MVS Band Saw 10.1 Operational problems Symptom Possible Cause Correction Cuts not square. Blade not square to vise/material. Adjust vise square to blade. Blade surface not perpendicular to table. Adjust blade guides until perpendicular. Workpiece shifting in vise. Prope...
Page 19 - Mechanical and electrical problems; Replacement Parts
19 10.2 Mechanical and electrical problems Symptom Possible Cause Correction * Motor will not start. Low voltage. Check power line for proper voltage. Open circuit in motor or loose connection. Inspect all lead connections on motor for loose or open connections. Overload condition. Allow machine to ...
Page 20 - HBS-56MVS Base and Stand Assembly – Exploded View
20 11.1.1 HBS-56MVS Base and Stand Assembly – Exploded View
Page 21 - HBS-56MVS Base and Stand Assembly – Parts List; Index No Part No
21 11.1.2 HBS-56MVS Base and Stand Assembly – Parts List Index No Part No Description Size Qty 1 ................ TS-0081031 .............. Hex Cap Screw ........................................................ 5/16”-18x3/4” ................ 1 11 .............. TS-0051051 .............. Hex Cap Scre...
Page 23 - HBS-56MVS Bow Assembly I – Exploded View
Page 24 - HBS-56MVS Bow Assembly II – Exploded View
24 11.2.2 HBS-56MVS Bow Assembly II – Exploded View
Page 25 - HBS-56MVS Bow Assembly – Parts List
25 11.2.3 HBS-56MVS Bow Assembly – Parts List Index No Part No Description Size Qty 1 ................ TS-0081031 .............. Hex Cap Bolt............................................................ 5/16”-18x3/4” ................ 3 2 ................ TS-0561011 .............. Hex Nut ...............
Page 27 - HBS-56MVS Blade Guide Assembly – Exploded View
27 11.3.1 HBS-56MVS Blade Guide Assembly – Exploded View
Page 28 - HBS-56MVS Blade Guide Assembly – Parts List
28 11.3.2 HBS-56MVS Blade Guide Assembly – Parts List Index No Part No Description Size Qty 8 ................ TS-0680031 .............. Flat Washer ............................................................. 5/16” .............................. 2 11 .............. TS-0051051 .............. Hex Ca...
Page 29 - Electrical Connections – HBS-56MVS Band Saw
29 12.0 Electrical Connections – HBS-56MVS Band Saw
Page 30 - Warranty and service
30 13.0 Warranty and service JET warrants every product it sells against manufacturers’ defects. If one of our tools needs service or repair, please contact Technical Service by calling 1-800-274-6846, 8AM to 5PM CST, Monday through Friday. Warranty Period The general warranty lasts for the time per...